
Related Manuals for Tait TP9800


Summary of Contents for Tait TP9800
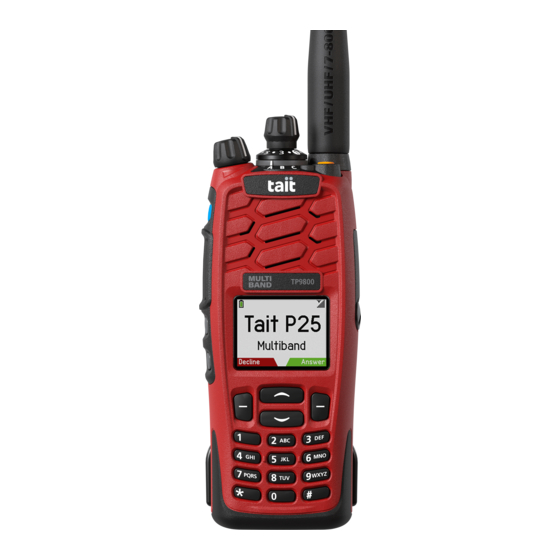
- Page 1 TP9800 Multiband P25 Portable Radio User's Guide MPH-00004 - Issue 01 - November 2024...
-
Page 2: Table Of Contents
Contents Contact Information About this Guide Scope of Manual Alerts Associated Documentation Publication Record 1 For your safety 1.1 Radio Frequency Exposure Information 1.2 Radio Frequency Emissions Limits in the USA 1.3 Radio Frequency Emissions Limits in Canada 1.4 USA Public Safety Bands (764–776MHz and 794–806MHz) 1.5 EMC Regulatory Compliance in Australia 1.6 Frequency Band Reserved for Distress Beacons 1.7 Health, Safety and Electromagnetic Compatibility in Europe... - Page 3 2.8 Removing the Antenna 2.9 Attaching a Belt Clip 2.10 Removing a Belt Clip 2.11 Installing an Audio Accessory 3 Getting Started 3.1 Setting and Viewing the Radio's Time and Date 3.2 About the Radio 3.3 About the Radio Controls 3.4 Understanding the Radio Display 3.5 Understanding the Radio Indicators 3.6 Using Function Keys to Access Frequently Used Features...
- Page 4 6 Operating in Conventional Mode 6.1 Selecting a Zone 6.2 Selecting a Channel 6.3 Understanding Talkgroups 6.4 Making an Individual Call 6.5 Making a Local Call 6.6 Making a Phone Call or DTMF Patch Call 6.7 Setting your Status 6.8 Using the Radio in Different Repeater Areas 7 P25 Services 7.1 P25 Emergency Operations 7.2 Call Alert...
- Page 5 11 Customizing Radio Settings 11.1 Changing the Color Mode 11.2 Changing the Volume of all Audible Indicators 11.3 Changing the Volume of Keypress Tones 11.4 Changing to Quiet Operation 11.5 Changing to Silent Operation 11.6 Turning on Backlighting 11.7 Adjusting the Display Orientation 12 Troubleshooting 12.1 The Radio won't Turn On 12.2 Identifying the Radio's Audible Tones...
-
Page 6: Contact Information
Tait By using a Tait product you are agreeing to be bound by the terms of International Limited. the Tait Software Licence Agreement.Please read the Tait Software Tait will comply with environmental requirements in other markets Licence Agreement carefully before using this Tait product. -
Page 7: About This Guide
The characters xx represent the issue number of the documentation. Technical notes are published from time to time to describe applications for Tait products, to provide technical details not included in manuals, and to offer solutions to any problems that arise. Look for... -
Page 8: Publication Record
Publication Record Issue Publication Date Description November 2024 First release Tait International Ltd November 2024... -
Page 9: For Your Safety
If you wear the radio, you must always put it in a carrying accessory that has been specifically approved by Tait for this radio. Using non-approved body-worn accessories may mean you expose yourself to higher levels of RF than recommended by the FCC’s occupational/controlled environment RF exposure limits. -
Page 10: Compliance With Rf Energy Exposure Standards
Cette radio se conforme aux limites d’exposition de l’IEEE (FCC) et ICNIRP pour les environnements d’exposition au rayonnement RF professionnel et contrôlé aux cycles de marche de 50% en mode transmission et 50% en mode réception. Tait International Ltd November 2024... -
Page 11: Radio Frequency Emissions Limits In The Usa
This radio complies with §90.553 (a) of 47 CFR. This states that: encryption is not permitted on the nationwide Interoperability calling channels. These channels are defined in §90.531 (b) (1) (ii) radios using encryption must have a readily accessible switch or control to allow the radio user to disable encryption. Tait International Ltd November 2024... -
Page 12: Emc Regulatory Compliance In Australia
Limitations may apply to transmitter power, operating frequency, channel spacing, and emission. 1.7.3 Declaration of conformity Brief Declarations of Conformity appear under 13 on page 71 of this document. To download the formal declaration of conformity, go to https://www.taitcommunications.com/our- resources/compliance/declarations-of-conformity. Tait International Ltd November 2024... -
Page 13: Interference With Electronic Devices
Warning Turn off the radio before approaching blasting caps, a blasting area, or any area where you are instructed to turn off a two-way radio. Obey all signs and instructions. Interference with blasting operations could cause serious injury or death. Tait International Ltd November 2024... -
Page 14: Radio Installation And Operation In Vehicles
The radio is designed to satisfy the applicable compliance regulations. Do not make modifications or changes to the radio that are not expressly approved by Tait. Failure to do so could invalidate compliance requirements and void the user’s authority to operate the radio. -
Page 15: Attaching Of Labels
Tait recommends that you do not affix additional labels to the surfaces between the radio chassis and the battery. The fit between these surfaces is intentionally firm and any added thickness will damage the points of attachment between radio and battery. -
Page 16: Before Using The Radio
Figure 2.1 Radio chassis and battery vent holes Notice Tait recommends that additional labels are not applied to the surfaces between the radio chassis and the battery. The fit between these surfaces is intentionally firm and any added thickness will damage the points of attachment between radio and battery. -
Page 17: Attaching A Label To The Front Panel
Users can also stick labels over the top of the model label. This recess will accommodate 1/4" label maker labels. Please ensure the labels have a suitable adhesive surface before application. Figure 2.4 Location of model and custom labels Tait International Ltd November 2024... -
Page 18: Charging The Battery Before First Use
Tait offers custom labelling for TP9800 Multiband P25 Portable Radios. Contact your Tait representative for more information. Charging the Battery Before First Use Before using the battery for the first time, it must be charged. Follow the instructions included with your Tait charger. -
Page 19: Removing The Battery
To attach a belt clip to the radio 1. Slide the belt clip into the two grooves at the top of the battery. 2. Press down on the belt clip until it snaps into place. Tait International Ltd November 2024... -
Page 20: Removing A Belt Clip
Installing an Audio Accessory Warning Use only Tait-supplied, or Tait-approved audio accessories with Tait radios. Fitting an audio accessory that is not Tait-approved may result in a poor user experience. For an up-to-date list of approved audio accessories, contact your regional Tait office. - Page 21 3. Tighten the screw (it only needs to be finger-tight). Do not slide the accessory’s connector along the radio connector’s pins; doing so will damage the radio’s connector and may prevent a reliable connection to the accessory. Tait International Ltd November 2024...
-
Page 22: Getting Started
Getting Started This section provides an overview of the TP9800 Multiband P25 Portable Radio. It describes the radio’s controls and indicators, and explains how the radio menus are organized. Setting and Viewing the Radio's Time and Date The radio may be programmed to use its internal real-time clock. It may be possible to view the time and date via a function key or via the radio menu. -
Page 23: Active Noise Cancellation
When using a Bluetooth audio device, active noise cancellation (secondary microphone) is not enabled. To optimize its performance, Tait recommends positioning the microphone 1 - 2 inches (2.5 - 5 cm) from the mouth and speaking directly into it. Additionally, it is essential that the rear microphone remains uncovered by your hand or clothing during calls. -
Page 24: About The Radio Controls
About the Radio Controls The radio controls and their functions are described in subsequent sections. Figure 3.1 Radio control functions Tait International Ltd November 2024... -
Page 25: Understanding The Radio Display
Low-power transmit: the radio is set to transmit on low power. When radio is not transmitting, the letter 'L' in red font is displayed. When the radio is transmitting, a single arrow appears beside the 'L' Tait International Ltd November 2024... - Page 26 Repeater talkaround: the radio is operating in repeater talkaround mode, or you are on a simplex channel Zone: this letter represents the zone in which the radio is operating, where zone 1, is zone 26 Tait International Ltd November 2024...
-
Page 27: Understanding The Radio Indicators
Flashing: the radio has received a call (analog channel only) Orange Flashing: the radio is registered on a trunked network (network) Trunked: network not available, or the radio is attempting to register on a trunked network All LEDs off Conventional: receive standby Tait International Ltd November 2024... -
Page 28: Audible Tones
Your radio may be programmed to play a pre-recorded message for the start-up zone and channel, when changing the zone or channel, for the battery condition, or when loneworker monitoring has been turned on or off. Tait International Ltd November 2024... -
Page 29: Using Function Keys To Access Frequently Used Features
Table 3.5 Programmed function keys Short key press Long key press For more information about the function keys that can be programmed on the radio, contact the radio provider. On speaker microphone (if fitted) Tait International Ltd November 2024... -
Page 30: Navigating The Radio's Menus
The radio may be programmed to use the scroll keys or the left selection key to directly access a menu. To quickly exit the menu system, press and hold the left selection key when the word Cancel or Back appears above it. Tait International Ltd November 2024... -
Page 31: Basic Operation
The volume control also changes the volume level of the radio’s audible indicators. Securing the Keypad The keypad lock feature prevents keys being pressed accidentally. The number of keys that are locked depends on the way the radio is programmed. Tait International Ltd November 2024... -
Page 32: Locking Or Unlocking The Keypad
PTT key to prevent cutting off the start of your sentence. Refrain from shouting for clear transmission. Speaking near an active noise-canceling microphone may cancel ambient noise and voice. See 4.7 on page 36 for details. Tait International Ltd November 2024... -
Page 33: Using A Bluetooth Audio Device
4.6.1 Bluetooth audio compatibility with Tait radios Bluetooth audio devices may operate with Tait radios, provided the accessory is compatible with the Bluetooth Specification Version 2.0 or higher. Tait recommends Bluetooth Specification Version 2.1 or higher. Additionally, the accessory must include Bluetooth Headset Profile (HSP) version 1.1 or 1.2, or Bluetooth Handsfree Profile (HFP) version 1.5 or 1.6. - Page 34 (Move down), or remove a device from My Headsets (Remove, Remove all). 4.6.6 Disconnecting the Bluetooth audio device To disconnect the device from the radio: Press Menu and select Bluetooth audio device > Disconnect. Alternatively, in the My headsets menu select Options > Disconnect. Tait International Ltd November 2024...
- Page 35 Bluetooth signal. If the radio is used with the right hand, wear the over-the-head device on the right ear. Avoid coming in contact with the internal antenna of a device or radio. Tait International Ltd November 2024...
-
Page 36: Turning On Active Noise Cancellation
To use the radio correctly and achieve the best results, Tait recommends holding the radio 1 - 2 inches (2.5 - 5 cm) from the mouth and speaking directly into the front of the radio speaker/microphone. -
Page 37: Operating On P25 Trunking Networks
P25 phase 1 features not supported in P25 phase 2 If the user tries to use a P25 phase 1 feature which is not yet supported in P25 phase 2, the radio may show a system error. Tait International Ltd November 2024... -
Page 38: Failsoft Operation
Depending on how the radio is programmed, the user may be able to press a function key, use the Quick Access menu or use the channel selector to select a talkgroup. 3. To call this talkgroup, hold the radio so that the microphone is about one inch (2.5 cm) from your mouth. Tait International Ltd November 2024... -
Page 39: Utilizing Active Noise Cancellation When Calling A Talkgroup
3. When the called party accepts the call, you will hear three short beeps. 4. Once the called party has finished talking, press and hold the PTT key to transmit, speak clearly into the microphone, and release the PTT key when you have finished talking. Tait International Ltd November 2024... -
Page 40: Utilizing Active Noise Cancellation When Making An Individual Call
When you receive a call from an individual radio, the radio displays the caller’s name or identity. The radio rings until the call is answered. 1. Press the PTT key to accept the call, or Cancel to reject the call. Tait International Ltd November 2024... -
Page 41: Emergency Calls
The dynamic regrouping feature allows the user to send a dynamic regrouping request to the dispatcher. The dispatcher can then reassign the user's radio to a special communications group. While are operating on this group, normal channel selection may be disabled. Tait International Ltd November 2024... - Page 42 5.10.1 To send a dynamic regrouping request Press Menu and select Trunking > Dyn Regrouping. When Select is pressed, 'Sending dynamic regroup rqst' appears in the display. If the request is successful, an acknowledgment message is displayed. Tait International Ltd November 2024...
-
Page 43: Operating In Conventional Mode
The following controls may also be used to select a zone: left selection key scroll keys function keys to scroll through zones 3-way selector If the 3-way selector is turned while pressing the PTT key, the zone will change after the PTT key is released. Tait International Ltd November 2024... -
Page 44: Selecting A Channel
Selecting a channel manually as described above will end automatic mode, and the manual mode icon will appear on the display. The radio may be configured to use a timer or a function key to return to automatic mode. Tait International Ltd November 2024... -
Page 45: Understanding Talkgroups
Making a call to one person 1. Press Menu and select Individual call. 2. Scroll to the desired person to call and press the PTT key to make the call immediately. Alternatively, press Call and then the PTT key. Tait International Ltd November 2024... -
Page 46: Making A Local Call
X. Dial # to fill the current X and all subsequent X characters in the current burst. When the user receives a call, the LED glows red and the call details plus appears on the display. The message Ack received may also appear. Tait International Ltd November 2024... -
Page 47: Making A Phone Call Or Dtmf Patch Call
The radio may be programmed to allow dialing of DTMF tones using the numeric keypad while on a channel or in a call. The dialing may be either sent out immediately (as it's typed) or sent after pressing Send. Tait International Ltd November 2024... -
Page 48: Setting Your Status
2. Scroll to the group you want and press Select. 6.8.2 Suspending a channel from a voting group Users may be able to use the function key programmed for nuisance delete to temporarily delete one of the channels from the voting group. Tait International Ltd November 2024... - Page 49 Press and hold the function key programmed for voting to remove the current channel from the voting group. If the operation has been successful, the message Channel nuisance deleted appears on the display. Tait International Ltd November 2024...
-
Page 50: P25 Services
When you turn the priority call feature on, the radio automatically sends an emergency alert (message) to the current talkgroup. Any calls you make while the priority call feature is turned on are flagged as emergency calls. Tait International Ltd November 2024... -
Page 51: Standard Emergency Mode
2. To end emergency mode and return the radio to normal operation, either: turn the radio off and on again to end emergency mode, push the function or emergency key again, or if configured, press the PTT key Tait International Ltd November 2024... -
Page 52: About Manual Emergency Operation
In the Emergency Menu, you can manually acknowledge the duress emergency call. This acknowledgment cancels the call. 1. Press Menu and select Emergency > Acknowledge. The name of the radio that initiated the emergency call appears in the display. Tait International Ltd November 2024... -
Page 53: Accessing Emergency Location Information
A message showing the radio destination appears on the display. The LED glows red, and a notification indicates whether the message was sent successfully. If an acknowledgment is not received from the recipient’s radio, you will have the option of either canceling or resending the request. Tait International Ltd November 2024... -
Page 54: Answering A Call Alert Page
3. Press Select. 4. Select the message recipient from the list and press Send to. If an acknowledgment is not received from the recipient’s radio, you will have the option of either canceling or resending the request. Tait International Ltd November 2024... -
Page 55: Radio Check
A message showing the radio destination appears on the display. The LED glows red, and a notification indicates whether the message was sent successfully. If the other radio has received your request, it will now call you so that you can monitor activity near the radio. Tait International Ltd November 2024... -
Page 56: Status Request
See Status Request above. 7.7.1 To send a status update 1. Press Menu and select Services > Status update. 2. Select the required status message from the list. 3. Press Send to or Select. Tait International Ltd November 2024... - Page 57 If an acknowledgment is not received from the recipient’s radio, you will have the option of either canceling or resending the request. To set a status without sending it to anyone, see Setting your Status on page 48 Tait International Ltd November 2024...
-
Page 58: Location Services
The information displayed can be sent to other radios on the network by pressing the Share selection key. Tait International Ltd November 2024... -
Page 59: Viewing Location Information
Figure 8.1 Latitude and longitude in degrees, minutes and decimal seconds Figure 8.2 The radio's current course and speed Figure 8.3 UTC: Coordinated Universal Time, 24-hour clock 3. Press Exit to exit the location display. Tait International Ltd November 2024... -
Page 60: Loneworker Monitoring
2. In the Loneworker menu, select On. A vertical scroll bar on the right-hand side of the display indicates the remaining activity timeout. To reset the count-down bar, press any key. Figure 9.1 Radio display when loneworker is activated Tait International Ltd November 2024... -
Page 61: Responding To A Loneworker Alarm
If no action is taken, the radio will activate emergency mode or send a status update in digital mode. Tait International Ltd November 2024... -
Page 62: Encryption
10.2.1 Turning encryption on or off Using the main menu 1. Press Menu and select Security > Encryption. 2. Scroll to On (or Off) and press Select. The message Encryption activated (or deactivated) appears in the display. Tait International Ltd November 2024... -
Page 63: Making An Encrypted Call
Removing Encryption Keys from the Radio It may be possible for users to delete encryption keys from their radio. Warning When emergency mode is activated, or when the radio is immobilized (‘inhibited’), encryption keys may be automatically deleted from the radio. Tait International Ltd November 2024... -
Page 64: Deleting An Encryption Key
Deleting all encryption keys 1. Press Menu and select Security > Advanced > Zeroize all. The message Zeroize all keys? appears in the display. 2. Press OK and the message All keys zeroized briefly appears in the display. Tait International Ltd November 2024... -
Page 65: Customizing Radio Settings
Depending on how the radio is programmed, users may be able to press a function key to change the level of indicators. 1. Press Menu and select Radio settings > Alert settings > Indicator level. 2. Scroll to High (or Low) and press Select. Tait International Ltd November 2024... -
Page 66: Changing The Volume Of Keypress Tones
2. In the Silent operation menu, scroll to either On or Off and press Select. While silent operation is on, the icon appears in the display. Depending on how the radio is programmed, you may be able to press a function key to toggle silent operation on and off. Tait International Ltd November 2024... -
Page 67: Turning On Backlighting
1. Press Menu and select Radio settings > Display settings > Rotate display. 2. Scroll to On (or Off) and press Select. Depending on how the radio is programmed, you may be able to press a function key to toggle rotate display on and off. Tait International Ltd November 2024... -
Page 68: Troubleshooting
Checking the version of the radio using the PTT key 1. Turn off the radio. 2. Hold down the PTT key and turn on the radio. The firmware and hardware versions, and the radio’s frequency band is briefly displayed. Tait International Ltd November 2024... -
Page 69: General Care
Cleaning the contacts of the battery Notice Do not scratch or scrape the contacts of the battery. If necessary, wipe the contacts of the battery with a dry, lint-free cloth to remove any dirt, oil or grease. Tait International Ltd November 2024... -
Page 70: Running Diagnostic Tests
Lists the current trunked site (indicated with an asterisk) and up to six detected adja- Site measure cent sites, with received signal strength (RSSI) information Transmits a 1011Hz or 1031Hz tone on the current channel with a bit error rate (BER) Tx Tone Cal of 5% Tait International Ltd November 2024... -
Page 71: Simplified Declaration Of Conformity
FR Le soussigné Tait International Limited, déclare que l'équipement ES Por la presente, Tait International Limited declara que el tipo de radioélectrique du type TPAB1A, TPAH5A, TPAH6A, TPCB1A, equipo radioeléctrico TPAB1A, TPAH5A, TPAH6A, TPCB1A, TPCC0A, TPCH5A, TPCH6A, TPDB1A, TPDB1B, TPDB1C,... - Page 72 TUFM2D, TUFM3A, TPGB1A, TPGHKA, TPGH7A & TPHN0A resources/compliance/declarations-of-conformity típusú rádióberendezés megfelel a 2014/53/EU irányelvnek. Az EU- SL Tait International Limited potrjuje, da je tip radijske opreme megfelelőségi nyilatkozat teljes szövege elérhető a következő TPAB1A, TPAH5A, TPAH6A, TPCB1A, TPCC0A, TPCH5A, internetes címen: https://www.taitcommunications.com/our-...
Need help?
Do you have a question about the TP9800 and is the answer not in the manual?
Questions and answers