Table of Contents
Advertisement
Advertisement
Table of Contents

Subscribe to Our Youtube Channel
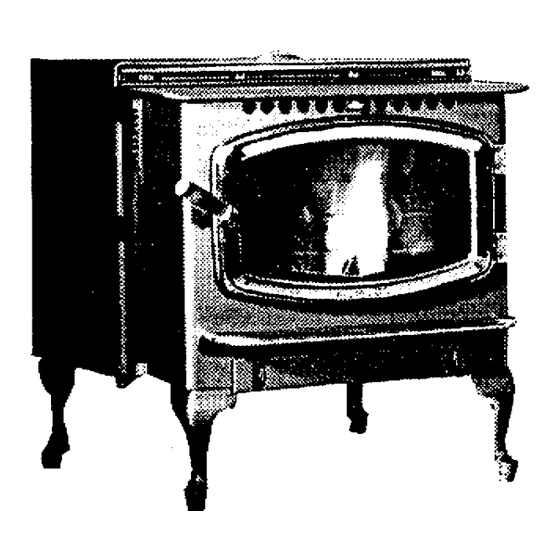
Related Manuals for Travis Industries Avalon 900 PS


Summary of Contents for Travis Industries Avalon 900 PS
-
Page 2: Safety Precautions
AFETY RECAUTIONS • The viewing door and • Contact your local ashpan must be closed building officials to and latched during obtain a permit and operation. information on any installation restrictions or • Never block free airflow inspection requirements in through the open vents of your area. -
Page 3: Mobile Home
A properly using the A ONTROL ONTROL • Do not throw this manual • Travis Industries, Inc. away. This manual has grants no warranty, This important operating and implied or stated, for the Manual maintenance instructions... -
Page 4: Table Of Contents
ABLE OF ONTENTS General Information Operating Your Heater Introduction & Important Information......1 Priming the Auger ............28 Safety Precautions............. 2 A Word about Pellets ..........28 Features & Specifications ........... 5 Location of Controls ........... 29 Starting Your Heater ..........30 Running Your Heater .......... -
Page 5: Features & Specifications
EATURES AND PECIFICATIONS Installation Options: Features: ¥ Freestanding ¥ Convenient Operating Controls ¥ Wide Range of Heat Output ¥ Freestanding in an Alcove ¥ Huge Hopper for Long Burning ¥ Freestanding in a Mobile Home ¥ Quiet Operation ¥ Masonry Fireplace Insert ¥... -
Page 6: Planning The Installation
¥ Required for mobile homes ¥ Must not be drawn from an enclosed space (garage, unventilated crawl space) ¥ Travis Industries strongly suggests outside air for all residential installations, especially for those that are energy efficient, air tight homes. WARNING: During a power outage there is a possibility of some smoke entering... -
Page 7: Stove Placement Requirements
TOVE NSTALLATION TOVE LACEMENT EQUIREMENTS HINT: REDUCING CLEARANCES - Clearances may be reduced by methods specified in NFPA 211, listed wall shields, pipe shields, or other means approved by local building or fire officials. The stove must be placed so all of the requirements below are met: ¥... -
Page 8: Floor Protection Requirements
TOVE NSTALLATION LOOR ROTECTION EQUIREMENTS (See the illustration on the previous page) The heater must be installed with floor protection that meets the following requirements: ¥ Made of a non-combustible material at least .018" thick (26 gauge) ¥ Extend under and 2" to each side of a chimney "Tee" if one is used Must extend 6"... - Page 9 TOVE NSTALLATION Pellet Vent Installation Options ¥ Minimum 3" clearance to any combustible ¥ No more than 180 of elbows (two 90 elbows, or two 45 & one 90 elbow, etc.) NOTE: The Center Flue Adapter is the same as a 90 elbow.
-
Page 10: Outside Air Requirements
TOVE NSTALLATION Pellet Vent Termination (See the illustration below) ¥ Must have an approved cap (to prevent water from entering) or a 45 downturn ¥ If the termination is located on a windy side of the house, an approved house shield is recommended to prevent soot from building up on the side of the house ¥... -
Page 11: Pellet Stove Installation
TOVE NSTALLATION The following pages detail the six different installations available for the Avalon 900 PS pellet stove. The drawings used for each type of installation detail most, but not all, of the requirements necessary for a safe installation. The section "Stove Requirements" details the rest of the installation requirements. -
Page 12: Horizontal Corner Installation
TOVE NSTALLATION Horizontal Corner Installation The horizontal corner installation is often used because it takes up very little space. Make sure to follow all of the requirements listed in the section "Stove Requirements" as well as those listed below in the illustration. The steps below detail the order of installation. HINT: Make sure to carefully plan the pellet vent route so that it always maintains a 3"... -
Page 13: Horizontal Installation
TOVE NSTALLATION Horizontal Installation The horizontal installation minimizes the amount of pellet vent needed by passing the pellet vent through the wall with a thimble. Make sure to follow all of the requirements listed in the section "Stove Requirements" as well as those listed below in the illustration. The steps below detail the order of installation. -
Page 14: Interior Vertical Installation
3" pellet vent clearance to the backwall. For improved rear clearance, use the Travis Industries center flue adapter (available at your dealer). Make sure to follow all of the requirements listed in the section "Stove Requirements" as well as those listed below in the illustration. -
Page 15: Exterior Vertical Installation
TOVE NSTALLATION Exterior Vertical Installation This type of installation utilizes natural draft while concealing the vent outside. Make sure to follow all of the requirements listed in the section "Stove Requirements" as well as those listed below in the illustration. The steps below detail the order of installation. Install the floor protection. -
Page 16: Chimney
TOVE NSTALLATION Vertical Installation into Existing Factory Built (Class "A") Chimney This type of installation utilizes an existing class "A" chimney to vent the flue gases. An adapter must be used to connect the pellet vent to the chimney. All of the pellet vent sections, the adapter, and the chimney must all be sealed to prevent flue gases from entering the room. -
Page 17: Hearth Stove Installation (Uses Existing Masonry Or Z.c. Fireplace)
TOVE NSTALLATION Hearth Stove Installation (Uses existing masonry or Z.C. fireplace) When installing the stove into an existing masonry or Z.C. fireplace (called a "Hearth Stove" installation), there are two options for routing the pellet vent. Both options allow the use of either type "L"... -
Page 18: Insert Installation
LANNING NSTALLATION HINT: We suggest that you have an authorized Travis Industries dealer install your heater. If you install the heater yourself, your authorized dealer should review your plans for installation. The Avalon 900 PI insert was designed to be installed into an existing masonry or zero-clearance (metal) fireplace, or built directly into the wall (see the section "Built-In Installation"). -
Page 19: Insert Size Requirements
NSERT NSTALLATION NSERT EQUIREMENTS For ZC and Masonry Fireplaces * The minimum fireplace size is larger in front than in back because the switch box slides into the left side panel and goes into the 21" Minimum fireplace cavity. 20" Minimum 20"... -
Page 20: Outside Air Requirements
Must be located so that it will not become plugged by snow or other material ¥ Travis Industries strongly suggests outside air for all residential installations, especially for those that are energy efficient, air tight homes WARNING: During a power outage there is a possibility of some smoke entering the room if an outside air connection is not used. - Page 21 NSERT NSTALLATION Installing the Panels, Trim, and Switch Box (Continued) The switch box clips into place into the square hole on the left side panel. Then attach the The top panel slides over the flanges on the electrical connector on the end of the cord to the side panels and over the top of the insert.
-
Page 22: Exhaust Tube Specifications
NSERT NSTALLATION Exhaust Tube Specifications The Avalon 900 PI is shipped with a vertical exhaust tube, but it can be adjusted to vent horizontally (i.e., for built-in installations using a horizontal vent). To vent horizontally, unlatch the upper and lower clips on the right side of the insert (remove the locking pins first), and remove the exhaust tube and vertical exhaust extender. -
Page 23: Installation Into A Masonry Fireplace
NSERT NSTALLATION Installation into a Masonry Fireplace The pellet insert can be installed into a masonry fireplace with either a direct or positive connection (full reline). Make sure to follow all of the requirements listed in the section "Insert Requirements" as well as those listed below. The steps below detail the order of installation. Clean the fireplace with a wire brush or scraper and inspect the fireplace cavity and chimney. -
Page 24: Installation Into An Existing Zero Clearance (Metal) Fireplace
NSERT NSTALLATION Installation into a Zero Clearance (Metal) Fireplace The pellet insert can be installed into a zero clearance (metal) fireplace with a positive connection (full reline). Make sure to follow all of the requirements listed in the section "Insert Requirements"... -
Page 25: Installation As A Built-In Heater
The pellet insert can be installed as a built-in heater with the use of type "L" vent and requires the Travis Industries floor shield. You may frame around the insert or use existing framing as long as there is enough room. Because this type of installation is complicated, we strongly recommend that a Travis Industries dealer installs it. - Page 26 NSERT NSTALLATION The next step is to install the floor shield kit (see the illustration below). Prop up the front of the insert approximately one foot. Remove the front and rear leveling bolts if they were installed. Place the floor shield underneath the insert and line up the holes on the floor shield with the holes in the insert baseplate, making sure the insulation included with the floor shield stays in place.
- Page 27 NSERT NSTALLATION Install the panels and brass trim to complete the installation. Included with the floor shield kit are two pairs of side panels. The set that are flat are used, the bent pair can be discarded. Attach the side panels to the side bays by placing them with the magnetic strip side up against the side bay.
-
Page 28: Operating Your Heater
PERATING EATER EFORE EGIN READ THIS ENTIRE MANUAL BEFORE YOU INSTALL AND USE YOUR NEW HEATER. FAILURE TO FOLLOW THE INSTRUCTIONS MAY RESULT IN PROPERTY DAMAGE, BODILY INJURY, OR EVEN DEATH. Before starting your first fire make sure you have read the section titled Safety Precautions. Any questions should be referred to your dealer. -
Page 29: Location Of Controls
PERATING EATER ONTINUED OCATION OF ONTROLS XPLANATION ELOW 900 PS Pellet Stove POWER START BURN RATE 900 PI Pellet Insert OPERATING Light POWER START BURN RATE AIR CONTROL Knob POWER Switch This control is used to turn the stove on and off. WARNING: Do not unplug the heater to turn it off. -
Page 30: Starting Your Heater
PERATING EATER ONTINUED STARTING YOUR HEATER (MAKE SURE THE AUGER IS PRIMED - PAGE 28) Pull the A all the way ONTROL out to the fully open position. Turn the BURN RATE to a O O O O F F F F F F F F "Medium"... -
Page 31: Running Your Heater
PERATING EATER ONTINUED UNNING EATER Your pellet heater is a high efficiency heater designed to burn over a wide range of heat output. This wide range of heat output, along with the different variety of pellets, requires the operator to know how to adjust the heater to achieve the most efficient burn. -
Page 32: Turning Off The Heater
PERATING EATER ONTINUED NOTE: Every bag of pellets you use may be different. Certain pellets will be heavier and won't want to move around in the firepot. Some pellets will be wet, and take longer to burn. While other pellets will be "dirtier"... -
Page 33: Maintaining Your Heater
AINTAINING EATER AINTENANCE CHEDULE Your heater requires periodic maintenance to run. The steps involved with maintenance are usually quick and easy. Look through this maintenance schedule and plan accordingly. WARNING: Failure to maintain your heater will lead to a restricted combustion air system, which may lead to smoke spillage into the room. -
Page 34: Check The Ashpan
AINTAINING EATER ONTINUED Check the Ashpan for Flyash At least once a day while the heater is in use, look down through the window and check for flyash buildup in the ashpan. If you see more than 1" of flyash, turn the heater off, wait for it to cool and empty the ash. -
Page 35: Clean The Ash Traps
AINTAINING EATER ONTINUED Clean the Ash Traps At least once a week the ash traps should be cleaned. They are used to catch the flyash before the exhaust gases exit the firebox. The Remove the ash trap doors provide access to the ash traps firepot &... -
Page 36: Clean The Exhaust Ducts
AINTAINING EATER ONTINUED HINT: This following sections detail difficult maintenance procedures that we strongly suggest be carried out by a TRAINED SERVICE TECHNICIAN, possibly by a service agreement set up by the dealer. Clean the Exhaust Ducts The exhaust ducts are located inside the firebox and are used to transfer heat. Every 6,000 pounds of fuel the flyash and soot from behind the exhaust ducts will need to be removed (perhaps more often depending on pellet quality). -
Page 37: Convection Blower
AINTAINING EATER ONTINUED FOR INSERTS: The internal components on either side of the insert are accessed by pulling the insert out of the fireplace. Turn the insert off and let it cool for one hour. Remove the power cord from the electrical socket. -
Page 38: Exhaust Blower
AINTAINING EATER ONTINUED Exhaust Blower The exhaust blower pulls the combustion air through the heater and pushes the flue gases out the pellet vent. It collects soot and must be cleaned every 3 tons of fuel burned. Follow the directions in "ACCESSING INTERNAL COMPONENTS" for accessing the right side. For stoves, remove the pellet vent connection at the back of the stove (make sure to re-seal with RTV F. -
Page 39: Pellet Vent
AINTAINING EATER ONTINUED Pellet Vent Check the pellet vent for soot and creosote build-up, and have it cleaned by a certified chimney sweep if necessary. The wind/rain cap should be cleared of any dirt or debris. The pellet vent sections Wind/Rain Cap should be inspected for soot and creosote build-up. -
Page 40: Troubleshooting
ROUBLESHOOTING Problem: Possible Cause: Don't Call for Service Until You: Heater won't start Heater not plugged in Plug the heater in (Operating light won't Power button not turned "ON or start button pressed See "Starting Your Heater" turn on) Power supply cut Check household fuse/breaker Fuse blown See "Fuse Blown"... -
Page 41: Air Leaks
ROUBLESHOOTING ONTINUED Air Leaks If air leaks into the firebox from the door or ashpan not properly closing, the amount of air flowing through the pellets will decrease. A good way to simulate an air leak is to open the door just a crack while the heater is burning. -
Page 42: Fuse Blown
ROUBLESHOOTING ONTINUED Fuse Blown Make sure the heater is fully cooled and unplugged. Check the fuse by opening the left side panel (see the section "ACCESSING INTERNAL COMPONENTS" in the maintenance portion of this manual) and pulling out the fuse located on the control box. If the fuse has blown, it means a short has occurred, and your dealer should be called. -
Page 43: How This Pellet Heater Works
ROUBLESHOOTING ONTINUED How this Pellet Heater Works This pellet heater is a combination of four systems working together to burn pellets and transfer the heat to your room. Your heater will only burn when there is an acceptable amount of air, pellets, and heat present in the firepot. -
Page 44: Replacement Parts
ROUBLESHOOTING ONTINUED Pellet Feed System Consists of: Purpose: Troubleshooting Tips Hopper Stores pellets Debris caught in mouth of auger tube Auger Motor Turns the spiraled auger flight Not user serviceable* Auger Tube Pushes pellets to feed tube See the section "Jammed Auger" Switch Box Determines the feed rate Not user serviceable*... -
Page 45: Warranty
Travis Industries has the option of either repairing or replacing the defective component. If your dealer is unable to repair your applianceÕs defect, he may process a warranty claim through TRAVIS INDUSTRIES, INC., including the name of the dealership where you purchased the appliance, a copy of your receipt showing the date of the applianceÕs purchase, and the serial number on your appliance. -
Page 46: Product Listing Information
RODUCT ISTING NFORMATION... -
Page 47: Optional Equipment
PTIONAL QUIPMENT ERAMIC The log set is included as standard equipment to make the pellet heater appear more like a wood stove (it is designed for aesthetic purposes only and is not required). The instructions below detail its installation. The log is placed on a log holder at the front of the firebox. This holder slides into place. -
Page 48: Stove Legs
PTIONAL QUIPMENT ONTINUED TOVE There are three different stove legs available for your pellet stove: cast brass; cast black; and, black steel. The instructions for installing the legs are the same for each type of leg. Raise the stove by inserting some pieces of lumber in the middle of the stove to a height of about 8". -
Page 49: Center Flue Adapter
PTIONAL QUIPMENT ONTINUED CENTER FLUE ADAPTER The center flue adapter is an optional item used to center the pellet vent on the pellet stove. It allows for a more compact installation than using offsets on the pellet vent. To install the center flue adapter, follow the directions below. -
Page 50: Insert Front Support
PTIONAL QUIPMENT ONTINUED NSERT RONT UPPORT The insert front support is used to support the insert when installed in a raised masonry or zero clearance fireplace. The instructions below detail its installation. ¥ Support ¥ Support Extension Packing List: ¥ 2 Screws (for Support Extension) ¥...
Need help?
Do you have a question about the Avalon 900 PS and is the answer not in the manual?
Questions and answers