Aastra 6751i RP Installation Manual
Hide thumbs
Also See for 6751i RP:
- User manual (100 pages) ,
- Administrator's manual (68 pages) ,
- Features (2 pages)
Table of Contents
Advertisement
Quick Links
Advertisement
Table of Contents

Related Manuals for Aastra 6751i RP


Summary of Contents for Aastra 6751i RP
- Page 1 6751i RP Phone Installation Guide 41-001211-15 Rev 00...
-
Page 3: Software License Agreement
Software License Agreement Aastra Telecom Inc., hereinafter known as "Seller", grants to Customer a personal, worldwide, non-transferable, non-sublicenseable and non-exclu- sive, restricted use license to use Software in object form solely with the Equipment for which the Software was intended. This Product may inte- grate programs, licensed to Aastra by third party Suppliers, for distribution under the terms of this agreement. -
Page 5: Table Of Contents
Connecting a Handset ..................11 Desk or Wall Installation.................. 12 Customizing Your Phone..................14 Response Point Assistant ................. 14 Aastra Web User Interface................16 Phone User Interface..................17 Other Phone Features ..................20 Adjusting the Volume..................20 Status Lights (LEDs)..................20 Call Timer...................... -
Page 7: Introduction
Congratulations on your purchase of the 6751i RP Phone! The 6751i RP communicates over an IP Network, allowing you to receive and place calls in the same manner as a regular business telephone. The 6751i RP has been specifically designed to operate as part of the AastraLink RP... -
Page 8: About This Guide
About This Guide This manual describes how to physically set up your new 6751i RP. Not all features listed are available by default and some may depend on your phone system or service provider. Contact your system administrator if you have any questions on what features and services are available to you on your system. -
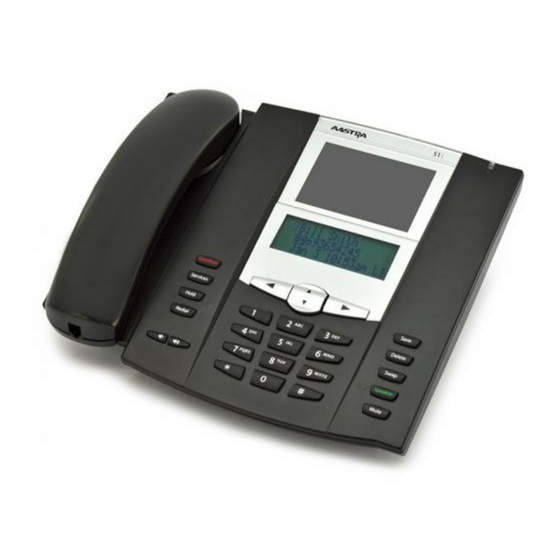
Page 9: Phone Parts
A PoE (Power over Ethernet) inline power injector supplies 48V power to the 6751i RP through the Ethernet Cable on pins 4 & 5 and 7 & 8. Warning: Do not use this PoE inline power injector to power other devices. -
Page 10: Key Panel
Delete Redial Speaker Mute Goodbye key Services key Hold key Redial Key Volume control Navigational keys 3-line LCD screen Message waiting lamp Keypad Save and Delete Keys Response Point Key Speakerphone Key Mute Keys Model 6751i RP Phone Installation Guide... -
Page 11: Key Descriptions
Can be used on Speaker Speaker active calls to switch from the handset to handsfree. Mute key - Mutes the microphone so that your caller cannot hear you. Mute Mute Model 6751i RP Phone Installation Guide 5... - Page 12 LEFT arrow key erases the character on the left; pressing the RIGHT arrow key sets the option. *See the Aastra 6751i RP User Guide for more information about each of these keys. Model 6751i RP Phone Installation Guide...
-
Page 13: Installation And Setup
Installation and Setup The 6751i RP can be setup to share a network connection with another network device. Power can be provided by the provided power adapter or by an 802.3af compliant network power source or with a PoE inline power injector (optional accessory). -
Page 14: Shared Network Connection
Power Adapter Connection To Network To Other Network Device Network Jack Ethernet (if Inline power provided, Cables do not install the power adapter) Power Adapter (optional) Other Network Devices Model 6751i RP Phone Installation Guide... -
Page 15: Connecting To The Network And To Power
Note: The jack on the 6751i RP does not supply inline power onto other network devices. All Ethernet cables used must be minimum category 5/5e straight- through cables, such as the cable provided with your phone. - Page 16 Jack Note: You should connect the power supply to a surge protector or power bar. All Ethernet cables used must be minimum category 5/5e straight-through cables, such as the cable provided with your phone. Model 6751i RP Phone Installation Guide...
-
Page 17: Connecting A Handset
Then route the handset cord through the groove as shown in the illustration below. Attach the handset to the other end of the handset cord. Handset Model 6751i RP Phone Installation Guide 11... -
Page 18: Desk Or Wall Installation
Desk or Wall Installation Install on the Desk The desk installation for the 6751i RP phone consists of two legs that attach to the back of the phone near the top corners. A total of four different viewing angles allows users to personalize their phone viewing preference. - Page 19 Also, if 802.3af compliant in-line power is not provided on your network, and you are installing the 6751i RP on a wall using a PoE in- line power injector, you may also wish to use an equivalent flat Ethernet cable rather than the one provided.
-
Page 20: Customizing Your Phone
In addition, several features can be configured Servi vices es using the Microsoft Response Point Assistant software on your computer. You can access some of these options via the Aastra Web User Interface also. Response Point Assistant In order to use the Response Point Assistant, you must first install the program on our computer. - Page 21 Click Help for assistance on the options available to you within Response Point Assistant. Contact your system administrator or refer to the Aastra 6751i RP User Guide for additional information on the Response Point Assistant. Model 6751i RP Phone Installation Guide 15...
-
Page 22: Aastra Web User Interface
3. At the prompt, enter your username and password and click The Network Status window displays for the IP phone you are access- ing. Note: For a user, the default user name is “user” and the password field is left blank. Model 6751i RP Phone Installation Guide... -
Page 23: Phone User Interface
The Network Status window displays for the IP phone you are accessing. 4. You can logout of the Aastra Web User Interface at any time by clicking Log Off. The following categories display in the side menu of the Aastra Web User Interface: Status, Operation, Basic Settings. - Page 24 This option turns the Live Dial Pad mode ON or OFF. With live dial pad ON, the 6751i RP phone automatically dials out and turns ON Handsfree mode as soon as a dial pad key or softkey is pressed. With live dial pad...
- Page 25 911, 999, 112, and 110; this is con- figurable via the Web User Interface or configuration file. Hint: To quickly lock your phone, press the button followed by the Servi vices es key. Model 6751i RP Phone Installation Guide 19...
-
Page 26: Other Phone Features
Indicates you have an incoming call. Even Flash Indicates one or more calls are on hold. Call Timer When you make or answer a call, the Timer shows the elapsed time of the call on the display. Model 6751i RP Phone Installation Guide... -
Page 27: Creating A Speeddial Key
You can use the to change the speeddial informa- tion to a different line if required. Line: 1 Change Use Save to end 4. Press to save the speeddial key to the line specified. Save Save Model 6751i RP Phone Installation Guide 21... -
Page 28: Troubleshooting Solutions
Model 6751i RP Phone Installation Guide... -
Page 29: Limited Warranty
(1) year period from the date of original purchase. If there is a defect or malfunction, Aastra Telecom shall, at its option, and as the exclusive remedy, either repair or replace the telephone set at no charge, if returned within the warranty period. - Page 31 7 desk stand 12 wall 13 redial key 5 introduction 1 Response Point Assistant installing 14 starting 15 key descriptions 5 response point key 5 key panel 4 restarting phone 19 Model 6751i RP Phone Installation Guide Index-1...
- Page 32 5 speaker key 5 speeddial key, creating 21 tones ring tone 18 tone set 18 user password 18 volume adjusting 20 control keys 5 wall installation 13 warranty 23 web user interface 16 Index-2 Model 6751i RP Phone Installation Guide...
- Page 36 If you’ve read this owner’s manual and consulted the Troubleshooting section and still have problems, please visit our Web site at www.aastratelecom.com, or call 1-800-574-1611 for technical assistance. Microsoft® Response Point™ is a trademark of Microsoft Corporation. © Aastra Telecom Inc. 2008 41-001211-15 Rev 00...
Need help?
Do you have a question about the 6751i RP and is the answer not in the manual?
Questions and answers