Advertisement
Quick Links
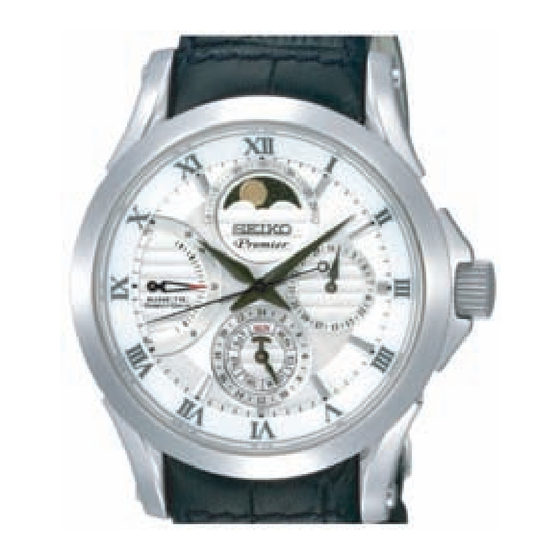
PARTS LIST / TECHNICAL GUIDE
KINETIC DIRECT DRIVE Cal. 5D88A
[SPECIFICATIONS]
Item
Movement
• 3 hands (Hour, Minute and Second hands) ,
24-hour hand
• Calendar (Date dial, Day dial, Moon phase)
Driving system
Additional functions
Normal position
Crown operation
1st click position
2nd click position
Loss/gain
Regulation system
Measuring gate by quartz tester
Current consumption
Coil resistance
Power generator
Power supply
R e c h a r g e a b l e
battery
Operating voltage range
Maximum continuous operating time
Number of jewels
Cal. No.
Step motor 2 pieces
• Direct drive indicator
Power reserve indicator
Real-time power indicator
• Energy depletion forewarning function
• Overcharge prevention function
• Electronic circuit reset function
• Second hand stop function
• Date correction function
• Moon phase display function
Free
Day setting (clockwise), Date setting (counterclockwise)
Time setting, hand position adjustment, resetting the circuit
Monthly rate: less than 15 seconds
(worn on the wrist at temperature range between 5 to 35 ºC)
Nil
10-second gate
Movement: less than 0.65
Circuit block: nil
Circuit block for calendar: less than 0.40
4002535 1 piece:1.90KΩ - 2.15KΩ Coil block for hour,minute, and second hand
4002540 1 piece:0.585KΩ - 0.645KΩ Generating coil block
4002529 1 piece:1.25KΩ - 1.50KΩ Power reserve coil block
Automatic generating system + Manual winding power generating system
MT920 Manganese titanium lithium rechargeable battery
1.05V - 2.50V
Approximately 1 month after the watch is fully charged
12 jewels
5D88A
• Diameter
Outside: Ø 30.0 mm
Height: 6.52 mm
μA
• Casing diameter: Ø 28.0 mm
μA
Advertisement

Related Manuals for Seiko 5d88A


Summary of Contents for Seiko 5d88A
- Page 1 PARTS LIST / TECHNICAL GUIDE KINETIC DIRECT DRIVE Cal. 5D88A [SPECIFICATIONS] Cal. No. 5D88A Item Movement • Casing diameter: Ø 28.0 mm • 3 hands (Hour, Minute and Second hands) , • Diameter 24-hour hand Outside: Ø 30.0 mm • Calendar (Date dial, Day dial, Moon phase) Height: 6.52 mm...
- Page 2 BEFORE STARTING REPAIR WORK ON CAL. 5D88A SEIKO Kinetic Direct Drive Cal. 5D88 is an embodiment of the SEIKO’s ‘emotional technology’. The watch features new functions but the knowledge of repairing the existing KINETIC series will be helpful. To repair the Cal. 5D88, therefore, you are requested to have the full knowledge of its functions and strictly observe the repairing and checking instructions provided in this guide so that the watch will be correctly repaired.
- Page 3 BEFORE STARTING REPAIR WORK ON CAL. 5D88A Crown position Functions by crown operation Functions by button operation Normal • Electric power generation by manual winding Clockwise turn: charging the watch by manual winding Counterclockwise turn: No function First click • Calendar setting...
- Page 4 BEFORE STARTING REPAIR WORK ON CAL. 5D88A Crown position Functions by crown operation Functions by button operation * Do not set the moon phase between 9 pm and 1 am, as the moon phase may not change to the correct display on the following day.
- Page 5 BEFORE STARTING REPAIR WORK ON CAL. 5D88A 3. HOW THE DIRECT DRIVE INDICATOR HAND WORKS 1. Power reserve indicator function • Except when the crown is being turned to charge the watch, the direct indicator hand functions as a power reserve indicator which shows how long the watch will keep operating within the range between the minimum 3 hours and the maximum 1 month.
- Page 6 BEFORE STARTING REPAIR WORK ON CAL. 5D88A 2. Real-time power indicator function <Display and movement flow of the direct drive indicator hand while charging the watch> Power generation status and generated power display Power reserve Initial status In-progress display A. While turning the crown B.
- Page 7 BEFORE STARTING REPAIR WORK ON CAL. 5D88A 4. HOW TO REACTIVATE THE WATCH AFTER IT STOPPED To reactivate the stopped watch, see the condition of the watch by following the steps below. T h e wa t c h s t ar t s o p e r a t in g Case 1: normally within a few seconds.
- Page 8 BEFORE STARTING REPAIR WORK ON CAL. 5D88A 5. HOW TO CHARGE THE WATCH WITH KINETIC ENERGY SUPPLIER YT-02A Before setting the KINETIC ENERGY SUPPLIER, make sure that the watch is moving. • In some cases, the KINETIC ENERGY SUPPLIER does not start charging the watches with cal.5D series when the watch stops.
-
Page 9: Parts List
PARTS LIST Cal. 5D88A [Automatic Generating Mechanism] Disassembling procedures Figs.:1 Reassembling procedures Figs. : For the type of oil and quantity of lubrication, refer to the following TECHNICAL GUIDE section. Oscillating weight screw 0022 Oscillating weight 0500 509 Oscillating weight wheel... - Page 10 PARTS LIST Cal. 5D88A Calendar train bridge screw 0016704 Calendar train cover 4283515 Dial Washer 0491735 Moon phase indicator wheel 0634524 Calendar train bridge screw 0012354 Calendar train bridge 0439508 Date star wheel 0970501 24 Hour indicator wheel Date corrector wheel...
- Page 11 PARTS LIST Cal. 5D88A [Calendar Mechanism] Date jumper screw 0012354 Date jumper 0810503 Day star wheel 1002529 2nd Intermediate wheel for day corrector 1026506 1st Intermediate wheel for day corrector 1026505 3rd Intermediate wheel for calendar corrector 2nd Intermediate wheel...
- Page 12 PARTS LIST Cal. 5D88A [Manual Winding Mechanism and Circuit Block] Circuit block cover A screw 0012354 Friction spring for sliding Circuit block cover B screw wheel 0012354 0353527 Oscillating weight bridge screw Sliding crown wheel 1002521 0012354 Crown wheel fixing...
- Page 13 PARTS LIST Cal. 5D88A [Power Reserve Indicator Mechanism] Power reserve train wheel bridge screw 0012 354 Power reserve train wheel bridge 0125 512 Power reserve indicator wheel 1002 522 Intermediate wheel for power reserve 0701 504 Power reserve rotor 4146 502...
- Page 14 PARTS LIST Cal. 5D88A [Gear Train Mechanism and Stepping Motor] Train wheel bridge screw 0012 354 Train wheel bridge 0125 511 Generating rotor 4146 522 Train wheel setting lever 0391503 Fourth wheel 0241565 Third wheel 0231 904 Fifth wheel 0701 504...
- Page 15 PARTS LIST Cal. 5D88A [Setting Mechanism] Calendar plate screw 32-T Calendar plate screw Dummy plate H-G001 0012 354 Calendar plate 4283515 Mount the Dummy plate instead of the Calenar plate when assembling by the Calendar plate screw and tighten it...
-
Page 16: Technical Guide
TECHNICAL GUIDE Cal. 5D88A 1. REMARKS ON DISASSEMBLING AND REASSEMBLING GENERAL INSTRUCTIONS FOR LUBRICATION 1) Pivot portions Refer to the illustrations A and B. Illutration B Illutration A 2) Part of axis of wheels (generally found on the center wheel and pinion and the fourth wheel. - Page 17 2 pins marked with red arrows should be taken out. Even after taking 2 pins out from the movement holder, it can be used for former 5D calibers. Front side • UNIVERSAL MOVEMENT HOLDER (S-682) Reverse side • Dammy Plate H-G001 • Watch oils SEIKO watch grease (S-6) and watch oils (AO-3 and AO-2) AO-3 AO-2 17/51...
- Page 18 TECHNICAL GUIDE Cal. 5D88A Winding stem if f Clutch wheel ig g Winding pinion When installing the WINDING STEM, support the WINDING PINION and the CLUTCH WHEEL by using the movement holder as illustrated below. Clutch wheel Winding pinion Winding stem...
- Page 19 TECHNICAL GUIDE Cal. 5D88A Hook the arm of the SETTING LEVER after fixing the SETTING LEVER JUMPER by tightening the SETTING LEVER JUMPER SCREW, taking care so as not to deform the arm of the setting lever. yg Rotor Do not mix up the ROTOR (65) with the POWER RESERVE ROTOR (53). To discriminate between the two, see the illustrations below.
- Page 20 TECHNICAL GUIDE Cal. 5D88A td Power reserve rotor ts Intermediate wheel for power reserve ta Power reserve indicator wheel t; Power reserve train wheel bridge rl Power reserve train wheel bridge screw Check the alignment carefully after mounting the POWER RESERVE ROTOR (53), INTERMEDIATE...
- Page 21 TECHNICAL GUIDE Cal. 5D88A 2) Direct drive indicator hand Before installing the direct drive indicator hand, force the direct drive indicator hand position back to “ 0 ” by resetting the built-in IC (system reset). [How to retrieve the remaining power reserve (after system reset)] * After system reset, power reserve indicator goes back to “...
-
Page 47: Technical Guide
(hand specification, or moment of inertia). * When using a SEIKO multi-tester S-860, select the following range. For the whole movement: NORMAL 40 μA l How to measure the current consumption 1. - Page 48 TECHNICAL GUIDE Cal. 5D88A * If the current consumption keeps going down or exceeds the standard value, repeat the procedure from the step 4 above. Checking the automatic generating system 1. Apply the probes of the tester as shown in the illustration, and measure the voltage of the rechargeable battery.
- Page 49 TECHNICAL GUIDE Cal. 5D88A <Notes on generating power and power reserve amount> l Number of swings and power reserve • When the power reserve in the rechargeable battery is depleted and the watch stops completely, swing the watch for a few seconds at a rate of 2 to 3 times a second, and then check if the direct drive indicator hand moves to the 0 position from the standby position.
-
Page 50: Troubleshooting
TECHNICAL GUIDE Cal. 5D88A 3. TROUBLESHOOTING Symptom Possible causes Solutions 1) The battery voltage has been 1) Charge the watch. The watch stops operating. depleted. 2) Replace the coil with a new 2) The coil is broken. one. 3) O n e o r m o r e w h e e l s h ave... - Page 51 TECHNICAL GUIDE Cal. 5D88A Solutions Symptom Possible causes 1) The battery voltage has been 1) Charge the watch. The dire c t drive indic ator depleted. 2) Replace the power reserve coil hand does not move. 2) The coil is broken.
-
Page 52: Parts List
PARTS LIST Cal. 5D88A [Automatic Generating Mechanism] Disassembling procedures Figs.:1 Reassembling procedures Figs. : For the type of oil and quantity of lubrication, refer to the following TECHNICAL GUIDE section. Oscillating weight screw 0022 Oscillating weight 0500 509 Oscillating weight wheel... - Page 53 PARTS LIST Cal. 5D88A Calendar train bridge screw 0016704 Calendar train cover 4283515 Dial Washer 0491735 Moon phase indicator wheel 0634524 Calendar train bridge screw 0012354 Calendar train bridge 0439508 Date star wheel 0970501 24 Hour indicator wheel Date corrector wheel...
- Page 54 PARTS LIST Cal. 5D88A [Calendar Mechanism] Date jumper screw 0012354 Date jumper 0810503 Day star wheel 1002529 2nd Intermediate wheel for day corrector 1026506 1st Intermediate wheel for day corrector 1026505 3rd Intermediate wheel for calendar corrector 2nd Intermediate wheel...
- Page 55 PARTS LIST Cal. 5D88A [Manual Winding Mechanism and Circuit Block] Circuit block cover A screw 0012354 Friction spring for sliding Circuit block cover B screw wheel 0012354 0353527 Oscillating weight bridge screw Sliding crown wheel 1002521 0012354 Crown wheel fixing...
- Page 56 PARTS LIST Cal. 5D88A [Power Reserve Indicator Mechanism] Power reserve train wheel bridge screw 0012 354 Power reserve train wheel bridge 0125 512 Power reserve indicator wheel 1002 522 Intermediate wheel for power reserve 0701 504 Power reserve rotor 4146 502...
- Page 57 PARTS LIST Cal. 5D88A [Gear Train Mechanism and Stepping Motor] Train wheel bridge screw 0012 354 Train wheel bridge 0125 511 Generating rotor 4146 522 Train wheel setting lever 0391503 Fourth wheel 0241565 Third wheel 0231 904 Fifth wheel 0701 504...
- Page 58 PARTS LIST Cal. 5D88A [Setting Mechanism] Calendar plate screw 32-T Calendar plate screw Dummy plate H-G001 0012 354 Calendar plate 4283515 Mount the Dummy plate instead of the Calenar plate when assembling by the Calendar plate screw and tighten it...
- Page 59 TECHNICAL GUIDE Cal. 5D88A 1. REMARKS ON DISASSEMBLING AND REASSEMBLING GENERAL INSTRUCTIONS FOR LUBRICATION 1) Pivot portions Refer to the illustrations A and B. Illutration B Illutration A 2) Part of axis of wheels (generally found on the center wheel and pinion and the fourth wheel.
- Page 60 2 pins marked with red arrows should be taken out. Even after taking 2 pins out from the movement holder, it can be used for former 5D calibers. Front side • UNIVERSAL MOVEMENT HOLDER (S-682) Reverse side • Dammy Plate H-G001 • Watch oils SEIKO watch grease (S-6) and watch oils (AO-3 and AO-2) AO-3 AO-2 17/51...
- Page 61 TECHNICAL GUIDE Cal. 5D88A Winding stem if f Clutch wheel ig g Winding pinion When installing the WINDING STEM, support the WINDING PINION and the CLUTCH WHEEL by using the movement holder as illustrated below. Clutch wheel Winding pinion Winding stem...
- Page 62 TECHNICAL GUIDE Cal. 5D88A Hook the arm of the SETTING LEVER after fixing the SETTING LEVER JUMPER by tightening the SETTING LEVER JUMPER SCREW, taking care so as not to deform the arm of the setting lever. yg Rotor Do not mix up the ROTOR (65) with the POWER RESERVE ROTOR (53). To discriminate between the two, see the illustrations below.
- Page 63 TECHNICAL GUIDE Cal. 5D88A td Power reserve rotor ts Intermediate wheel for power reserve ta Power reserve indicator wheel t; Power reserve train wheel bridge rl Power reserve train wheel bridge screw Check the alignment carefully after mounting the POWER RESERVE ROTOR (53), INTERMEDIATE...
- Page 64 TECHNICAL GUIDE Cal. 5D88A 2) Direct drive indicator hand Before installing the direct drive indicator hand, force the direct drive indicator hand position back to “ 0 ” by resetting the built-in IC (system reset). [How to retrieve the remaining power reserve (after system reset)] * After system reset, power reserve indicator goes back to “...
- Page 65 ILLUSTRATION AND SPECIAL INSTRUCTIONS ETC. sliding crown Insert the sliding crown wheel. crown wheel crown wheel smoothly moves 22/51...
- Page 66 PROCESS ILLUSTRATION AND SPECIAL INSTRUCTIONS ETC. I I ) A s s e m b l i n g <82> Mount the switching lever with setting wheel Intermediate wheel for calendar corrector t h e d i a l s i d e o f t h e m o v e m e n t Two wheels are attached to the switching lever as illustrated at ( 1 )
- Page 67 < > t i l Place the setting lever “ ” a jumper l l i Refer to the Fig.12 Fix the setting lever jumper by tightening wheel for the setting lever minute wheel of the Main plate B jumper screw. Fig.13 Refer to the Fig.12 <...
- Page 68 Cal.5D88A TECHNICAL GUIDE NO. 4 PROCESS ILLUSTRATION AND SPECIAL INSTRUCTIONS ETC. Mount the Dummy plate. <32-T> Mount the Before assembling the case back side of the movement, mount the Dummy plate instead of Dummy plate 32-T the Calendar plate. (The Calendar plate is thicker, and if the Calendar plate is mounted,...
- Page 69 Cal.5D88A TECHNICAL GUIDE NO.5 PROCESS ILLUSTRATION AND SPECIAL INSTRUCTIONS ETC. I I I ) A s s e m b l i n g t h e c a s e b a c k s i d e o f t h e m o v e m e n t “...
- Page 70 Cal.5D88A TECHNICAL GUIDE NO.6 PROCESS ILLUSTRATION AND SPECIAL INSTRUCTIONS ETC. <65> < > Mount the Center , t i wheel. Mount the Second Intermediate wheel for minute wheel. < > Refer to Fig.21. <64> f i f <68> <66> f i f <67>...
- Page 71 Cal.5D88A TECHNICAL GUIDE ILLUSTRATION AND SPECIAL INSTRUCTIONS ETC. Mount the coil <70> Mount the generating coil block. <73> Mount the coil block. block. When mounting thegenerating coil block, take care so as not to When mounting the coil block, take care so as not to...
- Page 72 Cal.5D88A TECHNICAL GUIDE ILLUSTRATION AND SPECIAL INSTRUCTIONS ETC. Mount the train wheel bridge and check the pivot hole. <59> Mount the train wheel bridge and check the pivot hole. Fix the train wheel bridge to the spacer for coil block rotor...
- Page 73 Cal.5D88A TECHNICAL GUIDE ILLUSTRATION AND SPECIAL INSTRUCTIONS ETC. < > Mount the <54> Mount the rechargeable battery connection (+). i t i i t i rechargeable battery - t l l l i y l l < > connection (+).
- Page 74 Cal.5D88A TECHNICAL GUIDE ILLUSTRATION AND SPECIAL INSTRUCTIONS ETC. < > < > < > Mount the power reserv train wheel bridge and check the pivot hole. I n t e r m e d i a t e w h e e l f o r...
- Page 75 Cal.5D88A TECHNICAL GUIDE ILLUSTRATION AND SPECIAL INSTRUCTIONS ETC. < > “ ” a < > “ ” f < > < > < > 32/51...
- Page 76 Cal.5D88A TECHNICAL GUIDE ILLUSTRATION AND SPECIAL INSTRUCTIONS ETC. < > &40 l l i < > “ ” a e “ . ” l l i l l i & < > l l i l l i “ ” a e “...
- Page 77 Cal.5D88A TECHNICAL GUIDE PROCESS ILLUSTRATION AND SPECIAL INSTRUCTIONS ETC. “ ” a “ ” e < > sliding circuit block cover A screw. “ ” a “ ” e < > sliding “ ” f b e a r i n g s...
- Page 78 Cal.5D88A TECHNICAL GUIDE NO. 14 PROCESS ILLUSTRATION AND SPECIAL INSTRUCTIONS ETC. Remove the Dummy plate. <32-T> <32> After removing the Dummy plate, mount After assembling the Oscillating weight bridge, turn Set the movement the Calendar Plate. over the movement and disassemble the dummy...
- Page 79 Cal.5D88A TECHNICAL GUIDE NO.15 PROCESS ILLUSTRATION AND SPECIAL INSTRUCTIONS ETC. Assembling the <27> Mount the Day driving wheel. Calendar Alignment check mechanism <29> Mount the Anti-magnetic shield plate. Lubricating The peak of the mark on the Day ◆ driving wheel should be set and...
- Page 80 Cal.5D88A TECHNICAL GUIDE NO.16 PROCESS ILLUSTRATION AND SPECIAL INSTRUCTIONS ETC. Mount the 2nd intermediate wheel <21> Mount the Day star wheel. for calendar corrector. Mount the 3rd intermediate wheel <22> Mount the 2nd intermediate for calendar wheel for day corrector.
- Page 81 Cal.5D88A TECHNICAL GUIDE NO.17 PROCESS ILLUSTRATION AND SPECIAL INSTRUCTIONS ETC. <20> Mount the Date jumper. Mount the Date Firmly press down the points ◆ jumper. of engagement to securely set it in position. (455#, 456#) <19> Fix the Date jumper to the...
- Page 82 Cal.5D88A TECHNICAL GUIDE NO.18 PROCESS ILLUSTRATION AND SPECIAL INSTRUCTIONS ETC. Mount the Moon <18> Lubricate the Moon phase phase corrector corrector lever. lever. Apply the lubricant as shown ◆ Lubricant Fig. 56 below. Hook the spring Type of oil: S-6 ◆...
- Page 83 Cal.5D88A TECHNICAL GUIDE NO.19 PROCESS ILLUSTRATION AND SPECIAL INSTRUCTIONS ETC. <12> Fix the Calendar train bridge by <17> Mount the Intermediate wheel tightening the Calendar train Mount the Inter- for 24 Hour indicator. bridge screw. (471#) mediate wheel for <13> Mount the Calendar train bridge.
- Page 84 NO.20 Cal.5D88A TECHNICAL GUIDE PROCESS ILLUSTRATION AND SPECIAL INSTRUCTIONS ETC. <9> Mount the calendar train <11> Mount the Moon phase cover. Mount the Moon indicator wheel. phase indicator <How to set and hook the jumper When handling the Moon of the Moon phase indicator ◆...
- Page 85 Cal.5D88A TECHNICAL GUIDE ILLUSTRATION AND SPECIAL INSTRUCTIONS ETC. < > . t i rechargeable battery < > . t i “ ” a “ ” b “ . ” f Fig.69 . t i rechargeable battery rechargeable battery for rechargeable...
- Page 86 Cal.5D88A TECHNICAL GUIDE ILLUSTRATION AND SPECIAL INSTRUCTIONS ETC. < > l l i < > l l i Fig.72. l l i < > l l i l l i l l i l l i l l i l l i...
- Page 87 V ) F u n c t i o n c h e c k s a n d i n s t a l l a t i o n o f t h e e x t e r i o r p a r t s •...
- Page 88 . t i “ ” a b “ . ” i F g ) . t P r e p a r a t i o n f o r m o u n t i n g t h e d i r e c t d r i v e i n d i c a t o r h a n d <...
- Page 89 Cal.5D88A TECHNICAL GUIDE NO. 25 PROCESS SPECIFICATIONS (QUALITY SPECIFICATIONS, HANDLING METHODS ETC.) ILLUSTRATIONS AND SPECIAL INSTRUCTIONS ETC. The direct drive indicator hand should indicate the “0” position Mount the direct drive as illustrated at right. indicator hand. Push-in force: push it in with a force less than 2 kg.
-
Page 90: Technical Guide
(hand specification, or moment of inertia). * When using a SEIKO multi-tester S-860, select the following range. For the whole movement: NORMAL 40 μA l How to measure the current consumption 1. - Page 91 TECHNICAL GUIDE Cal. 5D88A * If the current consumption keeps going down or exceeds the standard value, repeat the procedure from the step 4 above. Checking the automatic generating system 1. Apply the probes of the tester as shown in the illustration, and measure the voltage of the rechargeable battery.
- Page 92 TECHNICAL GUIDE Cal. 5D88A <Notes on generating power and power reserve amount> l Number of swings and power reserve • When the power reserve in the rechargeable battery is depleted and the watch stops completely, swing the watch for a few seconds at a rate of 2 to 3 times a second, and then check if the direct drive indicator hand moves to the 0 position from the standby position.
- Page 93 TECHNICAL GUIDE Cal. 5D88A 3. TROUBLESHOOTING Symptom Possible causes Solutions 1) The battery voltage has been 1) Charge the watch. The watch stops operating. depleted. 2) Replace the coil with a new 2) The coil is broken. one. 3) O n e o r m o r e w h e e l s h ave...
- Page 94 TECHNICAL GUIDE Cal. 5D88A Solutions Symptom Possible causes 1) The battery voltage has been 1) Charge the watch. The dire c t drive indic ator depleted. 2) Replace the power reserve coil hand does not move. 2) The coil is broken.
Need help?
Do you have a question about the 5d88A and is the answer not in the manual?
Questions and answers