IKEA RAFFINERAD Manual
Hide thumbs
Also See for RAFFINERAD:
- Instruction manual (108 pages) ,
- User manual (44 pages) ,
- Manual (44 pages)
Table of Contents
Advertisement
Available languages
Available languages
Advertisement
Chapters
Table of Contents

Related Manuals for IKEA RAFFINERAD


Summary of Contents for IKEA RAFFINERAD
- Page 1 RAFFINERAD...
- Page 3 ENGLISH DEUTSCH Please refer to the last page of this manual for the full list FRANÇAIS of IKEA appointed Authorized Service Centre and relative ITALIANO national phone numbers. Die vollständige Liste aller autorisierten IKEA Kundendienste sowie die zugehörigen Telefonnummern finden Sie auf der letzten Seite in diesem Handbuch.
-
Page 4: Table Of Contents
List of functions Recommended use and tips Description of display Electrical connection Daily use Environmental concerns Cooking tables IKEA GUARANTEE Cleaning and maintenance Safety Information Your safety and that of others are installation operations. very important. - The appliance must be... - Page 5 ENGLISH full disconnection under concerning use of the appliance overvoltage category III and in a safe way and understand must be incorporated in the hazards involved. Children shall fixed wiring in accordance with not play with the appliance. the national wiring rules. Cleaning and user maintenance - Do not use multiple plug shall not be made by children...
- Page 6 ENGLISH - Use oven gloves to remove birds) have to be kept away pans and accessories, taking from the area of the appliance care not to touch the heating location. elements. - Only use the temperature - Do not place flammable probe recommended for this materials in or near the oven.
-
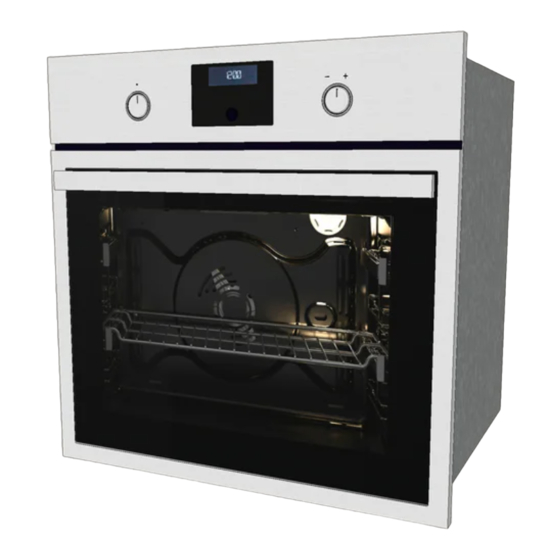
Page 7: Product Description
ENGLISH Product description Control panel Oven fan Cooling fan (hidden) Bottom heating element (not visible) Grill safety guard Oven door Upper heating element/Grill Meat probe connection Rear oven lamp Lateral grids The cooling fan may continue running even after the Prevents food from coming into direct contact with the oven is switched off. - Page 8 ENGLISH Inserting wire shelves and other accessories Remove the blue film as shown in the image in the oven 1. Insert the wire shelf horizontally, with the raised part “A” upwards (Fig. 1). How you align the tray with the telescopic runners.
-
Page 9: Control Panel
ENGLISH Control panel Function selector knob Browse knob Note: the control knobs are retractable. Press the knobs in the middle and they pop up. Selection/Confirmation button List of functions Turn the “Functions” knob to any position and the oven switches on: the display shows the functions or the associated submenus. -
Page 10: Description Of Display
ENGLISH Description of display Display of heating elements activated Pyrolisis function during the various cooking functions Browning Time management symbols: timer, cooking Special functions: defrosting, keep warm, time, end of cooking time, time rising Information regarding selected functions Automatic BREAD/PIZZA function selected Indication of door locked during automatic cleaning cycle Internal oven temperature... - Page 11 ENGLISH Oven functions table The oven has 4 cooking levels. Count up from the lower level. Function Description of function To stop cooking and switch off the oven. FORCED AIR To cook a variety of food requiring the same cooking temperature on two shelves at the same time (e.g: fish, vegetables, cakes).
- Page 12 ENGLISH Function Description of function SPECIAL FUNCTIONS To speed up defrosting of food. Place food on the middle shelf. Leave food in its packaging in order to prevent it from drying out on the outside. DEFROST For keeping just-cooked food hot and crisp (e.g: meat, fried food or flans).
-
Page 13: Daily Use
ENGLISH Daily use Selecting cooking functions When the set temperature is reached, the corresponding value (e.g. 200°) and an acoustic signal will sound. At the end of preheating, the oven automatically selects the conventional function . At this point food can be placed in the oven for 1. - Page 14 ENGLISH Selecting special functions To delay the end of cooking time, and thus also the cooking start time, proceed as 1. Turn the “Functions” knob till the follows: display shows “ DEFROST” along with this 1. Turn the “Browse” knob to display the function’s corresponding symbol.
- Page 15 ENGLISH press the button or turn one of the knobs. : the display shows “BREAD” and 2. Turn the “Browse” knob to display AUTO at the side. “ECO. 2. Press to select the function. 3. Press to access the setting (ON/OFF). 3.
- Page 16 ENGLISH care to ensure the tip does not end up in a PROBE hollow part (Fig. 2). In the case of meat with Since the end of cooking depends on very irregular thickness, check it is cooked the temperature set for the meat probe, properly before removing it from the oven.
- Page 17 ENGLISH To activate the oven’s automatic cleaning cycle (pyro-cleaning), proceed as follows: 1. Turn the “Functions” knob until the word “PYRO” appears on the display. 2. Press button to confirm your choice and start the pyro-cleaning cycle. To select ECO pyro-cleaning, turn the “Browse”...
-
Page 18: Cooking Tables
ENGLISH Cooking tables Type of food Function Preheating Level Temperature Cooking Accessories (from the (°C) time bottom) (min) Leavened cakes 160-180 30-90 Cake tin on wire shelf 160-180 30-90 Shelf 3: cake tin on wire shelf Shelf 1: cake tin on wire shelf Filled pies –... - Page 19 ENGLISH Type of food Function Preheating Level Temperature Cooking Accessories (from the (°C) time bottom) (min) Pizza 220-250 15-30 Drip-tray / baking tray Frozen pizza 10-15 Shelf 2: drip tray / baking tray or wire shelf 10-20 Shelf 3: baking tray Shelf 1: drip tray Savoury pies...
- Page 20 ENGLISH Type of food Function Preheating Level Temperature Cooking Accessories (from the (°C) time bottom) (min) Fish fillets / – 2 (medium) 20-35 Shelf 4: wire steaks shelf (turn food halfway through cooking) Shelf 3: drip tray with water Sausages / –...
- Page 21 ENGLISH Type of food Function Preheating Level Temperature Cooking Accessories (from the (°C) time bottom) (min) Lasagna & 50-100* Shelf 3: oven Meat tray on wire shelf Shelf 1: drip tray or oven tray on wire shelf Meat & 45-100* Shelf 3: oven Potatoes tray on wire shelf...
- Page 22 ENGLISH...
-
Page 23: Cleaning And Maintenance
ENGLISH Cleaning and maintenance CLEANING Accessories • Soak the accessories in water with WARNING! washing up detergent immediately after Never use steam cleaning equipment. use, handling them with oven gloves if still Only clean the oven when it is cool to the hot. - Page 24 ENGLISH • Remove all accessories before running the pyrolysis function (also the lateral grids). • For optimum cleaning of the oven door, remove the worst soiling with a damp sponge before using the pyrolytic function. • The appliance is equipped with 2 pyrolysis functions: 1.
- Page 25 Only use 40W/230 V type G9, T300°C halogen lamps. The lamp used in the appliance is specifically designed for electrical appliances and it is not suitable for household room illumination (Commission Regulation (EC) No 244/2009). Lamps are available from IKEA Authorized Service Centre.
-
Page 26: What To Do If
If after the above checks the fault still occurs, contact IKEA Authorized Service Centre. If any repairs are required, please contact Always specify: IKEA Authorized Service Centre (to guarantee • a brief description of the fault; that original spare parts will be used and •... -
Page 27: Technical Data
ENGLISH Technical data Type of product: Built-in Electrical Oven Model identification: RAFFINERAD 203.009.17 RAFFINERAD 603.009.15 Number of cavities Heat source Electrical Number of functions Usable volume. Measured with any side grids and catalytic panels removed l 1200 Area of the largest baking sheet cm... -
Page 28: Installation
ENGLISH Technical data The technical informations are situated in the rating plate inside the appliance. Installation After unpacking the oven, make sure that Remove the accessories from the oven it has not been damaged during transport and heat it at 200° for about an hour to and that the oven door closes properly. - Page 29 ENGLISH Door lock device To open the door with the door lock device see Fig 1. Fig. 1 The door safety device can be removed by following the sequence of images (see Fig. Fig. 2...
-
Page 30: Recommended Use And Tips
ENGLISH Recommended use and tips How to read the cooking table - If using non-stick cake tins, do not butter the The table indicates the best function to use edges as the cake may not rise evenly around for any given food, to be cooked on one or the edges. - Page 31 ENGLISH Rising function It is always best to cover the dough with a damp cloth before placing it in the oven. Dough proving time with this function is reduced by approximately one third compared to proving at room temperature (20-25°C). Proving time for a 1 Kg batch of pizza dough is around one hour.
-
Page 32: Electrical Connection
1,5 mm ) must be carried out by a qualified mains voltage. The rating plate is on the front electrician. Contact IKEA Authorized Service edge of the oven (visible when the door is Centre. open). -
Page 33: Ikea Guarantee
• Deliberate or negligent damage, damage IKEA, unless the appliance is named LAGAN in caused by failure to observe operating which case two (2) years of guarantee apply. instructions, incorrect installation or by... - Page 34 However, if an IKEA appointed Service kitchen furniture; Provider or its authorized service partner • ask for clarification on functions of IKEA repairs or replaces the appliance under appliances. the terms of this guarantee, the appointed To ensure that we provide you with the best...
-
Page 35: Sicherheitshinweise
Beschreibung des Displays und Empfehlungen Täglicher Gebrauch Anschluss an das Stromnetz Gartabellen Umweltschutz Reinigung und Pflege IKEA GARANTIE Sicherheitshinweise Ihre eigene Sicherheit und die anderer Schutzhandschuhe. Personen ist von höchster Wichtigkeit! - Halten Sie das Gerät von der Diese Anweisungen sowie das Stromversorgung getrennt, bis der Gerät selbst enthalten wichtige... - Page 36 DEUTSCH Trennung bei Überspannungen der Erfahrung oder Unkenntnis Kategorie III sorgt; der Trennschalter benutzt werden, wenn sie in das muss in die Festverdrahtung Gerät eingewiesen wurden und in Übereinstimmung mit den eine Anweisung für den sicheren nationalen Vorschriften für Gebrauch dieses Gerätes bekamen Verdrahtungen eingebaut werden.
- Page 37 DEUTSCH nach außen geblasen. Die während des Pyrolysezyklus. Belüftungsöffnungen dürfen nicht Halten Sie Kinder während des blockiert werden. Pyrolysezyklus fern von diesem - Verwenden Sie Gerät (gilt nur für Geräte mit Backofenhandschuhe, um Pyrolysefunktion). Gargeschirr und Roste zu - Während und nach der entnehmen.
-
Page 38: Produktbeschreibung
DEUTSCH Produktbeschreibung Bedienfeld Backofengebläse Kühlgebläse (nicht sichtbar) Unteres Heizelement (nicht sichtbar) Grillschutzvorrichtung Backofentür Oberes Heizelement/Grill Anschluss Kerntemperaturfühler Hintere Backofenbeleuchtung Seitliche Gitter Das Kühlgebläse kann auch nach dem Ausschalten Verhindert den direkten Kontakt der Speisen mit des Backofens noch lange nachlaufen. Im Verlauf dem Grill. - Page 39 DEUTSCH Einschieben der Roste und anderer Entfernen Sie die blaue Folie wie im Bild Zubehörteile in den Backofen gezeigt. 1. Schieben Sie den Rost mit dem erhöhten Teil “A” nach oben zeigend waagerecht ein (Abb. 1). So richten Sie die Fettpfanne auf die Teleskopführungen aus.
-
Page 40: Bedienfeld
DEUTSCH Bedienfeld Bedienknopf zur Funktionswahl Wähl-/Bestätigungstaste Navigationsknopf Hinweis: Die Bedienknöpfe sind versenkbar. Drücken Sie den Bedienknopf mittig ein, um ihn aus der Versenkung zu holen. Liste der Funktionen Durch Drehen des "Funktionswahlknopfs" in eine beliebige Position schaltet sich der Ofen ein: das Display zeigt die Funktionen oder zugehörigen Untermenüs an. -
Page 41: Beschreibung Des Displays
DEUTSCH Beschreibung des Displays Anzeige der aktiven Heizelemente für die Backofen-Innentemperatur verschiedenen Funktionen zum Garen Pyrolyse-Funktion Zeitmanagementsymbole: Timer, Garzeit, Anbräunen Garzeitende, Uhrzeit Sonderfunktionen: Auftauen, Informationen zu den ausgewählten Warmhalten, Aufgehen lassen Funktionen Automatische BROT/PIZZA Funktion ausgewählt Anzeige Backofentür geschlossen während des automatischen Reinigungszyklus Einstellung der Uhrzeit 3. - Page 42 DEUTSCH Übersicht Betriebsarten des Geräts Der Backofen verfügt über 4 Garebenen. Es wird von der untersten Ebene nach oben gezählt. Funktion Funktionsbeschreibung AUSSCHALTEN Zum Unterbrechen des Garvorgangs und Abschalten des Geräts. HEISSLUFT Zum gleichzeitigen Garen verschiedener Speisen (z. B. Fisch, Gemüse, Kuchen) bei gleicher Temperatur auf zwei Einschubebenen.
- Page 43 DEUTSCH Funktion Funktionsbeschreibung SONDERFUNKTIONEN Zur Beschleunigung des Auftauens von Speisen. Es wird empfohlen, das Gargut auf die mittlere Ebene zu geben. Es wird empfohlen, die Lebensmittel in ihrer Verpackung aufzutauen, um AUFTAUEN dem Austrocknen der Oberfläche vorzubeugen. Hält frisch zubereitete Speisen warm und knusprig (z. B. Fleisch, Frittiertes, Aufläufe).
-
Page 44: Täglicher Gebrauch
DEUTSCH Täglicher Gebrauch Wahl der Garfunktionen Änderung der Temperatur wie im vorigen Abschnitt beschrieben vor unter "Einstellung der Temperatur/Leistung des Grills". Die Meldung PRE erscheint am Display. Wenn die gewünschte Temperatur erreicht ist, wird der entsprechende Wert (z.B. 200 °C) 1. - Page 45 DEUTSCH aktuellen Uhrzeit um bis maximal 23 Stunden Um dieses zu unterbrechen, drücken Sie und 59 Minuten verzögert wird. Dies ist erst nach die Taste (auf dem Display erscheint die dem Einstellen der Garzeit möglich. aktuelle Uhrzeit). Nach Einstellen der Garzeit wird auf dem Display die Abschaltzeit angezeigt Wahl der Sonderfunktionen (beispielsweise 15:45), und das Symbol...
- Page 46 DEUTSCH "Pizza". Einstellungen Durch Drehen des Zeigers des Brot “Funktionswahlknopfs” auf das Symbol erhalten Sie Zugriff auf ein Untermenü mit fünf Displayeinstellungen, die sich ändern lassen. Drehen Sie den "Navigationsknopf" 1. Drehen Sie den "Funktionswahlknopf" bis "UHR" angezeigt wird. Zum Ändern der auf das Symbol : das Display zeigt Uhrzeit siehe den vorangehenden Abschnitt...
- Page 47 DEUTSCH Helligkeit aber der Garvorgang ist beendet, sobald Um die Helligkeit des Bildschirms zu ändern, die gemessene Temperatur die vom gehen Sie folgendermaßen vor: Kunden berechnete Temperatur des Kerntemperaturfühlers erreicht hat. Für die 1. Drehen Sie den "Navigationsknopf" , bis Garfunktionen des Kerntemperaturfühlers "HELLIGKEIT"...
- Page 48 DEUTSCH einer Garfunktion durch Drehen des Knopfs +/- ein und bestätigen Sie mit der Taste . Jetzt kann der eingestellte Wert für den Kerntemperaturfühler (unten rechts auf dem Display) geändert werden: drehen Sie den Um den automatischen Reinigungszyklus des Knopf +/- und bestätigen Sie mit der Taste Ofens (Pyrolyse) zu starten, gehen Sie wie folgt vor:...
-
Page 49: Gartabellen
DEUTSCH Gartabellen Art der Funktion Vorheizen Einschubebene Temperatur Garzeit Zubehör Speise (von unten) (°C) (Min.) Hefekuchen 160-180 30-90 Kuchenform auf Rost 160-180 30-90 Ebene 3: Kuchenform auf Rost Ebene 1: Kuchenform auf Rost Gefüllter – 160-200 30-85 Fettpfanne Kuchen / Backblech (Käsekuchen, oder Strudel,... - Page 50 DEUTSCH Art der Funktion Vorheizen Einschubebene Temperatur Garzeit Zubehör Speise (von unten) (°C) (Min.) Brot, Pizza, 190-250 15-50 Fettpfanne / Fladenbrot Backblech 190-250 25-50 Ebene 3: Backblech Ebene 1: Fettpfanne Brot 180-220 30-50 Fettpfanne / Backblech oder Rost Pizza 220-250 15-30 Fettpfanne / Backblech...
- Page 51 DEUTSCH Art der Funktion Vorheizen Einschubebene Temperatur Garzeit Zubehör Speise (von unten) (°C) (Min.) Hähnchen, 200-230 50-100 Fettpfanne Kaninchen, oder Form auf Ente Rost 1 kg Puter, Gans 190-200 80-130 Fettpfanne 3 kg oder Form auf Rost Fisch 180-200 40-60 Fettpfanne gebacken / oder Form auf...
- Page 52 DEUTSCH Art der Funktion Vorheizen Einschubebene Temperatur Garzeit Zubehör Speise (von unten) (°C) (Min.) Brathähnchen 2 (Mittel) 50-65 Ebene 2: Rost 1-1,3 kg (Gargut nach zwei Drittel der Garzeit wenden) Ebene 1: Fettpfanne mit Wasser 3 (hoch) 60-80 Ebene 2: Drehspieß/ Rotisserie Ebene 1:...
- Page 53 DEUTSCH Art der Funktion Vorheizen Einschubebene Temperatur Garzeit Zubehör Speise (von unten) (°C) (Min.) Lasagne und 50-100* Ebene 3: Form Fleisch auf Rost Ebene 1: Fettpfanne oder Form auf Rost Fleisch und 45-100* Ebene 3: Form Kartoffeln auf Rost Ebene 1: Fettpfanne oder Form auf Rost...
-
Page 54: Reinigung Und Pflege
DEUTSCH Reinigung und Pflege REINIGUNG HINWEIS: Während längeren Garens von Speisen mit hohem Wassergehalt (z. B. Pizza, WARNUNG! Gemüse usw.) kann sich Kondenswasser an Verwenden Sie niemals der Innenseite der Tür und der Türdichtung Wasserdampfreinigungsgeräte. bilden. Wenn der Backofen kalt ist, trocknen Lassen Sie das Gerät vor dem Reinigen Sie die Innenseite der Tür mit einem Tuch auskühlen. - Page 55 DEUTSCH Bei dieser Funktion werden die PFLEGE Schmutzablagerungen bei einer Temperatur von ca. 500 °C verbrannt. Die erzeugten WARNUNG! Ascherückstände lassen sich dann nach Verwenden Sie Schutzhandschuhe. Auskühlen des Backofens leicht mit einem Führen Sie die beschriebenen Vorgänge feuchten Schwamm entfernen. Aktivieren aus, wenn das Gerät kalt ist.
- Page 56 Lampe ist speziell für elektrische Geräte ausgelegt und nicht geeignet für die Beleuchtung von Räumen eines Haushalts (EU-Regelung (EC) Nr. 244/2009). Lampen sind beim autorisierten IKEA Kundendienst erhältlich. Glühlampe der hinteren Backofenbeleuchtung auswechseln 1. Trennen Sie den Ofen von der...
-
Page 57: Störung - Was Tun
Falls nach den oben beschriebenen Im Reparaturfall wenden Sie sich bitte an Kontrollen die Störung weiterhin besteht, einen autorisierten IKEA Kundendienst kontaktieren Sie bitte den autorisierten IKEA (nur dann wird garantiert, dass Kundendienst. Originalersatzteile verwendet werden und Sie benötigen dabei folgenden Angaben: eine sachgerechte Reparatur durchgeführt... -
Page 58: Technische Daten
DEUTSCH Technische Daten Art des Produkts: Einbau-Elektroofen Modellnummer: RAFFINERAD 203.009.17 RAFFINERAD 603.009.15 Anzahl der Innenräume Heizquelle Elektrisch Anzahl der Funktionen Nutzinhalt. Gemessen ohne seitliche Gitter und mit abgenommenen Pyrolysepaneelen l Fläche des größten Backblechs cm 1200 Energieeffizienzklasse (niedrigster Verbrauch) Energieeffizienzindex... -
Page 59: Aufstellung
DEUTSCH Technische Daten Die technischen Informationen befinden sich auf dem Typenschild im Geräteinneren. Aufstellung Prüfen Sie nach dem Auspacken, dass das Vorbereitung des Einbauschranks Gerät keine Transportschäden aufweist und die • Alle Küchenmöbel in unmittelbarer Nähe Backofentür richtig schließt. Bei auftretenden des Backofens müssen hitzebeständig sein Problemen wenden Sie sich bitte an Ihren (min. - Page 60 DEUTSCH Während des Gebrauchs Das Sicherheitselement der Tür kann ausgebaut Stellen Sie keine schweren Gewichte auf der werden Tür ab, um Beschädigungen zu vermeiden. durch Befolgen der Anweisungen in den Bildern Halten Sie sich nicht an der Tür fest und in der angegebenen Reihenfolge (siehe Abb.
-
Page 61: Hinweise Zum Gebrauch Und Empfehlungen
DEUTSCH Hinweise zum Gebrauch und Empfehlungen So lesen Sie die Garzeittabelle Dessert Die Tabelle gibt die beste Garfunktion für - Backen Sie sehr feine Süßspeisen bei ein bestimmtes Lebensmittel an, das auf Ober-/Unterhitze auf nur einer Ebene. einer oder mehreren Ebenen gleichzeitig Verwenden Sie Kuchenformen aus dunklem gegart werden kann. - Page 62 DEUTSCH - Wählen Sie für ein gleichmäßiges Garergebnis zum Grillen von Fleischstücken immer gleich dicke Scheiben. Sehr dicke Fleischscheiben benötigen eine längere Garzeit. Um zu vermeiden, dass das Fleisch anbrennt, vergrößern Sie den Abstand der gegarten Stücke zum Grill und versetzen Sie den Rost auf eine der unteren Ebenen.
-
Page 63: Anschluss An Das Stromnetz
Das Netzkabel (Typ H05 RR-F 3 x 1,5 mm Gerätes muss der Spannung des Stromnetzes darf nur durch Fachpersonal ersetzt werden. entsprechen. Das Typenschild befindet sich Wenden Sie sich an einen autorisierten IKEA an der Vorderkante des Backofens (bei Kundendienst. offener Tür sichtbar). -
Page 64: Ikea Garantie
DEUTSCH IKEA GARANTIE Wie lange ist die IKEA Garantie gültig? gemacht werden kann, wird IKEA durch seinen eigenen Kundendienst oder einen Die Garantie gilt fünf (5) Jahre ab dem autorisierten Servicepartner nach eigenem Kaufdatum von bei IKEA gekauften Ermessen das schadhafte Produkt entweder Geräten, es sei denn, es handelt sich um... - Page 65 Informationen im Benutzerhandbuch anderen Adresse transportiert, ist IKEA entspricht. von der Haftung für Transportschäden Der autorisierte Kundendienst für IKEA jeder Art freigestellt. Liefert IKEA das Geräte Produkt direkt an die Kundenadresse, Der IKEA-Service steht Ihnen bei folgenden werden eventuelle Transportschäden Fragen / Anliegen gerne zur Verfügung:...
- Page 66 Sie gekauft haben, vermerkt. Benötigen Sie weiteren Rat und Unterstützung? Bei allen anderen, nicht kundendienstspezifischen Fragen, bitten wir Sie, sich an Ihr nächstgelegenes IKEA- Einrichtungshaus zu wenden. Wir empfehlen Ihnen, sich vorher die dem Gerät beigefügten Unterlagen genauestens durchzulesen.
-
Page 67: Informations Relatives À La Sécurité
Utilisation quotidienne Conseils pour la protection Tableaux de cuisson de l'environnement Nettoyage et entretien GARANTIE IKEA Informations relatives à la sécurité Votre sécurité et celle d'autrui est très - Utilisez des gants de protection pour importante. déballer et installer l'appareil. - Page 68 FRANÇAIS une déconnexion complète en cas uniquement sous la surveillance et de surtension de catégorie III, à avec les instructions d'une personne incorporer dans l'installation électrique responsable. Empêchez les enfants de de l'habitation, conformément aux jouer avec l'appareil. Le nettoyage normes locales en vigueur en matière et l'entretien quotidien de l'appareil d'installation électrique.
- Page 69 FRANÇAIS ventilation. - Ne touchez pas le four pendant le - Munissez-vous de gants pour cycle de pyrolyse. Éloignez les enfants retirer les plats et les accessoires de l'appareil pendant le déroulement du four. Veillez à ne pas toucher les du cycle de pyrolyse (uniquement résistances.
-
Page 70: Description Du Produit
FRANÇAIS Description du produit Bandeau de commandes Ventilateur de four Ventilateur de refroidissement (dissimulé) Résistance de sole (non visible) Protection du gril Porte du four Résistance de voûte/Gril Raccordement de sonde à viande Éclairage arrière du four Grilles latérales Il se peut que le ventilateur continue de fonctionner Cette protection empêche le contact direct avec le même après l'extinction du four. - Page 71 FRANÇAIS Introduction de grilles et autres accessoires Retirez le film bleu comme indiqué sur à l'intérieur du four l'illustration 1. Insérez la grille horizontalement, avec la partie rehaussée « A » orientée vers le haut (Fig. 1). Insertion de la plaque dans les glissières coulissantes.
-
Page 72: Bandeau De Commandes
FRANÇAIS Bandeau de commandes Bouton de sélection des fonctions Touche de sélection/confirmation Bouton de navigation Remarque : les boutons de commande sont escamotables. Appuyez sur le centre de ces boutons pour les extraire de leur siège. Liste des fonctions En tournant le bouton « Fonctions » dans une position quelconque, le four s’active: l’afficheur visualise les fonctions ou les sous- menus associés à... -
Page 73: Description De L'affichage
FRANÇAIS Description de l'affichage Visualisation des éléments chauffants Indication porte four fermée durant le actifs pour les différentes fonctions cycle de nettoyage automatique Symboles pour la gestion du temps: Température intérieure du four minuterie, durée de cuisson, heure de fin Fonction pyrolyse de cuisson, heure courante Brunissage... - Page 74 FRANÇAIS Tableau des fonctions du four Le four possède 4 niveaux de cuisson. Le comptage s'effectue en partant du bas. Fonction Description de la fonction Pour interrompre la cuisson et éteindre le four. CHALEUR PULSÉE Pour cuire simultanément sur deux gradins des aliments, mêmes différents, nécessitant la même température de cuisson (par ex.
- Page 75 FRANÇAIS Fonction Description de la fonction FONCTIONS SPÉCIALES Pour accélérer la décongélation des aliments. Il est conseillé de placer l'aliment sur le gradin central. Laissez les aliments dans leur emballage pour empêcher que leur surface ne se déshydrate. DÉCONGÉLA- TION Pour conserver les aliments cuits chauds et croustillants (ex: viandes, fritures, flans).
-
Page 76: Utilisation Quotidienne
FRANÇAIS Utilisation quotidienne Sélectionnez une fonction de cuisson température du four, procédez comme indiqué dans le paragraphe précédent "Réglage de la température/puissance du gril". Le message PRE s'affiche. Une fois la température programmée atteinte, la valeur correspondante (200 °C par exemple) s'affiche et un 1. - Page 77 FRANÇAIS atteinte progressivement, c'est pourquoi la tournez le bouton "Navigation" jusqu'à durée de cuisson est légèrement plus longue l'affichage de la durée désirée. que celle indiquée dans le tableau de 2. Appuyez sur la touche pour lancer cuisson. le compte à rebours. Une fois la durée Vous pouvez programmer l'heure de fin de programmée écoulée, l'indication "END"...
- Page 78 FRANÇAIS Sélection de la fonction pain/pizza Réglages En plaçant l'indicateur du bouton "Fonctions" Positionnez l'indicateur du bouton en face du symbole , on accède à "Fonctions" face au symbole pour un sous-menu contenant deux fonctions accéder à un sous-menu regroupant cinq automatiques de cuisson pour "pain"...
- Page 79 FRANÇAIS Luminosité cuisson se termine dès que la température Pour modifier la luminosité de l'écran, définie par l'utilisateur est atteinte. Il procédez comme suit : n'existe pas de menu spécifique pour les fonctions de cuisson avec sonde, mais il est 1.
- Page 80 FRANÇAIS température du four et de la sonde à tout votre choix et démarrer le cycle de moment durant la cuisson. Pour modifier la pyrolyse. température du four, tournez simplement le Pour sélectionner le mode pyrolyse ECO, bouton +/- ; pour modifier la température tournez le bouton "Navigation"...
-
Page 81: Tableaux De Cuisson
FRANÇAIS Tableaux de cuisson Type d’aliment Fonction Préchauf- Niveau Température Temps Accessoires fage (°C) partant cuisson du bas) (min) Gâteaux levés 160-180 30-90 Moule à gâteau sur grille 160-180 30-90 Grad. 3 : moule à gâteau sur grille Grad. 1 : moule à... - Page 82 FRANÇAIS Type d’aliment Fonction Préchauf- Niveau Température Temps Accessoires fage (°C) partant cuisson du bas) (min) Meringues 1 10-150 Lèchefrite/ plaque à pâtisserie 130-150 Grad. 3 : plaque à pâtisserie Grad. 1 : lèchefrite Pain/Pizza/ 190-250 15-50 Lèchefrite/ Fougasse plaque à pâtisserie 190-250 25-50...
- Page 83 FRANÇAIS Type d’aliment Fonction Préchauf- Niveau Température Temps Accessoires fage (°C) partant cuisson du bas) (min) Vol-au-vent/ 190-200 20-30 Lèchefrite/ biscuits salés en plaque à pâte feuilletée pâtisserie 180-190 20-40 Grad. 3 : plaque à pâtisserie Grad. 1 : lèchefrite Lasagnes/ 190-200 30-60...
- Page 84 FRANÇAIS Type d’aliment Fonction Préchauf- Niveau Température Temps Accessoires fage (°C) partant cuisson du bas) (min) Saucisses/ – 15-40 Grad. 4 : grille brochettes/ (moyenne- (retourner les côtelettes/ élevée) aliments à mi- hamburgers cuisson) Grad. 3 : lèchefrite avec Poulet rôti 2 (moyenne) 50-65 Grad.
- Page 85 FRANÇAIS Type d’aliment Fonction Préchauf- Niveau Température Temps Accessoires fage (°C) partant cuisson du bas) (min) Pommes de – 2 (moyenne) 35-50 Lèchefrite/ terre au four plaque à pâtisserie (retourner les aliments aux deux tiers de la cuisson si nécessaire) Légumes –...
-
Page 86: Nettoyage Et Entretien
FRANÇAIS Nettoyage et entretien NETTOYAGE REMARQUE : pendant les cuissons prolongées d'aliments à forte teneur en eau AVERTISSEMENT ! (par exemple, pizzas, légumes, etc.), de la Pour nettoyer votre appareil, n'utilisez en condensation risque de se former à l'intérieur aucun cas un appareil de nettoyage à la de la porte et sur le pourtour du joint. - Page 87 FRANÇAIS Éloignez les enfants du four pendant le ENTRETIEN déroulement de cette opération. Cette fonction brûle les éclaboussures AVERTISSEMENT ! produites à l'intérieur du four pendant une Munissez-vous de gants de protection. cuisson à environ 500 °C. Les restes de Assurez-vous que le four est froid avant saleté...
- Page 88 électriques et n’est pas destinée à être utilisée pour un éclairage de pièce (Règlement (CE) n° 244/2009 de la Commission). Ces ampoules sont disponibles auprès du centre d'entretien et de réparation agrée IKEA. Pour remplacer l'ampoule arrière 1. Débranchez le four.
-
Page 89: Ce Qu'il Convient De Faire Si
Si le four doit être réparé, adressez-vous au adressez-vous au centre d'entretien et de Centre d'entretien et de réparation agréé réparation agréé IKEA. IKEA (vous aurez ainsi la garantie que les Veuillez toujours spécifier : pièces défectueuses seront remplacées par •... -
Page 90: Caractéristiques Techniques
FRANÇAIS Caractéristiques techniques Type de produit : Four électrique encastrable Code d'identification du modèle : RAFFINERAD 203.009.17 RAFFINERAD 603.009.15 Nombre de cavités Type de chauffage Électrique Nombre de fonctions Volume utile. Calculé grilles porte-accessoires latérales et panneaux catalytiques déposés (l) -
Page 91: Installation
FRANÇAIS Caractéristiques techniques Les informations techniques sont situées sur la plaque signalétique à l'intérieur de l'appareil. Installation Après avoir déballé le four, contrôlez Préparation du meuble d'encastrement que l'appareil n'a pas été endommagé • Les meubles de cuisine adjacents au four pendant le transport et que la porte ferme doivent résister à... - Page 92 FRANÇAIS Retirez tous les accessoires du four et Dispositif de verrouillage du four faites-le chauffer à 200 °C pendant une Pour ouvrir la porte avec le dispositif de heure environ afin de faire disparaître verrouillage du four, reportez-vous à la les odeurs et les fumées qui se dégagent figure 1.
-
Page 93: Conseils D'utilisation Et Suggestions
FRANÇAIS Conseils D'utilisation Et Suggestions Comment lire le tableau de cuisson Pour vérifier si le gâteau est cuit, introduisez Le tableau indique la meilleure fonction un cure-dent au centre du gâteau. Si le cure- à utiliser pour un aliment donné, à cuire dent en ressort sec, le gâteau est cuit. - Page 94 FRANÇAIS Pizza Graissez légèrement la plaque pour obtenir une pizza au fond croustillant. Répartissez la mozzarella sur la pizza aux deux tiers de la cuisson. Fonction levage Il est conseillé de toujours couvrir la pâte avec un torchon humide avant de la mettre au four.
-
Page 95: Branchements Électriques
(visible effectuée par un électricien qualifié lorsque la porte est ouverte). uniquement. Adressez-vous au Centre d'entretien et de réparation agréé IKEA. Conseils pour la protection de l'environnement Élimination des emballages Conseils d'économie d'énergie Les matériaux d'emballage sont... -
Page 96: Garantie Ikea
FRANÇAIS GARANTIE IKEA (FRANCE) CONTRAT DE GARANTIE ET DE SERVICE Nota - En cas de recherche de solutions APRES-VENTE IKEA amiables préalablement à toute action en Décret n° 87-1045 relatif à la présentation justice, il est rappelé qu’elles n’interrompent des écrits constatant les contrats de garantie pas le délai de prescription. - Page 97 Pour mettre en oeuvre le service après- série LAGAN qui sont garantis pour une vente en cas de panne couverte par la durée de deux (2) ans, achetés chez IKEA à garantie contractuelle, ou pour obtenir compter du 1er août 2007.
- Page 98 à compter de la date d’achat chez l’appareil reconnu défectueux. IKEA par le client. Elle ne s’applique que Le prestataire de service désigné par dans le cadre d’un usage domestique. IKEA s’engage à tout mettre en oeuvre...
- Page 99 FRANÇAIS • Les pièces d’usure normale dites pièces IKEA. Le client doit vérifier ses colis et consommables, comme par exemple les porter IMPERATIVEMENT sur le bon piles, les ampoules, les filtres, les joints, de livraison des RESERVES PRECISES : tuyaux de vidange, etc. qui nécessitent indication du nombre de colis manquants un remplacement régulier pour le...
- Page 100 - correspondre à la description donnée N’hésitez pas à contacter le centre d’entretien par le vendeur et posséder les qualités et de réparation agréé IKEA pour : que celui-ci a présentées à l’acheteur 1. requérir la mise en oeuvre du service sous forme d’échantillon ou de modèle ;...
- Page 101 IKEA (étendues et limites, produits couverts), adressez-vous à votre magasin IKEA le plus proche. Adresse et horaires sur le site www.IKEA.fr, dans le catalogue IKEA ou par téléphone au 0825 10 3000 (0,15 €/mn).
- Page 102 Qui effectuera la réparation ? électrochimiques, la rouille, la corrosion ou Le réparateur agréé IKEA se chargera de la un dégât des eaux, y compris, notamment, réparation par le biais de son propre réseau les dommages causés par un excès de...
- Page 103 • Les frais liés à l’installation initiale de exclusif pour appareils IKEA l’appareil IKEA. N’hésitez pas à contacter un centre Si un prestataire de service IKEA ou un d’entretien et de réparation agréé IKEA partenaire contractuel autorisé répare pour : ou remplace l’appareil conformément à...
- Page 104 IKEA avec leur numéro Le nom et le numéro d’article (code à de téléphone respectifs. 8 chiffres) IKEA de chaque appareil acheté figurent également sur la preuve d’achat. Afin de mieux vous servir, nous vous Besoin d’une assistance supplémentaire ?
- Page 105 Uso quotidiano 1 14 Consigli per la salvaguardia Tabelle di cottura 1 19 dell'ambiente Pulizia e manutenzione GARANZIA IKEA Informazioni sulla sicurezza Importanza della sicurezza per sé e installazione. per gli altri. - Prima di qualsiasi intervento Questo manuale e l'apparecchio...
- Page 106 ITALIANO con una separazione dei e conoscenza inadeguate, solo contatti di almeno 3 mm in tutti se sono sorvegliati o se è stato i poli che consenta di scollegare loro insegnato come usare completamente l'apparecchio in l'apparecchio in condizioni di caso di sovratensione di categoria sicurezza e se sono a conoscenza III;...
- Page 107 ITALIANO sopra il pannello comandi. Non - Non toccare il forno durante il ciclo ostruire in nessun caso le aperture di pirolisi. I bambini devono essere di ventilazione. mantenuti a distanza dal forno - Usare guanti da forno per durante il ciclo di pirolisi (soltanto rimuovere pentole e accessori per forni con funzione Pirolisi).
-
Page 108: Descrizione Del Prodotto
ITALIANO Descrizione del prodotto Pannello comandi Ventola forno Ventola di raffreddamento (non visibile) Resistenza inferiore (non visibile) Protezione grill Porta del forno Resistenza superiore Connessione sonda carne Lampada posteriore Griglie laterali La ventola di raffreddamento può continuare a Impedisce il contatto diretto con il grill. Vi funzionare anche dopo lo spegnimento del forno. - Page 109 ITALIANO Inserimento di griglie e altri accessori Rimuovere la pellicola azzurra come all’interno del forno mostrato in figura. 1. Inserire la griglia orizzontalmente, con la parte rialzata “A” orientata verso l’alto (Fig. 1). Come allineare la leccarda alle guide telescopiche. Collocare la leccarda sulle guide telescopiche fissandola fra gli elementi di Fig.
-
Page 110: Elenco Funzioni 1
ITALIANO 1 10 Pannello comandi Manopola selezione funzioni Tasto di selezione/Conferma Manopola navigazione Nota: le due manopole sono a scomparsa. Fare pressione al centro delle stesse per estrarle dalla loro sede. Elenco funzioni Ruotando la manopola "Funzioni" in una posizione qualsiasi, il forno si attiva: il display visualizza le funzioni o i sottomenu associati a ciascuna di esse. -
Page 111: Descrizione Del Display
ITALIANO 1 1 1 Descrizione del display Visualizzazione delle resistenza attive Indicazione porta forno chiusa durante il durante le diverse funzioni di cottura ciclo di pulizia automatica Simboli riguardanti la gestione del Temperatura interna forno tempo: timer, durata di cottura, ora di Funzione pirolisi fine cottura, ora corrente Doratura... - Page 112 ITALIANO 1 12 Tabella Funzioni Forno Il forno è dotato di 4 livelli di cottura. Contarli partendo dal più basso. Funzione Descrizione della funzione SPEGNIMENTO Per interrompere la cottura e spegnere il forno. TERMOVENTI- Per cuocere contemporaneamente su due ripiani alimenti, anche LATO diversi, che richiedono medesima temperatura di cottura (es.: pesce, verdure, torte).
- Page 113 ITALIANO 1 13 Funzione Descrizione della funzione FUNZIONI SPECIALI Per velocizzare lo scongelamento degli alimenti. Posizionare gli alimenti sul livello intermedio. Si suggerisce di lasciare l’alimento nella sua confezione per impedire la disidratazione della SCONGELAMEN- superficie. Per mantenere caldi e croccanti cibi appena cotti (es: carni, fritture, sformati).
-
Page 114: Uso Quotidiano 1
ITALIANO 1 14 Uso quotidiano Selezione funzione cottura come descritto nel paragrafo precedente "Impostazione della temperatura/ potenza del grill". Sul display appare la scritta "PRE". Al raggiungimento della temperatura impostata, questa verrà sostituita dal relativo valore (es. 200°) accompagnato da un segnale 1. - Page 115 ITALIANO 1 15 allungheranno leggermente rispetto a quelli alla rovescia. Allo scadere del tempo riportati nella tabella di cottura. impostato sul display appare "FINE" e È possibile impostare l’ora di fine cottura viene emesso un segnale acustico. Per desiderata, ritardando l’avvio del forno interromperlo, premere il tasto (sul fino ad un massimo di 23 ore e 59 minuti a...
- Page 116 ITALIANO 1 16 Impostazioni si accede ad un sottomenu contenente Posizionando l'indice della manopola due funzioni automatiche di cottura per "Funzioni" in corrispondenza del simbolo "pane" e "pizza". si accede ad un sottomenu contenente Pane cinque impostazioni del display che è possibile modificare.
- Page 117 ITALIANO 1 17 Luminosità in base alla funzione selezionata, ma il Per modificare la luminosità dello schermo processo di cottura termina quando la procedere come segue: temperatura rilevata raggiunge il limite stimato della sonda carne impostato dal 1. Ruotare la manopola "Navigazione" cliente.
- Page 118 ITALIANO 1 18 sonda carne (nella parte inferiore destra del display): ruotare la manopola +/- e confermare con il tasto per avviare la cottura. La temperatura del forno e della sonda carne possono essere modificate Per avviare il ciclo di pulizia automatica del in qualsiasi momento durante la cottura.
-
Page 119: Tabelle Di Cottura 1
ITALIANO 1 19 Tabelle di cottura Alimenti Funzione Preriscal- Livello Temperatura Tempo Accessori damento (dal (°C) fondo) cottura (min) Torte a 160-180 30-90 Tortiera su lievitazione griglia 160-180 30-90 Liv. 3: tortiera su griglia Liv. 1: tortiera su griglia Torte ripiene –... - Page 120 ITALIANO Alimenti Funzione Preriscal- Livello Temperatura Tempo Accessori damento (dal (°C) fondo) cottura (min) Pane/pizza/ 190-250 15-50 Leccarda/ focaccia piastra dolci 190-250 25-50 Liv. 3: piastra dolci Liv. 1: leccarda Pane 180-220 30-50 Leccarda/ piastra dolci o griglia Pizza 220-250 15-30 Leccarda/ piastra dolci...
- Page 121 ITALIANO Alimenti Funzione Preriscal- Livello Temperatura Tempo Accessori damento (dal (°C) fondo) cottura (min) Agnello/ 190-200 70-100 Leccarda o vitello/manzo/ teglia su griglia maiale 1 kg Pollo/coniglio/ 200-230 50-100 Leccarda o anatra teglia su griglia 1 kg Tacchino/oca 190-200 80-130 Leccarda o 3 kg teglia su griglia...
- Page 122 ITALIANO Alimenti Funzione Preriscal- Livello Temperatura Tempo Accessori damento (dal (°C) fondo) cottura (min) Pollo arrosto 2 (media) 50-65 Liv. 2: griglia 1-1,3 kg (girare il cibo a due terzi della cottura) Liv. 1: leccarda con acqua 3 (alta) 60-80 Livello 2: girarrosto Liv.
- Page 123 ITALIANO Alimenti Funzione Preriscal- Livello Temperatura Tempo Accessori damento (dal (°C) fondo) cottura (min) Carni e patate 45-100 Liv. 3: teglia su griglia Liv. 1: leccarda o teglia su griglia Pesce e verdure 30-50 Liv. 3: teglia su griglia Liv. 1: leccarda o teglia su griglia Arrosti ripieni...
-
Page 124: Pulizia E Manutenzione
ITALIANO Pulizia e manutenzione PULIZIA NOTA: durante le cotture prolungate di alimenti con un elevato contenuto di acqua ATTENZIONE! (pizza, verdure ripiene, ecc.), si può formare Non usare assolutamente pulitrici a getto condensa all'interno della porta e sulla di vapore. guarnizione. - Page 125 ITALIANO raffreddato. Non attivare la funzione pirolisi Per rimuovere la porta dopo ogni cottura, ma soltanto in presenza di molto sporco o di fumi e cattivi odori generati sia in fase di preriscaldamento che di cottura. • Nel caso in cui il forno sia installato sotto ad un piano di cottura, accertarsi che durante il ciclo di autopulizia (pirolisi), i bruciatori o le piastre elettriche siano...
- Page 126 Usare solo lampade alogene da 40 W/230 V, tipo G9, T300 °C. La lampada usata nell'apparecchio è progettata appositamente per apparecchi elettrici e non è indicata per l'illuminazione della stanza (Regolamento della Commissione (CE) N. 244/2009). Le lampade sono disponibili presso il Centro Assistenza IKEA.
- Page 127 Qualora si renda necessaria una per accertarsi che l'inconveniente sia riparazione, rivolgersi ad un Centro stato ovviato. Assistenza IKEA (a garanzia dell'utilizzo di Se dopo i suddetti controlli il forno non pezzi di ricambio originali e di una corretta funziona correttamente, contattare il Centro riparazione).
- Page 128 ITALIANO Dati tecnici Tipo di apparecchio: forno elettrico ad incasso Identificazione modello: RAFFINERAD 203.009.17 RAFFINERAD 603.009.15 Numero di cavità Fonte di calore Elettrica Numero di funzioni Volume utile. Misurato con le griglie laterali e i pannelli catalitici rimossi. 1200 Superficie della teglia da forno più grande cm...
- Page 129 ITALIANO Dati tecnici Le informazioni tecniche sono riportate sulla targhetta matricola all'interno dell'apparecchio. Installazione Dopo aver disimballato il forno, controllare Preparazione del modulo di alloggiamento che l’apparecchio non sia stato danneggiato • I mobili della cucina adiacenti al forno durante il trasporto e che la porta si devono resistere al calore (min 90 °C).
- Page 130 ITALIANO Durante l'utilizzo Il dispositivo Blocco Porta può essere rimosso Non appoggiare pesi sulla porta in seguendo la sequenza di immagini (vedere quanto essi potrebbero danneggiarla. Fig. 2). Non aggrapparsi alla porta o appendere oggetti alla maniglia. Non coprire l'interno del forno con pellicola di alluminio.
- Page 131 ITALIANO Consigli d'utilizzo e suggerimenti Come leggere la tabella di cottura - Per capire se una torta lievitata è cotta, La tabella indica la funzione migliore inserire uno stecchino di legno nella parte da utilizzare per un determinato più alta del dolce. Se lo stecchino rimane alimento, da cuocere su uno o più...
- Page 132 ITALIANO Pizza Ungere leggermente le teglie per ottenere una pizza croccante anche sul fondo. Distribuire la mozzarella sulla pizza a due terzi della cottura. Funzione lievitazione Si consiglia di coprire sempre l’impasto con un panno umido prima di inserirlo in forno. I tempi di lievitazione in tale funzione si riducono di circa un terzo rispetto ai tempi di lievitazione a temperature ambiente (20-...
- Page 133 Rivolgersi al Centro anteriore del forno, ed è visibile quando si Assistenza IKEA. apre la porta. Consigli per la salvaguardia dell'ambiente Smaltimento imballaggio Consigli per il risparmio energetico Il materiale di imballaggio è...
- Page 134 LAGAN, nel qual caso la garanzia è di 2 copertura della garanzia. Il Servizio (due) anni. È necessario esibire lo scontrino Assistenza IKEA o il suo Partner di originale come documento comprovante Assistenza autorizzato tramite i rispettivi l’acquisto. Eventuali interventi di assistenza...
- Page 135 IKEA. • richiedere chiarimenti sull’installazione Tuttavia, qualora un fornitore di servizi degli elettrodomestici IKEA installati nelle IKEA o un suo partner autorizzato ripari o cucine IKEA sostituisca l’apparecchio nei termini della • richiedere informazioni sul funzionamento presente garanzia, il fornitore o il partner degli elettrodomestici IKEA.
- Page 136 È la prova del vostro acquisto ed è necessario esibirlo affinché la garanzia sia valida. Sullo scontrino sono riportati anche il nome e il codice articolo IKEA (8 cifre) per ogni apparecchiatura acquistata. Avete bisogno di ulteriore aiuto? Per qualunque informazione non relativa all’assistenza vi preghiamo di far...
- Page 137 BELGIË - BELGIQUE - BELGIEN NEDERLAND Telefoon: 09002354532 en/of 0900 BEL IKEA Telefoon/Numéro de téléphone/Telefon-Nummer: 02620031 1 Tarief: 15 cent/min., starttarief 4.54 cent Tarief/Tarif/Tarif: Lokaal tarief/Prix d’un appel local/Ortstarif en gebruikelijke belkosten Openingstijd: Maandag - Vrijdag 8.00 - 20.00 Openingstijd: Maandag t/m - Vrijdag 8.00 - 20.00...
- Page 140 4 0 0 0 1 0 7 7 4 8 4 1 18535 © Inter IKEA Systems B.V. 2015 AA-1514188-1...
Need help?
Do you have a question about the RAFFINERAD and is the answer not in the manual?
Questions and answers