
Related Manuals for ARC Audio KS125.2 MINI


Summary of Contents for ARC Audio KS125.2 MINI
- Page 1 MOTO SERIES Installtion guide For Harley Davidson Models- Road GLide Ultra Classic ElEctra Glide...
-
Page 2: Installation Instructions
Protect your investement It is always recommended that when you are installing your Arc Audio MPAK Series audio components to protect your motorcycle from potential damage and use a protective fender cover. This will reduce the risk of damage from falling tools or debris. -
Page 3: Step 4 - Removing The Front Fairing
Step 3- Running the main harness Figure 3A- A. Remove the main harness from the wire kit B. Route the unterminated end of the harness behind and over the fuel tanks outlet hose (See Figure 3A) and behind the front tank bracket (See Figure 3B) pull about half way thru and secure with a wire zip tie to Figure 3B- the main harness. - Page 4 ..Continued C. After you have removed the lights and all of the Figure 4D fastners in order to remove the fairing position your- self in front of the bike and carefully lift upward in the front of the fairing housing. Please note this will take some force as there are slots in inside the fairing that are supported by frame hooks (See Figure 4D and 4E) lift upward and the pull foward to remove...
- Page 5 F. Next pull the remainder of the main harness thru the opening in the center of the ferring (See Figure 5F) next to the motorcycles main wire harness. Then secure the main harness to the motorcycles factory wiring with wire zip ties (Provided) G.
-
Page 6: Step 6- Installing The Speakers
Speaker Installation Speaker Installation Step 6- Installing the Speakers Figure 6A- A. Remove the (3) T25 torx screws that hold the factory speaker plate in place. (See Figure 6A and 6B) B. With both speaker panels removed from the motorcycle remove the (4) #2 phillips screws from the speakers and seperate. - Page 7 M. If installing speakers only to the factory head unit connect the factory speaker wires to the new speakers. N. If connecting to a ARC Audio KS125.2 Mini Amplifier, now connect your newely installed speak- ers directly to the speaker outputs of the ampli-...
-
Page 8: Harley Davidson
Protect your investement It is always recommended that when you are installing your Arc Audio MPAK Series audio components to protect your motorcycle from potential damage and use a protective fender cover. This will reduce the risk of damage from falling tools or debris. - Page 9 Step 3- Running the main harness A. Remove the main harness from the wire kit Figure 3A- B. Unbolt the ECU mounting tray from the motorcycle frame and carefully lift up from its resting position to expose the battery and the battery terimnals. (See Figure 3A) C.
- Page 10 ..Continued C. After you have removed all of the hardware Figure 5A- carefully, while supporting the main fairing cover, remove the remaining center t25 bolt that you had previously reinstalled at the windshield mounting bracket and remove the front fai]ing and place aside in a safe place.
- Page 11 H. Next Plug in the Amplifiers 5 pin Hi Level Speaker input plug (Provided with Amplifier) (See Firugre 5H- Figrue 5H) and using the provided blue butt crimp connectors attach the provided speaker wire to the wires extending from the plug. Extend and route the leads as necessary to reach the motorcycles factory speaker wires from the radio near where the factory speakers connect.
-
Page 12: Speaker Installation
Speaker Installation Step 6- Installing the Speakers If you are only installing speakers please first read Figure 6A- Step 4 of this manual for instruction to remove the fairing. Then disconnect the factory speaker leads and proceed to step 6A. A. - Page 13 Harley Davidson Electraglide model it is recom- mended to retain the connection of the speakers to Figure - 7D the factory head unit and not to the KS125.2 Mini amplifier. For speaker replacement please proceed to the following steps. 1) Using a phillips head screwdriver, remove the 4 phillips head screws from the grills of both drivers.
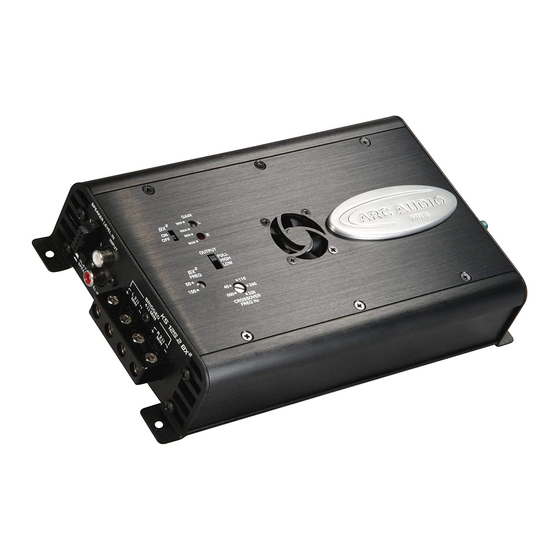
- Page 14 KS125.2 MINI Power output RMS @ 4 ohms 2 X 70 watts Power output RMS @ 2 ohms 2 X 125 watts Power output RMS @ 4 ohms Bridged 1 X 250 watts Transient Distortion (100W) <.05% @ 4ohms Frequency Response...
-
Page 15: Setting Gains
HD factory radio’s have been known WHEN USING ANY MPAK to clip (or distort) at higher oper- taing levels. ARC Audio recommends, KIT KIT. FAILURE TO DO but does not require that operation of the HD factory radio not be done... - Page 16 ARC AUDIO retailer. Upon inspection by ARC AUDIO should services be necessary under this warranty for any reason due to manufacture defects ARC AUDIO will, at its sole discretion, repair or replace the defective product with new or similar conditioned product at no charge.
Need help?
Do you have a question about the KS125.2 MINI and is the answer not in the manual?
Questions and answers