Table of Contents
Advertisement
Advertisement
Table of Contents

Subscribe to Our Youtube Channel
Related Manuals for VocoPro JAMCUBE


Summary of Contents for VocoPro JAMCUBE
- Page 1 JAMCUBE 4-Channel Portable P .A. System with Multi-Format Player...
-
Page 2: Table Of Contents
Table of Contents FCC Information ............3 Listening for a Lifetime ..........4 Safety Instructions ........... 5 Welcome ............... 6 Features and Specifications ........7 Before Getting Started ..........8 Getting Started ............9 Getting Connected Connecting to an Mp3 Player ....... 11 Connecting an External Player ...... -
Page 3: Fcc Information
FCC requirements. Modifications not expressly approved by 1. To ensure the finest performance, please read this Vocopro may void your authority, granted by the FCC, manual carefully. Keep it in a safe place for future reference. to use this product. -
Page 4: Listening For A Lifetime
Now itʼs time to consider how you can maximize the fun and excitement your equipment offers. VocoPro and the Electronic Industries Associationʼs Consumer Electronics Group want you to get the most out of your equipment by playing it at a safe level. One that lets the sound come through loud and clear without annoying blaring or distortion and, most importantly, without affecting your sensitive hearing. -
Page 5: Safety Instructions
Safety Instructions CAUTION 9. Heat - The appliance should be situated away from heat sources such as radiators, heat registers, stoves, or other appliances (including amplifiers) RISK OF SHOCK that produce heat. CAUTION: To reduce the risk of electric shock, do 10. -
Page 6: Welcome
Service directory! a KJ Service directory! We look forward to hearing you sound like a PRO, with VocoPro, the We look forward to hearing you sound like a PRO, with VocoPro, the singer’s ultimate singer’s ultimate choice. choice. -
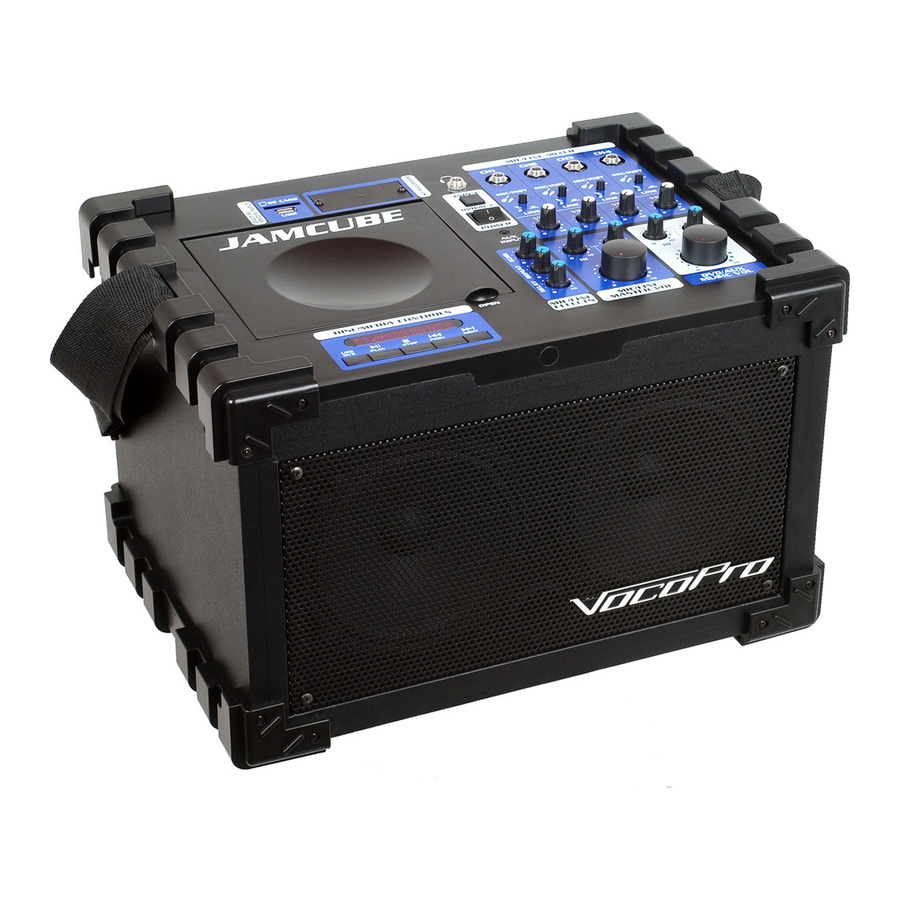
Page 7: Features And Specifications
JAMCUBE (4-Channel Portable P .A. System with Multi-Format Player) Your Portable P .A. On The Go! Need a “to go” P .A. system that’s easy to transport and set up? Vocopro’s all new JamCube has got you covered! The JamCube is lightweight, full-featured, and with its adjustable shoulder strap, super easy to transport. -
Page 8: Before Getting Started
Before Getting Started Thank you for purchasing the JAMCUBE system. The JAMCUBE will provide years of reliability and high quality entertainment for you if used properly. Please read this manual carefully before using your JAMCUBE to ensure best performance. Unpacking the JAMCUBE: Carefully remove the JAMCUBE from its carton. -
Page 9: Getting Started
Getting Started Connecting the Power Cable Plug the supplied AC power cable into the AC inlet after all other connections are complete and then plug the AC power cable to an AC wall outlet. CAUTION: Use the supplied AC cable. Do not use other AC power cables as doing so may result in fire hazard or electrical shock. -
Page 10: Getting Connected
Getting Connected Quickstart Diagram JAMCUBE TOP PANEL Connect your microphones, instruments, and portable media devices as shown. Microphones Guitar Bass JAMCUBE Laptop or Mp3 player JAMCUBE REAR PANEL Connect video and audio devices as shown. Choose the video connection that best suits your needs. -
Page 11: Connecting To An Mp3 Player
Connecting to an MP3 player (or other device) JAMCUBE to the JAMCUBE You can use the JAMCUBE as an amplifier for your MP3 player, laptop or other audio device with an 1/8” output. What you will need: • 1/8” cable •... -
Page 12: Connecting A Microphone Or Instrument
1. If connecting a handheld microphone, connect the 1⁄4” end of the microphone cable to an available 1⁄4” input on the top panel of the JAMCUBE. 2. If connecting a wireless microphone system, plug the 1⁄4” end of the line output to an available 1⁄4” input on the top panel of the JAMCUBE. -
Page 13: Connecting A Tv Or Monitor
Getting Connected Connecting a TV or Monitor to the JAMCUBE The JAMCUBE has three ways to output video. Choose the method that best suits your needs. Using RCA video output What you will need: • RCA video cable • TV or Monitor with RCA inputs To connect to a TV or Monitor using RCA video output: 1. -
Page 14: Descriptions And Functions
DVD: DISC/SD/USB AUX: 1/8” AUX/REAR RCA INPUT 14. POWER SWITCH - Use this switch to power the JAMCUBE ON or OFF. 15. AUX INPUT (1/8”) – Connect audio from an audio source (PC/MP3 player, etc) with an 1/8” audio cable. - Page 15 Descriptions and Functions Top Panel JAMCUBE 16. ECHO CONTROL – This controls the level of echo effect applied on all four mic inputs. Rotate clockwise to increase the amount of echo effect applied to the signal, and counter-clockwise to decrease.
- Page 16 Descriptions and Functions Top Panel JAMCUBE 24. MIC/LINE MASTER VOL CONTROL – Use this control to adjust the volume for all MIC/LINE CH.1-4. This is a master-level control, allowing for a one-touch volume adjustment for all the MIC/LINE channels at once. Rotate clockwise to increase the MIC/LINE master volume, and counter-clockwise to decrease.
-
Page 17: Rear Panel
NOTE: Replace only with type of fuse listed on back panel. 9. AC POWER INPUT – Connect the power cable here. 10. SPEAKER MOUNT - Use this to mount the JAMCUBE on a speaker stand with a 1 3/8” diameter shaft. -
Page 18: Remote Control
Descriptions and Functions Remote Control 1. SUBTITLE – Use this button to select subtitles when viewing a DVD movie. NOTE: This button only works with DVD discs. Not all DVDs contain subtitles. 2. MUTE – Press this button to MUTE audio output. 3. - Page 19 NOTE: The disc must be stopped in order to access the VCD View Menu. 18. SETUP – Use this button to enter the main SETUP menu for the JAMCUBE. 19. N/P – Use this button to select between PAL/NTSC video modes.
- Page 20 Descriptions and Functions Remote Control 22. TITLE – Use this button to go to the title screen of a DVD disc. 23. R/L – Use this button to CANCEL VOCAL on a MULTIPLEX disc. This button toggles between left channel, right channel and stereo outputs. Selecting MONO L will remove the R channel audio and play the L channel audio on both sides Selecting MONO R will remove the L channel audio and play the R channel audio on both sides.
-
Page 21: Sdr-3 (Optional Accessory)
Use the optional SDR-3 to capture audio direct to SD card. Once recorded, the audio can then be played instantly. Of course, you can also remove the SD card and transfer the MP3 files to your computer for further editing and processing. JAMCUBE SDR-3 SDR-3... - Page 22 Descriptions and Functions SDR-3 Installation 1. Turn OFF the JAMCUBE. 2. Unscrew the two retaining screws that hold the slot cover in place. 3. Remove plate and store it in a safe place. 4. Attach the cable to the back of the SDR-3.
-
Page 23: Receiver (Optional Accessory)
Descriptions and Functions VM-1 Receiver (optional accessory) 1. ANTENNA CONNECTORS - Connect each antenna to each connector. 2. CH1 VOL CONTROL - Turn this dial clockwise to increase the volume of wireless channel 1, turn counter-clockwise to decrease. 3. RF LED - This LED will light when the wireless mic 1 is switched on. 4. - Page 24 Descriptions and Functions Installing a Wireless Module 1. Turn OFF the JAMCUBE. 2. Remove the two screws that hold the slot cover in place. 3. Carefully detach the connector cable from the slot cover. NOTE: Make sure the cable does not fall back into the unit. It may be necessary to temporarily secure the cable to the unit with tape while there is no module in the slot.
-
Page 25: Microphone (Optional Accessory)
Descriptions and Functions VM-1 Microphone (optional accessory) 1. GRILL - Protects the microphone cartridge and helps reduce breath sounds and wind noise. 2. POWER BUTTON - Used to turn the microphone ON/OFF or put it in STANDBY mode. 3. BATTERY CAP - Removable cap hides and protects the microphone battery. Microphone Battery Installation 1. -
Page 26: General Operations
SD card: 1. Plug a USB flash drive or SD card into the appropriate slot on the top panel of the JAMCUBE. 2. Set the INPUT (DVD/AUX) BUTTON to DVD. 3. Use the USB/DVD BUTTON to select the slot you are playing from (USB/SD). - Page 27 General Operations Using the Program Feature You can use the PROGRAM feature to set up a custom playlist of tracks. NOTE: You can only include tracks from the currently selected source (DISC, USB, SD) to the program list. 0001 To Create a Program: 1.
- Page 28 General Operations Setting Surround Sound You can apply a surround sound setting to enhance the sound of source music. The surround settings are designed to simulate different acoustical settings: CONCERT, CHURCH, PASSIVE, WIDE and LIVE. NOTE: Surround sound does not apply to microphone/music instrument audio on CH 1-4. To apply a surround sound setting using the remote control: 1.
-
Page 29: System Setup Menu
The password to lock or unlock RATING setting is 0000. If you are a parent and want to limit the types of DVDs viewed with the JAMCUBE, type this password using the NUMBER keys on the remote, and press ENTER. You will see the padlock icon either open or close, affecting the ability of the user to make a selection in the RATING mode. - Page 30 This sets the default main menu language when playing DVDs. Choose from the list provided. NOTE: Available DVD menu languages may vary. 1. AUDIO OUT When connecting the JAMCUBE to an external sound system with digital inputs, choose between: SPDIF/OFF to disable digital audio output SPDIF/RAW for Dobly 5.1 SPDIF/PCM for digital 2-CH output 2.
- Page 31 System Setup Menu 1. OP MODE There are two operating modes for the Dolby Digital decoder: LINE OUT and RF REMOD. LINE OUT – Select for standard line-level output RF REMOD – Select for an increase in the output level 2.
-
Page 32: Troubleshooting
• Make sure the INPUT SELECTOR button is set to DVD. • Make sure the USB/DVD button is set to the correct device. • Make sure the files on the device are compatible with the JAMCUBE: MP3, AVI, JPG, VOB No Picture •... - Page 33 Notes...
- Page 34 Notes...
- Page 35 Notes...
- Page 36 JAMCUBE Owner’s Manual © VocoPro 2012 v1.0608 www.vocopro.com...
Need help?
Do you have a question about the JAMCUBE and is the answer not in the manual?
Questions and answers