Table of Contents
Advertisement
Available languages
Available languages
Multi-Channel IN-OUT Thermo-Hygrometer
with Cable Free Sensor and RF Clock
MODEL: RMR132HG
USER MANUAL
INTRODUCTION
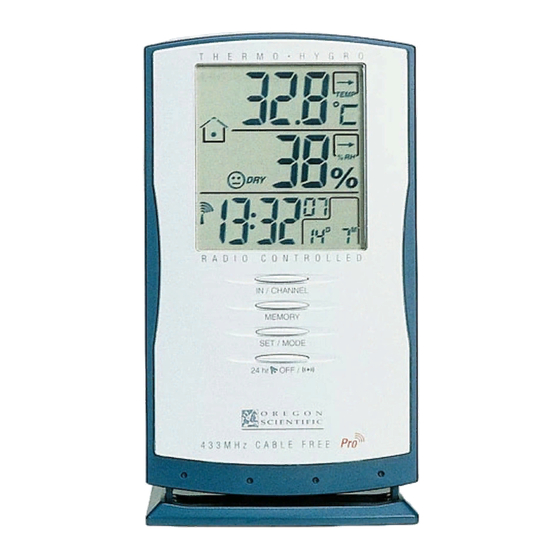
Congratulations on your purchase of the RMR132HG
Multi-Channel In-Out Thermo-Hygrometer with 433MHz cable
free sensor and radio-controlled calendar clock.
The basic package comes with a main unit, which is the
temperature and calendar clock station, and a remote unit, the
Thermo-Hygrometer sensor.
The main unit has large read-outs for indoors temperature and
humidity, calendar clock, temperatures and relative humidity
collected and transmitted by the remote unit. The main unit can
support up to
3
remote units.
The main unit is capable of keeping track of the maximum and
minimum recordings of different sites. And no wire installation is
required and the RMR132HG operates at 433MHz.
As for the calendar clock, it is radio-controlled. It automatically
synchronizes its current time and date when it is brought within an
approximate 1500km radius of the radio signal generated from
Frankfurt, Germany (DCF77).
You can also set the calendar clock manually when it is off range.
Other features include 4-language display, 4-step crescendo dual
alarms and interchangeable display modes.
MAIN FEATURES
A
B
C
D
E
J
K
L
M
N
R
1
I
H
G
F
O
P
Q
S
Advertisement
Table of Contents

Related Manuals for Oregon Scientific RMR132HG


Summary of Contents for Oregon Scientific RMR132HG
- Page 1 Cable Free Sensor and RF Clock MODEL: RMR132HG USER MANUAL INTRODUCTION Congratulations on your purchase of the RMR132HG Multi-Channel In-Out Thermo-Hygrometer with 433MHz cable free sensor and radio-controlled calendar clock. The basic package comes with a main unit, which is the temperature and calendar clock station, and a remote unit, the Thermo-Hygrometer sensor.
- Page 2 A. THREE-LINE LCD DISPLAY TEMPERATURE & RELATIVE HUMIDITY ALARM : K. [ L ] BUTTON Facilitates easy reading of remote and indoors temperature- humidity readings and calendar clock Sets the readings for the upper or lower temperature and B. [ ] BATTERY-LOW INDICATOR humidity of individual channels Activates when the remote-sensor or main unit battery power...
-
Page 3: Before You Begin
A. TWO-LINE LCD FEATURES: REMOTE Displays the current temperature and humidity monitored by THERMO-HYGRO SENSOR the remote unit B. LED INDICATOR Flashes when the remote unit transmits a reading ° ° F SLIDE SWITCH Selects between Centigrade (°C) and Fahrenheit (°F) D. - Page 4 3. Place the main unit as close as possible next to the remote unit, reset the main unit after installing batteries. This will ensure easier synchronization between the transmission and reception of signals. 4. Position the remote unit and main unit within effective transmission range, which, in usual circumstances, is 20 to 30 meters.
-
Page 5: Low Battery Warning
HOW TO USE THE TABLE STAND OR WALL MOUNTING The main unit has a removable table stand, which when connected, can support the unit on a flat surface. Or you can remove the stand and mount the unit on a wall using the recessed screw hole. As for the remote unit, it comes with a wall-mount holder and a removable stand. -
Page 6: The Reset Button
Remote unit GETTING STARTED Wall-mount Table Stand Once batteries are placed in a given remote sensor unit, it will start transmitting information at 40-second intervals. Also, for approximately a 3-minute duration, the main unit will automatically search for signals once batteries are installed. Upon successful reception, the individual channel temperature reading will be displayed on the top line and the respective humidity reading on the bottom line. -
Page 7: Kinetic Wave Display
HOW TO CHECK REMOTE AND INDOOR HOW TO READ THE TEMPERATURE & HUMIDITY KINETIC WAVE DISPLAY Display of readings from a remote sensor or the main unit is a 1- The kinetic wave display shows the signal receiving status of the step procedure. -
Page 8: Remote Sensor Scanning
TEMPERATURE AND REMOTE SENSOR SCANNING HUMIDITY TREND INDICATORS The unit can be set to automatically scan and display readings from the remote sensors and indoor readings. When the remote-sensor The temperature-trend and humidity-trend indicators show the mode is active, the display will show the readings from one channel trends of collected readings. - Page 9 2. Press L to set the temperature or humidity limit. Each press To clear the memory: will increase increments by degree or percentage. Press and • Press and hold MEMORY for 2-seconds. hold the button for a rapid-scrolling sequence by increments If you press MEMORY now, the maximum and minimum of 5.
-
Page 10: Transmission Collision
(TEMP % RH AL) CALENDAR CLOCK DISPLAY MODES the alarm sound will stop. The RMR132HG supports four display modes in the sequence of: DISCONNECTED SIGNALS MODE 1. Local Time If without obvious reasons the display for a particular channel goes blank, press IN/CHANNEL &... -
Page 11: About Radio Reception
Day, Month calendar clock once it is brought within range of the Frankfurt DCF77 radio signal. When the RMR132HG is within range, its radio-control mechanism will override all manual settings. When the unit is receiving radio signal, the radio reception signal will start to blink. - Page 12 For the second time zone, which is indicated by the ZONE ICON, enter the hour offset using the[L] or [M]buttons and the RMR132HG will calculate the second time accordingly. If there is an item you do not wish to change, simply press [SET/MODE] to bypass the item.
-
Page 13: How To Stop An Alarm
HOW TO STOP AN ALARM TIME ZONE AND OFFSET TABLE To stop an alarm, you can use either [24 hr OFF / ((•))] or [AL ON/OFF]. To stop an alarm from ringing on the same day, press [24HR OFF / ((•))] or [AL ON/OFF ] once. Note that the alarm is still armed and will go off at the set time the following day. -
Page 14: About Oregon Scientific
(E, D, F, I) We hope you will find all the information you need on our website, Second time zone with date and day however if you'd like to contact the Oregon Scientific Customer Care department directly, please visit www2.oregonscientific.com/ 2-minute crescendo alarm service/support or call 949-608-2848 in the US. -
Page 15: Ec Declaration Of Conformity
Additional information: EC-DECLARATION OF CONFORMITY The product herewith complies with the requirements of the Low Voltage Directive 73 / 23 / EC, the EMC Directive 89 / 336 / EC This product contains the approved transmitter module that com- and carries the CE marking accordingly. plies with the essential requirements of Article 3 of the R&TTE 1999 / 5 / EC Directive, if used as intended and the following stan- dards have been applied:... - Page 16 Bedienungsanleitung Zusätzlich verfügt das Gerät über vier Anzeigesprachen, einen 4- stufigen, dualen Crescendo-Alarm und umschaltbare Anzeigemodi. EINFÜHRUNG Wir gratulieren Ihnen zum Kauf des RMR132HG Mehrkanal- Innen-Aussen-Thermo-Hygrometers mit kabellosem 433MHz Sensor und Kalender-Funkuhr. In der Grundkonfiguration besteht das System aus einem Basisgerätes, daß...
- Page 17 A. DREI-ZEILIGE LCD-ANZEIGE MERKMALE DER EMPFANGSEINHEIT Erleichtert das Ablesen der Innen- und Außentemperatur sowie der Kalenderuhr. B. [ ] BATTERIESTAND-INDIKATOR Erscheint, wenn die Batterien des externen Sensors, oder die Batterien des Basisgerätes schwächer werden. C. ZEITSIGNAL-EMPFANGSINDIKATOR [ ] Zeigt den Empfang eines Zeitsignals über Funk an. D.
- Page 18 J. AUFHÄNGE-ÖSE S. HERAUSZIEHBARER STANDFUSS Zur Wandaufhängung des Empfangsgerätes. Zur Aufstellung des Empfangsgerätes auf einer ebenen Oberfläche. TEMPERATUR- UND LUFTFEUCHTIGKEITSALARM: K. [ L ] TASTE EIGENSCHAFTEN DER DRAHTLOSEN Auswahl der Grenzwerte für die obere- und untere SENSOREN Grenztemperatur, und der Luftfeuchtigkeit für die einzelnen Kanäle.
- Page 19 B. LEUCHTDIODEN-INDIKATOR 2. Legen Sie zuerst die Batterien in die Sendeeinheiten ein, bevor Sie die Batterien in die Empfangseinheit einlegen. Blinkt während der externe Sensor selne Messdaten an das Basisgerät sendet. 3. Plazieren Sie die Empfangseinheit so nahe wie möglich bei °...
- Page 20 3. Stellen Sie die Einheit der Temperaturanzeige (°C/°F) mittels VORBEREITUNG DER des entsprechenden Wahlschalters ein. EMPFANGSEINHEIT 4. Legen Sie die Batterien entsprechend den Polaritätsangaben ein, wie im Batterienfach angegeben. 5. Setzen Sie die Batterienfach-Abdeckung wieder auf, und ziehen Sie die Schrauben fest. Wechseln Sie die Batterien aus, wenn der Batterieanzeige für einen 1.
- Page 21 Sendeeinheit WANDAUFHÄNGUNG ODER Wandaufhängung Tischaufstellung TISCHAUFSTELLUNG Die Empfangseinheit ist mit einem herausziehbaren Standfuss ausgerüstet, der zur Aufstellung an der Unterseite eingerastet und das Gerät damit auf einer ebenen Fläche aufgestellt werden kann. Die Öse auf der Rückseite der Empfangseinheit dient zur Wandaufhängung.
- Page 22 Signalempfang manuell einleiten: Das Wellensymbol zeigt die Abtastung des jeweils eingestellten Aussensensors an. • Halten Sie [IN/CHANNEL] und [MEMORY] 2 Sekunden lang gedrückt, um manuell ein 3 Minuten dauerndes Abtastintervall einzuleiten. Anzeigen der vom Basisgerät gemessenen Temperatur/ Diese Funktion ist besonders dann nützlich, wenn Sie die Luftfeuchtigkeitswerte: Übertragung und den Empfang der von den externen Sensoren •...
- Page 23 ABLESEN DES KINETISCHEN TEMPERATUR ODER "WELLEN"-INDIKATORS LUFTFEUCHTIGKEITSTENDENZ Der "Wellen"-Indikator zeigt den Status des Basisgerätes im Bezug Der Temperatur- oder Luftfeuchtigkeitstendenz-Indikator zeigt den auf den Empfang der Signale an. Es können drei verschiedene Temperaturverlauf der gemessenen Werte am Aufstellungsort eines Anzeigen erfolgen: Sensors an.
- Page 24 2. Betätigen Sie MEM einmal, um die Maximaltemperaturwerte ANZEIGE DER EXTERNEN SENSOREN a n z u z e i g e n , u n d e i n z w e i t e s M a l , u m d i e Minimaltemperaturwerte anzuzeigen.
- Page 25 Die Anzeige für Maximal-Minimalwerte schreitet wie folgt fort: Wenn Sie den Luftfeuchtigkeitsgrenzwert erstmals einstellen, erscheint 2% für den unteren Grenzwert, und 98% für den oberen Grenzwert. Andernfalls erscheinen die zuletzt eingestellten Werte. Anzeigesequenz Entsprechende Anzeige 3. Wi e d e r h o l e n S i e d i e S c h r i t t e , u m d e n o b e r e n HI/LO einmal betätigen RUFT MAXIMAL-Temperaturwert ab Luftfeuchtigkeitsgrenzwert, und den unteren Temperatur- und...
- Page 26 Störung vorüber ist. [HI/LO], [L], [ON/OFF] , und der Alarm wird abgeschaltet. (TEMP % RH AL) ANZEIGE-MODI DER FUNKUHR MIT DATUM Ihr RMR132HG ermöglicht vier unterschiedliche Anzeigemodi von KEIN SIGNAL VON DEN EXTERNEN Uhrzeit und Datum: SENDENEINHEITEN MODUS 1. Normalzeit Falls die Übertragung der extern gemessenen Temperaturen ohne...
- Page 27 DES ZEITSIGNALS Stunde, Minute Wochentag Tag, Monat Das Gerät RMR132HG ist so konstruiert, daß die Kalenderuhr automatisch synchronisiert wird, sobald sie sich innerhalb der Reichweite des Frankfurter DCF77-Funksignals befindet. Für einen guten Empfang des Zeitsignals sollten Sie das RMR132HG nicht in der Nähe von metallischen Gegenständen oder elektrischen Geräten aufstellen, um Störungen möglichst...
-
Page 28: Manuelle Einstellung
EINSTELLEN UND AKTIVIEREN DER ALARMFUNKTIONEN MANUELLE EINSTELLUNG Ihr RMR132HG ist mit zwei Alarmfunktionen ausgestattet. Sie Drücken Sie die Taste [SET/MODE] drei Sekunden lang, um die können wahlweise beide Alarmzeiten einstellen oder unabhängig Uhr manuell einzustellen. Die Anzeige schaltet in den Anzeige- voneinander aktivieren. - Page 29 jedoch aktiviert und ertönt am nächsten Tag zur eingestellten Zeit neu. Einstellen der Alarmzeit: Wenn Sie die Taste ALARM EIN/AUS (AL ON/OFF) danach noch 1. Wählen Sie mit der Taste einmal betätigen, wird die Alarmfunktion vollständig deaktiviert. [24 hr OFF / ( )] die Alarmfunktion 1 oder 2.
-
Page 30: Technische Daten
Über OREGON SCIENTIFIC Externer Thermo-Hygro-Sensor Besuchen Sie unsere Website (www.oregonscientific.de) und Betriebstemperaturbereich : -20.0°C bis +60.0°C erfahren Sie mehr über unsere Oregon Scientific-Produkte wie zum (-4°F bis 140.0°F) Beispiel Digitalkameras, MP3-Player, Kinderlerncomputer und Auflösung : 0,1°C (0,2°F) Spiele, Projektionsfunkuhren, Produkte für Gesundheit und Fitness, Wetterstationen und Digital- und Konferenztelefone. - Page 31 Zusätzliche Information: EG-Konformitätserklärung Damit ist das Produkt konform mit derNiederspannungsrichtlinie 73 / 23 / EG, der Richtlinie für elektromagnetische Verträglichkeit Dieses Produkt enthält das genehmigte Sendemodul, welches bei 89 / 336 / EG und entspricht den Anforderungen des Artikels 3 der bestimmungsgemäßer Verwendung den grundlegenden R &...
- Page 32 La unidad principal es capaz de registrar la temperatura máxima y mínima de diferentes lugares. Y no se necesita ninguna instalación de cable. Dado que el RMR132HG funciona a 433MHz, puede utilizarse en los Estados Unidos y en la mayoría de los países del continente europeo.
- Page 33 A. PANTALLA LCD DE TRES LÍNEAS J. AGUJERO PARA MONTAJE EN PARED Facilita la visión de las lecturas de la temperatura exterior e Para montar la unidad principal en una pared interior, de la humedad y del reloj almanaque. ALARMA DE TEMPERATURA Y HUMEDAD RELATIVA: B.
-
Page 34: Antes De Empezar
A. LCD DE DOS LíNEAS FUNCIONES: SENSOR TERMO- Muestra la temperatura y humedad actuales recogidas por la HIGROMÉTRICO REMOTO unidad remota B. INDICADOR LED Parpadea cuando la unidad remota transmite una lectura ° ° C. INTERRUPTOR PARA SELECCIONAR ENTRE Selecciona entre grado Centígrado (°C) y Fahrenheit (°F) D. - Page 35 3. Coloque la unidad principal tan cerca como sea posible de la unidad remota, reajuste la unidad principal después de instalar las pilas. Esto asegurará una sincronización más fácil entre la transmisión y recepción de señales. 4. Coloque la unidad remota y la unidad principal dentro del área de transmisión efectiva, que en circunstancias normales, es de 20 a 30 metros.
- Page 36 COMO USAR EL SOPORTE DE MESA O LA MONTURA DE LA PARED La unidad principal tiene un soporte de mesa retractable, que cuando se abre, puede apoyar la unidad sobre una superficie plana. O puede cerrar el soporte y montar la unidad en la pared usando el agujero para el tornillo.
-
Page 37: Procedimientos Preliminares
Unidad remota mientras que la lectura de humedad respectiva aparecerá en la línea inferior. La unidad principal actualizará automáticamente sus Montura de la pared Soporte de Mesa lecturas a intervalos de 40 segundos aproximadamente. Si no se recibe ninguna señal, la pantalla mostrará espacios “ --- ” en blanco y el icono de onda cinética no se mostrará. - Page 38 COMO LEER LA MUESTRA Icono de DE LA ONDA CINETICA onda cinética La onda cinética muestra el estado de la señal recibida de la unidad Pantalla Pantalla Pantalla principal. Hay dos formas posibles: Pantalla de Pantalla remota remota remota designada interior Canal dos Canal uno...
- Page 39 TENDENCIA DE TEMPERATURA Y EXPLORACIÓN DE LOS SENSORES HUMEDAD REMOTOS El indicador de tendencia de temperatura y humedad en pantalla Se puede ajustar la unidad para explorar y mostrar automáticamente muestra la tendencia de las lecturas agrupadas en ese lugar remoto las lecturas de los sensores remotos.
- Page 40 Para borrar la memoria: Para establecer una alarma de temperatura o humedad alta o baja: 1. Seleccionar la visualización de la temperatura/humedad actuales o la memoria de máxima. 1. Pulsar HI/LO, el canal 1 aparecerá en la pantalla. 2. Pulsar L para establecer el límite de temperatura o humedad. 2.
- Page 41 Si se selecciona otro canal distinto del canal uno, cuando la alarma SEÑALES DESCONECTADAS se activa, la pantalla cambiará al canal 1 y destellará. Si se deja sin tocar, la alarma se activará durante 1 minuto. Pulsar En el caso de que sin razones obvias la pantalla queda en blanco [HI/LO], [L], [ON/OFF] IN/CHANNEL, MEMORY, tecla para...
-
Page 42: Recepcion De Radio
Del Segundo Uso Horario MODOS DE VISUALIZACION DEL RELOJ ALMANAQUE Hora, Minuto Día-de-la-semana Día, Mes RMR132HG soporta cuatro modos de visualización en la secuencia de: MODO 1. Hora Local Hora, Minuto Segundo Día, Mes Cada vez que se presiona el botón [SET/MODE], la pantalla cambiará... -
Page 43: Ajuste Manual Del Reloj
[L] y interferencias. [M] y el RMR132HG calcula el segundo huso horario de la debida Si desea desactivar la función de recepción automática, presione el forma. - Page 44 De esta manera, la alarma seguirá activada y sonará al día siguiente a la hora fijada. RMR132HG tiene dos alarmas: ALARMA 1 Y ALARMA 2, las Para desactivar la alarma completamente, pulse [AL ON/OFF ] cuales se pueden seleccionar juntas o separadas.
-
Page 45: Especificaciones
Humedad relativa Gama de medición : 25% HR a 90% HR TABLE DE HUSOS ORARIOS Unidad termo-higrométrica remota Gama de funcionamiento prevista : -20,0°C a 60,0°C (-4,0°F a 140,0°F) Resolución de temperatura : 0,1°C a (0,2°F) Compensación de temperatura : -20.0°C a +60.0°C (4.0°F a 140.0°F) Humedad relativa Gama de medición : 25% HR a 90% HR Reloj de control por radio... -
Page 46: Sobre Oregon Scientific
El uso eficaz de espectro de frecuencia de radio Visite nuestra página web (www.oregonscientific.com) para conocer (Artículo 3.2 de la Directiva R&TTE) más sobre los productos de Oregon Scientific tales como: Reproductores MP3, juegos y productos de aprendizaje electrónico el standard(s) aplicado para niños, relojes de proyección, productos para la salud y el deporte,... - Page 49 L’appareil principal peut garder la trace des températures maximum et minimum dans différents sites. Aucune pose de câble n’est requise. Comme le RMR132HG fonctionne sur 433MHz, il peut être utilisé aux Etats-Unis et dans la plupart des pays d’Europe Continentale.
- Page 50 A. AFFICHAGE LCD TROIS LIGNES J. COUVERCLE DU DOS Permet de lire facilement les relevés de température et Plaque arrière de l’appareil principal. d'humidité des sondes à distance et intérieures et la pendule ALARME DE TEMPERATURE ET D'HUMIDITE RELATIVE : calendrier.
- Page 51 S. PIED REPLIABLE A. LCD DEUX LIGNES Pour poser l’appareil principal sur une surface plane. Affiche la température et l’humidité actuelles relevées par l’appareil à distance. B. TEMOIN LED CARACTERISTIQUES: SENSEUR THERMO-HYGRO Clignote lorsque la sonde transmet des indications. ° °...
- Page 52 3. Placez l'unité déportée le plus près possible de l'unité principale, puis effectuez une remise à zéro (après avoir installé les piles). Ceci permettra une meilleure synchronisation entre l'émission et la réception des signaux. 4. Positionnez la sonde et l'unité principale à l'intérieur du rayon de communication, une distance d'environ 20 à...
- Page 53 La sonde est muni d'un support mural et d'un socle amovible. Positionnez l'unité à l'aide de l'un ou l'autre. Unité principale Fixation murale Socle 3. Refermez le compartiment à piles. Lorsque le témoin d'usure des piles de la température intérieure s'allume, remplacez les piles.
-
Page 54: Mise En Marche
TOUCHE DE REMISE A ZERO COMMENT VERIFIER LES TEMPERA- TURES ET HUMIDITES EXTERIEURES ET Cette touche n'est utilisée qu'en cas de fonctionnement défectueux INTERIEURES ou de panne. Enfoncez la touche à l'aide d'un objet à pointe arrondie. Tous les éléments programmés seront remis à leurs valeurs par L’affichage des relevés d’un senseur à... - Page 55 En cas de non-réception sur un canal ou un autre pendant plus de 15 minutes, des tirets “ --- ” s’afficheront jusqu’à réception des Niveau relevés. Vérifier le senseur à distance pour s’assurer qu’il est bien fixé et que le canal a été correctement sélectionné. Alternativement, Humide Confortable appuyer sur [IN/CHANNEL] et [MEMORY] pendant 2 secondes...
- Page 56 Pour annuler la mémoire : BALAYAGE DU SENSEUR A DISTANCE 1. Sélectionner l’affichage de température/humidité actuelles ou l’affichage de mémoire maximum. L’appareil peut scanner et afficher automatiquement les relevés des senseurs à distance. Quand le mode de senseur à distance est 2.
- Page 57 Pour régler une alarme de température ou d’humidité déclenche, l’affichage passera au canal 1 et clignotera. Si elle n’est superieure ou inferieure : pas éteinte préalablement, l’alarme sonnera pendant une minute. 1. Appuyer sur HI/LO pour afficher le canal 1. Appuyez sur [IN/CHANNEL], [MEMORY], [HI/LO], [L], [ON/OFF] 2.
- Page 58 PENDULE CALENDRIER INTERRUPTION DES SIGNAUX Le RMR132HG supporte quatre modes d’affichage dans la Si l’affichage d’un canal particulier disparaît sans raison apparente, séquence suivante : appuyez sur [CHANNEL] et [MEMORY] pour entreprendre une recherche immédiate. Si cela ne donne aucun résultat MODE 1.
-
Page 59: Reception Radio
L’appareil ne répondra pas aux signaux DCF77. radio. Quand le RMR132HG se trouve dans le rayon d’émission, son Pour réactiver cette caractéristique, appuyez sur [L] pendant trois mécanisme radio-piloté surpasse tous les réglages manuels. L’heure secondes. Le signal de réception radio se mettra à clignoter pour se mettra en marche à... - Page 60 MANUELLEMENT ARMER LES ALARMES Pour régler la pendule manuellement, appuyez sur [SET/MODE] Le RMR132HG possède deux alarmes, l’ALARME 1 et pendant trois secondes. L’affichage retournera à MODE 1, et les l’ALARME 2. Elles peuvent être appelées ensemble ou chiffres des heures se mettront à clignoter.
- Page 61 5. Utiliser uniquement des piles neuves du type préconisé dans le COMMENT ARRETER UNE ALARME manuel d’utilisation. Ne pas mélanger piles neuves et piles usées afin d’éviter les fuites. Pour arrêter, vous pouvez utiliser [24 hr OFF / ((•))] ou [AL 6.
-
Page 62: A Propos D'oregon Scientific
En consultant notre site internet (www.oregonscientific.fr), vous Rayon de relevé de l’humidité relative : 25% HR à 90% HR pourrez obtenir des informations sur les produits Oregon Scientific: photo numérique; lecteurs MP3; produits et jeux électroniques éducatifs; réveils; sport et bien-être; stations météo; téléphonie. Le Pendule radio-pilotée... -
Page 63: Déclaration De Conformite Européenne
Utilisation efficace du spectre des fréquences radio avez besoin sur notre site, néanmoins, si vous souhaitez contacter (Article 3.2 de la Directive R&TTE Directive) le service client Oregon Scientific directement, allez sur le site norme(s) appliquée(s) www2.oregonscientific.com/service/support ou appelez le 949-608- 2848 aux US. - Page 64 MANUALE PER L'UTENTE INTRODUZIONE Congratulazioni per l'acquisto dell'Igrotermometro multicanale IN/ OUT RMR132HG con sensore senza cavo a 433 MHz e orologio-calendario a radiocomando. La confezione base prevede un'unità principale, che è la stazione di controllo della temperatura, del calendario e dell'orologio, ed un'unità...
- Page 65 A. DISPLAY LCD A TRE RIGHE J. FORO PER IL MONTAGGIO A PARETE Consente di leggere i rilevamenti di temperatura/umidità Permette di appendere l’unità principale ad una parete. eseguiti internamente o a distanza,l'ora e la data. ALLARME DI TEMPERATURE E UMIDITÀ RELATIVA : B.
- Page 66 S. SUPPORTO DI APPOGGIO RETRAIBILE A. LCD A DUE SEZIONI Permette di posizionare l'unità principale su una superficie Visualizza le letture di temperatura ed umidità rilevate dall’unità piana. a distanza B. INDICATORE LED CARATTERISTICHE: TERMOMETRO- Lampeggia quando l'unità remota trasmette un rilevamento °...
-
Page 67: Prima Di Cominciare
2. Selezionare il numero di canale con il selettore CHANNEL. PRIMA DI COMINCIARE 3. Selezionare l'unità di visualizzazione delle temperature con il selettore ºC/ºF. Per ottenere il funzionamento ottimale, 1. Abbinare i canali alle unità remote. 2. Inserire le batterie per le unità remote prima di quelle dell’unità principale. - Page 68 INSTALLAZIONE DELLE BATTERIE: COME USARE IL SUPPORTO DA TAVOLO UNITÀ PRINCIPALE O IL FORO DI MONTAGGIO A PARETE 1. Sollevate delicatamente lo sportello del vano batterie. L’unità principale dispone di un supporto di appoggio retrattile il quale, quando è aperto, permette di appoggiare l’unità su una 2.
- Page 69 Unità remota AVVIAMENTO Montaggio a parete Supporto da tavolo Una volta inserite le batterie in una delle unità remote, l’unità comincerà a trasmettere informazioni ad intervalli di 40 secondi. Una volta installate le batterie, l’unità principale esegue una ricerca automatica dei segnali, della durata di tre minuti. Una volta trovato il segnale, sulla sezione superiore del display compare l’indicazione della temperatura, mentre su quella inferiore compare l’indicazione dell’umidità.
- Page 70 COME INTERPRETARE IL SIMBOLO Icona onda DELL’ONDA CINETICA cinetica Questo [display] mostra lo stato di ricezione del segnale dell’unità Postazione Postazione Postazione Display principale. Sono disponibili tre formati: esterna- Interno esterna- esterna- designato Canale Uno Canale Due Canale Tre L’unità è nella modalità di ricerca. Per visualizzare i rilevamenti di temperatura/umidità...
-
Page 71: Tendenza Di Temperatura Eumidità
Quando la modalità del sensore a distanza è attiva, il display TENDENZA DI TEMPERATURA E visualizza i rilevamenti di un canale per circa 4 secondi e poi UMIDITÀ visualizza il rilevamento del secondo canale. Sul display, l’indicatore di tendenza indica la tendenza delle letture Per attivare la modalità... - Page 72 Per cancellare la memoria: Per impostare un allarme di temperatura o umidità alta o bassa: 1. Selezionare il display della temperatura/umidità attuali oppure 1. Premere HI/LO; compare il canale 1. il display della memoria dei rilevamenti massimi. 2. Premere L per impostare il limite di temperatura o umidità. 2.
- Page 73 il canale 1 e l’indicazione sul display lampeggia. Se non lo si tocca, MANCATA RICEZIONE l’allarme si attiva per 1 minuto. Per arrestare momentaneamente l’allarme si può premere un pulsante IN/CHANNEL, MEMORY, Se, senza motivi apparenti, la temperatura di un particolare canale [HI/LO], [L], [ON/OFF] .
- Page 74 MODALITÀ 4. Secondo Fuso Orario MODALITÀ DI VISUALIZZAZIONE DELL'OROLOGIO/CALENDARIO Ora, Minuti Glorno della settimana Giorno, Mese RMR132HG supporta quattro modalità di visualizzazione che sono, nell'ordine: MODALITÀ 1. Ora Locale Ora, Minuti Secondi Giorno, Mese Va notato che se si preme il pulsante [24 hr OFF / ((•))], la riga...
- Page 75 COME IMPOSTARE E avviare la ricezione automatica del segnale. ATTIVARE LE SVEGLIE COME IMPOSTARE MANUALMENTE RMR132HG ha due sveglie: ALLARME 1 e ALLARME 2, che L'OROLOGIO possono essere richiamati insieme o separatamente. Per impostare una sveglia: Per impostare manualmente l'orologio, tenere premuto [SET/ 1.
- Page 76 selezionata per ultima. Se è la prima volta che si imposta PRECAUZIONI l'allarme, l'ora indicata è 00:00. 2. Tenere premuto [24 hr OFF / ((•))] per tre secondi. Le cifre Questo prodotto è studiato per un funzionamento ottimale e duraturo delle ore lampeggiano.
-
Page 77: Dati Tecnici
TAVOLA DEI FUSI ORARI Unità remota termometro/igrometro Campo operativo proposto : da -20°C a 60°C (da -4°F a 140°F) Risoluzione temperatura : 0,1°C (0,2°F) Compensazione di temperatura : da -10°C a 60°C (da 14°F a 140°F) Campo di rilevamento umidità relativa: da 25% a 90% UR Orologio radio controllato •... -
Page 78: Informazioni Su Oregon Scientific
Compatibilità Elettromagnetica INFORMAZIONI SU OREGON SCIENTIFIC (Articolo 3.1.b della direttiva R&TTE) Per avere maggiori informazioni sui nuovi prodotti Oregon Scientific, Standard applicati come le fotocamere digitali, il lettori MP3, i computer didattici per ragazzi, ETSI EN 301 489-1-3 (Ver.1.4.1) : 2002-08 gli orologi con proiezione dell’ora, le stazioni barometriche, gli orologi... - Page 79 MULTI-KANAAL BINNEN/BUITEN U kunt de klok ook handmatig instellen, bijv. als hij buiten het bereik van het signaal is. Tevens kan de dag aanduiding in 4 talen THERMO/HYGROMETER worden weergegeven, heeft de unit een crescendo duo alarm en 4 MET DRAADLOZE SENSOR EN verschillende uitlezingen van de tijd/datum.
- Page 80 A. 3-LIJNS LCD DISPLAY TEMPERATUUR & RELATIEVE LUCHTVOCHTIGHEID ALARM: Voor een gemakkelijke uitlezing van de binnen en buiten K. INSTEL [ L ] TOETS temperatuur alsmede de tijd en de datum B. [ ] LEGE BATTERIJ INDICATIE Voor het instellen van de hoge en lage tempertuur en luchtvochtigheid uitlezing van de individuele kanalen.
-
Page 81: Voordat U Begint
A. 2-LIJNS LCD KENMERKEN : REMOTE UNIT Geeft de huidige temperatuur aan zoals gemeten door de remote unit. B. LED INDICATIE Knippert als de remote unit een uitlezing naar de hoofd unit overzend. ° ° F SCHUIF SCHAKELAAR Voor het kiezen tussen graden Celsius (°C) en Fahrenheit (°F). D. -
Page 82: Remote Unit
3. Plaats de hoofd unit zo dicht mogelijk naast de remote unit. Herzet de hoofdunit nadat u de batterijen geplaatst heeft. Dit vergemakkelijkt de synchronisatie tussen het verzenden en ontvangen van de signalen. 4. Plaats de remote unit en de hoofdunit binnen het zend bereik, dit is normaliter tussen de 20 en 30 meter. - Page 83 BATTERIJ INSTALLATIE: HOOFD UNIT HET GEBRUIK VAN DE BURO EN WANDHOUDER 1. Til het uitsteeksel op het batterijklepje omhoog. De hoofd unit heeft een verwijderbare buro standaard om de unit 2. Plaats de batterijen en let hierbij op de + en - tekens in het op een vlakke ondergrond te plaatsen.
- Page 84 Remote unit HET AANVANGEN VAN DE METINGEN Wandbevestiging Tafelstandaard Zodra u de batterijen in de remote unit heeft geplaatst, zullen temperatuur gegevens worden verzonden met een interval van 40 sekonden. De hoofd unit zal ook naar signalen beginnen te zoeken gedurende 3 minuten als de batterijen geplaatst zijn.
- Page 85 HET UITLEZEN VAN DE KINETISCHE Kinetisch GOLF DISPLAY golf Icoon De kinetische golf display in de hoofd unit geeft de ontvangst sterkte Remote Remote Remote Toegekende Binnenshuis aan van de signalen zoals deze gezonden worden door de remote display display display Display Display...
- Page 86 TEMPERATUUR EN HET AFTASTEN VAN DE REMOTE SENSORS LUCHTVOCHTIGHEID TREND U kunt de unit instellen zodat hij automatisch de beschikbare remote INDICATIES kanalen aftast (bij gebruik van meer dan 1 remote sensor). Als deze instelling actief is, toont de hoofd unit ca. 4 seconden de uitlezing De temperatuur-trend en luchtvochtigheid-trend indicaties tonen van een remote sensor en daarna ca 4 seconden de volgende remote de trends van de verzamelde uitlezingen.
- Page 87 Opm: HET GEBRUIK VAN HET KANAAL-1 Het temperatuur bereik loopt van –50°C (-58°F) tot +70°C (158°F) TEMPERATUUR/VOCHTIGHEID ALARM Als dit de eerste keer is dat u de grenzen instelt, begint de laagste grens bij –50°C (-58°F) en de hoogste grens bij +70°C (158°F). Het temperatuur alarm stelt u in staat de hoogste en laagste grenzen Anderzijds begint de uitlezing bij de laatst ingestelde waarden.
- Page 88 Om een afgaand alarm af te zetten drukt u op IN/CHANNEL, KLOK/KALENDER DISPLAY [HI/LO], [L], [ON/OFF] MEMORY, toets. UITLEZINGEN (TEMP % RH AL) De RMR-132HG kan de volgende uitlezingen geven: AFGEBROKEN SIGNALEN Uitlezing 1. Plaatselijke Tijd Als zonder aanwijsbare oorzaak de display van een bepaald kanaal Uren - Minuten Seconden blank uitslaat, drukt u gelijktijdig op de [IN/CHANNEL] &...
- Page 89 Als de ontvangst compleet is, stopt het signaal met knipperen. De MODE 4. Tweede Tijdzone sterkte van het signaal over het laatste hele uur wordt weergegeven. Uren - Minuten Dag v/d Week Dag/Maand - STERK - ZWAK - GEEN ONTVANGST Door het achter elkaar indrukken van de [SET/MODE] toets kunt u tussen de bovenstaande uitlezingen kiezen.
- Page 90 HET HANDMATIG INSTELLEN HET INSTELLEN EN LATEN VAN DE KLOK AFGAAN VAN HET ALARM Houdt de [SET/MODE] toets 3 seconden ingedrukt. De display De RMR-132HG heeft 2 alarm instellingen, ALARM 1 en ALARM gaat naar display uitlezing 1 en de uren knipperen. 2.
- Page 91 onderdelen die door de gebruiker moeten worden onderhouden. HET STOPPEN VAN EEN ALARM 5. Gebruik uitsluitend nieuwe batterijen, zoals vermeld in deze handleiding. Om een alarm te stoppen, kunt u op de [24 hr OFF / ((•))] toets Gebruik geen oude en nieuwe batterijen samen, aangezien de of de [AL ON/OFF] toets drukken.
-
Page 92: Over Oregon Scientific
Bezoek onze website (www.oregonscientific.com) om meer te Temperatuur meet cyclus : Ca. 30 seconden weten over uw nieuwe product en andere Oregon Scientific producten zoals digitale fototoestellen, gezondheids- en fitnessuitrusting en weerstations. Op deze website vindt u tevens * Radio gestuurde klok... -
Page 93: Eg-Verklaring Van Gelijkvormigheid
Bijkomende informatie: EG-VERKLARING VAN GELIJKVORMIGHEID Dit product is bijgevolg conform de Richtlijn voor Laagspanning 73/23/EC, de EMC-richtlijn 89/336/EC en de R&TTE-richtlijn Dit product bevat een goedgekeurde zendermodule en voldoet aan 1999/5/EC (appendix II) en is voorzien van de overeenkomstige de essentiële vereisten van Artikel 3 van de R&TTE-richtlijnen CE-markering. -
Page 94: Características Principais
A unidade principal tem a possibilidade de fazer medir registos dos valores máximos e mínimos em lugares distintos. O RMR132HG não necessita de instalação elétrica e opera a 433 MHz. O relógio – calendário é sincronizado via radio. Sincroniza automaticamente a hora e data correntes quando se encontra num raio de ação de cerca de 1500 km dos sinais de rádio DCF77,... - Page 95 A. PAINEL DE TRÊS SEÇÕES ALARME DE TEMPERATURA E HUMIDADE RELATIVA: Facilita a leitura da temperatures e umidade e relógio – calendário. K. BOTÃO [ L ] B. [ ] INDICADOR DE BATERIA FRACA Ajusta as leituras da temperatura e umidade máxima e mínima dos canais individuais.
-
Page 96: Antes Da Primeira Utilização
A. LCD DE DUAS SEÇÕES CARACTERÍSTICAS: Mostra a temperatura e umidade correntes monitorizadas pela SONDA REMOTA TERMO-HIGRO unidade remota. B. INDICADOR LED Começa a piscar quando a unidade remota transmite uma leitura. ° ° C. COMUTADOR DESLIZÁVEL Selecione entre graus Centígrados (°C) e Fahrenheit (°F) D. - Page 97 3. Coloque a unidade remota o mais perto possível da unidade principal, reajuste a unidade principal após a inserção das pilhas. Este procedimento assegura uma melhor sincronização entre os sinais de transmissão e recepção. 4. Coloque a unidade remota e a unidade principal de forma a que estejam dentro dos limites do raio de ação da transmissão, que em circumstâncias normais é...
- Page 98 COMO UTILIZAR O SUPORTE PARA MESA OU A COLOCAÇÃO NA PAREDE A unidade principal tem um suporte móvel de mesa, o qual quando ligado consegue agüentar o aparelho numa superfície plana. Ou pode retirar o suporte e instalar o aparelho numa parece usando o orifício de encaixe do parafuso.
- Page 99 Unidade Remota INÍCIO DA OPERAÇÃO Instalação de parede Suporte de mesa Uma vez as pilhas colocadas numa unidade remota, esta começa a transmitir as leituras da temperatura em intervalos de 40 segundos. A unidade principal também inicia a busca automática de sinais, durante 3 minutos, depois da instalação das pilhas.
- Page 100 CONTROLE DA TEMPERATURA REMOTA LEITURA DA ONDA CINÉTICA E INTERIOR E HUMIDADE A onda cinética indica as condições de recepção da unidade principal. Tem três formas possíveis: A amostragem das leituras de uma sonda remota ou da unidade principal é um procedimento de apenas uma ordem. O canal da sonda remota ou o painel da unidade principal ë...
- Page 101 Para ativar o modo de exploração da sonda remota: INDICADOR DE TENDÊNCIAS DAS • Pressione o botão IN/CANAL [IN/CHANNEL], durante 2 TEMPERATURA E DA HUMIDADE segundos. O indicador de tendências das temperatura e da umidade indica a tendência das leituras recolhidas. As setas apresentam três Para desativar o modo de exploração da sonda remota: tendências: a subir, estável, a descer.
- Page 102 Atenção: COMO UTILIZAR O ALARME DE A variação da temperatura vai de -50°C (-58°F) até +70°C TEMPERATURA/UMIDADE DO CANAL-1 (158°F). Se é a primeira que introduz os limites, o limite mínimo começa a Os limites para as temperaturas superiors e inferiors do CANAL-1 partir de -50°C (-58°F) e o limite máximo +70°C (158°F).
- Page 103 MODOS DE VISUALIZAÇÃO DO RELÓGIO CALENDÁRIO SINAIS DESLIGADOS O RMR132HG incluiu quarto modos de visualização com esta Se, sem razão óbvia, na visualização de um determinado canal seqüência: aparecer um espaço em branco, Pressione o botão de IN/CANAL e MEMÓRIA [IN/CHANNEL] &...
-
Page 104: Sobre A Recepção De Rádio
Hora Local SOBRE A RECEPÇÃO DE RÁDIO Hora, Minuto Dia da Semana O RMR132HG foi concebido para sincronizar automaticamente o Dia-Mês relógio-calendário, quando entra no raio de ação do sinal de freqüência radio de Frankfurt, DCF77. Quando o aparelho está dentro destes limites, os mecanismos controlados por rádio sobrepõem-se a todas as definições manuais. -
Page 105: Ajuste Manual Do Relógio
O sinal de recepção de rádio começa a piscar para iniciar AJUSTE E ATIVAÇÃO DO ALARME a recepção automaticamente. O RMR132HG tem dois alarmes, o ALARME 1 e o ALARME 2. Podem ser ativados juntos ou independents. AJUSTE MANUAL DO RELÓGIO Para ajustar um alarme, Para ajustar o relógio manualmente, Pressione os botões de... - Page 106 misture pilhas novas e velhas porque estas podem derramar COMO PARAR O ALARME líquidos. 6. Leia este manual com muita atenção antes de utilizar o aparelho. Para parar um alarme, pode utilizar ou o botão de [24h DESLIGADO/((.))] (24 hr OFF / ((•))) ou [AL ON/OFF].
-
Page 107: Sobre A Oregon Scientific
: 92 x 60 x 20 mm (LxCxA) Unidade Remota Termo-Higro Limites propostos de operação : -20.0° C até 60.0°C SOBRE A OREGON SCIENTIFIC ( -4.0° F até 140.0°F) Temperatura de resolução : 0.1° C ( 0.2°F) Visite nosso site (www.oregonscientific.com.br) para aprender mais sobre nossos outros produtos, tais como Câmeras Digitais;... -
Page 108: Declaração De Conformidade - Ec
Informações Adicionais: DECLARAÇÃO DE CONFORMIDADE - EC O produtos está em conformidade com as diretrizes de Baixa Voltagem 73 / 23 / EC, a diretriz EMC 89 / 336 / EC e diretriz Este produto contém um módulo transmissor aprovado que está R&TTE 1999 / 5 / EC (apêndice II) e leva a marca CE respectiva. -
Page 123: Om Oregon Scientific
“EMC Directive 89 / 336 / EC” och “R&TTE direktivet 1999 / 5 / med Oregon Scientific kundkontakt besöker du vår lokala hemsida EC (bilaga II)” och är försedd med respektive CEmärkning.
Need help?
Do you have a question about the RMR132HG and is the answer not in the manual?
Questions and answers