
Related Manuals for Doran Scales DS5100


Summary of Contents for Doran Scales DS5100
- Page 1 Model DS5100 Digital Beam Scale Instruction Manual Doran Scales, Inc. 1315 Paramount Pkwy Batavia, IL 60510 USA 1-800-264-4107 www.doranscales.com MAN0260 Revision 0.3...
-
Page 3: Table Of Contents
Section 1. Unpacking and Assembly ............1 Introduction ........................1 Cautions and Warnings ....................1 Care & Cleaning......................1 Moving Scale........................ 2 Scale Assembly Instructions ..................3 Component List ......................3 Battery Installation ....................... 6 Section 2. Scale Operation ................ 7 Display Pushbuttons .................... -
Page 4: Section 1. Unpacking And Assembly
We are dedicated to deliver a superior product that will provide many years of trouble free service. As an ISO9000 registered company, Doran Scales is dedicated to delivering products built with strict compliance to our high quality standards. If you have any questions regarding your scale, please contact Doran Scales, Inc. -
Page 5: Moving Scale
Once the scale has been moved, press ZERO before weighing. NOTE: The DS5100 will automatically perform a zero function periodically. When moving the scale, it may perform an automatic zero, which will affect the accuracy of the weight reading. Be sure to zero the scale after it has been... -
Page 6: Scale Assembly Instructions
Scale Assembly Instructions Before assembly, ensure you have all the components below. If any items are missing, contact Doran Scales. Please be careful to follow all instructions. Improper assembly may void the warranty. If you notice any shipping damage, notify the shipper immediately. Be sure to retain all shipping materials in case the scale must be shipped elsewhere. - Page 7 1. Carefully remove the scale from the shipping carton. The Upper Tower (1), Lower Tower (4) and Scale Platform (2) are Connected by the Wire Harness (5) and must be removed for the packaging together. CAUTION: DO NOT PUT STRESS ON THE WIRE HARNESS WHEN REMOVING ITEMS FROM THE BOX.
- Page 8 NOTE: Proper installation of the Height Rod Arm (9) is shown above. The Upper Height Rod (8) tabs are engaged completely and the Height Rod Arm (9) tabs are inserted into the Upper Height Rod cap properly. 7. Connect the Upper Height Rod (8) and the Lower Height Rod (7) and install the Height Rod Screw (10) and washer using a Phillips screwdriver.
-
Page 9: Battery Installation
Battery Installation The DS5100 comes with a set of four C alkaline batteries. These batteries supply three year’s of typical use. The batteries can be accessed at the rear of the scale display. 1. Press the button at the top of the battery compartment to release. -
Page 10: Section 2. Scale Operation
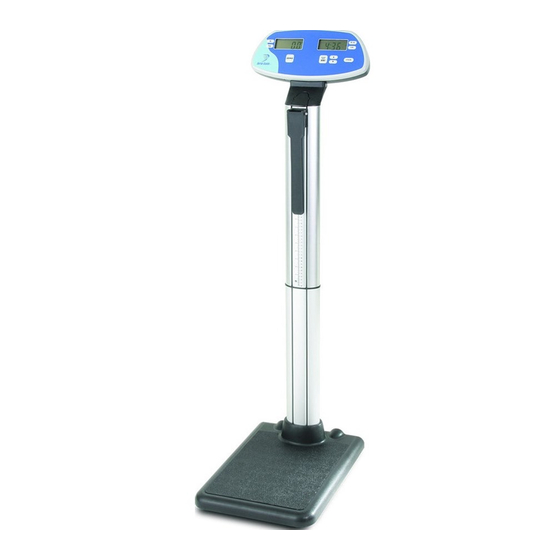
Section 2. Scale Operation Fig. 2 DS5100 Front Panel Display Pushbuttons The Model DS5100 controls consist of ZERO, LB, KG, FT/IN, CM, CLOCK and BMI buttons. The display is used to provide weight indications and operator messages indicating scale operation. -
Page 11: Scale Displays
Scale enters BMI mode. See instructions below. Clock Accesses clock settings. See instructions below. Scale Displays Two LCD displays are utilized to indicate Weight, BMI, Clock values as well as the current scale status. Weight Display The patient weight is displayed on the left LCD display. Hold Indicates a stable weight has been achieved and held on the display. -
Page 12: Weighing A Patient
Weighing a Patient 1. Step on the scale and stand still. 2. When a stable weight is reached the display will lock and the HOLD annunciator will be displayed. 3. The weight will be displayed until the scale automatically shuts off. BMI (Body Mass Index) Operation 1. -
Page 13: Height Measurement
Height Measurement When moving the height rod arm, lift the arm upwards until you hear a click. Grasp the arm at the point closest to the hinge of the height rod arm. Improper use of the height rod arm may void the warranty. Fig. - Page 14 To measure a height 43.25” (110cm) or LOWER 1. Extend the Height Rod Arm. 2. Step onto the scale. 3. Adjust the Height Rod Arm until it touches the top of the patient’s head. 4. The height reading is indicated by the bottom of the Height Rod Arm as shown below.
- Page 15 To measure a height ABOVE 43.25” (110 cm) 1. Extend the Height Rod Arm. 2. Pull the Height Rod Arm above the height to be measured. 3. Step onto the scale. 4. Adjust the Height Rod Arm until it touches the top of the patient’s head. 5.
-
Page 16: Section 3. Scale Calibration
Section 3. Scale Calibration Calibration CAUTION: Scale calibration requires a full set of certified weights up to 400lb or 200kg. Calibrating this scale improperly will void the warranty and will require field service or return of the scale to the factory. At any time to exit calibration without saving, press kg. -
Page 17: Calibration Troubleshooting
Calibration Troubleshooting If Err 0 appears on the display during step 4, the calibration zero is out of range. Remove all weight from the platform and press BMI to perform the zero calibration again. If this error persists, consult the raw counts table below. If ErrSp appears on the display during step 6,8,10 or 12, the span calibration is out of range. -
Page 18: Section 4. Specifications
Section 4. Specifications Scale Dimensions 22.6” L x 15” W x 54” H Platform Dimensions 15” L x 13” W x 2” H Power 4 C Alkaline Batteries Four year battery life in typical applications. Displayed Units lb, kg Capacity 500 x 0.1 lb 200 x 0.05 kg Construction... -
Page 19: Section 5. Troubleshooting
Section 5. Troubleshooting General Problem Resolution Problem What to Do or Check Scale will not turn on when buttons Check the battery compartment to be sure are pressed or when a patient stands the batteries are installed with the correct on the scale. -
Page 20: Error Messages
Error Messages Error Message What to Do or Check The setup parameters loaded in nonvolatile memory have become corrupted. Er EP If this problem persists, contact Doran Technical Support for assistance. The A/D communication is not detected. Ensure the wire harness was not pinched during assembly. Er Ad If this problem persists, contact Doran Technical Support for assistance. - Page 21 Limited Three Year Warranty Doran Scales, Inc. warrants Model DS5100 to be free from defects in material and workmanship for a period of three (3) years from date of shipment. Any product found to be defective within this time period may be returned to Doran’s factory, freight prepaid, with prior return authorization and proof of purchase showing date of original sale, for repair or replacement at no charge.
Need help?
Do you have a question about the DS5100 and is the answer not in the manual?
Questions and answers