
Related Manuals for Grasslin Famoso 800


Summary of Contents for Grasslin Famoso 800
-
Page 1: Table Of Contents
List of contents List of contents Page Elementary operator control Installation notes Installation 5 / 6 Connecting up Fitting/replacing the battery 8 / 9 Setting the correct time Setting the switching times Setting the temperature levels Manual switch/operating modes Heating cycle setting 14 / 15 Reset Technical data... -
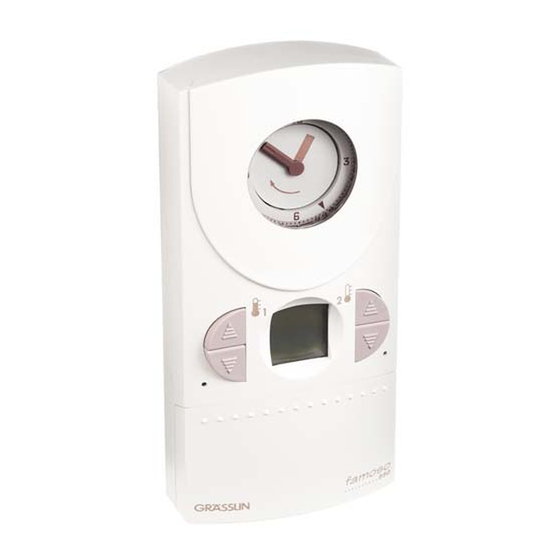
Page 2: Elementary Operator Control
2. Elementary operator control This room thermostat clock creates comfortable room temperatures in the simplest way possible. The two temperature levels = Comfort temperature = Lower temperature are set with the according knobs. Settings between 5 °C and 32 °C possible. manual switch can be used to switch between three operating modes: Operating mode = Automatic... -
Page 3: Installation Notes
3. Installation notes Assembly/installation should only be carried out by qualified person exercising due care. Switch off the heating system before assembly. Check and make sure that the connection wires are not live. Assembly note: – only use PVC-sheathed cables (solid wire) during installation –... -
Page 4: Installation
3.1 Installation Open the battery compartment lid and release the catch Remove the famoso from its base... -
Page 5: Installation
3.1 Installation Feed the connection wires through the opening in the unit’s base max. 3,5 mm Attach the base on a firm surface or surface-mounted socket Place the famoso on its base and resecure... -
Page 6: Connecting Up
3.2 Connecting up The unit must be connected by a qualifeid person exercising due care. max. 2,5 mm max. 2,5 mm Check and make sure that the connecting wires are not live. Strip the connection wires properly and connect as shown in the circuit diagram. -
Page 7: Fitting/Replacing The Battery
3.3 Fitting/replacing the batteries Open the battery compartment lid Fit the batteries Battery type LR6/AA (2 batteries) Close the battery compartment lid Note: If the actual temperature is not displayed after the batteries hav been changed, press the „Reset“ button, see page 16... - Page 8 3.3 Fitting/replacing the batteries Battery symbol is displayed Change batteries immediately. Otherwise safe functioning ist not guaranteed. The entered data will not be erased when the batteries are changed. Note: The unit measures the battery voltage when switching on and off. The battery display will not change if no switching occurs.
-
Page 9: Setting The Correct Time
4. Setting the correct time/weekday Type 800 day time switch Type 850 week time switch Slide the cover upwards and remove. Only turn in the direction of the arrow Day time switch e. g. 14.00 h Turn the ring in the direction of the arrow until the desired hour is aligned with the locating arrow. -
Page 10: Setting The Switching Times
5. Setting the switching times 5.1 Switching times for changing temperatures with the day time switch (famoso 800) e. g. 06.00 – 22.00 Uhours = Comfort- temperature e. g. 22.00 – 06.00 hours = Lower temperature Inside segments = Lower... -
Page 11: Setting The Temperature Levels
6. Switching the temperatures on/off The two temperature values – desired temperatures are set independently of each other. Adjustable by 0,5 °C steps between 5 °C and 32 °C. The last displayed desired value is stored. Comfort temperature e. g. +22 °C (Factory setting 21 °C) Lower temperature e. -
Page 12: Manual Switch/Operating Modes
7. Manual switch/operating modes manual switch selects on of three operating modes: Operating mode = Automatic The unit operates during the set times and switches between Continuous temperature operating modes = Comfort temperature = Lower temperature The selected temperature remains until a different operating mode is selected. - Page 13 8.1 Heating cycle setting/assembly The heating-cycle setting (CDF value) is for adapting to the control range. This is affected by: – Room size – Type of heating, e. g. convectors, storey heating – Type of assembly – Temperature control/thermostat The set value can be altered to achieve an optimum heating control.
- Page 14 8.2 Heating cycle setting/assembly Recommended settings Set value Direct electric heating 1 or 2 Supplementary electric 2 or 3 bathroom radiator Single-room control system 3 or 4 with electrically operated radiator valves (hot-water heating) Small or medium-sized rooms Single-room control system 4 or 5 with electrically operated radiator valves (hot-water heating)
- Page 15 9. Reset The unit is put into a defined operating status with reset. The set temperature values and the CDF setting are maintained Press the 1x button with a pencil or similar object The room temperature is displayed after approx. 8 seconds.
- Page 16 10. Technical data Dimensions H x W x D (mm) 158 x 75 x 36,5 Operating modes Automatic mode Operating voltage battery, type LR6/AA (2 batteries) Comfort temperature Switching capacity – at ohmic loads 5 A/250 V~ Lower temperature – at inductive loads 1 A/250 V~ cos ϕ...
- Page 17 11. Problems and remedies Problems: Remedy: Page Restricted operation and function. Change batteries 8 / 9 The symbol appears in the display. The room is too hot or cold Check temperature settings The heating system does not switch Check time and switching 10 / 11 on or off on time time...
-
Page 18: Heating Cycle Setting
12. Cleaning and maintenance 14. Alphabetical subject-index Use a dry cloth to clean the unit. Key word Page Never use any caustic cleaning agents. Automatic mode 3 / 11 / 13 13. Service addresses Battery 8 / 9 CDF value 14 / 15 GRÄSSLIN GmbH &...
Need help?
Do you have a question about the Famoso 800 and is the answer not in the manual?
Questions and answers