Table of Contents
Advertisement
Advertisement
Table of Contents

Related Manuals for Minuteman E Ride ER28C


Summary of Contents for Minuteman E Ride ER28C
-
Page 1: User Manual
User Manual E Ride 28/32 Rider Scrubber... -
Page 2: Technical Specifications
Technical Specifications This manual is furnished with each new MINUTEMAN ERide 28/32. This provides the necesary operating and preventive main- tenance instructions. Operators must read and understand this manual before operating or servicing this machine. This machine was designed to give you excellent performance and efficiency. For best results and minimal cost, please follow the general guidelines below: - Operate the machine with reasonable care. -
Page 4: Introduction
Scrubber machine. It is battery operat- (collectively, "proper use"). Using the E mental regulations would govern. ed and is intended by Minuteman to be Ride beyond its proper use will be Your authorized Minuteman dealer used in accordance with this manual, deemed improper use by Minuteman. - Page 5 Introduction Disclaimer: rors exist in this manual, Minuteman re- Valid as of: August 2010 Minuteman disclaims liability for any serves the right to make changes to personal injury, property, or other dam- subsequent editions of this manual Minuteman International Inc.
-
Page 6: Notes On Warranty
In this re- gard, any maintenance work must be Minuteman International Inc. performed by an authorized Minuteman 14N845 U.S. ROUTE 20 service representative and confirmed in PINGREE GROVE, II. 60140 the "Maintenance Certificate"... -
Page 7: The E Ride 28/32
The E Ride 28/32 This machine was designed with total operator comfort and ease of use in mind. All machine components have been designed as a total system to efficiently clean dirty floors. The E Ride has four available scrub head types and sizes to fit specific applications. Please contact your Min- uteman representative for specific recommendations for the correct scrub head type, size, and brush type and chemical applications. -
Page 9: Table Of Contents
Operator Compartment ....14 Minuteman System Control Console ......16 Maintenance. -
Page 10: Important Safety Instructions
This machine is designed solely for scrubbing dirt and dust in an indoor environment. Minuteman does not recommend using this Store or park this machine on a level surface only, with the key machine in any other capacity. -
Page 11: Unpacking Instructions
Volts DC (6) 6-volt batteries. Avoid contact with battery acid. Battery acid can cause burns. When The recommended batteries are rated 235Ah (Minuteman P.N. working on or around batteries, wear protective clothing and safety 956740). glasses. Remove metal jewelry. -
Page 12: Machine Overview
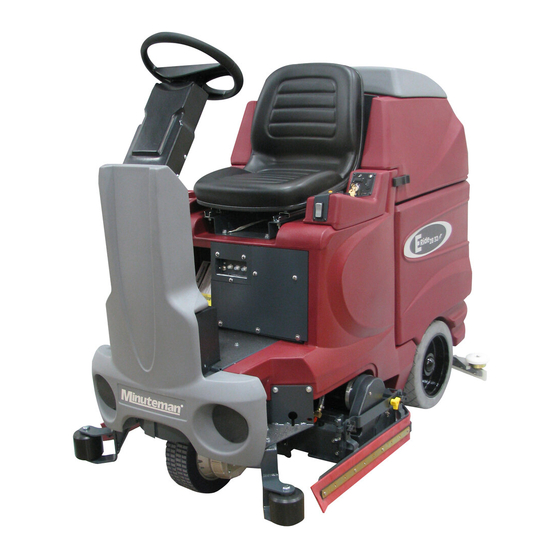
Machine Overview Machine Overview Machine Overview - Front 1 Front Drive Wheel 2 Side Squeegee 3 Accelerator Pedal 4 Steering Tilt Lever 5 Steering Wheel 6 Operator’s Seat 7 Recovery Tank Lid 8 Recovery Tank 9 Control Console 10 Directional Switch 11 Recovery Tank Safety Latch 12 Battery Compartment 13 Solution Tank... -
Page 13: Machine Overview - Rear
Machine Overview Machine Overview - Rear 19 Rear Squeegee 20 Rear Wheel 21 Side Squeegee 22 Accelerator Pedal 23 Solution Tank 24 Steering Tilt Lever 25 Steering Wheel 26 Recovery Tank Lid 27 Vacuum Filter Access 28 Vacuum Inlet Assembly 29 Recovery Tank 30 Battery Compartment 31 Clean-Out Cap... -
Page 14: Operator Compartment
Machine Overview Operator Compartment Operator’s Seat Solution Tank Lid Cup Holder Solution tank Accelerator Pedal Steering Wheel Directional Switch Control Panel Recovery Tank Safety Latch... - Page 15 Machine Overview...
-
Page 16: Control Console
Machine Overview Control Console For operator ergonomics, the control console houses all the primary function controls in a central area. The key switch and optional headlight and off- aisle wand switches are clustered in the back portion of the console. The directional switch (forward/reverse) is located at the front of the console for easy fingertip operation. - Page 17 Machine Overview this signal is displayed, all functions will shut off, including Horn Button (G) - S3 transport mode. The operator must then turn the key switch Depressing this button will activate the machine’s horn. OFF and then ON to reset the machine. The machine will then have only a few minutes left of reserve power to briefly Directional Switch (H) - S6 use Vacuum Only mode to pick up any remaining solution on...
-
Page 18: Operation Modes
Machine Overview Operation Modes solution to stay on the floor emulsifying the grease and oil. If the op- erator stops moving in either direction, the machine will automatically 1. Regular Scrub Mode raise the scrub deck and turn off the brushes. After double scrubbing, When the machine is running in this mode, the machine will perform the operator should use the vacuum only mode to recover the dirty all operations. - Page 19 Machine Overview signal is displayed, all functions will shut off, including transport mode. The operator must then turn the key switch OFF and then ON to reset the machine. The machine will then have only a few minutes left of reserve power to briefly use Vacuum Only mode to pick up any remaining solution on the floor and Transport mode to return to the charging station.
-
Page 20: Fault/Diagnostic Codes
Machine Overview Fault/Diagnostic Codes remaining solution on the floor and Transport mode to return to the When an error or fault occurs within the machine, a fault code will ap- charging station. pear on the battery gauge represented by a specific number of flash- ing LEDs. -
Page 21: Steering Wheel
Machine Overview Steering Wheel switch governs the direction of travel the ma- sets the machine to move in reverse. The steering wheel is adjustable for operator chine will take. Switching the directional comfort by pulling the tilt-steering lever up switch with the pedal depressed will make 1.11 Parking Brake and positioning the steering wheel up or... -
Page 22: Circuit Breakers
6-volt batteries connected in series. Connect the batteries according to the battery con- nection diagram (see diagram). The recom- mended batteries are 235Ah (Minuteman P.N. 956740). The two batteries positioned in the center are offset and held in position by two steel spacers. -
Page 23: Battery Connection Diagram
Machine Overview... -
Page 24: Scrub Decks
Machine Overview 1.14 Scrub Decks Cylindrical Scrub Deck Minuteman offers two deck types (Cylindrical and Disc) to fit your specific needs. The E Ride design is very dynamic wherein the decks are interchangeable in a matter of minutes whenever necessary (removal of four bolts, one hose, and one electrical con- nection). - Page 25 Machine Overview Disc Scrub Deck A Center Deck Cover B Side Deck Cover (2) C Brush Motor D Mounting Plate E Solution Feed Hose F Three Sided Knob (4) G Wing Nut for Squeegee Adj. (4) H Helical Lock Washer for Squeegee Adj. (4) J Flat Washer for Squeegee Adj.
-
Page 26: Scrub Deck Installation
Machine Overview 1.15 Scrub Deck installation When installing a cylindrical deck to a machine: 1. Install brushes after the deck has been mounted to avoid flat spots on the brushes. 2. Use a piece of cardboard underneath the deck to prevent scratches to the painted surface when sliding the deck under the machine. 3. - Page 27 Machine Overview Cylindrical scrub brushes must be installed with the chevron pattern pointing away from each other for best water and debis pick up Important Note when Interchanging Scrub Decks As previously mentioned, the scrub deck brush pressure is computer controlled. However, when interchanging the two types of decks, an ad- ditional step must be taken to ensure that the controller correctly compensates the pressure for the type of deck that is currently installed.
-
Page 28: Side Squeegees
Machine Overview 1.16 Side Squeegees The side squeegees (left and right) are attached to the scrub decks. These items channel the dirty solution to the rear squeegee, helping contain the water within the ma- chine’s cleaning path. These squeegees are raised when the scrub deck is in the raised position. - Page 29 Machine Overview Brush Changes On the Cylindrical Deck In order to change the brushes on the cylindri- cal deck the side squeegee must be moved in order to access the brush doors. The cylindri- cal deck was designed so one can change the brushes without having to realign the side squeegees.
-
Page 30: Rear Squeegee
Machine Overview 1.17 Rear Squeegee The rear squeegee is the main element that acts as the conduit that transfers the spent solution into the recovery tank. A daily maintenance check of this component is essential to have optimum machine performance. The rear squeegee assembly is equipped with a universal front blade that allows the operator the option to use a slotted and a non-slotted side for specific applications. - Page 31 Machine Overview Rear Squeegee Adjustment Ensure that the scrubber is on a relatively flat surface. Turn on the key switch and select the Vacuum only mode. This lowers the squeegee to the floor and turns the vacuum motor on. Move the scrubber one or two feet forward slowly while someone behind the machine checks the rear squeegee blade (item A) for uni- form deflection to the floor.
-
Page 32: First Operation
First Operation First Operation and tanks must be free from any Start Machine leakage or damage. Proceed with the following to set the Instruction 2. Install brushes - see maintenance machine to operating mode: Only persons trained by qualified Min- chapter. -
Page 33: Operation
First Operation Operation lapping each path by 2 to 3 inches. tank. 1. Switch on the machine. 2. Select one of the five available Start moving machine immedi- 7. Drive the machine to a designated modes using the mode selector . ately after switching on the dirty water disposal area and empty 3. -
Page 34: Stop Machine
First Operation The battery/ fault gauge will Stop Machine flash to signal that the machine To stop cleaning, select the transport Do not clean the electrical is almost out of power. When mode. This will automatically stop the parts by means of high-pres- this signal is displayed, all solution flow, raise the scrubdeck, and sure cleaning equipment. -
Page 35: Transporting The Machine
First Operation Transporting the machine To transport the machine, turn the key switch ON, select the transport mode, select forward or reverse, activate the accelerator pedal to start movement. Tie-down points When transporting on a vehicle or trail- er, the machine has to be secured. Tie the machine down firmly by using the front foot steps (Fig. -
Page 36: Maintenance And Care
(every 250 hours of operation) bility of the machine Compliance with the recommended To be performed by qualified personnel The Minuteman System Maintenance is maintenance work will ensure that you of authorized Minuteman Service structured in separate modules and always have a reliable machine... -
Page 37: Maintenance Document
Maintenance and Care Maintenance Document Handing over System Maintenance I System Maintenance II System Maintenance I 125 operating hours 250 operating hours 375 operating hours Upgrade Workshop stamp Workshop stamp Workshop stamp Test drive Handing over to the customer Instruction carried out on: carried out on: carried out on:... -
Page 38: Maintenance Schedule
Maintenance and Care Maintenance Schedule System Maintenance Customer Maintenance intervals must be performed by the customer/operator. Interval To be performed daily weekly Check/Clean Tanks and Hoses Charge batteries Check/Clean/Rotate the Brushes/Pads Check/Clean the Squeegee Check/Clean Vacuum Shut-Off Float Check/Clean the Vacuum Motor Foam Filter Clean Hopper on Cylindrical System Check Each Battery Cell(s) Water Level Inspect Scrub Housing Skirts... - Page 39 - Steering wheel chain sprockets and idlers turn clockwise. Do not clean the spray jet/tips with needles * Have Minuteman check the vacuum motor or wire. Doing so could damage, resulting an carbon motor brushes after 300 operating uneven spray pattern or streaking.
- Page 40 Maintenance and Care System Maintenance I & II The following maintenance work must be performed by an authorized Minuteman Service workshop. Interval To be performed every 125 hours of every 250 hours of operation (I) operation (II) Check battery charger...
- Page 41 Maintenance and Care System Maintenance S (Safety check) The following maintenance work must be performed by an authorized Minuteman Service workshop at least once a year. Interval To be performed every 500 hours of operation Perform maintenance works according to System Maintenance II...
- Page 42 Maintenance and Care Notes...
- Page 43 Maintenance and Care Notes...
-
Page 44: Troubleshooting
Troubleshooting Troubleshooting Problem Possible Cause Remedy Worn or torn squeegee blades Rotate or replace blades Squeegee out of adjustment Adjust so blades touch floor evenly across entire width Recovery tank full Empty recovery tank Recovery tank lid gasket leak Replace gasket lid cover properly Poor water pick-up Debris caught in squeegee Clean squeegee... - Page 45 Troubleshooting Problem Possible Cause Remedy Operator seat safety switch Operator has to be seated.Check for open circuit Main system controller Check error fault codes Machine does not run Tripped 100 amp circuit breaker Check for an electrical short circuit. Reset machine: Reset breaker and turn key switch off and restart Batteries Low Charge Batteries...
- Page 46 Troubleshooting 9) Fault Codes No. of No. of Fault Fault Description Bars Flashes Code LOW BATTERY ERROR 0x2C00 LOW BATTERY ERROR2 0x2C01 SOFT BATTERY LOCKOUT OCCURRED 0x2C02 SOFT BATTERY LOCKOUT 2 OCCURRED 0x2C03 Traction MOTOR FAULT 1 0x7800 TRACTION OVER CURRENT ERROR 0x7801 SOFT TRACTION MOTOR IN FOLDBACK STATE 0x7802...
- Page 47 Troubleshooting No. of No. of Fault Fault Description Bars Flashes Code EXCESSIVE CURRENT TRIP (Supported on LCD only) 0x1310 SOFT BRUSH DECK ACTUATOR OVERCURRENT 0x1311 OCCURRED BRUSH DECK ACTUATOR OVERCURRENT 2 OCCURRED 0x1321 ERROR BRUSH DECK ACTUATOR POSITIVE SHORTED 0x1411 ERROR BRUSH DECK ACTUATOR NEGATIVE SHORTED 0x1412 SOFT SOLENOID 2 OVERCURRENT OCCURRED...
- Page 48 Troubleshooting No. of No. of Fault Fault Description Bars Flashes Code SPEED POTENTIOMETER FAULT 1 0x0810 SPEED POTENTIOMETER MAX WIPER DIFFERENCE 0x0811 ERROR SPEED POTENTIOMETER MAX PULL DOWN DIFFERENCE 0x0812 ERROR SPEED POTENTIOMETER MAX PULL SAFE DIFFERENCE 0x0813 ERROR SPEED POTENTIOMETER REFERENCE ERROR 0x0814 SPEED POTENTIOMETER LO REFERENCE ERROR 0x0815...
- Page 49 Troubleshooting No. of No. of Fault Fault Description Bars Flashes Code Any faults not covered elsewhere SOLUTION TANK EMPTY 0x1318 SOFT ALARM OVERCURRENT OCCURRED 0x131C SOFT SOLUTION PUMP OVERCURRENT OCCURRED 0x1313 SOFT SOLENOID 1 OVERCURRENT OCCURRED 0x1314 BRAKE FAULT 1 0x1500 BRAKE FAULT 2 0x1501...
-
Page 50: Warranty
Minuteman International, Inc. warrants to the original purchaser/user that the product is free from defects in workmanship and materials under normal use. Minuteman will, at its option, repair or replace without charge, parts that fail under normal use and service when operated and maintained in accordance with the applicable operation and instruction manuals. All warranty claims must be submitted through and approved by factory authorized repair stations. -
Page 51: Minuteman International Made Simple Commercial Limited Warranty
Minuteman International Made Simple Commercial Limited Warranty If a difficulty develops with this machine, you should contact the dealer from whom it was purchased. This warranty gives you specific legal rights, and you may have other rights which vary from state to state. Some states do not allow the exclusion or limitation of special, incidental or consequential damages, or limitations on how long an implied warranty lasts, so the above exclusions and limitations may not apply to you. - Page 52 Minuteman International Inc. · 14N845 U.S. Route 20 · Pingree Grove, Illinois 60140 · U.S.A. Phone: 800-323-9420 · Fax 800-422-6933 www.minutemanintl.com A Member of the Hako Group...
Need help?
Do you have a question about the E Ride ER28C and is the answer not in the manual?
Questions and answers