Table of Contents
Advertisement
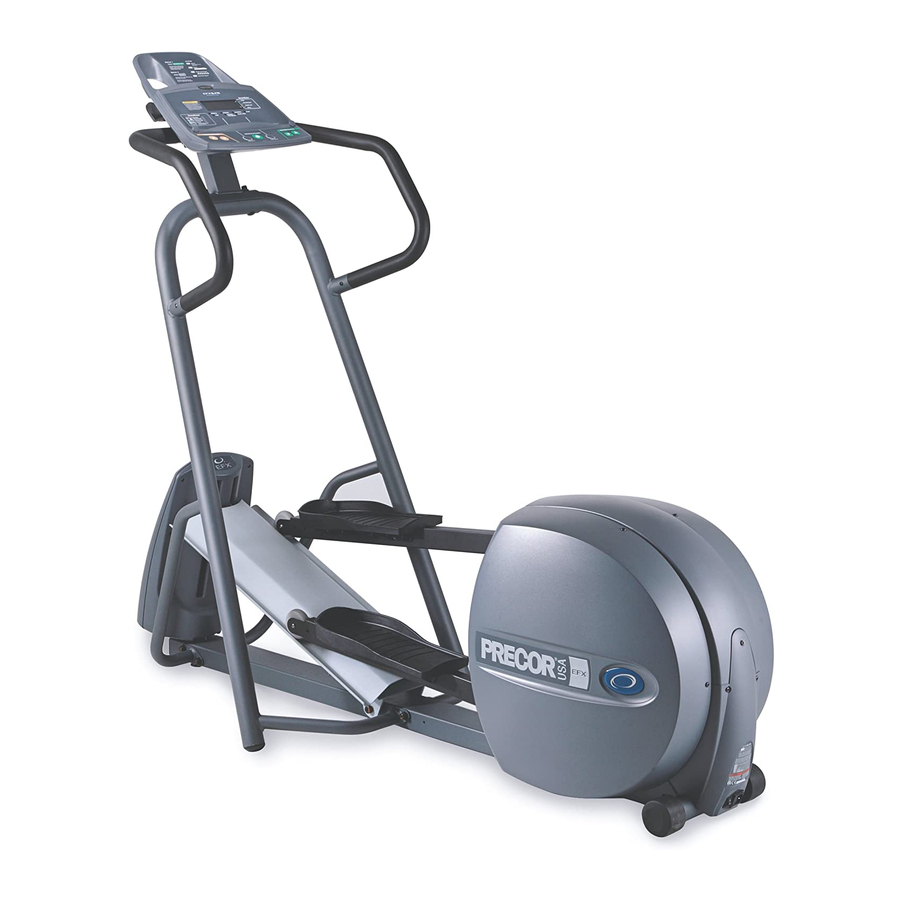
5.17i Elliptical Fitness Crosstrainer
5.17i Elliptical Fitness Crosstrainer
Warning: This service manual is for use by Precor trained service providers only.
If you are not a Precor Trained Servicer, you must not attempt to service any Precor Product;
Call your dealer for service.
This document contains information required to perform the majority of troubleshooting, and
replacement procedures required to repair and maintain this product.
This document contains general product information, software diagnostic procedures (when
available), preventative maintenance procedures, inspection and adjustment procedures,
troubleshooting procedures, replacement procedures and electrical block and wiring diagrams.
To move directly to a procedure, click the appropriate procedure in the bookmark section to the
left of this page. You may "drag" the separator bar between this page and the bookmark section
to change the size of the page being viewed.
© 2004 Precor Incorporated
Unauthorized Reproduction and Distribution Prohibited By Law
Page 1
Advertisement
Table of Contents
Troubleshooting

Related Manuals for Precor EFX 5.17i


Summary of Contents for Precor EFX 5.17i
- Page 1 5.17i Elliptical Fitness Crosstrainer Warning: This service manual is for use by Precor trained service providers only. If you are not a Precor Trained Servicer, you must not attempt to service any Precor Product; Call your dealer for service. This document contains information required to perform the majority of troubleshooting, and replacement procedures required to repair and maintain this product.
-
Page 2: Section One - Things You Should Know
Exercise caution when touching any wire or electrical component during EFX 5.17i operation. Caution statements are intended to prevent damage to the EFX 5.17i as a result of the current activity. Caution statements included in this manual are listed below: •... -
Page 3: General Information
5.17i Elliptical Fitness Crosstrainer • Do not set anything on the handlebars, display enclosure, or cover. Never place liquids on any part of the EFX 5.17i other than a water bottle in the water bottle holder during normal operation. •... -
Page 4: Required Tools And Equipment
5.17i Ellipitical Fitness Crosstrainer Required Tools and Equipment The following list is a summary of the tools and equipment required when you service Precor’s EFX 5.17i. TOOLS EQUIPMENT phillips and flat-head screwdrivers anti-static wrist strap (20024-101) digital multimeter standard and metric allen wrench sets... -
Page 5: Procedure 2.1 - Accessing The Diagnostic Program
• Brake (eddy current) Test Procedure Plug the power cord into the wall outlet, then turn on the EFX 5.17i with the on/off switch. Note: For the purpose of entering the key sequences to access the various diagnostic programs, the keypad keys are hypothetically numbered from 1 to 7 from left to right. - Page 6 5.17i Ellipitical Fitness Crosstrainer Watch the display as the LED test progresses. The test is programmed to display the following LED illumination sequence: The test name “DISPLAY TEST” will be scrolled. All of the L.E.D.s on the display will be illuminated. Press the RESET key to proceed to the keyboard test.
- Page 7 5.17i Elliptical Fitness Crosstrainer 16. The resistance level will be displayed on the left side of the display and the corresponding power bits (duty cycle) will be displayed on the right side of the display. Initially, the power bits level will be zero, pressing the , keys will change the number of power bits being applied to the eddy current system.
-
Page 8: Procedure 2.2 - Accessing The Information Display
Procedure 2.2 - Accessing the Information Display Procedure Plug the power cord into the wall outlet, then turn on the EFX 5.17i with the on/off switch. With the PRECOR banner displayed, press keys RESET,6,5, sequentially. The EFX 5.33 Information display cycles through the following displays:... -
Page 9: Procedure 2.3 - Accessing The Set User Parameters Display
Procedure Plug the power cord into the wall outlet, then turn on the EFX 5.17i with the on/off switch. With the PRECOR EFX 5.17i banner displayed, press keys RESET,5,6,7,1, sequentially. The display name “SELECT UNITS” will be scroll. -
Page 10: Procedure 2.4 - Documenting Software Problems
If you isolated the problem to either the PROM, upper PCA, or lower PCA, include the information you have recorded with the malfunctioning PROM or PCA when you ship it to Precor. When a problem occurs, record the following information: •... -
Page 11: Section Three - Preventive Maintenance
Regular Preventive Maintenance (Owner) Cleanliness of the EFX 5.17i and its operating environment will keep maintenance problems and service calls to a minimum. Precor recommends that you perform the following preventive maintenance schedule. - Page 12 Resistance Level 20. Operate the EFX for another 2–3 minutes. If the resistance of the EFX 5.17i does not change or the EFX operation feels inconsistent with Resistance Levels 1 and 10, troubleshoot per Procedure 6.5.
-
Page 13: Procedure 5.1 - Measuring The Resistance Of An Eddy Current Magnet
5.17i Elliptical Fitness Crosstrainer Procedure 5.1 - Measuring the Resistance of an Eddy Current Magnet Caution Remove power from the EFX before you measure magnet resistance. Procedure Set the on/off switch in the “off” position, then unplug the power cord from the wall outlet. WARNING Before continuing with this procedure, review the Warning and Caution statements listed in Section One, Things You Should Know. - Page 14 5.17i Ellipitical Fitness Crosstrainer Diagram 5.2 - Eddy Current Magnet (serial code AMPF) Eddy Current Magnet Magnet Cable If the resistance measures significantly less than 90 Ω or significantly more than 110 Ω. THEN... OTHERWISE... Replace the magnet as described Reconnect the magnet wires, then in Procedure 7.13.
-
Page 15: Procedure 5.2 - Inspecting And Adjusting Belt Alignment And Tension
5.17i Elliptical Fitness Crosstrainer Procedure 5.2 - Inspecting and Adjusting Belt Alignment and Tension Procedure Set the on/off switch in the “off” position, remove the A.C. line cord from the A.C. outlet. WARNING Before continuing with this procedure, review the Warning and Caution statements listed in Section One, Things You Should Know. - Page 16 Tension Bolt 14. Place a belt gauge (Precor part # 20030-117 or equivalent) in the middle of the step up belt at the center of the belt span (see Diagram 5.4). Lay a straight edge along the length of the belt and beside the belt gauge.
- Page 17 5.17i Elliptical Fitness Crosstrainer Diagram 5.4 - Measuring Belt Tension 15 lbs 1/4” 16. If the locking tabs on the right and left step up belt tension bolts have not been straightened, use pliers to bend the locking tabs out of the way so that the bolts can be turned. IF...
- Page 18 5.17i Ellipitical Fitness Crosstrainer 21. Using your finger, press in on the center of the lower span of the input belt. Compare the pressure required to deflect the input belt to the pressure required to deflect the step up belt. 22.
-
Page 19: Procedure 5.3 - Calibrating The Lift Motor
5.17i Elliptical Fitness Crosstrainer Procedure 5.3 - Calibrating the Lift Motor In order to calibrate the lift motor, it is necessary to disconnect the lift motor from the ramp assembly. Set the on/off switch in the “on” position. Lower the ramp to incline level 1 and set the on/off switch in the “off”... - Page 20 5.17i Ellipitical Fitness Crosstrainer Set the on/off switch in the “on” position. Enter the diagnostics routine per Procedure 2.1 and proceed to the LIFT A/D TEST portion of the procedure. Operate the CROSSRAMP or CROSSRAMP keys as required to set the lift calibration A/D number to 129.
-
Page 21: Procedure 6.1 - Troubleshooting The Lower And Upper Interconnect Cable
5.17i Elliptical Fitness Crosstrainer Procedure 6.1 - Troubleshooting the Lower and Upper Interconnect Cable Typical symptoms associated with a defective interconnect cable is either an error 30 or no power to the upper PCA. This procedure requires that you have a known good upper interconnect cable, lower interconnect cable and mid-point connector. - Page 22 11. If the connector contacts are damaged the PCA must be replaced. Replace the lower PCA per Procedure 7.3 or the upper PCA per Procedure 7.2, as required. 12. If you have performed all of the procedures above and have been unable to correct the problem, call Precor customer service. Page 22...
-
Page 23: Procedure 6.2 - Troubleshooting The Keypad And Upper Pca
5.17i Elliptical Fitness Crosstrainer Procedure 6.2 - Troubleshooting the Keypad and Upper PCA If the function keys on the electronic console are unresponsive, the problem may be either the upper PCA or keypad. It is necessary to use the keypad diagnostics to troubleshoot the key functions. - Page 24 10. If you have performed all of the procedures above and have been unable to correct the problem, call Precor customer service. 11. Access the diagnostics program per Procedure 2.1. If the key(s) necessary to access the diagnostic program is not functioning, skip to step 14.
-
Page 25: Procedure 6.3 - Troubleshooting The Speed Sensor
5.17i Elliptical Fitness Crosstrainer Procedure 6.3 - Troubleshooting the Speed Sensor Circuit Description The speed sensor is a reed switch. A magnet is mounted on the step up pulley. The magnet passes the speed sensor once per revolution. The output from the speed sensor is a 5 Vdc square wave, the frequency of which indicates the operating speed. - Page 26 If you have performed all of the above tests and the speed sensor is still not functioning, call Precor Technical Support. Check the operation of the EFX as described in Section Four. Page 26...
-
Page 27: Procedure 6.4 - Troubleshooting The Eddy Current System
They are lower PCA and upper PCA. Replace only one part at a time. If the new part does not correct the problem re-install the original part. If you have performed all of the above tests and there is still no resistance, call Precor Technical Support. - Page 28 13. Measure from both eddy current magnet wires to frame ground. A normal reading for both measurements is open (∞). If the either resistance measurement is significantly low, replace the eddy current magnet. 14. If you have performed all of the above tests and the resistances are still incorrect, call Precor Technical Support. Page 28...
-
Page 29: Procedure 6.5 - Upper Display Does Not Illuminate
PCA 12. If you have performed all of the above tests and are unable to resolve the problem, contact Precor customer support. 13. Plug the line cord into the wall outlet and set the on/off switch in the “on” position. - Page 30 17. If the measurement is good, replace the speed sensor. If the measurement is significantly low, replace the interconnect cable. 19. If you have performed all of the above tests and are unable to resolve the problem, contact Precor customer support. Diagram 6.5 - Lower PCA (Serial code SB) TP26...
- Page 31 5.17i Elliptical Fitness Crosstrainer Diagram 6.6 - Lower PCA (Serial code AMPF) Data Cable Connector Speed sensor Magnet Cable Connector Lift Fuse Lift Position Connector AC Wiring Lift Power Connector Page 31...
-
Page 32: Procedure 6.6 - Troubleshooting The Lift System
If the new part does not correct the problem, replace the original part. If you have performed all of the above tests and the lift system is still not functioning, call Precor Technical Support. Set the circuit breaker in the “off” position. Remove the lift fuse (2 amp slow blow) fuse from the lower PCA. - Page 33 Replace only one part at a time. If the new part does not correct the problem, replace the original part If you have performed all of the above tests and the lift system is still not functioning, call Precor Technical Support. Page 33...
-
Page 34: Procedure 7.1 - Replacing Or Removing A Rear Cover Section
5.17i Ellipitical Fitness Crosstrainer Procedure 7.1 - Replacing or Removing a Rear Cover Section Warning: Care must be taken when work is being performed in the area of the stairarms. Pinch points exist between the stairarm and ramp and between the stairarm and crankarm, when the rear covers are removed. - Page 35 5.17i Elliptical Fitness Crosstrainer Diagram 7.2 - Upper and Lower Front Cover Sections Upper Front Cover Lower Front Cover If all of the cover sections have been removed, first replace lower and upper front cover sections, then the top cover section and then the left and right cover sections as described below.
-
Page 36: Procedure 7.2 - Replacing A Display Enclosure Or Upper Pca
- Replacing a Display Enclosure or Upper PCA Procedure Anti-static kits (part number 20024-101) can be ordered from Precor. The keyboard is part of the display housing front panel. If the keyboard is not functioning properly, replace the display housing front panel. - Page 37 5.17i Elliptical Fitness Crosstrainer 11. Position the display enclosure on the display plate. Replace and tighten the display mounting screws. 12. Check operation as described in Section Four. Page 37...
-
Page 38: Procedure 7.3 - Replacing A Lower Pca
5.17i Ellipitical Fitness Crosstrainer Procedure 7.3 - Replacing a Lower PCA Warning: Care must be taken when work is being performed in the area of the stairarms. Pinch points exist between the stairarm and ramp and between the stairarm and crankarm, when the rear covers are removed. - Page 39 5.17i Elliptical Fitness Crosstrainer Carefully, rotate the lower PCA mounting bracket away from the front cover section and disconnect the interconnect cable from the lower PCA. Remove the lower PCA and mounting bracket from the unit. Remove the four screws that fasten the lower PCA to the mounting bracket and remove the lower PCA from the mounting bracket.
- Page 40 15. Remove the ground lead of the wrist strap from the EFX frame, then remove the wrist strap from your arm. 16. Re-install the left and right rear cover sections per Procedure 7.1. Check the operation of the EFX 5.17i as described in Section Four. Page 40...
-
Page 41: Procedure 7.4 - Replacing An Interconnect Cable
5.17i Elliptical Fitness Crosstrainer Procedure 7.4 - Replacing an Interconnect Cable Procedure Note: Before you install a new interconnect cable, ensure that the interconnect cable is defective. Refer to Procedure 6.1. Set the on/off switch in the off position. There are three interconnect cables in the 5.17i. The upper, intermediate and lower interconnect cables. - Page 42 5.17i Ellipitical Fitness Crosstrainer Diagram 7.5 - Display Mounting Intermediate Display Mounting Cable Loosen, do Remove not remove Diagram 7.6 - Interconnect Cables. Frame Base Left Frame Lower Tube Cable Intermediate Mid-Point Cable Connector 10. Disconnect the intermediate interconnect cable from the mid-point connectors at the display mounting and the lower end of the left frame tube.
- Page 43 5.17i Elliptical Fitness Crosstrainer 12. When the replacement interconnect cable emerges from the bottom of the left frame tube, separate the interconnect cables and discard the defective interconnect cable. Connect the replacement interconnect cable to the mid-point connector at the lower end of the left frame tube.
- Page 44 5.17i Ellipitical Fitness Crosstrainer 25. Replace the left frame tube as described in steps 1- 16 above. 26. Replace the right and left rear cover sections and front frame end cap. Thoroughly, test the unit per Section 4. Page 44...
-
Page 45: Procedure 7.5 - Replacing A Power Entry Module
5.17i Elliptical Fitness Crosstrainer Procedure 7.5 - Replacing a Power Entry Module Procedure Note: The power entry module on this EFX is a multifunction unit. It functions as a power entry module, A.C. line fuse holder, on/off switch and A.C.line filter. Set the on/off switch in the off position. - Page 46 5.17i Ellipitical Fitness Crosstrainer Set the replacement power entry module at it’s mounting position, secure the power entry module with the screws removed in step 4. Replace the wires removed in step 3. Connect the blue wire to terminal D, the brown wire to terminal A and the green wire to the ground terminal of the power entry module.
-
Page 47: Procedure 7.6 - Replacing A Crankarm Assembly
5.17i Elliptical Fitness Crosstrainer Procedure 7.6 - Replacing a Crankarm Assembly Warning: Care must be taken when work is being performed in the area of the stairarms. Pinch points exist between the stairarm and ramp and between the stairarm and crankarm, when the rear covers are removed. - Page 48 5.17i Ellipitical Fitness Crosstrainer Clean the crankarm mounting bolt threads and the input pulley shaft threads with an alcohol swab. Allow them to dry and apply blue loctite to the crankarm mounting bolt threads. Position the crankarm on the input pulley shaft. Thread and hand tighten the crankarm mounting bolt into the input pulley shaft.
-
Page 49: Procedure 7.7 - Replacing A Pillow Block Bearing
5.17i Elliptical Fitness Crosstrainer Procedure 7.7 - Replacing a Pillow Block Bearing Warning: Care must be taken when work is being performed in the area of the stairarms. Pinch points exist between the stairarm and ramp and between the stairarm and crankarm, when the rear covers are removed. - Page 50 5.17i Ellipitical Fitness Crosstrainer Diagram 7.9 - Pillow Block Bearings (serial code SB) Input Pulley Mounting Nut Pillow Block Bearing Diagram 7.10 - Pillow Block Bearings (serial code AMPF) 10. Thread and hand tighten the pillow block mounting nuts onto the mounting studs or mounting bolts.
- Page 51 5.17i Elliptical Fitness Crosstrainer 12. Tension the belts per Procedure 5.2. 13. Replace the crankarm(s) per Procedure 7.6. 14. Replace the eddy current magnet per Procedure 7.13. 15. Replace the stairarms per Procedure 7.17. Replace the front, top, left and right cover sections per Procedure 7.1. Page 51...
- Page 52 5.17i Ellipitical Fitness Crosstrainer Procedure 7.8 - Replacing an Input Drive Assembly Warning: Care must be taken when work is being performed in the area of the stairarms. Pinch points exist between the stairarm and ramp and between the stairarm and crankarm, when the rear covers are removed.
- Page 53 5.17i Elliptical Fitness Crosstrainer Slide the step up and input belts onto the input drive assembly as you set the input drive assembly in it’s mounting position in the EFX. Replace the magnet assembly per Procedure 7.13. 10. Complete the installation, alignment and tensioning per Procedure 7.7, steps 9 to 16. Page 53...
-
Page 54: Procedure 7.9 - Replacing An Input Pulley Belt
5.17i Ellipitical Fitness Crosstrainer Procedure 7.9 - Replacing an Input Pulley Belt Warning: Care must be taken when work is being performed in the area of the stairarms. Pinch points exist between the stairarm and ramp and between the stairarm and crankarm, when the rear covers are removed. - Page 55 5.17i Elliptical Fitness Crosstrainer Diagram 7.12 - Input Pulley Belt Input Pulley Belt Input Pulley 12. Slide the step up and input belts onto the input drive assembly as you set the input drive assembly in its mounting position in the drive unit. 13.
-
Page 56: Procedure 7.10 - Replacing A Step-Up Pulley Belt
5.17i Ellipitical Fitness Crosstrainer Procedure 7.10 - Replacing a Step-Up Pulley Belt Warning: Care must be taken when work is being performed in the area of the stairarms. Pinch points exist between the stairarm and ramp and between the stairarm and crankarm, when the rear covers are removed. - Page 57 5.17i Elliptical Fitness Crosstrainer Diagram 7.13 - Step Up Pulley Belt Step Up Pulley Belt Step Up Pulley Tension Bolt Tension Bolt 13. Slide the pillow block bearings onto the input pulley shaft. 14. Complete the installation, alignment and tensioning per Procedure 7.7, steps 9 to 16. Page 57...
-
Page 58: Procedure 7.11 - Replacing A Step-Up Pulley Assembly
5.17i Ellipitical Fitness Crosstrainer Procedure 7.11 - Replacing a Step-Up Pulley Assembly Warning: Care must be taken when work is being performed in the area of the stairarms. Pinch points exist between the stairarm and ramp and between the stairarm and crankarm, when the rear covers are removed. -
Page 59: Procedure 7.12 - Replacing A Speed Sensor Assembly
5.17i Elliptical Fitness Crosstrainer Procedure 7.12 - Replacing a Speed Sensor Assembly Procedure Set the on/off switch in the “off” position. WARNING Before continuing with this procedure, review the Warning and Caution statements listed in Section One, Things You Should Know. Remove the left and right cover sections as described in Procedure 7.1. - Page 60 5.17i Ellipitical Fitness Crosstrainer Reconnect the speed sensor cable to the lower PCA. Re-install the left and right cover sections as described in Procedure 7.1, then check the operation of the EFX as described in Section Four. Page 60...
-
Page 61: Procedure 7.13 - Replacing An Eddy Current Magnet Assembly
5.17i Elliptical Fitness Crosstrainer Procedure 7.13 - Replacing an Eddy Current Magnet Assembly Procedure Set the on/off switch in the “off” position, then unplug the power cord from the wall outlet. WARNING Before continuing with this procedure, review the Warning and Caution statements listed in Section One, Things You Should Know. - Page 62 5.17i Ellipitical Fitness Crosstrainer Position the magnet assembly at its mounting position so that the eddy current disk is centered between the magnet poles. Replace and hand tighten the magnet assembly mounting bolts. Torque the magnet assembly mounting bolts to 43 in/lbs. Reconnect the magnet cable to the magnet assembly.
-
Page 63: Procedure 7.14 - Replacing A Stairarm Pivot Block
5.17i Elliptical Fitness Crosstrainer Procedure 7.14 - Replacing a Stairarm Pivot Block Warning: Care must be taken when work is being performed in the area of the stairarms. Pinch points exist between the stairarm and ramp and between the stairarm and crankarm, when the rear covers are removed. - Page 64 5.17i Ellipitical Fitness Crosstrainer Slide the stairarm pivot block onto the crankarm pin and replace the retaining ring removed in step 5. Slide the stairarm onto the stairarm pivot block. Install the felt pad and hand tighten the stairarm pivot block mounting hardware. Torque the stairarm pivot block mounting bolt to 15 foot pounds.
-
Page 65: Procedure 7.15 - Replacing A Wheel Assembly
5.17i Elliptical Fitness Crosstrainer Procedure 7.15 - Replacing a Wheel Assembly Warning: Care must be taken when work is being performed in the area of the stairarms. Pinch points exist between the stairarm and ramp and between the stairarm and crankarm, when the rear covers are removed. -
Page 66: Procedure 7.16 - Replacing A Stairarm Pedal
5.17i Ellipitical Fitness Crosstrainer Procedure 7.16 - Replacing a Stairarm Pedal Warning: Care must be taken when work is being performed in the area of the stairarms. Pinch points exist between the stairarm and ramp and between the stairarm and crankarm, when the rear covers are removed. -
Page 67: Procedure 7.17 - Replacing A Stairarm
5.17i Elliptical Fitness Crosstrainer Procedure 7.17 - Replacing a Stairarm Warning: Care must be taken when work is being performed in the area of the stairarms. Pinch points exist between the stairarm and ramp and between the stairarm and crankarm, when the rear covers are removed. -
Page 68: Procedure 7.18 - Replacing A Ramp Assembly
5.17i Ellipitical Fitness Crosstrainer Procedure 7.18 - Replacing a Ramp Assembly Warning: Care must be taken when work is being performed in the area of the stairarms. Pinch points exist between the stairarm and ramp and between the stairarm and crankarm, when the rear covers are removed. - Page 69 5.17i Elliptical Fitness Crosstrainer Hand start both lower mounting bolts remove in step 6. Torque both bolts to 35 foot pounds. 10. Raise the ramp and position it so that the ramp mounting holes align with the holes in the plastic lift nut.
-
Page 70: Procedure 7.19 - Replacing A Handlebar
5.17i Ellipitical Fitness Crosstrainer Procedure 7.19 - Replacing a Handlebar Set the on/off switch in the “off” position, then unplug the power cord from the wall outlet. Remove the four screws that fasten the display front panel to the display housing. Lift the display front panel off of the display housing and disconnect the interconnect cable from the upper PCA. -
Page 71: Procedure 7.20 - Replacing A Input Belt Tensioner
5.17i Elliptical Fitness Crosstrainer Procedure 7.20 - Replacing a Input Belt Tensioner Warning: Care must be taken when work is being performed in the area of the stairarms. Pinch points exist between the stairarm and ramp and between the stairarm and crankarm, when the rear covers are removed. -
Page 72: Procedure 7.21 - Replacing A Rear Cover Support
5.17i Ellipitical Fitness Crosstrainer Procedure 7.21 - Replacing a Rear Cover Support Procedure Set the on/off switch in the off position. Remove the A.C. line cord from the A.C. outlet and from the power entry module. Remove the top, left and right cover sections per Procedure 7.1. Diagram 7.22 - Rear Cover Support Mounting Screw... - Page 73 5.17i Elliptical Fitness Crosstrainer Replace the top, left and right cover sections per Procedure 7.1. 10. Insert the A.C. line cord in the power entry module and the A.C. outlet. 11. Set the on/off switch in the on position and test the EFX per Section Four. Page 73...
-
Page 74: Procedure 7.22 - Replacing A Power Entry Module Fuse
5.17i Ellipitical Fitness Crosstrainer Procedure 7.22 - Replacing a Power Entry Module Fuse Procedure Set the on/off switch in the off position. Remove the A.C. line cord from the A.C. outlet and from the power entry module. Using a thin bladed screwdriver, carefully pry the fuse access door open (See Diagram 7.23 or Diagram 7.24). - Page 75 5.17i Elliptical Fitness Crosstrainer Diagram 7.24 - Power Entry Module Fuse (serial code AMPF) Power Entry Module Fuse Fuse Module Set the on/off switch in the on position and test the EFX per Section Four. Page 75...
-
Page 76: Procedure 7.23 - Replacing A Lift Motor
5.17i Ellipitical Fitness Crosstrainer Procedure 7.23 - Replacing a Lift Motor Set the on/off switch in the “on” position. Lower the ramp to incline level 1 and set the on/off switch in the “off” position. Remove the front cover. Disconnect the lift connector from the intermediate lift cable (See Diagram 7.25). Remove the two screws that fasten the keeper to the cover and remove the keeper. - Page 77 5.17i Elliptical Fitness Crosstrainer Remove the bolt that fastens the lower end of the lift motor to the frame. Note the location of the mylar washers, they must be replaced in the same locations to minimize lift motor operating noise. Set the replacement lift motor in its mounting location and fasten it to the frame with the hardware removed in step 5.
-
Page 78: Procedure 7.24 - Replacing The Prom
5.17i Ellipitical Fitness Crosstrainer Procedure 7.24 - Replacing the PROM Anti-static kits (part number 20024-101) can be ordered from Precor. The PROM and the associated printed circuit assembly (PCA) are static sensitive. Anti- static devices must be used and all anti-static precautions must be followed during this procedure. -
Page 79: Wiring Diagram 8.1 - 5.17I
5.17i Elliptical Fitness Crosstrainer Wiring Diagram 8.1 - 5.17i Power Entry Module J6-2,5,8 Upper J6-1,4,7 J6-6 Lower J6-3 Fuse F3 = 2 amp Fuse F2 = 2 amp Mid-Point Connectors J4-1 P4-1 J4-2 P4-2 P4-3 J4-3 Lift Motor J6-1 P6-1 J6-2 P6-2 J6-3... -
Page 80: Block Diagram 8.2 - 5.17I
5.17i Ellipitical Fitness Crosstrainer Block Diagram 8.2 - 5.17i Page 80...
Need help?
Do you have a question about the EFX 5.17i and is the answer not in the manual?
Questions and answers
I had a couple of inches of water in the basement. The elliptical was plugged into a GFI outlet and it tripped as it should have. Now the machine will not respond to the on switch, is there a reset button or a fuse somewhere that I need to check?