Table of Contents
Advertisement
Quick Links
BALANCE
Control Throws
Set the control throws as followings for a starting point. After you
familiar with its flying characteristics then these control throw can
be tailored to fit your flying style.
1"
Rudder-Low Rate
1"
1 3/4"
Rudder-High Rate
1 3/4"
1/ 2"
Aileron-Low Rate
1/ 2"
3/4"
Aileron-High Rate
3/4"
1/2"
Elevator-Low Rate
1/2"
3/4"
Elevator-High Rate
3/4"
Flap
3"
Center of Gravity
IMPORTANT - Do not attempt to fly your model before
completing this very important section. A model that is not
properly balanced will be unstable and could cause serious
damage and/or injury. Adjust the battery location or add
weight as needed to achieve level balance.
Measure the C.G. while plane is dry. The balance point is
about 3 3/4"(95mm) behind the leading edge where there
is a panel line on fuselage.
3 3/4"
(95
)
mm
Locate A Good Flying Site
Generally, the best place to fly your model is at an AMA
(Academy of Model Aeronautics) chartered club field. Your
local hobby dealer can tell you if there is such a club in your
area or write the AMA for information. It is also a good idea
to join this organization before flying your model since they
offer liability insurance that can protect you if your model
causes damage or injury to others.
Academy of Model Aeronautics
5151 East Memorial DR
Muncie, IN 47302-9252
www.modelaircraft.org
If there is not a chartered club field in your community,
you will need to find a large area free of obstructions, and
has a smooth grass or asphalt surface to be used as a
runway. For safetysake, it should be located well away from
houses, buildings, schools, power lines and airports. If you
will be flying within 6 miles of an airport, you should check
with the airport manager before flying your model.
A Note On Batteries
The batteries are the heart of your radio system. Make sure
you have fully charged batteries! With recharge-able
batteries, follow the manufacturers instructions to make
sure the batteries are fully charged, especial the first time
the radio is used. We would recommend you use larger
capacity (1000mAh) if you use high performance servos as
they will draw more current than ordinary servos.
1000mAH
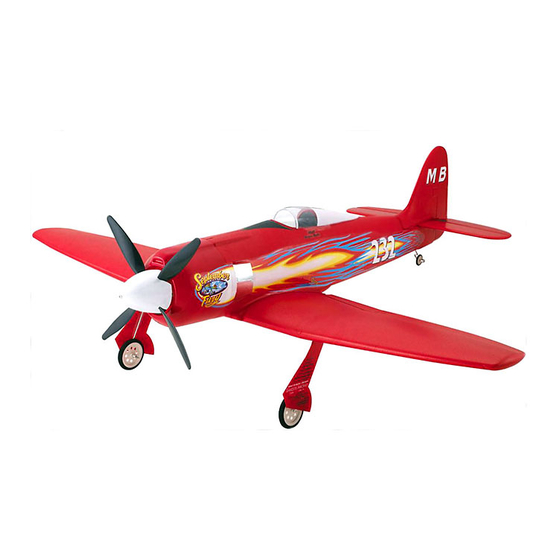
Congratulations
Now that you have completed the assembly of your Sept.
Fury we feel that you have a very capable and good
looking sports scale plane. We hope that you will enjoy
this model and get many hours of flying pleasure from its
use. Thank you for purchasing this Sept. Fury from
Thunder Tiger and we look forward to providing you with
other great R/C products in the future.
24
Assembly Manual
No. 4573
Specifications:
Wing Span: 67 3/4" (1720mm)
Length: 60" ( 1525mm)
Weight: 5500g ( 12 lbs.)
Engine: .90 2C, 1.20 4C req'd
Unlimited Pylon Racer
Radio: 5~8ch
6~8 servos req'd
Warranty
This kit is guaranteed to be free from defects in material and workmanship at the date of purchase.
It does not cover any damage caused by use or modification. The warranty does not extend beyond
the product itself and is limited only to the original cost of the kit. By the act of building this user-
assembled kit, the user accepts all resulting in liability for damage caused by the final product. If the
buyer is not prepared to accept this liability, it can be returned new and unused to the place of
purchase for a refund. Neither your dealer nor Thunder Tiger Distributors, can accept kits for return if
construction has begun.
Notice: Adult Super Vision Required
This is not a toy. Assembly and flying of this product requires adult super vision.
Read through this book completely and become familiar with the assembly and flight of this airplane.
Inspect all parts for completeness and damage. fIyou encounter any prob lems, call us for help.
1
JE6788 V2
Advertisement
Table of Contents

Subscribe to Our Youtube Channel
Related Manuals for THUNDER TIGER Sept. Fury


Summary of Contents for THUNDER TIGER Sept. Fury
- Page 1 Neither your dealer nor Thunder Tiger Distributors, can accept kits for return if construction has begun.
-
Page 2: Table Of Contents
Adhesives: Instant setting Cyanoacrylate adhesive (thin CA) Thunder Tiger has teamed up with the Michael Brown Racing team to bring this legendary airplane to your hands; Thunder Slow setting Cyanoacrylate adhesive (thick CA) Tiger is proudly to present the only officially licensed 1/7th replica of the "Sept.Fury" to all the R/C hobbyist alike worldwide! 5-10 Minute Epoxy (fast) It's a replica that has stayed true to the "Sept.Fury"... -
Page 3: Hex Wrench 1
PARTS DRAWINGS PARTS DRAWINGS No.3265 Fuel Tank AS6429 Fuselage No. 3299 Wheel AS6432 Canopy FRP Cockpit (1) Coveling 200X80mm VT Lower Trailing Edge (1) VT Upper Trailing Edge (1) Fiberglass Cloth (1) Silicone Tube (1) Crank Weight (1) Straight Nipple (1) Fuel Stopper (1) FRP Tail Cover (1) Canopy (1) -
Page 4: Tail Gear
PARTS CHECK LIST WING 1. Glue the CA hinges in aileron first. 4. Using a sealing iron to tack down the covering inside the servo well. Trim the excess covering away. Kit Contents: Torque Wire (1) Elevator Wood Push Rod (1) FRP Fuselage (1) M2 Nut (15) Elevator Pushrod Retainer (1) -
Page 5: Wing
WING WING Flap II Flap I 7. Use Throttle Pushrod to guide the wire through the 10. If you would use Flap function then proceed the wing panels. Fix the wire with mask tape to prevent from following steps. If not then skip to step 24. Do the same falling back into wing pannel. - Page 6 WING LANDING GEAR 19. Secure control horn on Flap I with 2x15mm machine 26. Place the retract in place and drill 5/64"(2mm) holes 23. Epoxy the dowels at wing root in place as shown. screw. Note the control horn should away from the edge on the retract mount.
-
Page 7: Upper Retainer
LANDING GEAR FUSELAGE 29. You may need to trim the wires of retract so the wheel axle is lever to the wing root. Secure the retract in 35.Install the wheel and secure collar with 3x3mm set screw. 32.Sand the upper retainer B and place it in the strut coil 38. -
Page 8: Tail
TAI L TAI L 41. Locate the hole that is located at the bottom wing between retract the flap servo hatch. Drill a 5/64" (2mm) hole through the fiberglass tube of the main wing halves, and make sure they are firmly close to the fuselage then 43.Epoxy the firewall in place. -
Page 9: Rubber
TAI L RUDDER 58. Apply a small tube onto the clevis then connect the elevator pushrod to the elevator torque rod. A flat head screwdriver will help snapping the clevises onto the 52.Sand the tail saddle to increase the roughness as well 55. -
Page 10: Steering
TAIL GEAR TAIL GEAR 67. Drill the pull-pull wire exit hole and thread the wire 70. Locate the tail gear bag, and assemble the tail gear into fuselage to the rudder servo. Do the same way to as shown. Note the orientation of steering arm, trim the 73. -
Page 11: Radio
81. Locate the retract servo tray, glue the doubler as shown. Then, install the retract servo on the servo tray. 76.Place the Engine (Thunder Tiger PRO-91 Shown) in 84. Secure battery box cover with four 2x8mm washer 78.Install the Sept. Fury Exclusive Muffler(TTR9791), the Engine Mount then proceed to make mount hole wood screws. -
Page 12: Cowling
95.You may need to remove the cowling and apply silver decal as shown. Your Sept. Fury is now ready to fly, carefully set up the control throws and balance your plane well before each 89. Install the propeller and furnished spinner. What we and every flight;...
Need help?
Do you have a question about the Sept. Fury and is the answer not in the manual?
Questions and answers