Table of Contents
Advertisement
Advertisement
Table of Contents

Subscribe to Our Youtube Channel
Summary of Contents for Bewatec MediPaD 10 LX
- Page 1 Bedienungsanleitung Bessere Ideen - Bessere Kommunikation MediStream 10" Inhalt OPERATING MANUAL MediPaD 10 LX ©BEWATEC Kommunikationstechnik GmbH, Orkotten65, D ‐ 48291 Telgte, T: +49 25 04 73 37‐0, F: +49 25 04 73 37‐590 , info@bewatec.com, www.bewatec.com ...
- Page 2 Manufacturer: BEWATEC Kommunikationstechnik GmbH Orkotten 65 48291 Telgte GERMANY Tel: +49 2504 73 37‐0 Mail: info@bewatec.com Web: www.bewatec.com © Copyright 2015 by BEWATEC® Kommunikationstechnik GmbH Subject to change! This document is protected by copyright. It supports the user in the safe and efficient operation of the device. Reproduction or duplication of the contents, as a whole or in part, is not permitted without the prior permission of the rights holder. 2 / 36 Operating manual MediPaD 10 LX ...
-
Page 3: Table Of Contents
CONTENT NOTES ON THE OPERATING MANUAL 4 1 SAFETY 5 SAFETY, WARNING AND ADVICE SYMBOLS ALLGEMEINE SICHERHEITSHINWEISE Fehler! Textmarke nicht definiert. INTENDED USE TARGET GROUPS AND QUALIFICATION LIABILITY AND GUARANTEE ... -
Page 4: Notes On The Operating Manual
NOTES ON THE OPERATING MANUAL NOTES ON THE OPERATING MANUAL Read the operating manual carefully and follow all advice given. This will ensure a reliable and long‐lasting operation of your product. For reasons of clarity, the instruction manual does not contain detailed information on every possible use of the product. Therefore it cannot take into account every conceivable form of installation, operation or servicing. Should further information be desired or problems arise which are not dealt with in the manual, the necessary advice can be obtained from the manufacturer. The product has been constructed in accordance with the current applicable technical regulations and is safe to use. It has been tested and left the factory in good order and condition in terms of operational safety. To maintain this condition throughout the operational period, the instructions contained in this manual must be taken into account and followed. Modifications and repairs of the product can only be carried out if they are explicitly permitted in this manual. Observing safety advice and all safety and warning symbols contained in this instruction manual ensures the best possible protection for the user and the environment as well as a safe and problem‐free operation of the product. 4 / 36 Operating manual MediPaD 10 LX ... -
Page 5: Safety
SAFETY SAFETY SAFETY, WARNING AND ADVICE SYMBOLS WARNING – RISK TO PERSONAL SAFETY This symbol, in conjunction with the signal word "Warning", indicates a potentially dangerous situation. Ignoring this safety advice can lead to serious injury or death. CAUTION – RISK OF MINOR INJURY This symbol, in conjunction with the signal word "Caution", indicates a potentially dangerous situation. Ignoring this safety advice can lead to minor injury. It can also be used to warn of potential material damage. ATTENTION – RISK OF MATERIAL DAMAGE This symbol represents the potential for material damage. Ignoring this safety advice can lead to damage to the product or its destruction. INFORMATION This symbol represents information or a reference to further useful topics. This is not a signal word for a dangerous situation. Operating manual MediPaD 10 LX 5 / 36 ... - Page 6 SAFETY GENERAL SAFETY ADVICE Observe the following safety advice when handling the device: CAUTION – LIVE COMPONENTS Danger of injury through electric shock, and risk of short‐circuit or fire! – Do not open the device. – Never expose the device to rain or humidity. – Never use the device near plumbing units. – Never connect the device to any power supply not specified by the manufacturer. Only replace damaged cables with original cables. – Do not insert any objects into the device through the slots or openings. CAUTION – BREAKAGE OF GLASS – The device is equipped with a glass front made of Corning® Gorilla® Glass. – In case of breakage of the glass e.g. by dropping the unit or willful damage to property there is the possibility for risk of cuts. – Thoroughly clean the area where the device has been damaged. – Send in the device for repair. ATTENTION – DAMAGE TO THE DEVICE – Protect the LCD device against heat. – Do not position it directly next to radiators or heaters. – Avoid positioning of the device in direct sunlight. – Do not obstruct the ventilation slots of the LCD device. – Repairs to the device may only be carried out by qualified personnel. – During long periods of inactivity, disconnect the device from the power supply. – Should foreign metallic objects or liquids enter the device, immediately disconnect the device from the ...
-
Page 7: Intended Use
SAFETY INTENDED USE This device is used to receive and play TV and radio programs, usage of special applications and to access the Internet. Additional connection facilities enable expansion of the reception and playback sources. This device is intended for use only in dry indoor spaces. TARGET GROUPS AND QUALIFICATION Installation, commissioning and maintenance of the product must only be carried out by trained specialist personnel, who have been authorized to do so by the operator of the facility. The specialist personnel must have read and understood the manual and must follow the instructions it contains. The operator must ensure that the relevant national regulations concerning installation, testing for correct function, repair and maintenance of electrical products are observed. LIABILITY AND GUARANTEE Improper use, non‐observance of the instructions in this manual, the use of insufficiently qualified personnel as well as any independent modifications releases the manufacturer from liability for any resultant damage. This will also invalidate the manufacturer's guarantee. Operating manual MediPaD 10 LX 7 / 36 ... -
Page 8: Cleaning
SAFETY CLEANING All BEWATEC flat screens, telephones and equipment are especially designed, developed and produced for the operation at the patient’s bedside (Point‐of‐care) respectively couch side since 1998. This is the reason why we use only materials which completely fulfill the requirements of the daily usage in the day‐to‐day operation of a hospital to produce our components. The experience with more than 140.000 sold flat screen/telephone‐units shows that these products can be installed in intensive care units or in bone marrow transplantation centers where detergents and disinfectants are used in a very high concentration. Our customers in hospitals, dialysis wards and rehabilitation clinics for example use detergents and disinfectant like: Fresenius Medical Care Deutschland GmbH ‐ ClearSurf und Freka®‐NOL B. Braun Melsungen AG ‐ Melsept® SF and Meliseptol® Foam pure Bode Chemie GmbH ‐ Mikrobac® forte and Kohrsolin®FF Schülke & Mayr GmbH ‐ Terralin® Liquid Ecolab Deutschland GmbH ‐ Incidin®Active and Incidin®Plus Due to this experience BEWATEC flat screens, telephones and mounting solutions can be generally cleaned by wipe disinfection with each common detergent and disinfectant in a hospital and dialysis ward. Please observe the following points during the cleaning of a device: ‐ To avoid damage to plastic parts please do not use abrasive, alkaline or acid cleaners or disinfectants ‐ Test the compatibility of the cleaner/disinfectant in an inconspicuous place first ‐ ... -
Page 9: Repair
SAFETY REPAIR ‐ Any repairs to the device should be carried out only by qualified personnel. ‐ Should any repairs be necessary, please only contact the BEWATEC Service department. ‐ Only use replacement parts specified by the manufacturer. Using inappropriate replacement parts can lead to damage to the device. DISPOSAL MATERIALS The materials must be sorted into material groups (aluminum, steel, plastic, electronic components, etc.) and then taken to the relevant waste collection points. DISPOSAL REGULATIONS When disposing of the device, the applicable national and regional laws and guidelines must be observed. Operating manual MediPaD 10 LX 9 / 36 ... -
Page 10: Set-Up And Function
SET-UP AND FUNCTION SET‐UP AND FUNCTION FUNCTION DESCRIPTION With this device TV and radio programs can be received and played by using IP‐Streaming. Additionally the device can be extended with optional hardware or software. Further possible communication functions are the internet, menu ordering systems, room controls or access to the intranet to hospital information systems or to the electronic patient record. The device is been controlled via the integrated capacitive buttons within the glass front or via the touch screen. GESTURE CONTROL You can use your fingers e.g. to activate an application, search within the channel lists, cancel a call … The following gestures are supported: Touching = Selecting/activating Swipe up/down = Move up/down Swipe left/right = Move left/right 10 / 36 Operating manual MediPaD 10 LX ... -
Page 11: Variants
SET-UP AND FUNCTION VARIANTS The device is available in two different housing designs: – „STANDARD“ Glass front with standard function buttons for ON/OFF, TV, RADIO, Channel +/‐, HOME, Volume +/‐, Reading and Room light and INFO. – „NURSE CALL“ Glass front with integrated DIN VDE 0834 compliant red nurse call button with nurse symbol. In addition this button contains an integrated feedback LED. This LED serves finding the button into darkness. Additionally this LED gives a feedback to the patient by lighting brighter after pressing the nurse call button. Operating manual MediPaD 10 LX 11 / 36 ... -
Page 12: Functional Elements And Connectors
SET-UP AND FUNCTION FUNCTIONAL ELEMENTS AND CONNECTORS No. Description 1 LCD display with touch screen 2 Capacitive function buttons 3 Webcam (hardware pre‐equipped) 4 Headphones jack No. Description 1 RJ45 socket for the connection of a MediTel patient telephone and other compatible and released devices. 2 RJ45 socket LAN‐INPUT 3 3,5 mm socket for optional One‐Button‐ Control (hardware pre‐equipped) 4 20W1 jack for the connection of: – power supply 15V/DC – aerial for TV and Radio (Analog/DVB‐ C)* – Reading /Room light – Nurse call – others 5 VESA‐II (75 x 75 mm) monitor connection ... -
Page 13: Functional Button Overview - Standard
SET-UP AND FUNCTION FUNCTIONAL BUTTON OVERVIEW – STANDARD Nr. Beschreibung Function 1 Device on/off Standby 2 TV function 3 RADIO function 4 Channel back/forth Zapping 5 HOME button Main menu 6 Volume down/up 7 Reading light on/off 8 Room light on/off 9 INFO button Help texts INFORMATION Additional control sequences via the touch screen depend on the software and the applications which are installed. Operating manual MediPaD 10 LX 13 / 36 ... -
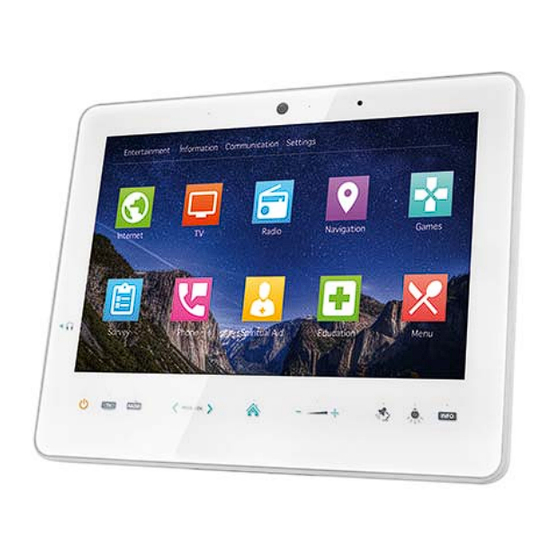
Page 14: Touchscreen - Main Menu
SET-UP AND FUNCTION TOUCHSCREEN – MAIN MENU No. Name Description Categories Display of applications by different categories Applications* Direct clickable applications * Scope of functions depends on the installed applications INFORMATION The corresponding functions can be performed by touching the applications on the user interface. 14 / 36 Operating manual MediPaD 10 LX ... -
Page 15: Starting-Up
STARTING-UP STARTING‐UP CONNECTING AND TURNING ON Depending of the mounting solution there are two different ways of connecting the device. 1. Connect the 20W1 socket to the 20W1 plug on the backside of the device. 2. Connect the 10W1 plug to the 10W1 connection socket. 4. Plug the short RJ45 patch cable into the RJ45 socket of the combined 10W1/RJ45 plug. 5. Connect the other end of the short RJ45 patch cable to the on‐side RJ45 data socket or 5. Connect the integrated network cable to the LAN‐IN socket of the device. Operating manual MediPaD 10 LX 15 / 36 ... - Page 16 STARTING-UP 6. Connect the network cable directly to the on‐side RJ45 data socket. INFORMATION For further information please see the additional available installation instructions of the mounting solution. ATTENTION – DAMAGE TO THE DEVICE If connecting the device via LAN with PoE please choose the correct socket on the bottom of the device. Otherwise the device may be damaged. 16 / 36 Operating manual MediPaD 10 LX ...
-
Page 17: Configuration
STARTING-UP CONFIGURATION Please note that the device actually cannot be configured by using the MyMediNet Online Management System. For the first start‐up and configuration of the device you will receive an additional configuration data file via e‐mail. For the configuration of the devices you will need a blank USB flash drive. If necessary further steps, such as performing a frequency scan for digital TV reception (DVB‐C), must be observed. This will be communicated separately to you. INFORMATION Requirements for the update via USB flash drive: – For the easier e‐mail delivery the transmitted files are compressed. – Encrypt these files to a blank USB flash drive (without any sub folder). – Plug the USB flash drive to the USB interface of the device. – Follow the display instructions. Operating manual MediPaD 10 LX 17 / 36 ... -
Page 18: Operation
OPERATION OPERATION GENERAL OPERATION Using the touch screen and function button – The device is controlled by the touch screen or via the function buttons. – Return to main menu by pressing the HOME button. – The symbols which are available on the screen depend on the software and applications which are installed. The illustrations in these instructions may therefore deviate from your own version. – Some of the buttons may have no function. 4.1.1 HELP FUNCTION You can obtain useful information by selecting the help function. – Press the INFO button. INFORMATION HELP FUNCTION – Within running applications the INFO button may have different functions (e.g. channel list) or there may be independent help functions. – Select the help function to get further information. 18 / 36 Operating manual MediPaD 10 LX ... -
Page 19: On/Off
OPERATION 4.1.2 ON/OFF TURN THE DEVICE ON/OFF 1. Press the ON/OFF button to turn on the device. 2. Keep the button ON/OFF pressed for more than 10 seconds to turn the device off. INFORMATION! Depending on the configuration status and the installed applications it might be possible that the complete shutdown of the device is prevented. 4.1.3 STANDBY MODUS 1. Shortly press the ON/OFF button. The display shuts down. 2. Press the ON/OFF button to turn on the display again. Operating manual MediPaD 10 LX 19 / 36 ... -
Page 20: Setting The Volume
OPERATION 4.1.4 SETTING THE VOLUME Use the „VOL ‐“ or „VOL +“ buttons to change the headphones volume. The volume can be varied within a range of 0 (mute) to 32 (maximum volume). The current volume level is shown on the screen while changing the volume. 20 / 36 Operating manual MediPaD 10 LX ... -
Page 21: Language Selection
OPERATION 4.1.5 LANGUAGE SELECTION 1. Press the HOME button to get back to the main menu. Use the touch screen for the further steps. 2. Tap the SETTINGS category. 3. The available languages are shown on the right side. To select the requested language tap onto it. The display language is changed to the selected one within the menus. 4. After a reset or reboot of the device the language is set to default. INFORMATION Factory settings include both the national language and English. Operating manual MediPaD 10 LX 21 / 36 ... -
Page 22: Font Size
OPERATION 4.1.6 FONT SIZE 1. Press the HOME button to get back to the main menu. Use the touch screen for further steps. 2. Tap the SETTINGS category. 3. Below left is a slider to select the font size of the main menu. 4. Slide to the left to decrease the font size or slide to the right to increase the font size. After a reset or reboot of the device the font size is set to default. 22 / 36 Operating manual MediPaD 10 LX ... -
Page 23: Choose Tv Channel
OPERATION CHOOSE TV CHANNEL START TV FUNCTION You have two possibilities to start the TV function: 1. Press the TV button on the glass front or 2. Tap on the display icon TV. The TV function starts and the TV picture of the last selected TV channel is shown. NOTE! If the program support EPG information these info is shown on the upper left side. Operating manual MediPaD 10 LX 23 / 36 ... - Page 24 OPERATION CHOOSE TV CHANNEL You have two possibilities to select the channel list: 1. Start the TV function as described above. 2. Press the INFO button on the glass front or 3. Tap once on the display to show the additional TV functions and tap on the icon Channels. All available channels are shown on the left side of the display. 3. You can choose the requested channel by using your finger. Swipe up and down to search for the channel in the channel list. 4. Tap on the requested channel logo to select it. 5. Press onto the INFO button on the glass front or tap onto the display to close the channel list. CHANNEL ZAPPING Use the buttons „<“ or „>“ on the glass front to move a channel forward or backward (zapping). 24 / 36 Operating manual MediPaD 10 LX ...
-
Page 25: Format Selection
OPERATION FORMAT SELECTION In default the format of the shown TV picture is selected to auto and recognizes automatically the optimal picture format. It could be that the automatic recognition may fail and that you have to select the right format manually. 1. Start the TV function as described before. 2. Tap on the display to show the additional TV functions. 3. Tap on the icon FORMAT to choose between auto, 16:9, 4:3 or zoom. Operating manual MediPaD 10 LX 25 / 36 ... -
Page 26: Choose Radio Channel
OPERATION CHOOSE RADIO CHANNEL START RADIO FUNCTION You have two possibilities to start the Radio function: 1. Press the RADIO button on the glass front 2. Tap on the icon RADIO. The Radio function starts with its user interface. The last selected radio channel and the channel list is shown. CHOOSE RADIO CHANNEL All available radio channels are shown in the channel list. 1. You can choose the requested radio channel by using your finger. Swipe up and down to search within the channel list. 2. Tap on the requested radio channel to select it. CHANNEL ZAPPING (ZAPPEN) Use the buttons „<“ or „>“ on the glass front for channel zapping. 26 / 36 Operating manual MediPaD 10 LX ... -
Page 27: Sleep Timer
OPERATION SLEEP TIMER You can choose an interval between 15 and 120 minutes after which the device is automatically switched off. INFORMATION The sleep timer can be activated within the functions TV and RADIO. Activation within the main menu is not possible. 1. Within one of the functions tap on the display to show the additional functions bar. 2. Tap on the symbol Sleep timer. The user interface of the sleep timer starts. 3. Tap on the requested time to activate the Sleep Timer. 4. Tap on the X symbol to close the sleep timer window. For the deactivation of the sleep timer open the sleep timer user interface as described above and tap onto the OFF symbol. Operating manual MediPaD 10 LX 27 / 36 ... -
Page 28: Subtitle
OPERATION SUBTITLE INFORMATION The subtitle icon within the additional function bar is shown only when the selected program supports this. 1. Tap on the display to show the additional function bar. 2. Tap on the symbol Subtitle. 3. The additional function bar disappears and after a short time the subtitle is displayed. 28 / 36 Operating manual MediPaD 10 LX ... -
Page 29: Light Control Buttons
OPERATION LIGHT CONTROL BUTTONS With the buttons „ “ and „ “ you can switch on and off the connected light sources. INFORMATION The integrated light control buttons must be connected to the on‐side light sources. For this a special project‐specific wiring is needed. Please refer to the project‐specific documents or please contact us. INTEGRATED LED READING LIGHT INFORMATION On the bottom of the device is an integrated LED reading light. In default this reading light is deactivated. For activation you need an optional license. 1. Press the button on the glass front to turn the reading light on or off. 2. Keep the button pressed to dim the light. Operating manual MediPaD 10 LX 29 / 36 ... -
Page 30: Optional Extensions
OPTIONAL EXTENSIONS OPTIONAL EXTENSIONS VERSION – NURSE CALL 5.1.1 CONTROL OVERVIEW INFORMATION The device with integrated nurse call button is only available in combination with our Function Module Nurse Call. The Function Module Nurse Call is the DIN VDE 0834‐compliant interface to the on‐side nurse call system. It may only be used with an existing on‐side nurse call system. During the installation all valid regulations and the manufacturer's instructions of the nurse call system must be observed 30 / 36 Operating manual MediPaD 10 LX ... - Page 31 OPTIONAL EXTENSIONS No. Descritpion Function 1 On/Off Standby 2 TV function 3 RADIO function 4 Channel back/forward Zapping 5 HOME button Main menu 6 Volume down/up 7 Reading light on/off 8 Room light on/off 9 Nurse call button Activation of nurse call Information to the reassurance light: – To find the button in darkness the reassurance light lights generally. – It lights brighter when a nurse call is activated (feedback). ...
-
Page 32: Technical Data
TECHNICAL DATA TECHNICAL DATA Display screen 25.6 cm (10.1“), TFT Format 16:10 Resolution 1200 x 800 Brightness 300 cd/m² Viewing angle +/‐ 85° Color depth 18 bit Dimensions W x H x D 264 x 209 x 37 mm Weight approx. 1.0 kg (depends on the version of the device) Power supply 15 V DC (EN 60601 certificated) external power pack or via PoE (IEEE‐Standard 802.3af‐2003) Power consumption Maximal 11 W Betrieb 9 W Standby 0.6 W Ausgangsleistung Ton: ... -
Page 33: Technical Notes
TECHNICAL DATA TECHNICAL NOTES Button combination Description Press button „PROG./CH.“ and „PROG./CH +“ The software and hardware revision is displayed. simultaneously for more than 5 seconds on the glass front. Press button ON/OFF and HOME Device is performing a reset. The device restarts. simultaneously for more than 5 seconds on the glass front. Keep button ON and VOL‐ simultaneously The device performs the function RECOVERY. pressed until the LED of the ON/OFF buttons The device installs the internally saved default flashes. software. The device is set to factory defaults. Thereafter press button ON/OFF again for confirmation. Operating manual MediPaD 10 LX 33 / 36 ... -
Page 34: Index
INDEX INDEX Operation .......... 1 8 Choose radio channel ...... 2 6 Operation of the device ....... 1 8 Choose TV channel ....... 2 4 Operator .......... 7 Configuration ........ 1 7 Optional Extensions ...... 3 0 Connecting ........... 1 5 radio function ........ 2 6 Connectors ........... 1 2 reading light ......... 2 9 Disposal .......... ... -
Page 35: Trademark/Licenses Notes
TRADEMARK/LICENSES NOTES Linux® Linux® IS THE REGISTERED TRADEMARK OF Linux Torvalds IN THE U.S. AND OTHER COUNTRIES. MPEG‐2 USE OF THIS PRODUCT IN ANY MANNER THAT COMPLIES WITH THE MPEG‐2 STANDARD IS EXPRESSLY PROHIBITED WITHOUT A LICENSE UNDER APPLICABLE PATENTS IN THE MPEG‐2 PATENT PORTFOLIO, WHICH LICENSE IS AVAILABLE FROM MPEG L.L.C., 250 STEELE STREET, SUITE 300, DENVER, COLORADO 80206. AVC/H.264 THIS PRODUCT IS LICENSED UNDER THE AVC PATENT PORTFOLIO LICENSE FOR THE PERSONAL AND NONCOMMERCIAL USE OF A CONSUMER TO (i) ENCODE VIDEO IN COMPLIANCE WITH THE AVC STANDARD (“AVC VIDEO“) AND/OR (ii) DECODE AVC VIDEO THAT WAS ENCODED BY A CONSUMER ENGAGED IN A PERSONAL AND NON‐COMMERCIAL ACTIVITY AND/OR WAS OBTAINED FROM A VIDEO PROVIDER LICENSED TO PROVIDE AVC VIDEO. NO LICENSE IS GRANTED OR SHALL BE IMPLIED FOR ANY OTHER USE. ADDITIONAL INFORMATION MAY BE OBTAINED FROM MPEG LA, L.L.C. SEE HTTP://WWW.MPEGLA.COM MP3 MPEG Layer‐3 AUDIO DECODING TECHNOLOGY LICENSED FROM Fraunhofer IIS AND Thomson LICENSING. Operating manual MediPaD 10 LX 35 / 36 ... - Page 36 In case of any questions or problems please contact our service hotline under: +49 2504 7337‐777 36 / 36 Operating manual MediPaD 10 LX ...
Need help?
Do you have a question about the MediPaD 10 LX and is the answer not in the manual?
Questions and answers