
Related Manuals for Bose CineMateSERIES II


Summary of Contents for Bose CineMateSERIES II
- Page 1 ® ERIES GS S ® ERIES IGITAL HEATER PEAKER YSTEM Owner’s Guide | Guía de usuario | Notice d’utilisation | Guia dos proprietários...
- Page 2 (100ºC), or incinerate. Replace only with an agency approved (ex. UL) CR2032 or DL2032 3-volt lithium battery. Dispose of used batteries promptly. ©2014 Bose Corporation. No part of this work may be reproduced, modified, distributed, or otherwise used without prior written permission.
-
Page 3: Table Of Contents
English TAB 2 TAB 3 TAB 4 TAB 5 TAB 6 TAB 7 TAB 8 ONTENTS NTRODUCTION ONTROLS AND NDICATORS Before you begin ......Acoustimass module bass control . -
Page 4: Before You Begin
NTRODUCTION Before you begin Setup help The CineMate system easily connects to your TV and other home theater equipment. To help you set up your Thank you for purchasing the Bose ® CineMate ® system, CineMate system, the following items are provided: which delivers the superb acoustic performance needed •... -
Page 5: Unpacking
Save all packing materials, which provide the safest way to transport your system. If any part of the system appears damaged, do not try to use it. Notify Bose or your authorized Bose dealer immediately. For Bose ® contact information, refer to the ❏... -
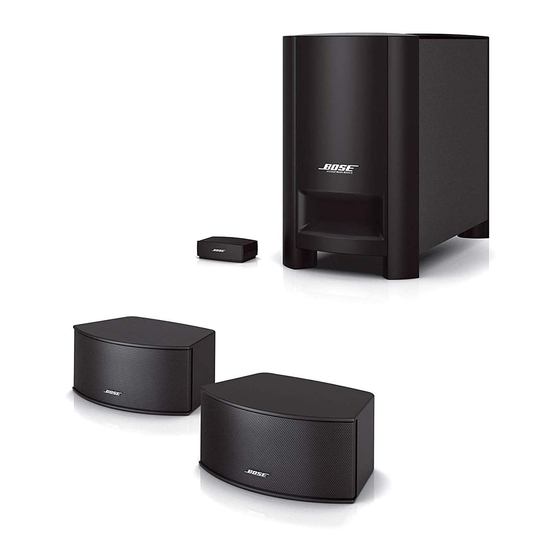
Page 6: Ystem Etup
TAB 8 TAB 7 TAB 6 TAB 5 TAB 4 TAB 3 TAB 2 English YSTEM ETUP The image below shows one of the many ways you can Placing position your system. the system components What you need to use: ®... - Page 7 English TAB 2 TAB 3 TAB 4 TAB 5 TAB 6 TAB 7 TAB 8 YSTEM ETUP 1. On the bottom of each speaker, attach one set of 4. Place the Acoustimass module: small rubber feet. • at the same end of the room as the speakers and your TV •...
- Page 8 TAB 8 TAB 7 TAB 6 TAB 5 TAB 4 TAB 3 TAB 2 English YSTEM ETUP The interface module receives commands from the CAUTION: When positioning the interface module, remote control and provides audio input connections for avoid blocking any ventilation openings on the TV or the CineMate ®...
-
Page 9: Acoustimass ® Module
English TAB 2 TAB 3 TAB 4 TAB 5 TAB 6 TAB 7 TAB 8 YSTEM ETUP 1. Notice the two plugs at one end of the speaker Connecting the cable. speakers to the ® Acoustimass module What you need to use: Speaker cable 2. - Page 10 TAB 8 TAB 7 TAB 6 TAB 5 TAB 4 TAB 3 TAB 2 English YSTEM ETUP 3. Insert each plug into the connector on the proper 4. Insert the single plug at the other end of the speaker speaker. cable into the connector labeled SPEAKERS on the ®...
- Page 11 English TAB 2 TAB 3 TAB 4 TAB 5 TAB 6 TAB 7 TAB 8 YSTEM ETUP 1. Insert the plug from the interface module Connecting into the input connector on the back of the the interface module Acoustimass module. Fastener screws What you need to use: Interface module...
-
Page 12: Audio/Video Source
TAB 8 TAB 7 TAB 6 TAB 5 TAB 4 TAB 3 TAB 2 English YSTEM ETUP Determining what to connect Connecting There are several ways to make an audio connection to your TV or another ® the CineMate II system. audio/video source How you proceed depends on the number of audio/ video source devices you use. -
Page 13: Connecting A Single Source Device
English TAB 2 TAB 3 TAB 4 TAB 5 TAB 6 TAB 7 TAB 8 YSTEM ETUP Connecting a single source device Device settings for digital audio When connecting your device using the optical cable, Use this type of connection only if you use a single you may need to change settings on the device for the audio/video source device. -
Page 14: Using Stereo Audio Cable
TAB 8 TAB 7 TAB 6 TAB 5 TAB 4 TAB 3 TAB 2 English YSTEM ETUP Using Stereo audio cable Connecting the device video Connect the Video Out from this device to your TV. Make this type of connection only if your source device does not provide an optical audio output. -
Page 15: Routing Audio/Video To The Tv
English TAB 2 TAB 3 TAB 4 TAB 5 TAB 6 TAB 7 TAB 8 YSTEM ETUP Connecting your TV audio • Component or composite video cable. Component cable provides video quality similar to Use this type of connection only if you are using more HDMI. -
Page 16: Device Settings For Digital Audio
TAB 8 TAB 7 TAB 6 TAB 5 TAB 4 TAB 3 TAB 2 English YSTEM ETUP Device settings for digital audio Using stereo cable from your TV If you have connected devices to your TV using optical, If your TV does not have an optical output, or you are coaxial, or HDMI cable, you may need to change the unable to get sound from connected devices, you can setting on the device for the correct output. -
Page 17: Setting The Tv Audio Properly
English TAB 2 TAB 3 TAB 4 TAB 5 TAB 6 TAB 7 TAB 8 YSTEM ETUP Setting the TV audio properly 2. Insert the red and white RCA plugs into the ANALOG IN connectors on the interface module. With either an optical or stereo audio connection, the ANALOG IN internal speakers on your TV speaker should be turned off. - Page 18 TAB 8 TAB 7 TAB 6 TAB 5 TAB 4 TAB 3 TAB 2 English YSTEM ETUP 1. Insert the large plug on the power cable into Connecting to the power connector marked on the a power outlet Acoustimass module. What you need to use: ®...
- Page 19 When you press the remote control On-Off, Volume Up/ Down, or Mute button, the green LED on the interface module flashes. CAUTION: Bose recommends using a safety agency- approved surge protector on all electronic equipment. Voltage variations and spikes can damage electronic components in any system.
- Page 20 TAB 8 TAB 7 TAB 6 TAB 5 TAB 4 TAB 3 TAB 2 English YSTEM ETUP 2. Insert the two batteries, making sure to match Inserting the the – and + symbols. ® CineMate remote batteries The CineMate ® GS series II remote control requires two AA batteries (supplied).
- Page 21 English TAB 2 TAB 3 TAB 4 TAB 5 TAB 6 TAB 7 TAB 8 ONTROLS AND NDICATORS ® Acoustimass module bass control The bass control knob located on the rear of the Acoustimass module allows you to change the bass level of the system.
-
Page 22: Cinemate Series Ii Remote Control
Or, for one-button control of both devices, Note: For convenience, the systems shuts down use the CineMate ® GS series II remote control. For automatically when no remote control activity for information on how to purchase this premium remote, 30 minutes. contact Bose Customer Service. -
Page 23: Cinemate Gs Series Ii Remote Control
English TAB 2 TAB 3 TAB 4 TAB 5 TAB 6 TAB 7 TAB 8 ONTROLS AND NDICATORS ® CineMate GS series II remote control The remote control provided with the CineMate GS series II system can be programmed to control your TV, DVD or Blu-ray Disc™... -
Page 24: The Cinemate System
TAB 8 TAB 7 TAB 6 TAB 5 TAB 4 TAB 3 TAB 2 English ONTROLS AND NDICATORS Using the remote to control the Setting the remote for your TV and other devices CineMate ® system To use the remote with your TV, you must set the remote When you point the remote control at the interface for the proper TV device code. -
Page 25: To Control A Combination Device
English TAB 2 TAB 3 TAB 4 TAB 5 TAB 6 TAB 7 TAB 8 ONTROLS AND NDICATORS Using the remote to watch TV Follow the same procedure for each of your other devices, using the appropriate device code and source button for each one. -
Page 26: Using The Remote To Watch A Dvd
TAB 8 TAB 7 TAB 6 TAB 5 TAB 4 TAB 3 TAB 2 English ONTROLS AND NDICATORS Using the remote to watch a DVD Selecting the TV input Press TV Input to select the correct TV input Note: In order to control your TV and other audio/video for the source you want to watch. - Page 27 English TAB 2 TAB 3 TAB 4 TAB 5 TAB 6 TAB 7 TAB 8 ONTROLS AND NDICATORS ® Using the CineMate • CBL-SAT: Selects the CBL-SAT source. When the CBL-SAT source is selected, the remote will series II remote control control cable/satellite box functions, such as channel selection and Electronic Program Guide navigation.
- Page 28 TAB 8 TAB 7 TAB 6 TAB 5 TAB 4 TAB 3 TAB 2 English ONTROLS AND NDICATORS Menu and program selection • Skips back one page in the Electronic Program Guide (if supported). Note: The menu and program selection buttons will CBL-SAT source must be selected.
- Page 29 English TAB 2 TAB 3 TAB 4 TAB 5 TAB 6 TAB 7 TAB 8 ONTROLS AND NDICATORS Play options • Starts the CD, DVD, VCR, or DVR program. Note: The functionality of the play options buttons • Rewinds or forwards the CD, DVD, may vary depending on the brand of your device(s).
- Page 30 TAB 8 TAB 7 TAB 6 TAB 5 TAB 4 TAB 3 TAB 2 English ONTROLS AND NDICATORS • Enters Setup mode (for entering device codes into the remote). Press and hold for 3 seconds to enter Setup mode. • Returns to previously selected channel. •...
-
Page 31: Remote Battery
English TAB 2 TAB 3 TAB 4 TAB 5 TAB 6 TAB 7 TAB 8 ARE AND AINTENANCE ® Replacing the CineMate 2. Remove the used battery and replace with a new battery (CR2032 or DL2032). Refer to page ii for series II remote battery battery safety instructions. -
Page 32: Remote Batteries
TAB 8 TAB 7 TAB 6 TAB 5 TAB 4 TAB 3 TAB 2 English ARE AND AINTENANCE ® Replacing the CineMate Cleaning your speaker system series II remote batteries • You can clean the surface of your speakers, Acoustimass ®... -
Page 33: Troubleshooting
English TAB 2 TAB 3 TAB 4 TAB 5 TAB 6 TAB 7 TAB 8 ARE AND AINTENANCE Troubleshooting Problem What to do ® No power • Unplug the Acoustimass module power cord from the AC wall outlet for one minute. •... - Page 34 TAB 8 TAB 7 TAB 6 TAB 5 TAB 4 TAB 3 TAB 2 English ARE AND AINTENANCE Problem What to do No sound • Make sure the connection between your TV and the interface module is secure. If you are using optical continued: cable, make sure it is fully inserted into the interface module.
-
Page 35: Customer Service
• There may be more than one device code for your brand of device. Find your device and brand in the Universal Device Codes book. Try programming another code, then check the device for improved functionality. Customer service ® For additional help in solving problems, contact Bose Customer Service. Refer to the address sheet included with the CineMate system. -
Page 36: Eference
Your CineMate ® system is covered by a limited warranty. ©2014 Bose Corporation. No part of this work may be reproduced, modified, distributed, or otherwise used without prior written permis- Details of the limited warranty are provided on the sion. - Page 37 English TAB 2 TAB 3 TAB 4 TAB 5 TAB 6 TAB 7 TAB 8...
- Page 38 ©2014 Bose Corporation, The Mountain, Framingham, MA 01701-9168 USA AM350497 Rev.01...
Need help?
Do you have a question about the CineMateSERIES II and is the answer not in the manual?
Questions and answers