Table of Contents
Advertisement
Quick Links
Advertisement
Table of Contents

Related Manuals for medemagroup MC Concept 1103


Summary of Contents for medemagroup MC Concept 1103
- Page 1 P9-0200-B ver. 2.0.0 - February 2011...
- Page 2 Medema Production A/S 2 of 20 Quick guide P9-0200-Q Version 2.0.0/2011...
-
Page 3: Table Of Contents
Medema Production A/S Content Quick guide - MC Concept 1103 Multi ............. 4 Introduction ....................4 Part names ....................5 Joystick parts .................... 6 Operating ....................6 Clock on/off .................... 7 Set Speed ....................8 Setting the seat - back and leg supports ..........9 Light on / off .................. -
Page 4: Quick Guide - Mc Concept 1103 Multi
Quick guide - MC Concept 1103 Multi Introduction Congratulations on your new MC Concept 1103 electric mobility scooter. You are now the owner of an electric mobility scooter developed for use indoors as well as outdoors. It is what is called a Class A vehicle according to the European classifi... -
Page 5: Part Names
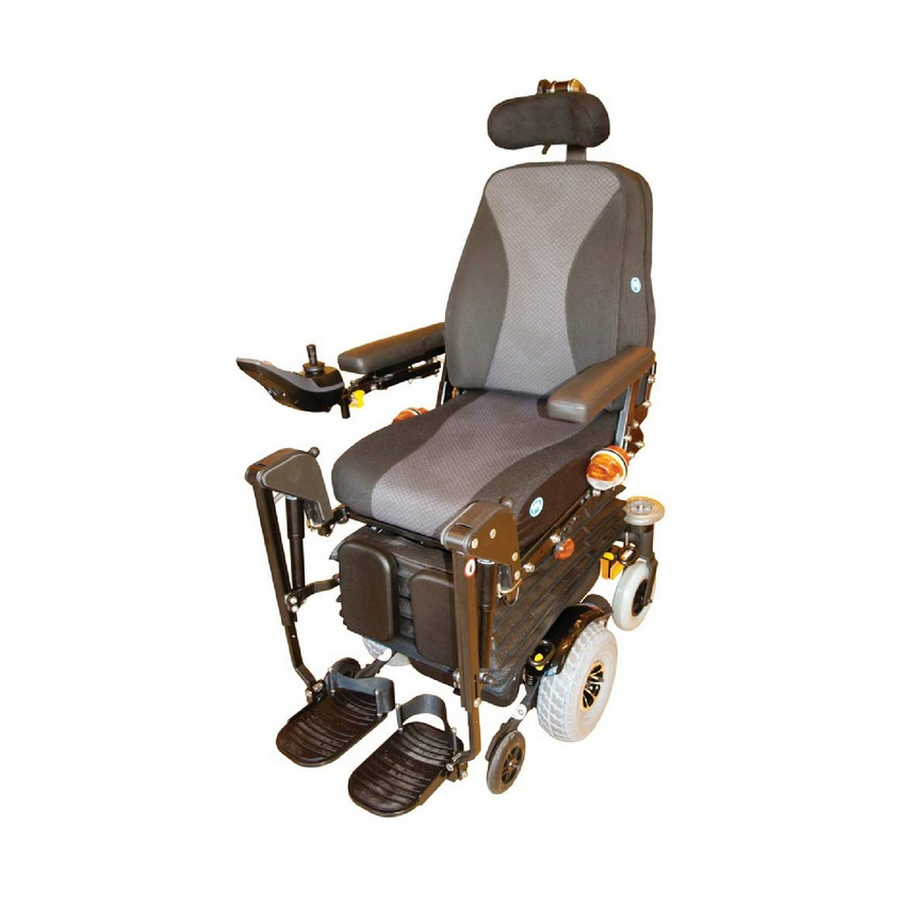
Medema Production A/S Part names The part names given below refer to the descriptions later in the this guide. Headrest (Optional extra) Control panel Actuator for electric backrest. Joystick (Optional extra) Swing-away release (Optional extra) Finger screw to loosen seat Eye for restraints Central wheel Serial number on... -
Page 6: Joystick Parts
Medema Production A/S Joystick parts Dynamic DX2 AJR Start/stop button Indicator left Indicator right Select Display Speed selector Accessory Selector Horn Operating At the top of the display you will fi nd the status bar. Battery indicator is displayed constantly. The clock can be turned on or off as you wish. The other is lit when the corresponding function is active. -
Page 7: Clock On/Off
Medema Production A/S Clock on/off Press arrow up/down or joystick (push forward) until the above icon is showed in the center of the screen. Use ”Select” to switch between X and Accept by pressing the arrow up/down button. 7 of 20 Quick guide P9-0200-Q Version 2.0.0/2011... -
Page 8: Set Speed
Medema Production A/S Set Speed When you turn the joystick on, the image shown below will be presented in the display. The number in the centre shows the speed you have chosen as max speed. Change the Speed by selecting the plus / minus key. Maximum speed is 5, lowest is 1. -
Page 9: Setting The Seat - Back And Leg Supports
Medema Production A/S Setting the seat - back and leg supports Chosen speed Select Press the arrow up / down until the image shows the chair. Use the “Select” to choose the function you want modifi ed. Use the joystick to change example angle of the seat back. -
Page 10: Light On / Off
Medema Production A/S Light on / off Push the arrow up / down until the image for light is shown in the centre. Push the joystick forward to turn the light on. And again to turn of the light. Push the joystick back to activate the hazard warning lights. Push the joystick back again to turn it of. -
Page 11: Setting The Display Environment
Medema Production A/S Setting the display environment Use the arrows up /down until “day / night” icon i shown in the centre. Push the joystick forward to enter settings. The image below will show. Exit / Cancel Exit / Cancel Setting Result 1 - Indoor... -
Page 12: Setting The Clock
Medema Production A/S Setting the Clock Use arrow up / down until the clock is shown in the centre. Push the joystick forward to enter settings. The image below will show. Press the Select button or push the joystick right / left to choose the digit to change. - Page 13 Medema Production A/S System lock To lock the DX system Press the on / off button, for 4 sec. while the system is turned on. The system will now shut down in locked condition. To unlock the DX system Press the on / off button. The system will show a lock in the display. Press the horn twice within 10 seconds.
-
Page 14: Error Code
Medema Production A/S Error Code Code Cause Meaning DX Module Could mean: - Errors in programming - Error in wire connection - Internal fault in a module Turn off the chair and turn on again. If it doesn’t works, contact qualifi ed technician (HMC or therapist). DX Accessory Could mean: - driving slowly because of raised seat. -
Page 15: Charging
Medema Production A/S Charging Charging Plug the cable into the control box on the scooter Plug the charger into the outlet or switch it on Use the indicator lights on the charger to check that charging has started. When charging has fi nished, switch off or unplug the charger, and then remove the charger cable from the control box. -
Page 16: Driving The Mc Concept 1103
Medema Production A/S Driving the MC Concept 1103 Before getting on or off the vehicle, you must check the following: That the scooter is switched off and that it is not disengaged. That the scooter and the seat you are moving to are both stable. -
Page 17: 11 Tips For Driving The Mc Concept
Medema Production A/S 11 tips for driving the MC Concept: • Reduce the speed when turning corners and also when going downhill. • Reduce the speed when driving on inclines. Max. incline = 8° = • Reduce the speed when driving on a sideways incline. Max. -
Page 18: Driving On Public Roads
Medema Production A/S Driving on public roads: When driving on public roads, footpaths, pedestrian streets, car parks, shopping centres, etc. you must make sure you adjust your speed and distance for other users. At 7 km/h you must follow the traffi c rules applicable to cyclists. -
Page 19: Brakes
Medema Production A/S Brakes The MC Concept is equipped with two sets of brakes: the motor brake and the parking brake. Motor braking: When you drive downhill, the control unit of the MC Concept applies the motor brake. Parking brake: When the vehicle is stationary and the joystick is not moved, a magnetic brake is automatically applied to each drive unit. - Page 20 medemagroup...
Need help?
Do you have a question about the MC Concept 1103 and is the answer not in the manual?
Questions and answers