
Subscribe to Our Youtube Channel
Related Manuals for REI EVR-6500D


Summary of Contents for REI EVR-6500D
- Page 1 6.2” Touch Screen AM/FM Multimedia Receiver with CD/DVD, USB, iPod , Auxiliary A/V Inputs, & Bluetooth Audio Streaming ® ® Installation/ Operation Manual EVR-6500D...
- Page 2 Thank you for purchasing the 6.2” Touch Screen AM/FM Multimedia Receiver from REI. This product is designed and tested to with stand temperature and vibration extremes. Please read the owner’s manual carefully before attempting to install this unit. If you have an installation question or need installation assistance, please call...
-
Page 3: Table Of Contents
CONTENTS Front controls and Indicators........................4 Home Screen............................5 General Setup............................6 Navigation Path............................9 Setting the Time............................10 Changing the Background ........................10 Connecting a Bluetooth® Device......................11 Bluetooth® Operation...........................12 Recent Calls............................13 Bluetooth® Setup..........................13 Phone book............................14 Bluetooth®... -
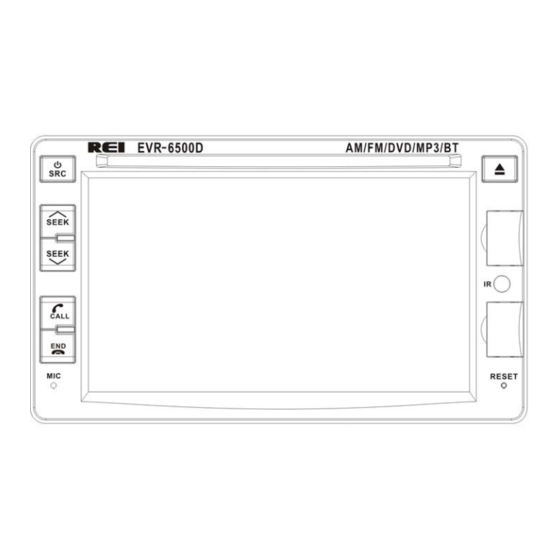
Page 4: Front Controls And Indicators
FRONT CONTROLS AND INDICATORS 1. Power/Source Button Press and HOLD the Power Button to turn the unit ON or OFF. Press this button to return to the home menu screen. 2. Seek/Track Buttons Press either to change stations, tracks, or chapters. 3. -
Page 5: Home Screen
HOME SCREEN From the HOME screen you can use the touch screen to change the source. To access the HOME screen, touch the HOME button in top left corner of the screen or press the SRC button. Touch either the Radio, BT Phone, Setup, DVD, AUX, iPod®, USB, SD, Rear View, or BT Music to change to the corresponding source. -
Page 6: General Setup
GENERAL SETUP Press the SETUP icon to access the General Setup Pages, page 1 is below: General Setup Pages 2 is below: Use the up/down arrows on the right side of the page to access the desired options. The general Setup options include: 1) OSD TIME ON/OFF Switches the clock display ON/OFF when is enabled video on the front panel. - Page 7 4) GPS INFO Screen displays the current GPS location status, if GPS is installed. If auto SYNC is set to on, the GPS will automatically update the clock setting on the RADIO, and NOT allow the user to manually set the clock. To manually set the clock, verify that AUTO SYNC is set to OFF first.
- Page 8 Within the Factory set options, the following options can be changed: LOGO SET The user can change the initial logo screen to a custom 800*480.bmp file using a microSD card. Select the SD icon, then choose the image. VOLUME BALANCE Adjusts the gain settings of the source.
-
Page 9: Navigation Path
IPOD® ENABLE Turns the iPod® playback control icon ON/OFF in the HOME screen. d. RADIO AREA Use the arrows to select the region of operation for the AM/FM tuner. Choices include USA, LATIN, EUROPE, OIRT, & JAPAN. CAMBRIGHT Use the arrows to select the desired backlight brightness level of the Back-up camera image. -
Page 10: Setting The Time
SETTING THE TIME Touch above or below the highlighted area of the screen, then slide to move settings either up or down. CHANGING THE BACKGROUND Touch the desired background image on the screen to change. If the user has a custom image, it must first be loaded onto a microSD card with a resolution of 800*480 and saved as a .BMP file. -
Page 11: Connecting A Bluetooth® Device
CONNECTING A BLUETOOTH® DEVICE To connect your Bluetooth® device to the Radio, the device must first be paired. You will need to verify that “BT Enable” is set to ON (See SETUP page 6), and verify the passkey on the Radio to complete the pairing. (See BT SET page 13). Pairing the Your mobile device with the Head Unit Your mobile phone can initiate a search for new devices and pair to the unit. -
Page 12: Bluetooth® Operation
BLUETOOTH® PHONE OPERATION 1. Bluetooth® Status: Displays the connection status of the Radio and the incoming or outgoing phone number. The connected Phone ID is also displayed, an example is below using a Motorola phone: 2. Number Keys: Touch 0-9,*, # to enter the phone number you wish to dial. 3. -
Page 13: Recent Calls
RECENT CALLS 1. Display a list of all INCOMING calls. 2. Displays a list of all OUTGOING calls. 3. Displays a list of all MISSED calls. 4. Press to DELETE all calls in the list. 5. SCROLL UP/DOWN to access addition pages on the list. BT SET 1. -
Page 14: Phone Book
PHONEBOOK BUTTON Accessing the Phonebook menu, the user has the following options: 1. REQUEST contacts of the connected device. 2. SAVE the contacts list into the radio’s memory. 3. DELETE the current list of Contacts After accessing the list of contacts, simply scroll Up/Down and press the screen on the desired contact. -
Page 15: Bluetooth® Audio Streaming
BLUETOOTH® STREAMING AUDIO BUTTON The unit allows you to play back audio files from your mobile device using a Bluetooth® connection. The Radio can control a Bluetooth® audio player via Advanced Audio Distribution Profile (A2DP) or Audio/Video Remote Control Profile (AVRCP). Bluetooth® audio players (or Bluetooth® adapters) compatible with these profiles can be connected to this Radio. -
Page 16: Am/Fm Operation
AM/FM OPERATION 1. Home button: Press to return to the HOME screen. 2. Tune DOWN button: Press to tune to lower radio frequencies. 3. Preset Memory/Recall button: Press momentarily to select the displayed preset station. Press and hold any button to preset the current station to the button being pressed. -
Page 17: Usb/Microsd/Cd Media
USB/microSD/CD Media Operation Insert a USB/micro SD/ or CD into the radio and it will automatically switch to this input and begin playback of compatible media files. If in any other source, press the HOME button and change the source to USB to begin playback. If ID3 tag information is present, it will display automatically on the front LCD as shown below:. -
Page 18: Ipod®/Iphone® Operation
4. PLAY/PAUSE button: Touch to pause playback. Touch again to resume playback. 5. PREVIOUS button: Touch to skip to the previous track or chapter. Hold for 1 second then release to rewind by x2, x4, x8, x20, or PLAY 6. NEXT button: Touch to skip to the next track or chapter. Hold for 1 second then release to advance by x2, x4, x8, x20, or PLAY 7. -
Page 19: Dvd Operation
5. REPEAT button: Touch to repeat current track, all tracks, or to turn repeat off. 6. LIST button: Touch to return back to the previous detail screen. Or continue pressing to reach the search menu. The Search Menu allows you to search for Playlists, Artists, Album, Genre, Song, or Composer. - Page 20 1. PREVIOUS CHAPTER: Press to skip to the PREVIOUS chapter. 2. REWIND: Press REW rapidly x2, x4, x8, or x20 3. PLAY/PAUSE button: Touch to pause playback. Touch again resume playback. 4. STOP: Press to stop playback. 5. NEXT CHAPTER: Touch to skip to the NEXT chapter. 6.
- Page 21 2. AUDIO: Changes the language on multi-language DVD discs. 3. REPEAT: Switch the repeat mode 4. MENU: Displays the root menu that is stored on the DVD disc. 5. SUBTITLE: Changes the subtitle language on multi-subtitle DVD discs. 6. ZOOM: press to Zoom in by 2X, 3X, 4X, 1/ 2, 1/3 or 1/4. 7.
-
Page 22: Dvd Setup
DVD SETUP After a DVD begins playing, press the SETUP button on the remote control. There are six setup pages available. SYSTEM SETUP MENU TV SYSTEM This setting determinates the video system of the output signal. Please select the proper signal according to your monitor. The AUTO option will output the video signal according to current DVD title. - Page 23 Default Highlight RESTORE and press ENTER button to restore the system settings to the initial factory settings. LANGUAGE SETUP MENU OSD LANGUAGE This item sets the default language for the On-Screen Display (OSD) messages. Press ENTER and then to move cursor over the available selections, and press ENTER again to select desired language setting.
- Page 24 SUBTITLE LANG This item sets the default SUBTITLE language for DVD discs. MENU LANG This item is for setting the default MENU language for DVD discs. DIVX® VOD Not used VIDEO SETUP MENU Valid for Digital output settings only, NOT USED FOR THIS MODEL VIDEO SETUP MENU Page | 24...
- Page 25 BRIGHTNESS This item adjusts the BRIGHTNESS of the video output of the unit. CONTRAST This item adjusts the CONTRAST of the video output of the unit. This item adjusts the HUE of the video output of the unit. SATURATION This item is for adjusting the SATURATION of video output of the unit. SHARPNESS This item is for the SHARPNESS adjustment of the video output of the unit.
- Page 26 SPEAKER SETUP MENU DOWNMIX This allows users to select the sound effect mode for a 2-channel audio output. Audio Down mix Modes: LT/RT Mixes the signals from center and all left positions into one Mixes the signals from center/rear-right/front-right positions. STEREO Mixes the signals from center/rear-left/front-left and rear-right positions.
-
Page 27: Back-Up Camera Operation
BACK-UP CAMERA OPERATION The Radio has rear Back-up camera input. You must install the Back-up camera to the BROWN CAMERA RCA input of the Radio. The PINK trigger wire must then be connected to the REVERSE GEAR lamp indicator lead of the vehicle. -
Page 28: Remote Control
The Bluetooth® word mark and logos are registered trademarks owned by Bluetooth SIG, Inc. and any use of such marks by REI under license. DivX®, DivX Certified® and associated logos are trademarks of Rovi Corporation or its subsidiaries and are used under license. DivX Certified® to play DivX®... - Page 29 NUMBER (1-10) BUTTONS In radio mode, press number key 1-6 to store up to 6 radio stations. In DVD/USB/microSD mode, press any number 1-9 for the desire track. Press 10+ to increment the number by 10. SEEK+/- BUTTONS In radio mode, press and hold to SEEK stations. Press and release to change preset stations. In DVD/USB/microSD mode, press and hold to advance x2, x4, x8, or x20.
-
Page 30: Troubleshooting
TROUBLE SHOOTING Problem Cause Solution Unit will not power on. No power to BATTERY wire or ACC wire, Check for both ACC & BATTERY voltage blown 10A main fuse or 1A accessory fuse. with Multi-meter, check all fuses. Cannot tune radio stations. The antenna cable is not connected. -
Page 31: Radio Installation
RADIO INSTALLATION ISO INSTALLATION: For installations that do NOT require the use of the DIN collar. The radio has threaded holes in the chassis side panels for ISO mount applications. If necessary, four M5x10mm screws are included with the hardware pack to assist you. COLLAR INSTALLATION: RECOMMENDED CUTOUT DIMENSIONS Page | 31... - Page 32 Place the DIN collar into the dash opening. Bend the tabs outward as shown on the drawing below to lock into place. Pass the harnesses and antenna cable through the DIN collar, and connect to the back of the radio. Verify clearance; then gently insert the radio into the DIN Collar until both spring clips are locked into place.
-
Page 33: Radio Removal
For installations requiring additional support, install a rear support bracket as shown below: RADIO REMOVAL To remove the radio when installed using the DIN collar, remove the Face Plate is installed. Then insert the removal keys in both sides to release the lock clips. Page | 33... -
Page 34: Electrical Connections
ELECTRICAL CONNECTIONS **An optional USB Panel mount extension is available (P/N 512485), contact an REI sales representative for details Warning: For safety reasons, you cannot view a video source on the built-in monitor as long as the vehicle is in motion. This is a violation of federal law. In order to display video, the Brown handbrake Trigger wire of the included harness must be hardwired into the vehicle's parking brake ground circuit, and the vehicle's parking brake must be engaged. -
Page 35: Specifications
SPECIFICATIONS: General Specifications Operating Voltage (10.0 –15.6V allowable) Maximum Current Consumption 10A (15mA Standby) Handbrake Trigger Ground Backup Camera trigger 12-24V allowable FM STEREO RADIO Frequency range USA 87.5MHZ – 107.9MHZ (0.2 MHz step) EURO 87.50MHZ –108.00MHz (0.05 MHz step) 10.2 dBf. - Page 36 BLUETOOTH® Version Bluetooth® 2.0 Certified Frequency Range 2.402 – 2.480 GHz Output power +4dBm Max Profiles supported HFP 1.5, A2DP 1.2, AVRCP 1.0, & PBAP USB INTERFACE USB Standard USB1.1/2.0 (Full Speed) Maximum Supply Current 500mA File System Fat16/32 microSD CARD INTERFACE Frequency Response (+/- 1dB) 10 –...
Need help?
Do you have a question about the EVR-6500D and is the answer not in the manual?
Questions and answers