
Related Manuals for Endurance 10K


Summary of Contents for Endurance 10K
- Page 1 5K 8K 10K T RIATHLON PENTATHLON DECATHLON 600ir 600iu 700iu 700ir 3.0i 4.0i Xtrainer Endurance 10k Treadmill ® User Manual...
-
Page 3: Safety Guidelines
Warning When using an electrical appliance, basic precautions should always be taken, including the following: • Read all instructions before using your treadmill. These instructions are written to ensure your safety and to protect the unit. • Before beginning any fitness program, you should obtain a complete physical examination by your physician. -
Page 4: Important Safety Instructions
IMPORTANT SAFETY INSTRUCTIONS SAVE THESE INSTRUCTIONS Personal Safety • Assemble and operate the treadmill on a solid, level surface. Locate the treadmill at least 4 feet from walls or furniture. Keep the area behind the treadmill clear. • Check the treadmill before each use. •... -
Page 5: Grounding Instructions
Grounding Instructions Your Endurance Treadmill must be grounded. If it should malfunction or break down, grounding provides a path of least resistance for electric current which reduces the risk of electrical shock. The treadmill is equipped with a power cord having an equipment-grounding conductor and a grounding plug. - Page 6 FCC WARNING - POSSIBLE RADIO/TELEVISION INTERFERENCE NOTE: This equipment has been tested and found to comply with Part 15 of the FCC rules. These limits are designed to provide reasonable protection against harmful interference in a residential installation. Any changes or modifications not expressly approved by the party responsible for the compliance could void the user's authority to operate the equipment.
- Page 7 The Proper Outlet This product must be grounded. A temporary adapter such as the one illustrated below may be used to connect this plug to a 2-pole receptacle as shown, if a properly grounded outlet is not available. If it should malfunction or breakdown, grounding provides a path of least resistance for electric current to reduce the risk of electric shock.
-
Page 8: Table Of Contents
Table of Contents Safety Guidelines…………………………………………………………………1-5 Introduction…………………………………………………………………………7 Hardware and Components Chart……………………………………………….8-9 10K Assembly Diagram…………………………………………………………...10 Assembly Steps……………………………………………………………………11 Belt Tension………………………………………………………………………...12-14 Adjustments………………………………………………………………………...15 The Console and Controls………………………………………………………..16-18 Working Out………………………………………………………….....19-23 Stretching and Flexibility………………………………………….......24-26 Maintenance And Lubrication…………………………………….......27-28 Warranty……………………………………………………………......29 Endurance Customer Service Information……………………….....30... -
Page 9: Introduction
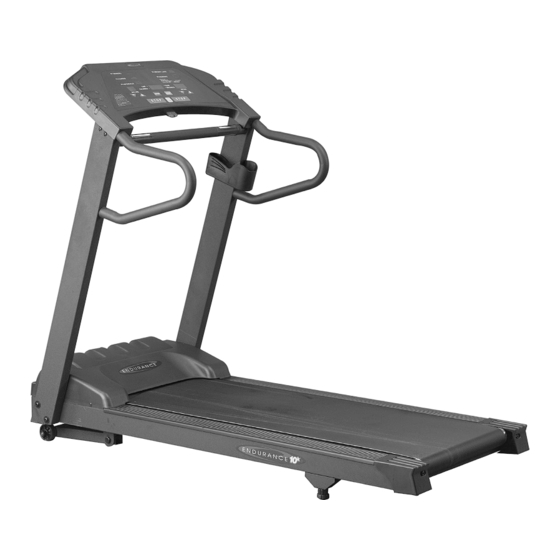
Understanding the correct assembly, adjustments, maintenance and operation of this machine will enhance your ability to achieve your fitness goals safely and successfully. The image below details the various components of your new Endurance treadmill: Console Control Panel... -
Page 10: Hardware And Components Chart
Assembly Components A (1PC) K (1PC) H (1PC) J (1PC) G (1PC) F (1PC) L (1PC) I (1PC) C (1PC) E (1PC) D (1PC) - Page 11 Hardware Diagram Round Inner Hex Screw 10mm x 90mm Part # QTY. 4 Included Round Inner Hex Screw 10mm x 120mm Part # QTY. 2 Tools Hex Head Bolt 10mm x 100mm Part # QTY. 2 Round Inner Hex Screw 10mm x 16mm Part # QTY.
-
Page 12: Assembly Diagram
Fig. 2 Assembly Diagram... -
Page 13: Assembly Steps
Assembly Please Note: We recommend that you have a person assist you with the assembly of your new treadmill. Use caution during the assembly of this product. Step 1: Align the vertical support frame (C) to the bottom base of the treadmill deck (A). -
Page 14: Belt Tension
Belt Tension and Centering Set Up Initial Adjustment After assembly and before turning power on position the rear roller using the "T" wrench (refer to the drawing if needed). Make 3 turns clockwise to avoid the belt from slipping. Make 3 Turns If belt is too far to the left side: 1) Turn the left roller bolt 1/4 turn clockwise (tighten) 2) Turn the right roller 1/4 turn counterclockwise (loosen) - Page 15 THE BELT AND MAY CAUSE FURTHER DAMAGE TO OTHER COMPONENTS. NOTE: If you have tightened the running belt and are still experiencing a slipping sensation, call your Endurance dealer for service. B) CENTERING THE BELT If belt is too far to the left side:...
- Page 16 INSTALLATION REQUIREMENTS A) Electrical Requirements Your Endurance™ treadmill is intended for use in the country to which it was shipped. Electrical supplies outside of this country may differ and may not be compatible with the product. Please consult Customer Support before using the treadmill in a different country.
-
Page 17: Adjustments
Leveling The Treadmill Leveler Legs After finding a location that is suitable for the treadmill, the rear legs may need to be adjusted to provide stable support. Turn the adjustable leg counter clockwise to raise the height (Fig. 1). Once you have reach the desired leg height for leveling, lock the leg in place by hand tightening the collar Fig. -
Page 18: The Console And Controls
Control Panel Instructions GETTING STARTED After the treadmill is correctly installed and plugged in, it's time to start our workout. Begin by depressing the power switch, located in the front of the treadmill near the power cord, to the ON position. Elevation Display Time/ Calories/HeartRate/Distance Display Speed Display... - Page 19 Start Button Located in the center of the Display Console the Start button is used to begin a workout after all of the prompted information has been entered. To start a simple, manual program in ascending time, press the Start button and the tread belt will start to move after a 3 second countdown.
- Page 20 Understanding the Elevation Window The Elevation Window displays the current incline rate in "Percentage of Grade." % of Grade Degrees 0.45 1.35 2.25 3.15 4.05 This is the same system used to measure hills and roads. A 100% grade is equal to 45%.
-
Page 21: Working Out
Working Out On Your Endurance Treadmill Before You Start: Your new Endurance treadmill will help you enjoy a healthier lifestyle if used properly. Be sure to completely read and understand this user guide before you begin your exercise regimen. • At the beginning of a workout, take several minutes at a moderate pace to bring your heart rate into your training zone. - Page 22 Working With Fitness Programs Starting Levels Your Endurance treadmill features fitness programs designed to help you achieve different goals. To further compliment your Cardio workout, these programs feature 5 user levels at progressive...
- Page 23 P3 – Interval Training Interval Training is a great way to eliminate frustrating fitness plateaus. It combines aspects of endurance training and cardio workout with various inclines and speeds. Step 1 Step onto the side rails of the treadmill deck and enter your weight, then press Enter –...
- Page 24 Step 3 – Adjusting the Workout Time To adjust the workout time for any user level, follow the same procedure as written in Step 1 until the Main Display reads . Press Enter and the Incline Display will read . Use the arrow buttons to adjust to the desired level (from L1 to L5).
- Page 25 P5 – Running Designed to bring out the marathon champion in you! This program will build up strength and endurance in your entire physique and cardiovascular system. Step 1 Step onto the side rails of the treadmill deck and enter your weight, then press Enter –...
-
Page 26: Stretching And Flexibility
Stretching / Flexibility Adequate flexibility is the ability to move your limbs and joints easily (through a complete range of motion) the way you need to in order to meet the challenges of daily life. Fortunately thereʼs a positive reinforcing cycle between flexibility and activity. Adequate flexibility enables you to maintain an active lifestyle, and an active lifestyle makes an important contribution to maintaining adequate flexibility. - Page 27 Lower Back, Hips, Groin, and Hamstrings 1. Stand with the feet about shoulder- width apart and pointed straight ahead. If you are pretty flexible and need more of a stretch, cross one leg in front of the other for a few stretches, then switch legs. 2.
- Page 28 Groin (inside of thigh) 1. Sit on the floor with the soles of your feet together. Gently push knees down toward the floor with your elbows. 2. Stand with your feet three to four feet apart and turned out slightly. 3.
-
Page 29: Maintenance And Lubrication
Maintenance Here are some preventative maintenance tips that will keep your treadmill operating at its best. Cleaning When cleaning the exterior of the unit, a non-abrasive cleanser and soft cotton cloth are strongly recommended. At no time should cleanser be applied directly to any part of the equipment. - Page 30 Lubricating the Running Belt and Deck Your running deck features a phenolic surface which reduces friction. Use the included Treadmill Silicone Lubricant Spray (H) (see Treadmill Hardware and Components Page at the front of the book) for optimum performance and extended deck and belt life.
-
Page 31: Warranty
Endurance directly. This warranty becomes VALID ONLY if the Lifetime Home-Use Warranty Registration form included in the box is completely filled in, signed by the original purchaser and mailed to Endurance WITHIN 10 DAYS of the purchaserʼs receipt of the treadmill. -
Page 32: Endurance Customer Service Information
©Copyright 2005. Endurance. All rights reserved. Endurance reserves the right to change design and specifications when we feel it will improve the product. Endurance machines maintain several patented and patent pending features and designs. All rights reserved on all design patents and utility patents.
Need help?
Do you have a question about the 10K and is the answer not in the manual?
Questions and answers