NEC UT880 Owner's Manual
Smart desk set (sds) phone
Hide thumbs
Also See for UT880:
- User manual (13 pages) ,
- Owner's manual (9 pages) ,
- User manual (80 pages)
Table of Contents
Advertisement
Quick Links
Advertisement
Table of Contents

Related Manuals for NEC UT880


Summary of Contents for NEC UT880
- Page 1 UT880 Owner’s Guide NDA-31647 Issue 1.0...
- Page 3 NEC Corporation of America has prepared this document for use by its employees and customers. The information contained herein is the property of NEC Corporation of America and shall not be reproduced without prior written approval of NEC Corporation of America.
-
Page 5: Table Of Contents
Introduction ....................1-1 Section 2 Device Layout ..................1-1 Section 3 Icons ......................1-2 Section 4 Inserting a Memory Card into the UT880 ..........1-5 Section 5 Adjusting the UT880 Volume Control ............1-7 Chapter 2 Basics Section 1 Connections ..................... 2-1 Get the Phone IP Address ................ - Page 6 Issue 1.0 UT880 ___________________________________________________________________________________ Contacts ...................... 3-8 Dialer ......................3-9 Call Logs ....................3-11 UC Suite ....................3-12 Feature Options (... More) ................. 3-14 Notifications ....................3-15 Section 2 Contacts ....................3-16 Managing Contacts ................... 3-17 Section 3 Email ..................... 3-21...
- Page 7 Section 1 About Settings ..................7-1 Ethernet Settings ..................7-1 Proxy Settings ..................... 7-1 Display ......................7-2 Apps ......................7-2 Security ......................7-2 Data Reset ....................7-2 About Tablet ....................7-3 Installing an Application ................7-3 ___________________________________________________________________________________ UT880 Owner’s Guide...
- Page 8 Issue 1.0 UT880 ___________________________________________________________________________________ THIS PAGE INTENTIONALLY LEFT BLANK ___________________________________________________________________________________ Table of Contents...
-
Page 9: Section 3 Icons
Forcing an Application to Close or Uninstall ..............2-8 Figure 2-7 Widgets ..........................2-9 Figure 3-1 UT880 NMLT Dialer App showing “Online” Status for the extension ......3-2 Figure 3-2 Manual Configuration of the PBX Server and Proxy ............3-3 Table 3-1 Account Provisioning Parameters in the UT880 Dialer Phone App .......3-4 Figure 3-3 Account Management –... -
Page 10: Issue
Issue 1.0 Figure 3-15 Contacts Screen ......................3-16 Figure 3-16 Creating a Contact ...................... 3-17 Figure 3-17 Contact Menu ......................3-18 Figure 3-18 Adding Contacts to a Group ..................3-20 Figure 3-19 Setting up an Email Account ..................3-21 Figure 3-20 Setting up an Email Account (Continued) .............. - Page 11 Figure 6-6 Search for Events ......................6-6 Figure 6-7 Adjust an Event ......................6-7 Figure 6-8 View a List of Events ......................6-8 Figure 6-9 Calendar Settings ......................6-9 Figure 6-10 Folder Options Display ....................6-10 Figure 6-11 Downloaded Files Display ....................6-11 UT880 Owner’s Guide...
- Page 12 Issue 1.0 THIS PAGE INTENTIONALLY LEFT BLANK viii List of Figures and Tables...
-
Page 13: Getting Started
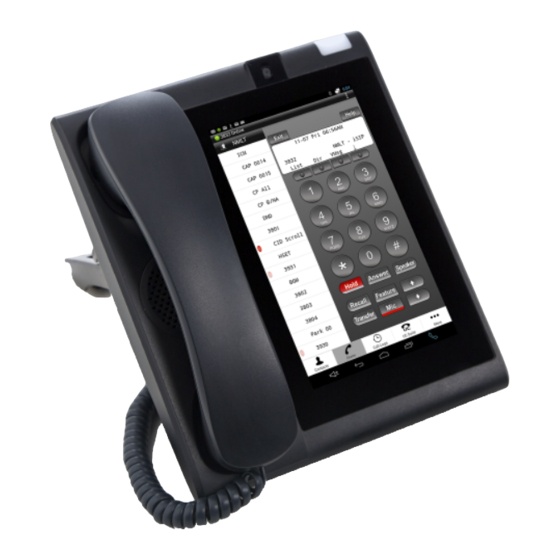
Getting Started NTRODUCTION ECTION The UT880 is a Smart Desk Set (SDS) Phone with UT880 Multiline Client that supports the NEC Phone Features and functionality. Power over Ethernet (PoE) is used to power the phone, reducing the need for power cables. -
Page 14: Icons
Issue 1.0 UT880 CONS ECTION Table 1-1 shows and briefly explains the display icons. Table 1-1 UT880 Icons Icon Description Back Control is used to return to the previous screen or function. Browser is used to launch the Internet browser. - Page 15 The Movie Studio icon is used to launch the movie maker feature. Refer to Section 3 Gallery on page 5-7 for more information on the UT880 Movie Studio feature. The Music icon is used to open the UT880 music player. Refer to Section 3 Gallery on page 5-7 for more information.
- Page 16 NMLT dialer. The Multiline Client Dialer icon. The Open Manager icon. The Phone icon. This is a hot key for quick access to the NEC voice phone application. The Power Management icon is used for turning the UT880 on or off.
-
Page 17: The "Micro Sd" Memory Card
Figure 1-2 The “Micro SD” Memory Card To install the Micro SD Card into the UT880, follow the steps below. Tip the UT880 forward and locate the memory card slot on the lower left side. UT880 Owner’s Guide 1 - 5... -
Page 18: The "Micro Sd" Memory Card Slot
Issue 1.0 UT880 This is marked as “Micro SD”. Figure 1-3 The “Micro SD” Memory Card Slot Note that the memory card is inserted “upside down”, that is, the printed side is face down and the card’s contact pins are face up. Insert the memory card into the slot until it locks into place. -
Page 19: Adjusting The Ut880 Volume Control
UT880 V DJUSTING THE OLUME ONTROL ECTION Various sounds can be independently adjusted on the UT880. Volume controls are available for items such as ringtones, alarms and notifications. To adjust the volume controls: Press the Settings icon. Locate the Sound icon found under the Device selections. - Page 20 Issue 1.0 UT880 THIS PAGE INTENTIONALLY LEFT BLANK 1 - 8 Getting Started...
-
Page 21: Chapter 2 Basics
When the UT880 has completed booting it will get an IP address from a DHCP server. The UT880 factory default is set to use DHCP, so if there is a designated DHCP server on the user’s network, the IP address will be automatically assigned. -
Page 22: Using Dhcp
Select DHCP on Connection Type and click Save. Using Static IP The following procedure is to change the IP Address of the UT880 or change the obtaining IP address method from DHCP to Static IP in accordance to the network environment. -
Page 23: Section 2 Shortcuts
Multiple applications may be stored in a folder and labeled by simply dragging a application over an existing shortcut application. Shortcuts Figure 2-1 Shortcuts Screen UT880 Owner’s Guide 2 - 3... -
Page 24: Section 3 Home Screen
Issue 1.0 UT880 CREEN ECTION The Home screen provides immediate access to the applications you use most. The screen is divided into four different panels to store your favorites or most used applications. Using a long-press of the app icon you can drag it to the home screen. -
Page 25: Setting Time For Locking Device
Locking and Unlocking the Device The device automatically locks if it is not used for a specified period. This is based on user settings display sleep settings. At default the UT880 display will lock if the device is idle for five minutes. -
Page 26: Using Applications (Apps)
Issue 1.0 UT880 SING PPLICATIONS ECTION Applications Screen Tap the Applications icon for access to the “APPS” window for all applications, including any new applications installed. This device can run many different types of applications, ranging from media to Internet applications. -
Page 27: Closing An Application
Select an application to re-open. Closing an Application Close applications not in use to maintain device performance. Press the Recently used icon, and then swipe the application to close it. Figure 2-5 Closing an Application UT880 Owner’s Guide 2 - 7... -
Page 28: Forcing An Application To Close Or Uninstall
Issue 1.0 UT880 To Force an Application to Close or Uninstall Access Settings Apps then select the specific application to be stopped, or uninstalled. Figure 2-6 Forcing an Application to Close or Uninstall On the Home screen, tap the Applications icon to open the Applications screen. -
Page 29: Widgets
Adding Widgets Under the Applications icon, select the Widgets tab. While pressing the widget, drag left or right to the desired panel and release to create a shortcut to the widget. Figure 2-7 Widgets UT880 Owner’s Guide 2 - 9... -
Page 30: Upgrading The Device And Transferring Files
Copy upgrade file to the Micro SD drive. Remove Micro SD drive from the support PC. Insert the Micro SD drive into the UT880. There is a small slot for this drive located underneath the phone on the front side. -
Page 31: Using An Usb Drive
Insert USB drive in the support PC. Copy upgrade file to the USB drive. Remove the USB drive from support PC. Insert the USB drive into UT880. There is a USB slot for this drive located underneath the phone. Go to desk top of the UT800. - Page 32 Issue 1.0 UT880 THIS PAGE INTENTIONALLY LEFT BLANK 2 - 12 Basics...
-
Page 33: Chapter 3 Communication
Communication - UT880 NMLT M HONE ULTILINE ELEPHONE ECTION PPLICATION The Multiline Telephone application may be automatically configured for you during install. When pre-configured, the App shows online status of your user, depending on the following conditions: Device has network connectivity. -
Page 34: Ut880 Nmlt Dialer App Showing "Online" Status For The Extension
PBX information based on the information provided by your IT support team, and let the PBX configure the App similar to any other NEC phone. Once the accounts screen is open, click on the “+” to add an account, or click on an... -
Page 35: Manual Configuration Of The Pbx Server And Proxy
UT880 Issue 1.0 Figure 3-2 Manual Configuration of the PBX Server and Proxy UT880 Owner’s Guide 3 - 3... -
Page 36: Account Provisioning Parameters In The Ut880 Dialer Phone App
Issue 1.0 UT880 Table 3-1 Account Provisioning Parameters in the UT880 Dialer Phone App Field Name Description Default Value/Note Account Name Name of the profile or account. This This is a required field. cannot be left blank. User Name SIP user name assigned by the... -
Page 37: Account Management - Set As Default And Delete
Similarly, selection of Delete option will delete the account. It is recommended that advanced setting not be changed without help from a qualified support person. Figure 3-3 Account Management – Set as Default and Delete UT880 Owner’s Guide 3 - 5... -
Page 38: The Ut880 Nmlt Multiline Telephone Application Status
UT880 The UT880 NMLT Multiline Telephone Application Status The UT880 NMLT Multiline Telephone Application Status is a drop down status notification providing quick viewing of the application status including “online” or “offline” state, Call information during active call and voicemail indication, if there is a pending message. -
Page 39: Ut880 Nmlt App Menu
This line provides a quick view of the App and its status, e.g. Online or Offline. This line remains visible for all screens of the app. The remainder of the screen items are specific to the NEC ® Dterm used and are described in its feature specification. -
Page 40: Figure
Contacts The device contact allows the end user to use the native contacts application from within the UT880 NMLT Dialer application. Clicking the Contacts button opens the contact application within the App as shown. Refer to Figure 3-7 Opening Contacts from the UT880 NMLT Dialer App. -
Page 41: Issue 1.0
When the App comes to the forefront it opens the Dialer page. If the user is online, then the end user of the UT880 can dial out by following the process similar to the Dterm. Once registered, the UT880 can also receive calls and use features and functions currently supported by the App. -
Page 42: The Ut880 Nmlt Dialer App Dialer Screen
Issue 1.0 UT880 Figure 3-8 The UT880 NMLT Dialer App Dialer Screen The semantics similar to the Dterm are implemented in the UT880 NMLT Dialer application. For example, the LED function is replicated in the App. Refer to Figure 3-9 Dialer LED Function Emulation. -
Page 43: Call Logs
The UT880 NMLT App also allows the user to call out from the call logs directly through the dialer. Figure 3-10 Call Logs In the UT880 NMLT Dialer App UT880 Owner’s Guide... -
Page 44: Uc Suite
Issue 1.0 UT880 UC Suite Selecting the UC Suite icon calls up the UC application available on your PBX platform. Refer to Figure 3-11 UC Suite Application. Figure 3-11 UC Suite Application If the password is registered, the end user is automatically logged into the UC Suite. - Page 45 UT880 Issue 1.0 Figure 3-12 UC Suite Dial Screen UT880 Owner’s Guide 3 - 13...
-
Page 46: Feature Options
Issue 1.0 UT880 Feature Options (... More) The Feature Options currently allow access to the Account information. Figure 3-13 Feature Options Menu and Software Information Screen 3 - 14 Communication... -
Page 47: Notifications
When you touch an App, a screen opens that gives you details about turning certain App features on and off. Near the top of the App setting display is a check box for turning the Notifications feature on or off. Figure 3-14 Notifications Screen UT880 Owner’s Guide 3 - 15... -
Page 48: Contacts
Issue 1.0 UT880 ONTACTS ECTION Use this application to manage contacts, including phone numbers, email addresses and others. Tap Contacts on the Applications Screen. Contact Preference & General Settings Edit Contact Information Create a New Contact Search Contact All Contacts, Favorites, Groups ... -
Page 49: Managing Contacts
Searching for Contacts Use on of the following search methods: Scroll up or down the Contacts list. Tap the search field at the top of the Contacts list and enter the search criteria. UT880 Owner’s Guide 3 - 17... - Page 50 Issue 1.0 UT880 2.1.4 Importing Contacts Figure 3-17 Contact Menu Import/Export Import from SIM card, Import from SD card, or Import from USB storage. 2.1.5 Exporting Contacts Import/Export Export from SIM card, Export from SD card, or Export from USB storage.
- Page 51 Add to favorites – Add the contacts to Favorites Remove from favorites – Remove contacts from Favorites Grid View/List View – View contacts in grid or list form Help – Access help information about using contacts UT880 Owner’s Guide 3 - 19...
- Page 52 Issue 1.0 UT880 2.1.8 Contact Groups To add Contacts to a group: Define the group, select contacts to add, then tap Done. Figure 3-18 Adding Contacts to a Group 2.1.9 Managing Groups Tap, then take one of the following actions: Create –...
-
Page 53: Email
UT880 Issue 1.0 MAIL ECTION To add an Exchange email account on the UT880, follow the steps below. Tap the Settings icon. On the Settings display, tap the Email icon, followed by Account settings. Figure 3-19 Setting up an Email Account UT880 Owner’s Guide... - Page 54 Issue 1.0 UT880 Add a new Email account with credentials provided by the network administrator. Figure 3-20 Setting up an Email Account (Continued) 3 - 22 Communication...
- Page 55 Select Manual Setup to define the type of Email account (POP3, IMAP, or Exchange). The recommended settings below may not apply for your specific network. Please consult with your network administrator for specific server settings. Figure 3-21 Setting up an Email Account (Continued) UT880 Owner’s Guide 3 - 23...
- Page 56 Issue 1.0 UT880 Continue defining the account options. Figure 3-22 Setting up an Email Account (Continued) 3 - 24 Communication...
- Page 57 UT880 Issue 1.0 Press Next. Once you have successfully defined your email account the server will sync your emails. Figure 3-23 Setting up an Email Account (Continued) UT880 Owner’s Guide 3 - 25...
- Page 58 Issue 1.0 UT880 To set up a Gmail or Yahoo email account follow the steps below: To add an Exchange email account on the UT880, follow the steps below. Tap the Settings icon. On the Settings display, tap the Email icon, followed by Account settings.
- Page 59 UT880 Issue 1.0 Add a new Email account with credentials provided by the network administrator. Figure 3-25 Setting up an Email Account (Continued) UT880 Owner’s Guide 3 - 27...
- Page 60 Issue 1.0 UT880 Select Manual Setup to define the type of Email account (POP3, IMAP, or Exchange). In this case, IMAP is selected. Figure 3-26 Setting up an Email Account (Continued) 3 - 28 Communication...
- Page 61 UT880 Issue 1.0 Continue defining the account options. Figure 3-27 Setting up an Email Account (Continued) UT880 Owner’s Guide 3 - 29...
- Page 62 Issue 1.0 UT880 Press Next. Once you have successfully defined your email account the server will sync your emails. Figure 3-28 Setting up an Email Account (Continued) 3 - 30 Communication...
-
Page 63: Web And Media
Web and Media NTERNET ROWSER AT A LANCE ECTION Opening the Browser Use the UT880 Browse icon on the applications screen to open the Internet browser. Preference & General Settings Bookmarks, History, Search & Saved Pages Enter a Web Address or a... -
Page 64: Viewing Webpages
Issue 1.0 UT880 Viewing Webpages Tap the address field, enter the web address, then tap Go. Tap to share, save, current webpage while viewing a webpage. Figure 4-2 Viewing Pages 4 - 2 Web and Media... -
Page 65: Bookmarks
UT880 Issue 1.0 Bookmarks To bookmark the current webpage, tap the Add bookmark icon. To open a bookmarked webpage, tap the Bookmarks-History-Saved pages icon. Select one. Figure 4-3 Bookmarks Screen UT880 Owner’s Guide 4 - 3... -
Page 66: History
Issue 1.0 UT880 History Tap the Bookmarks-History-Saved pages icon to open a webpage from the list of recently visited webpages. To clear the history, tap Clear History. Figure 4-4 History Screen 4 - 4 Web and Media... -
Page 67: Browser Preferences And General Settings
UT880 Issue 1.0 Browser Preferences and General Settings General user settings may be defined – Privacy & Security, Accessibility, Advances, Bandwidth Management and Labs settings. Figure 4-5 Browser Preferences and General Settings Screens UT880 Owner’s Guide 4 - 5... -
Page 68: Bluetooth
Issue 1.0 UT880 LUETOOTH ECTION The UT880 can easily connect to a Blue tooth headset. You will need to enable your headset for pairing. The UT880 Bluetooth settings are listed under the Settings icon. First, turn bluetooth ON. Next, search the list of Paired Devices. Once you find your headset, tap on the name and it will connect to the UT880. - Page 69 UT880 Issue 1.0 Figure 4-7 Turning Bluetooth On UT880 Owner’s Guide 4 - 7...
- Page 70 Issue 1.0 UT880 THIS PAGE INTENTIONALLY LEFT BLANK 4 - 8 Web and Media...
-
Page 71: Chapter 5 Media
ECTION Play Music Use the Music application to listen to music from the UT880 or to stream music. Play music by selecting a music category (Artist, Albums, Songs or Playlist) and tap the Play button. Figure 5-1 Play Music UT880 Owner’s Guide... -
Page 72: Camera
Issue 1.0 UT880 AMERA ECTION Select the Applications icon and tap the camera icon image on the preview screen where the camera should focus. When the subject is in focus, tap the “blue circle”. Figure 5-2 Camera Application 5 - 2... - Page 73 UT880 Issue 1.0 General Camera Settings The following are available options for the camera or video: Picture size – Use higher resolution for higher quality. Figure 5-3 Picture Size UT880 Owner’s Guide 5 - 3...
- Page 74 Issue 1.0 UT880 Metering – Select a metering method. This determines how light values are calculated. Center-weighted measures background light in the center of the scene. Spot measures the light value at a specific location. Matrix averages the entire scene.
- Page 75 UT880 Issue 1.0 Resolution – Select a value. This controls camera light sensitivity. Figure 5-5 Picture Resolution UT880 Owner’s Guide 5 - 5...
- Page 76 Issue 1.0 UT880 Storage – Select the memory location and picture size. Figure 5-6 Storage Location 5 - 6 Media...
-
Page 77: Gallery
Zooming in and out – Use one of the following methods to zoom in an image: Double-tap anywhere to zoom in. Spread two fingers apart on any place to zoom in. Pinch to zoom out, or double-tap to return. Figure 5-7 Viewing Images UT880 Owner’s Guide 5 - 7... -
Page 78: Movie Maker
Movie Maker is a powerful video editor tool that is a perfect Movie Studio designed for the UT880 platform. Movie maker allows for easy movie making and video editing it is also a simplistic way to share business videos. Select your photos, music and Movie maker will turn them into movies in minutes. - Page 79 UT880 Issue 1.0 Adding a Project To add a project, tap the Movie Studio icon to open the Movie Maker application. Figure 5-8 Adding a Project UT880 Owner’s Guide 5 - 9...
- Page 80 Issue 1.0 UT880 Create a Project Name The first step in creating a project is naming the project. Use the keyboard to define the project name, then press OK when done. Figure 5-9 Creating a Project Name 5 - 10...
- Page 81 UT880 Issue 1.0 Movie Maker Dashboard The Movie Maker Dashboard opens allowing you to Figure 5-10 Movie Maker Dashboard UT880 Owner’s Guide 5 - 11...
- Page 82 Issue 1.0 UT880 THIS PAGE INTENTIONALLY LEFT BLANK 5 - 12 Media...
-
Page 83: Chapter 6 Utilities
Utilities LOCK ECTION To set the UT880 clock, follow the steps listed below. Tap the Settings icon. On the Setting display, tap Date & time. Figure 6-1 Date & Time Settings UT880 Owner’s Guide 6 - 1... -
Page 84: Apps And Widgets Display
Choose date format – The date can be displayed as (M/D/Y), (D/M/Y) or (Y/M/D). NTP Server configuration – The UT880 Apps and Widgets will allow you to place a customized Analog and Digital clock on the phone dashboard. Figure 6-2 Apps and Widgets Display 6 - 2 Utilities... -
Page 85: Calculator
ECTION A simple calculator with support for large numbers (up to 12 digits) can be displayed. The calculator offers addition, subtraction, multiplication and division as well as advanced mathematical calculations. Figure 6-3 Calculator Application UT880 Owner’s Guide 6 - 3... -
Page 86: Calendar
Issue 1.0 UT880 ALENDAR ECTION Add an Event To add an event to the calendar, select the date of the year and tab the time slot [ + New event], then define the event details that may include information such as What, Where, From, Repetition, and reminders. -
Page 87: Change Your Calendar View
UT880 Issue 1.0 Change Your Calendar View Select a Day, Week, Month or Agenda view. In the Day or Week view, pinch to zoom in or out. Figure 6-5 Changing Calendar View UT880 Owner’s Guide 6 - 5... -
Page 88: Search For Events
Issue 1.0 UT880 Search for Events Select the search tab then enter text in the search field. The What, Where and Description fields from the calendar you are viewing are searched. Figure 6-6 Search for Events 6 - 6 Utilities... -
Page 89: Adjust An Event
Issue 1.0 Adjust an Event Search for the event name and select the Edit icon, Modify the event detail and select the Done icon to save the new information. Figure 6-7 Adjust an Event UT880 Owner’s Guide 6 - 7... -
Page 90: View A List Of Events
Issue 1.0 UT880 View a List of Events Locate the calendar view week drop list and select Agenda. The Agenda view will list all the month’s calendar events on the left side of the phone and one of the selected events on the right side of the display. -
Page 91: Calendar Settings
There are several calendar configurable settings listed under general settings: Calendar View Setting Default time for reminder alerts Which day starts the week Use Home Time Zone support Notifications and Reminder Alerts Figure 6-9 Calendar Settings UT880 Owner’s Guide 6 - 9... -
Page 92: Open Manager
UT880 ANAGER ECTION Open Manager is a utility that allows the user to access the file structure of the UT880 to browse, and if needed, managed. You can copy and paste files to and from the UT880 as needed. Figure 6-10 Folder Options Display... -
Page 93: Downloads
UT880 Issue 1.0 OWNLOADS ECTION Use the UT880 download icon on the applications screen to see what files have been downloaded . Figure 6-11 Downloaded Files Display UT880 Owner’s Guide 6 - 11... - Page 94 Issue 1.0 UT880 THIS PAGE INTENTIONALLY LEFT BLANK 6 - 12 Utilities...
-
Page 95: Chapter 7 Settings
Ethernet Settings Ethernet Settings are used to configure the LAN and PC ports of the UT880 for the local area network (LAN). These setting should be left at default unless there are specific reasons to change them. The following settings are available: The LAN port can be enabled or disabled. -
Page 96: Display
Issue 1.0 UT880 The following settings are available: Proxy hostname. Proxy port. Bypass proxy for – use to define a URL that should not go through the proxy server. Multiple entries must be separated by a comma “,”. -
Page 97: About Tablet
Micro SD drive from the adapter. Insert the Micro SD drive into UT880. There is a small slot for this drive on the front bottom of the phone which you will have to lift up to see. - Page 98 Copy the upgrade file onto the USB drive. Remove the USB drive from the support PC. Insert the USB drive into UT880. There is a USB slot on the bottom of the phone which you will have to turn over to see.
- Page 100 UT880 Owner’s Guide NEC Corporation of America Issue 1.0...
Need help?
Do you have a question about the UT880 and is the answer not in the manual?
Questions and answers