Table of Contents

Related Manuals for LifeCore Fitness LC-ST


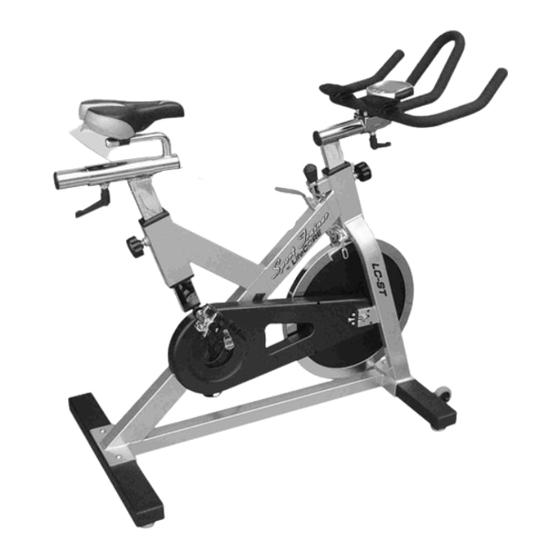
Summary of Contents for LifeCore Fitness LC-ST
- Page 1 GENERAL INFORMATION ~ CHECK LIST ~ MEDICAL and SAFETY ~ WARRANTY CARE and MAINTENANCE ~ ASSEMBLY and LUBRICATION INSTRUCTIONS USER GUIDE ~ SETUP INSTRUCTIONS ~ PARTS LIST ~ EXPLODED DRAWINGS COMPUTER and SPEED TRANSMITTER INSTRUCTIONS...
-
Page 2: Table Of Contents
GENERAL INFORMATION TABLE OF CONTENTS The LifeCORE Sport Trainer can be used in a General Information page 1 home, light commercial or full commercial Check List page 1 setting. Medical & Safety Information page 2 Warranty Information page 2 The official maximum load is 400 lbs. Care and Maintenance page 2 In the unlikely event your LifeCORE Sport... -
Page 3: Care And Maintenance
MEDICAL & SAFETY CARE AND MAINTENANCE Read this Hand Book thoroughly to familiarize Your LifeCORE Sport Trainer is made of the highest yourself with the LifeCORE Sport Trainer before quality materials. However it is still important that using it. you take care of your LifeCORE Sport Trainer on a regular basis. -
Page 4: Lubrication Instructions
LUBRICATION INSTRUCTIONS We strongly suggest that you follow these optional lubrication instructions to improve the ease of making seat and handlebar adjustments and the stability of the seat and handlebar when locked. During the assembly process lubricate the appropriate parts either with the OIL or GREASE provided as illustrated in the diagrams below. -
Page 5: Assembly Instructions
ASSEMBLY INSTRUCTIONS STEP 1 STEP 3 Secure both STABILIZER [002,003] with 4x Secure HANDLEBAR [009] to HANDLEBAR BOLT [401] + WASHER [500] and tighten firmly. SLIDER [008] with 4 x BOLT [404] + WASHER [503 & 504] and tighten firmly. ALLEN ALLEN STEP 2... - Page 6 ASSEMBLY INSTRUCTIONS STEP 4 STEP 5 Assemble the COMFORT PADS [121] on Insert HANDLEBAR POST [007] into MAIN H A N D L E B A R [ 0 0 9 ] b y s e c u r i n g 2 x FRAME [001] and secure by tightening COMFORT PAD PLATE with VELCRO [010] KNOB [105].
-
Page 7: Assembly Instructions
OPTIONAL ASSEMBLY INSTRUCTIONS The LifeCORE Sport Trainer comes with this optional handlebar post STABILITY PLUG [108]. This STABILITY PLUG [108] can not be assembled by the manufacturer as it would increase the carton size and reduce the container loading which inturn would increase the cost. So in order to keep costs down to our valued customers and still provide the STABILITY PLUG [108] these optional assembly instructions where devised. -
Page 8: User Guide
USER GUIDE HANDLES There are 2 x HANDLES [106] on your LifeCORE Sport Trainer that adjust the handlebar and seat horizontally. To operate the handles rotate clockwise to lock and counterclockwise to unlock. The spring loaded locking system allows you to free rotate the handle without locking or unlocking. To use the spring loaded locking system simply pull the handle, then rotate. -
Page 9: User Guide
USER GUIDE PEDAL INSTRUCTIONS The LifeCORE Sport Trainer pedals have been specifically designed for use on stationary fitness equipment. Attaching Cleats to Shoes These pedals are designed to be used with the supplied VP-C01 cleats. It is recommended that you consult a bicycle dealer for assistance and refer to your shoe manufacturers instructions. -
Page 10: Setup Instructions
SETUP INSTRUCTIONS The LifeCORE Sport Trainer has both vertical and horizontal adjustment for the seat and handlebar as it is important to correctly adjust the seat and handlebar to fit your body type. These adjustment systems have been designed to ensure a quick and easy custom fit. VERTICAL SEAT POST VERTICAL HANDLEBAR If your legs are too straight or your feet cannot... -
Page 11: Parts List
PARTS LIST PART PART DESCRIPTION Q’TY DESCRIPTION Q’TY MAIN FRAME CRANK - LEFT STABILIZER - FRONT CRANK - RIGHT STABILIZER - REAR PEDAL - LEFT ADJUSTMENT BLOCK PEDAL - RIGHT FLYWHEEL SHAFT RESISTANCE CALIPERS SPACER RESISTANCE CABLES HANDLEBAR POST FLYWHEEL HANDLEBAR SLIDER HANDLEBAR COMFORT PAD PLATE with VELCRO... - Page 12 EXPLODED VIEW...
- Page 13 EXPLODED VIEW...
-
Page 14: Computer Instructions
COMPUTER INSTRUCTIONS LCD DISPLAY TIME DISPLAY Liquid Crystal Display hours, minutes and seconds DISTANCE DISPLAY CALORIES DISPLAY kilometers (Km) or miles (Mile) Measured in kilocalories (K/CAL). Also known as large Calories SPEED DISPLAY and food Calories. kilometers per hour(KPH) RPM / CADENCE DISPLAY revolutions per minute (RPM) miles per hour(MPH) NOTE: CALORIES and RPM share the... -
Page 15: Computer Instructions
COMPUTER INSTRUCTIONS SPEED TRANSMITTER Note that there is no wire connected to the computer. This allows for more freedom with handlebar adjustment and improves the appearance of the bike. However this also means that the speed signal is sent to the computer via a radio wave by the speed transmitter which runs on a battery. - Page 16 Click “Product Registration” and fill-in all the details, then click send. The Serial Number is located on your Sport Trainer. See page 1 for the location of the Serial Number. LIFECORE FITNESS 242 Bingham Rd. #101 San Marcos, CA 92069...
Need help?
Do you have a question about the LC-ST and is the answer not in the manual?
Questions and answers
Want a more comfortable seat for my spor trainer. What will fit so it will be moveable?