Table of Contents
Advertisement
Available languages
Available languages
MINI OFFSET SMOKER AND GRILL
MINI PARRILLA Y AHUMADOR
OWNER'S MANUAL
ASSEMBLY AND OPERATING IN STRUC TIONS
MANUAL DEL PROPIETARIO
INSTRUCCIONES DE ARMADO Y OPERACIÓN
SAVE THIS MANUAL FOR FUTURE REFERENCE
GUARDE ESTE MANUAL PARA REFERENCIA FUTURA
WARNING
NOTICE TO INSTALLER:
LEAVE THESE INSTRUCTIONS WITH
READ AND FOLLOW ALL WARNINGS AND
INSTRUCTIONS IN THIS MANUAL TO AVOID
THE GRILL OWNER FOR FUTURE
PERSONAL INJURY OR PROPERTY DAMAGE.
REFERENCE .
ADVERTENCIA
AVISO PARA EL INSTALADOR:
LEA Y SIGA TODAS LAS ADVERTENCIAS E
ENTREGUE ESTAS INSTRUCCIONES AL
INSTRUCCIONES EN ESTE MANUAL PARA
PROPIETARIO DE LA PARRILLA PARA
EVITAR LESIONES PERSONALES O DAÑOS
REFERENCIA FUTURA.
MATERIALES.
Advertisement
Table of Contents

Related Manuals for Brinkmann 810-3015-S


Summary of Contents for Brinkmann 810-3015-S
- Page 1 MINI OFFSET SMOKER AND GRILL MINI PARRILLA Y AHUMADOR OWNER’S MANUAL ASSEMBLY AND OPERATING IN STRUC TIONS MANUAL DEL PROPIETARIO INSTRUCCIONES DE ARMADO Y OPERACIÓN SAVE THIS MANUAL FOR FUTURE REFERENCE GUARDE ESTE MANUAL PARA REFERENCIA FUTURA WARNING NOTICE TO INSTALLER: LEAVE THESE INSTRUCTIONS WITH READ AND FOLLOW ALL WARNINGS AND INSTRUCTIONS IN THIS MANUAL TO AVOID...
-
Page 2: Important Safety Warnings
IMPORTANT SAFETY WARNINGS WE WANT YOU TO ASSEMBLE AND USE YOUR GRILL AS SAFELY AS POSSIBLE. THE PURPOSE OF THIS SAFETY ALERT SYMBOL IS TO ATTRACT YOUR ATTENTION TO POSSIBLE HAZARDS AS YOU ASSEMBLE AND USE YOUR GRILL. WHEN YOU SEE THE SAFETY ALERT SYMBOL, PAY CLOSE ATTENTION TO THE INFORMATION WHICH FOLLOWS! READ ALL SAFETY WARNINGS AND INSTRUCTIONS CAREFULLY BEFORE ASSEMBLING AND OPERATING YOUR GRILL. - Page 3 We advise that a fire extinguisher be on hand. Refer to your local authority to determine proper size and type of fire extinguisher. • Accessory attachments not manufactured by The Brinkmann Corporation for this particular product are not recommended and may lead to personal injury or property damage.
-
Page 4: Assembly Instructions
ASSEMBLY INSTRUCTIONS READ ALL SAFETY WARNINGS & ASSEMBLY INSTRUCTIONS CAREFULLY BEFORE ASSEMBLING OR OPERATING YOUR GRILL. FOR MISSING PARTS, PLEASE CALL CUSTOMER SERVICE AT 800-527-0717. Inspect contents of the box to ensure all parts are included and undamaged. We recommend two people work together when as sem bling this unit. The following tools are required to assemble this Mini Offset Smoker and Grill: •... -
Page 5: Parts Bag Contents
Parts Bag Contents 20 M5 Nuts M6 X 10 mm Bolts 38 M5 X 10 mm Bolts M5 X 40 mm Bolts M5 Nuts M6 X 10 mm Bolts M5 X 10 mm Bolts M5 X 40 mm Bolts... - Page 6 Choose a good, cleared assembly area and get a friend to help you put your grill together. Lay card board down to protect grill finish and assembly area. Turn the grill on its side to begin assembly. Front Shelf Bracket Holes Step 1 Connect right and left legs together (2 pairs).
- Page 7 NOTE: With the help of a friend, turn cart assembly over. Step 3 Attach bottom panel to left legs using two M5 X 40 mm bolts. Step 4 Attach bottom panel to right legs using two M5 X 40 mm bolts.
- Page 8 Step 5 Attach right cart beam to right legs using four M5 X 10 mm bolts. Step 6 Attach left cart beam to left legs using two M5 X 10 mm bolts. Step 7 Attach smoker body to cart base using five M5 X 10 mm bolts and one M5 nut.
- Page 9 Cotter Pin Step 8 Attach smoker lid to smoker body using two hood hinge bolts and cotter pins. Hood Hinge Bolt Step 9 Attach lid handle to smoker lid using two M5 X 10 mm bolts. M5 X 10 mm Bolts Step 10 Insert the temperature gauge, and then turn it clockwise to lock into place.
- Page 10 Step 11 Attach chimney to the smoker lid using two M5 X 10 mm bolts and two M5 nuts. Step 12 Attach firebox door hinge and firebox door assembly to firebox bottom using four M5 X 10 mm bolts and M5 nuts. Attach step bolt to the firebox bottom.
- Page 11 Step 14 Attach firebox top to firebox bottom using six M5 X 10 mm bolts and M5 nuts. Step 15 Attach firebox assembly to smoker using six M6 X 10 mm bolts. Step 16 Secure firebox bottom to left beam using two M5 X 10 mm bolts and M5 nuts.
- Page 12 Step 17 Attach two firebox lid hinges to firebox lid. Attach firebox lid to firebox using two M5 X 10 mm bolts and M5 nuts. Step 18 Insert firebox lid support bracket into firebox. Attach this bracket to firebox using one M5 X 10 mm bolt and M5 nut.
- Page 13 Step 20 Attach two front shelf brackets to cart base using two M5 X 10 mm bolts. Attach front shelf to smoker using two M5 X 10 mm bolts and M5 nuts. Attach two front shelf brackets to front shelf using two M5 X 10 mm bolts. Step 21 Remove one pre-attached lock nut on the warming rack.
- Page 14 Step 22 Insert smoker charcoal grate to ash tray. Hang the charcoal grate assembly inside grill body using charcoal grate brackets. WARNING: Never hang charcoal grate from charcoal grate adjuster handles. Handle Charcoal Grate Adjuster Step 23 Place cooking grates on support ribs directly above charcoal grate.
- Page 15 Step 24 Insert grease cup bracket on the cart right beam. Step 25 Place firebox charcoal grate inside firebox. Step 26 Place firebox cooking grates on support ribs directly above charcoal grate.
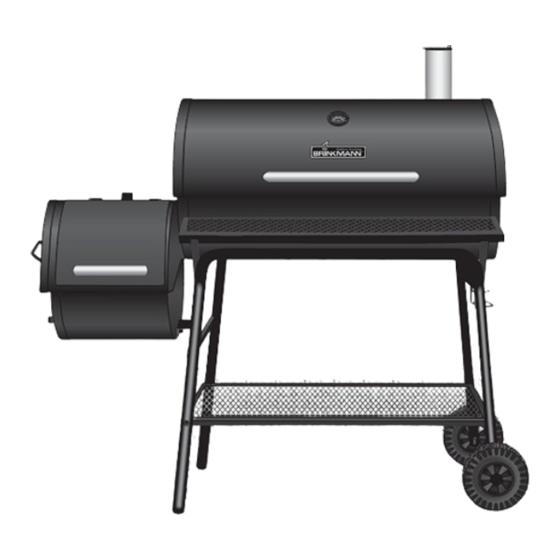
- Page 16 Mini Offset Smoker and Grill (Assembled)
-
Page 17: Preparation For Use & Lighting In Struc Tions
BEFORE OPERATING YOUR GRILL. Curing Your Grill Prior to your first use of the Brinkmann Mini Offset Smoker and Grill, follow the in struc tions below carefully to cure your grill. Curing your grill will minimize damage to the exterior finish as well as rid the grill of paint odor that can impart unnatural flavors to the first meal prepared on your Brinkmann Mini Offset Smoker and Grill. - Page 18 Never exceed a temperature of 450°F in cooking chamber. It is important that the exterior of the smoker is not scraped or rubbed during the curing process. YOUR BRINKMANN MINI OFFSET SMOKER AND GRILL IS NOW CURED AND READY FOR USE.
-
Page 19: Operating Instructions
OPERATING INSTRUCTIONS PLACE THE GRILL OUTDOORS ON A HARD, LEVEL, NON-COMBUSTIBLE SURFACE AWAY FROM ROOF OVERHANG OR ANY COMBUSTIBLE MATERIAL. NEVER USE ON WOODEN OR OTHER SURFACES THAT COULD BURN. PLACE THE GRILL AWAY FROM OPEN WIN DOWS OR DOORS TO PREVENT SMOKE FROM ENTERING YOUR HOUSE. -
Page 20: Smoke Cooking Tips
Step 5 Open the firebox air shutter approximately 1” to 2” and smokestack damper half way. With firebox lid open, stand back and carefully light charcoal and allow to burn until covered with a light ash (ap prox i mate ly 20 minutes). WARNING: Charcoal lighting fluid must be allowed to com plete ly burn off prior to closing firebox lid (approximately 20 minutes).Failure to do this could trap fumes from charcoal lighting fluid in grill and may result... - Page 21 Grilling In Cooking Step 1 Remove cooking grills from cooking cham ber and set aside. Place charcoal Chamber grate assembly to lowest level of cooking chamber. Step 2 Place a tin can on the grease cup holder. A tin can must be placed under the grease hole at all times.
-
Page 22: Flavoring Wood
IF USING LIGHTER FLUID, PROCEED TO STEP 8 If using pre-treated charcoal, follow all manufacturer’s warnings and instructions regarding the use of their product. Start with 5.5 pounds of charcoal in cooking chamber. Open the firebox air shutter approximately 1” to 2” and smokestack damper halfway. Step 7 With grill lids open, stand back and carefully light charcoal and allow to burn until covered with a light ash (ap prox i mate ly 20 minutes). -
Page 23: Adding Charcoal/Wood During Cooking
Adding Charcoal/Wood Additional charcoal and/or wood may be re quired to maintain or increase cooking tem per a ture. During Cooking Adding Charcoal/Wood in Firebox Step 1 Stand back and carefully open firebox lid. Use caution since flames can flare-up when fresh air suddenly comes in contact with fire. Step 2 Wearing oven mitts/gloves, stand back a safe distance and use long cooking tongs to lightly brush aside ashes on hot coals. -
Page 24: After-Use Safety
To protect your smoker from excessive rust, the unit must be properly cured and covered at all times when not in use. A Mini Offset Smoker and Grill cover may be ordered directly from Brinkmann by calling 800- 468-5252. •... -
Page 25: Importantes Advertencias De Seguridad
IMPORTANTES ADVERTENCIAS DE SEGURIDAD ES NUESTRO DESEO QUE ARME Y UTILICE SU PARRILLA EN LA FORMA MÁS SEGURA POSIBLE. EL PROPÓSITO DE ESTE SÍMBOLO DE ALERTA DE SEGURIDAD ES QUE USTED PRESTE ATENCIÓN A LOS POSIBLES PELIGROS CUANDO ARME Y UTILICE SU PARRILLA. ¡CUANDO VEA ESTE SÍMBOLO DE ALERTA DE SEGURIDAD, PRESTE ESPECIAL ATENCIÓN A LA INFORMACIÓN A CONTINUACIÓN! LEA DETENIDAMENTE TODAS LAS ADVERTENCIAS DE SEGURIDAD E INSTRUCCIONES ANTES DE ARMAR Y USAR LA PARRILLA. - Page 26 • Recomendamos que tenga a mano un extinguidor de incendios. Consulte con la autoridad local para determinar el tamaño y tipo correctos. • No se recomienda usar accesorios no fabricados por The Brinkmann Corporation para este producto en particular ya que pueden causar lesiones personales o daños materiales.
-
Page 27: Instrucciones De Armado
INSTRUCCIONES DE ARMADO LEA DETENIDAMENTE TODAS LAS ADVERTENCIAS DE SEGURIDAD E INSTRUCCIONES ANTES DE ARMAR Y USAR LA PARRILLA. SI FALTAN PARTES, LLAME A SERVICIO AL CLIENTE AL 800-527-0717. Inspeccione el contenido de la caja para verificar que todas las partes estén incluidas e intactas. Recomendamos que esta unidad sea armada por dos personas. - Page 28 Contenido de la bolsa de partes 20 Tuercas M5 Pernos M6 X 10 mm 38 Pernos M5 X 10 mm Pernos M5 X 40 mm Tuercas M5 Pernos M6 X 10 mm Pernos M5 X 10 mm Pernos M5 X 40 mm...
- Page 29 Elija un lugar adecuado y despejado para armar la parrilla y pídale a un amigo que le ayude. Tienda cartón sobre el suelo para proteger el acabado de la parrilla y el área de armado. Coloque la parrilla de costado para comenzar el armado. Agujeros para apoyos de repisa delantera Paso 1...
- Page 30 NOTA: Con la ayuda de un amigo, voltee el carrito. Paso 3 Coloque la repisa inferior a las patas izquierdas usando dos pernos M5 x 40 mm. Paso 4 Coloque la repisa inferior a las patas derechas usando dos pernos M5 x 40 mm.
- Page 31 Paso 5 Una el soporte para las patas a las patas derechas usando cuatro pernos M5 X 10 mm. Paso 6 Una el apoyo para el fogón a las patas izquierdas usando cuatro pernos M5 X 10 mm. Paso 7 Instale la base de la parrilla a la base del carrito usando cinco pernos M5 X 10 mm y una tuerca M5.
- Page 32 Chaveta Paso 8 Instale la tapa de la parrilla a la base de la parrilla usando dos pernos de bisagra y chavetas. Perno de Bisagra Paso 9 Instale la manija de la tapa de la parrila usando dos pernos M5 X 10 mm. Pernos M5 X 10 mm Paso 10 Inserte el medidor de temperatura, y girelo a...
- Page 33 Paso 11 Conecte la chimenea a la tapa de la parrilla usando dos pernos M5 X 10 mm y dos tuercas M5. Paso 12 Conecte la bisagra de la puerta del fogón y el ensamblado de la puerta del fogón a la base del fogón usando cuatro pernos M5 X 10 mm y tuercas M5.
- Page 34 Paso 14 Instale la parte superior del fogón a la base del fogón usando seis pernos M5 X 10 mm y tuercas M5. Paso 15 Instale el ensamblado del fogon a la parrilla usando seis pernos M6 X 10 mm. Paso 16 Asegure la parte inferior del fogón al travesal izquierdo usando dos pernos...
- Page 35 Paso 17 Instale dos bisagras para la tapa del fogón en la tapa del fogón. Instale la tapa del fogón usando dos pernos M5 X 10 mm y tuercas M5. Paso 18 Inserte el tope para la tapa del fogón en el fogón.
- Page 36 Paso 20 Instale dos soportes para la repisa frontal a la base del carrito usando dos pernos M5 X 10 mm. Una la repisa frontal a la parrilla usando dos pernos M5 X 10 mm y tuercas M5. Una los dos soportes para la repisa frontol a la repisa frontal usando dos pernos M5 X 10 mm.
- Page 37 Paso 22 Coloque la rejilla para carbón de la parrilla en la bandeja de carbón. Cuelgue el ensamblado de rejilla para carbón dentro de la base de la parrilla usando los ajustadores de la rejilla para carbón. ADVERTENCIA: Nunca cuelgue la rejilla para carbón de las manijas de los ajustadores de la...
- Page 38 Step 24 Inserte el sujetador de resipiente para grasa en el soporte derecho del carrito. Step 25 Coloque la rejilla para carbon del fogón dentro del fogón. Step 26 Coloque las rejillas para cocinar en las esquinas de apoyo directamente sobre la rejilla para carbón.
- Page 39 Mini Parrilla y Ahumador (Armado)
-
Page 40: Instrucciones De Encendido
ANTES DE USAR LA PARRILLA. Curado de la parrilla Antes de usar la Mini Parrilla y Ahumador Brinkmann, siga las instrucciones a continuación para curarla. El curado de la parrilla reducirá al mínimo los daños al acabado exterior y eliminará el olor a pintura que puede afectar el sabor de la primera comida preparada en la Mini Parrilla y Ahumador Brinkmann. - Page 41 NOTA: Nunca exceda una temperatura de 450 °F en la cámara de cocción. Es importante no rayar o frotar el exterior del ahumador durante el proceso de curado. AHORA MINI PARRILLA Y AHUMADOR BRINKMANN ESTÁ CURADA Y LISTA PARA EL USO.
-
Page 42: Instrucciones De Operación
INSTRUCCIONES DE OPERACIÓN COLOQUE LA PARRILLA AL AIRE LIBRE SOBRE UNA SUPERFICIE DURA, NIVELADA Y NO COMBUSTIBLE, LEJOS DE UN ALERO O DE CUALQUIER MATERIAL COMBUSTIBLE. NUNCA LA USE SOBRE UNA SUPERFICIE DE MADERA U OTRAS SUPERFICIES QUE PUEDEN ARDER. SITÚE LA PARRILLA LEJOS DE LAS VENTANAS O PUERTAS ABIERTAS PARA EVITAR QUE ENTRE HUMO A LA CASA. - Page 43 Paso 5 Abra el obturador de aire del fogón aproximadamente 1 ó 2 pulg. y el regulador de tiro de la chimenea hasta la mitad. Con la tapa del fogón abierta, apártese y encienda cuidadosamente el carbón; déjelo arder hasta que esté cubierto con una ceniza ligera (aproximadamente 20 minutos).
- Page 44 Paso 1 Cómo cocinar a la parrilla Quite las rejillas para cocinar de la cámara de cocción y póngalas a un lado. Coloque el conjunto de la rejilla para carbón en el nivel más bajo de la cámara en la cámara de cocción de cocción.
- Page 45 SI ESTÁ USANDO LIQUIDO ENCENDEDOR CONTINÚE CON EL PASO 8 Si usa un Encendedor para Chimenea a Carbón, siga todas las advertencias e instrucciones del fabricante para el uso de su producto. Comience con 5.5 libras de carbón en el compartimiento para cocinar Abra el obturador de aire del fogón aproximadamente 1 ó...
- Page 46 Cómo agregar carbón/ Puede ser necesario añadir carbón y/o leña para mantener o aumentar la temperatura de cocción. leña mientras cocina Cómo agregar carbón/leña en el fogón Paso 1 Apártese y abra cuidadosamente la tapa del fogón. Sea precavido ya que pueden producirse llamaradas cuando el aire fresco hace contacto repentino con las llamas.
-
Page 47: Cuidado Y Mantenimiento Apropiados
Para proteger su ahumador contra la oxidación excesiva, la unidad debe curarse correctamente y mantenerse cubierta todo el tiempo cuando no la esté usando. Se puede ordenar una cubierta para la Mini Parrilla y Ahumador directamente de Brinkmann llamando al 800-468-5252. •... - Page 48 Durante un año a partir de la fecha de compra, The Brinkmann Corporation garantiza al comprador original que está libre de defectos de materiales o mano de obra. Las obligaciones de The Brinkmann Corporation con respecto a esta garantía se limitan a lo siguiente: •...
Need help?
Do you have a question about the 810-3015-S and is the answer not in the manual?
Questions and answers