
Related Manuals for AT&T CL80109


Summary of Contents for AT&T CL80109
- Page 1 User’s manual CL80109 DECT 6.0 expansion handset for use with AT&T models CL81109/CL81209/CL81309/ CL82109/CL82209/CL82309/ CL82359/CL82409/CL82509/ CL82609/CL82659/CL82859/ CL84109/CL84209/CL84309...
- Page 2 CL82209/CL82309/CL82359/CL82409/CL82509/CL82609/ CL82659/CL82859/CL84109/CL84209/CL84309 telephone. If you are unable to find your manual, go to www.telephones.att.com manual. Model #: CL80109 Type: DECT 6.0 expansion handset Serial #: Purchase date: Place of purchase: Both the model and serial number of your AT&T product can be found on the bottom of the charger.
-
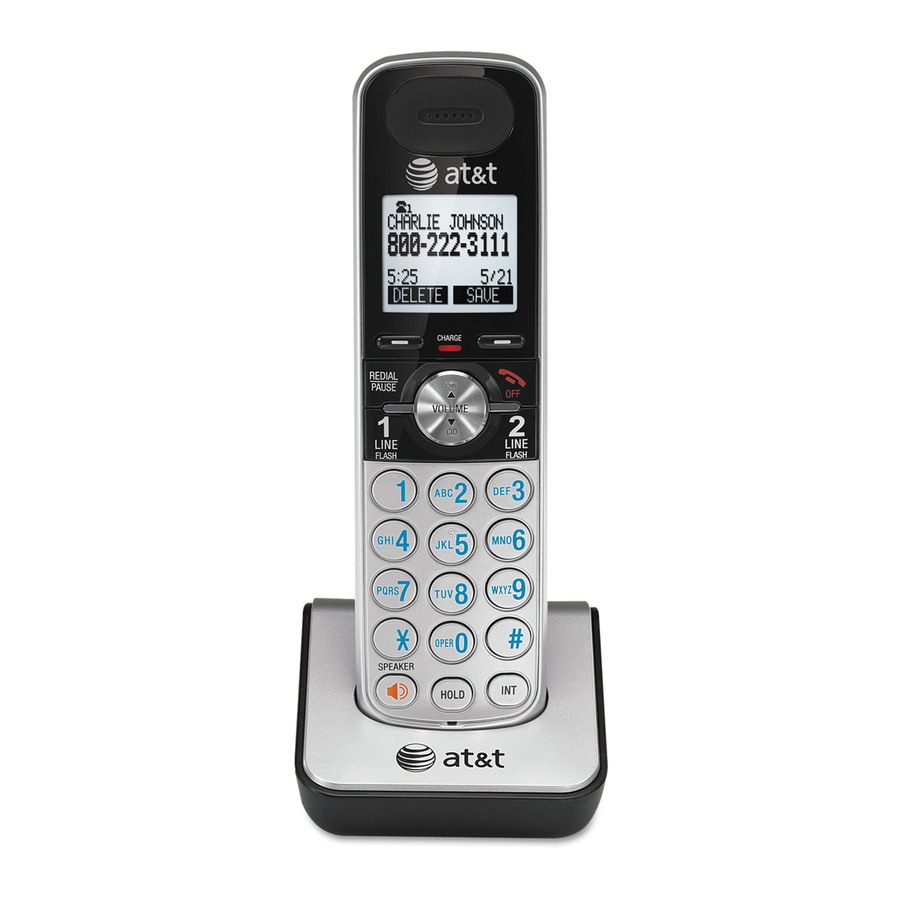
Page 3: Cordless Handset
Your telephone package contains the following items. Save your sales receipt and original packaging in the event warranty service is necessary. User’s manual CL80109 DECT 6.0 expansion handset for use with AT&T models CL81109/CL81209/CL81309/ CL82109/CL82209/CL82309/ CL82359/CL82409/CL82509/ CL82609/CL82659/CL82859/ CL84109/CL84209/CL84309 User's manual... -
Page 4: Table Of Contents
User’s manual CL80109 DECT 6.0 expansion handset for use with AT&T models CL81109/CL81209/CL81309/ CL82109/CL82209/CL82309/ CL82359/CL82409/CL82509/ CL82609/CL82659/CL82859/ CL84109/CL84209/CL84309 Table of contents Getting started Quick reference guide - handset... 1 Installation ... 3 Charger installation ... 4 Battery installation & charging ... 5... -
Page 5: Getting Started
Quick reference guide - handset CHARGE indicator On when the handset is charging in the telephone base or charger. qCID/-VOLUME Press qCID to display caller ID history. Press to scroll down while in menus. While entering names or numbers, press to move the cursor to the left. -
Page 6: Using Menus
Quick reference guide - handset Main menu > Highlights a menu item. >DIRECTORY CALL LOG For complete instructions, please refer to the manual provided with your CL81109/CL81209/CL81309/CL82109/CL82209/CL82309/ CL82359/CL82409/CL82509/CL82609/CL82659/CL82859/ CL84109/CL84209/CL84309 telephone. If you are unable to find your manual, go to download the manual. -
Page 7: Installation
Installation You must install and charge the battery before using the telephone. Your product may be shipped with a protective sticker covering the handset or telephone base display - remove it before use. For customer service or product information, visit our website at www.telephones.att.com 1 (866) 288-4268 Canada, dial... -
Page 8: Charger Installation
Charger installation IMPORTANT INFORMATION 1. Use only the power adapter supplied with this product. To order a replacement power adapter, visit our website at www.telephones.att.com 1 (866) 288-4268 Canada, dial 2. The power adapter is intended to be correctly oriented in a vertical or floor mount position. -
Page 9: Battery Installation & Charging
Getting started Battery installation & charging Install the battery as shown below. After installing the battery, you can make and receive short calls. Place the handset in the telephone base or charger when not in use. For optimal performance, charge the handset battery for at least 16 hours before use. - Page 10 Battery installation & charging Step 1 Plug the battery securely into the connector inside the handset battery compartment, matching the color-coded label. Insert the supplied battery with the label THIS SIDE UP facing up as indicated. Step 3 Charge the handset by placing it face up in the charger.
-
Page 11: Telephone Base
Adding the handset to your telephone base Adding and registering handsets Before using a new CL80109 handset, you must register it with the AT&T CL81109/CL81209/CL81309/CL82109/CL82209/CL82309/ CL82359/CL82409/CL82509/CL82609/CL82659/CL82859/ CL84109/CL84209/CL84309 telephone system (purchased separately), the telephone system can accommodate up to 12 handsets. - Page 12 Adding the handset to your telephone base Adding and registering handsets The handsets that come with the CL82609/CL82659 are HANDSET 1, HANDSET 2, HANDSET 3, HANDSET 4, HANDSET 5 and HANDSET 6. You can register up to six additional handsets to the telephone base, and they are in sequential order (HANDSET 7, HANDSET 8, HANDSET 9 and so on).
-
Page 13: To Register A Handset To Your Telephone Base
Adding and registering handsets The AT&T CL80109 needs to synchronize with the telephone base before use. When new, all expansion handsets show NOT REGISTERED on the screen. If the handset does not have enough power to proceed with the registration, you need to charge the new handset for about five minutes. -
Page 14: De-Registering A Handset
De-registering a handset You can de-register handsets. You may need to de-register your handsets if: You have twelve registered handsets and need to replace a handset. -OR- You wish to change the designated handset number of your registered handsets. You must first de-register ALL the handsets, and then re-register each handset you wish to use. -
Page 15: Appendix A Troubleshooting
Troubleshooting If you have difficulty with your phone, please try the suggestions below. For Customer Service, visit our website at www.telephones.att.com 1 (866) 288-4268 Canada, dial The handset registration is unsuccessful. The handset screen shows PRESS HNDST LOC 4 SEC ON BASE and the handset is out of the telephone... - Page 16 Troubleshooting My phone doesn’t work at all. I cannot get a dial tone. • Make sure the power cord is securely plugged in. • Make sure you plug the battery connector securely into the cordless handset. • Make sure you plug the telephone line cord securely and firmly into the telephone base and the telephone wall jack.
- Page 17 Troubleshooting I cannot dial out. My cordless handset isn’t performing normally. • If the previous suggestions do not work, disconnect the telephone base from the telephone jack and connect to a different phone. If there is no dial tone on that phone either, the problem is in your wiring or local service.
- Page 18 Troubleshooting CONNECTING... appears on my cordless handset. • Move the cordless handset closer to the telephone base. You might have moved out of range. • Reset the telephone base. Unplug the electrical power. Wait for 15 seconds then plug it back in. Allow up to one minute for the cordless handset and telephone base to reset.
- Page 19 Troubleshooting The batteries does not hold a charge. I get noise, static, or weak signals even when I’m near the telephone base. • If the cordless handset is in the telephone base or charger and the charge light is not on, refer to The charge light is off in this Troubleshooting guide.
- Page 20 Troubleshooting I experience poor sound quality when using the speakerphone. I hear other calls while using my phone. • Other electronic products can cause interference to your cordless phone. Try installing your phone as far away from the following electronic devices as possible: television sets, VCRs, or other cordless telephones.
- Page 21 Troubleshooting My cordless handset does not ring when I receive a call. • Make sure that the ringer is not off. Refer to Ringer volume in the user’s manual provided with your CL81109/CL81209/CL81309/ CL82109/CL82209/CL82309/CL82359/ CL82409/CL82509/CL82609/CL82659/ CL82859/CL84109/CL84209/CL84309 telephone. • Make sure you plug in the telephone line cord securely into the telephone base and the telephone jack.
- Page 22 Troubleshooting My calls cut in and out while I’m using my cordless handset. • Other electronic products can cause interference with your cordless phone. Try installing your phone as far away as possible from electronic devices such as television sets, VCRs, or other cordless telephones. •...
- Page 23 Troubleshooting The charge light is off. My caller ID isn’t working. • If the other phones in your home are having the same problem, contact your local telephone company (charges may apply). • Make sure you plug the power and line cords in correctly and securely.
- Page 24 Troubleshooting System does not receive caller ID when on a call. Common cure for electronic equipment. • Make sure you subscribe to caller ID with call waiting features from your local telephone company. Caller ID features works only if both you and the caller are in areas offering caller ID service, and if both telephone companies use compatible equipment.
-
Page 25: Appendix B Maintenance
Maintenance Taking care of your telephone • Your cordless telephone contains sophisticated electronic parts, so you must treat it with care. • Avoid rough treatment. • Place the handset down gently. • Save the original packing materials to protect your telephone if you ever need to ship it. -
Page 26: Appendix C Important Safety Information
Important safety information This symbol is to alert you to important operating or servicing instructions that may appear in this user’s manual. Always follow basic safety precautions when using this product to reduce the risk of injury, fire, or electric shock. Safety information •... -
Page 27: Important Safety Information
Important safety information Especially about cordless telephones • Privacy: The same features that make a cordless telephone convenient create some limitations. Telephone calls are transmitted between the telephone base and the handset by radio waves, so there is a possibility that your cordless telephone conversations could be intercepted by radio receiving equipment within range of the cordless handset. -
Page 28: Save These Instructions
Appendix C Important safety information Pacemaker patients Should keep wireless telephones at least six inches from the pacemaker. Should NOT place wireless telephones directly over the pacemaker, such as in a breast pocket, when it is turned ON. Should use the wireless telephone at the ear opposite the pacemaker. WTR’s evaluation did not identify any risk to bystanders with pacemakers from other persons using wireless telephones. -
Page 29: Fcc Part 68 And Acta
Appendix D FCC part 68 and ACTA This equipment complies with Part 68 of the FCC rules and with technical requirements adopted by the Administrative Council for Terminal Attachments (ACTA). The label on the back or bottom of this equipment contains, among other things, a product identifier in the format US:AAAEQ##TXXXX. - Page 30 Appendix D FCC part 68 and ACTA Remain on the line and briefly explain the reason for the call before hanging up. Perform such activities in off-peak hours, such as early morning or late evening. Industry Canada Operation is subject to the following two conditions: (1) this device may not cause harmful interference, and (2) this device must accept any interference, including interference that may cause undesired operation.
-
Page 31: Fcc Part 15
FCC part 15 This equipment has been tested and found to comply with the requirements for a Class B digital device under Part 15 of the Federal Communications Commission (FCC) rules. These requirements are intended to provide reasonable protection against harmful interference in a residential installation. This equipment generates, uses and can radiate radio frequency energy and, if not installed and used in accordance with the instructions, may cause harmful interference to radio communications. -
Page 32: Appendix F Limited Warranty
Limited warranty The AT&T brand is used under license - any repair, replacement or warranty service, and all questions about this product should be directed to: In the United States of www.telephones.att.com America, visit 3111 . In Canada, call 1. What does this limited warranty cover? The manufacturer of this AT&T-branded product warrants to the holder of a valid proof of purchase (“CONSUMER”... - Page 33 Limited warranty • PRODUCT to the extent that the problem experienced is caused by signal conditions, network reliability or cable or antenna systems; or • PRODUCT to the extent that the problem is caused by use with non-AT&T accessories; or •...
- Page 34 Appendix F Limited warranty 7. Other limitations This warranty is the complete and exclusive agreement between you and the manufacturer of this AT&T branded PRODUCT. It supersedes all other written or oral communications related to this PRODUCT. The manufacturer provides no other warranties for this PRODUCT.
-
Page 35: Technical Specifications
Technical specifications RF frequency band Channels Operating temperature Handset voltage Charger voltage (AC adapter output) Operation Talk time (handset) Talk time (speakerphone) Standby * Operating times varies depending on your actual use and the age of the battery. DECT 6.0 digital technology The AT&T DECT 6.0 products offer unsurpassed range performance and sound clarity. - Page 36 www.telephones.att.com © 2009 Advanced American Telephones. All rights reserved. AT&T and the AT&T logo are trademarks of AT&T Intellectual Property II, L.P. d/b/a AT&T Intellectual Property licensed to Advanced American Telephones, San Antonio, TX 78219. Printed in China. Issue 4 AT&T 03/09.
Need help?
Do you have a question about the CL80109 and is the answer not in the manual?
Questions and answers
Deleting phone numbers from handset
To delete phone numbers from the AT&T CL80109 handset's caller ID history:
1. Press MENU/SELECT while the handset is in idle mode.
2. Use the CID (q) or DIR (p) button to scroll to >CALL LOG, then press MENU/SELECT.
3. Scroll to >DEL ALL CALLS and press MENU/SELECT.
4. When prompted with DELETE ALL CALLS?, press MENU/SELECT to delete all numbers or press OFF/CLEAR to cancel.
To delete an individual number while editing a directory entry:
- Press MUTE/DELETE to erase a digit.
- Press and hold MUTE/DELETE to erase the entire entry.
This answer is automatically generated
How do you change your message on answering machine?
To change the message on the AT&T CL80109 answering machine, use the remote access command *7. Call your phone number, enter your two-digit access code (preset to 19), and then press *7 to record a new announcement.
This answer is automatically generated