Table of Contents
Advertisement
Quick Links
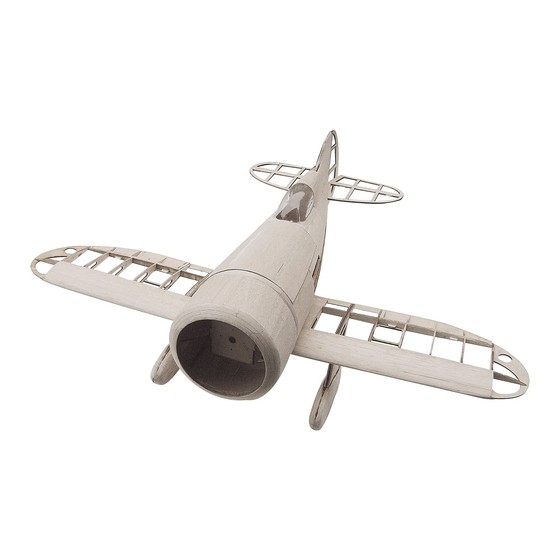
Gee Bee Z
Instructions
Please read these instructions carefully before starting to build the
model and retain them afterwards for future reference!
Safety Instructions
!
This model is not a toy!
Not suitable for under 14 year olds!
* Beginners should seek the help of an experienced modeler
to ensure the safe operation of the model
* Assemble the model away from small children
* Observe all of the safety instructions when assembling
the model. You are responsible for its safe operation
* Keep these instruction for reference even after you have
completed the model
GB
00 6131
Part.-No.
Advertisement
Table of Contents

Related Manuals for Jamara Gee Bee Z 00 6131


Summary of Contents for Jamara Gee Bee Z 00 6131
-
Page 1: Safety Instructions
Gee Bee Z 00 6131 Instructions Part.-No. Please read these instructions carefully before starting to build the model and retain them afterwards for future reference! Safety Instructions This model is not a toy! Not suitable for under 14 year olds! * Beginners should seek the help of an experienced modeler to ensure the safe operation of the model * Assemble the model away from small children... -
Page 2: Table Of Contents
Always observe any local laws regarding the operation of model aircraft. General Information As the company JAMARA Modelltechnik has no influence over the Warning! use, maintenance or conditions under which our products will op- In some countries it is a legal requirement to carry third party in- erate, we accept no responsibility for any damage caused be it of demnity insurance when operating a radio controlled model. -
Page 3: Kit Contents
Kit Contents • CNC laser cut formers and ribs, strip and sheet from selected light weight balsa and ply • Fitting kit, including wheels, undercarriage, horns and hinges etc. • Clear canopy • Instructions Building the Model Assemble 2 fuselage halves as shown ensuring that you build a left and a right hand side. Warning, Engine side thrust: The shorter side should be on the right in the direction of flight to accommodate the engine side thrust. - Page 4 Building the Model Glue the 4 front fuselage rings on and sand the edges down. Glue the fin into place ensuring that it is vertical and square along the fuselage. Glue the stringers into the slots, the stringers will protrude approx. Elevator cut out 1.5mm out of the of the side formers.
- Page 5 Building the Model Use 1.5 mm sheet to plank the upper fuselage over the 3 mm stingers only as shown here. Mount the rudder as shown here but do not glue the hinges yet. Build the battery cover and use 1.5 mm sheet to plank it.
- Page 6 Building the Model Assemble the elevator and fit it temporarily to the fuselage. Adjust the fit until the elevator is horizontal. Sand all of the edges round. Assemble 2 cowl rings as shown here. Glue the horizontal spacer plates into position. The front ring is a made of 3 laminations.
- Page 7 Building the Model Glue on the 4th and last ring which is 6 mm thick on and sand the The cowl is glued to the fuselage after covering. edges off. Glue the undercarriage strengtheners between the ribs as shown.
- Page 8 Building the Model Once the lower sheeting has been fitted, build the lower wing fair- ing and use 1.5mm sheet to plank it. Cut a channel into the front and rear of the undercarriage fairings Glue 6 laminations together to make the wheel pants. to allow the undercarriage leg wires to be let-in.
-
Page 9: Control Throws And C Of G
Zusammenbau This shows how the wheel pants are glued to the undercarriage wire and the wing. Control Throws and C of G: Elevator: 15 mm Rudder: 30 mm Aileron: 12-15 mm Centre of Gravity: 53 mm Behind the leading edge Recommended Accessories Motor A2820/6 ESC Xetronic 50 A... -
Page 10: Building Plans
Building Plan - The original sized plan can be found on the DVD... - Page 11 Bauzeichnung - Die Originalgrösse finden Sie auf der beiliegenden DVD...
-
Page 12: Building Plans
Copyright JAMARA e.K. 2009 The original sized plan can be found on the DVD Reproduction in part or whole only with the expressed permission of JAMARA e. K. Top View Newsletter Aktuelle Neuheiten erfahren Sie in unserem Newsletter. Sollten Sie daran Inter- esse haben, abbonieren Sie den Jamara Newsletter.
Need help?
Do you have a question about the Gee Bee Z 00 6131 and is the answer not in the manual?
Questions and answers