Avermedia c281 User Manual
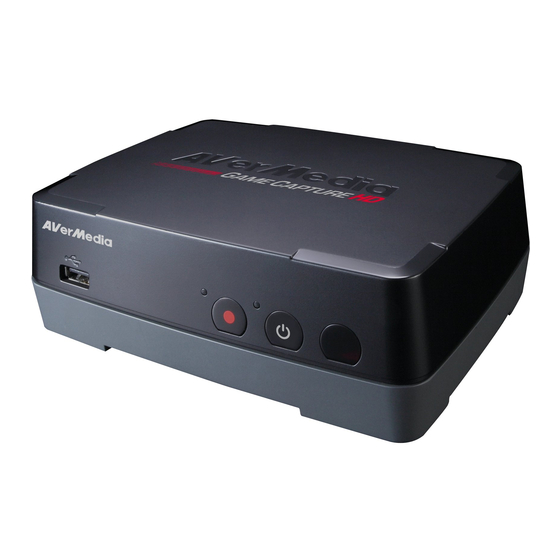
Capture box
Hide thumbs
Also See for c281:
- Specification (2 pages) ,
- User manual (100 pages) ,
- User manual (116 pages)
Table of Contents
Advertisement
Quick Links
Download this manual
See also:
User Manual
Advertisement
Table of Contents

Related Manuals for Avermedia c281


Summary of Contents for Avermedia c281
-
Page 1: User Manual
Capture Box Italiano C281 English 繁體中文 한국어 User Manual... -
Page 3: Safety Precautions
Safety Precautions Please read all of the safety precautions before using the product. The following symbols are used to indicate important information: CAUTION: The exclamation point within an equilateral triangle is intended to alert the user to the presence of important operating and maintenance (servicing) instructions in the documentations accompanying the appliance. - Page 4 This product is herewith confirmed to comply with the requirements set out in the Council Directives on the approximation of the laws of the Member States relating to Electromagnetic Compatibility Directive (EMC) 2004 / 108 / EC, Low Voltage Directive (LVD) 2006/95/EC and Energy-related Products Directive (ErP) 2009 / 125 / EC. KCC Class B Statement KCC-REM-AVM-C281...
- Page 5 Disclaimer & Copyright ©2013 by AVerMedia Technologies, Inc. All rights reserved. No part of this document may be reproduced or transmitted in any form, or by any means (Electronic, mechanical, photocopy, recording, or otherwise) without prior written permission of AVerMedia Technologies, Inc.
- Page 6 安全資訊 使用前注意事項 請小心打開本產品的包裝,建議您將包裝保留,可作為將來運送,儲存或送修之用。 本產品的內部並無使用者需要操作之任何開關或調整按鈕,所以為了您的安全,請不要自行開啟外殼,以免遭受 觸電危險及喪失產品保固,有任何問題您可以直接與我們聯絡。 本產品會在運作中產生熱量,因此必須有足夠的空氣循環,使機體保持低溫狀態,所以請於正常環境下使用,以 延長使用壽命,並請避免置放於下列環境。 不穩定的位置或非完全水平的地點。 磁場強大的地點。 潮濕或可能漏水的地方。 過熱、加熱器、風管或陽光直射的位置。 多灰塵的地點。 高處或可能震動、摔落的地方。 太靠近功率擴大機容易引起共震情況。 當有異物、電線或液體意外的掉入機體時,如果發覺有煙霧或異味時,請儘快的將電源拔除,並送至維修中心處 理,以免發生著火或電擊之危險。 為了防止觸電的危險,變壓器插頭應穩固的完全插入電源插座,不可暴露在外,並有足夠電容量承受電流傳送; 接線之前請勿插變壓器電源插頭,以免危險。 長時間不使用時,請將變壓器電源插頭拔掉,確保用電之安全,在拔起插頭時,請用乾燥的手握住插頭部份再拔起。 重要安全指示 本設備在設計和生產時已充分考慮人身安全。但不正確的使用可能導致觸電或火災危險。如果您遵守以下過程進行安裝、 使用和維修,本設備將提供安全保證的保護。本設備完全是積體電路,不存在任何可由用戶自行修理的零件。請勿移開 機殼,否則您可能會暴露在危險電壓下。維修請務必洽合格授權的維修人員。 閱讀用戶手冊 拆卸本產品包裝後,仔細閱讀用戶手冊,並遵守所有操作和其他說明。 電源 本產品僅運用在標牌上指示的電源類型下操作。如果您不清楚室內的電源類型,請與產品經銷商或本地電力公司聯 繫。對於要用電池或其他電源操作的產品,請參考操作說明。 電源指示燈 在 LED 燈泡點亮時不要直接注視燈光。強光可能會引起眼睛或視力損壞。 通風 機身上開孔是供通風使用的,用以確保產品可靠地工作,防止過熱,這些開孔不應阻塞或遮蓋。不應該將產品放置...
- Page 7 不要使牆壁插座、延長線或整體電源超過負荷,因為這會導致火災或觸電的危險。 電擊 在暴雨期間,無人值守或長期不使用時,為進一步保護此產品,請從牆壁插座拔下插頭。這將防止因閃電和電源線 突波造成對產品的損壞。但是當外面正在打雷或閃電時,請勿觸摸該設備和任何相連的電纜或設備。這將防止您在 電流突波時被電擊。 外物和液體進入 不要讓任何種類的物體經由機身上開孔推入該產品中,因為它們可能會觸及危險高壓電或使零件短路,這可能會導 致火災或觸電。不要將任何種類的液體濺入該產品中,設備上不應放置諸如花瓶一類裝滿液體的物品。 禁止堆疊 不要將其他設備堆疊此產品上,也不要將產品放置在其他設備上。本產品的上下面板產生熱量,可能會對其他部件 造成某些意外損壞。 附件 不要使用產品製造商沒有推薦的附件,因為這樣可能會導致危險。 配件 不要將此產品放置在不穩定的推車、支架、三腳架;托架和桌子上。該產品可能會跌落,可能嚴重傷及小孩或大人 和嚴重損壞產品。產品和推車組合時應小心移動。突然停止、過度用力、以及不平坦的表面都可能會引起產品和推 車一併翻倒。 需要維修的損害情況 在以下情況下,將此產品的插頭從牆上插座拔下,並聯繫授權維修人員進行維修: a)在電源線或插頭損壞時。 b)產品中灑入液體或進入異物。 c)產品被暴露在雨中或水中。 d)沒有遵守操作說明正確操作該產品。只能調節那些在操作說明中包含的控制,因為不正確的調節其他控制可能 導致損壞,這通常需要由授權技術人員進行大量工作才能將產品恢復到正常操作狀態。 e)產品掉落或損壞。 f)產品在效能上出現明顯變化,需要維修時。 維修 不要試圖自己維修該設備,因為打開或移動機蓋可能會將您暴露在高壓電或其他危險之中。所有維修服務都應請 求授權的維修人員。 更換零件 在需要更換零件時,確保維修人員使用了由製造商指定的更換零件,並具有與原零件相同的特性。未認證的替代品 可能導致火災、電擊或其他危險。 安全檢查 在完成此產品的任何維修或修理之後,要求維修人員執行安全檢查,確定該產品處於正確的操作狀態。 電池安全訊息 - 將電池置放於陰涼、乾燥的地方。 - 勿將用過的電池任意丟棄,請將電池集中於特定的回收點。 - 如長時間不使用,請將遙控器中的電池取出。此外,也請將用完的電池取出,因為電池漏電或侵蝕可能會 損害遙控器。...
- Page 8 公司聲明及版權 ©2013 by AVerMedia Technologies, Inc.及其子公司 AVerMedia 產品彩盒設計、使用手冊及其內容受到著作權之保護並歸屬於 AVerMedia 所有,非經事先書面同意,嚴格禁 止重製、拍攝、抄寫、翻譯、轉載或以其他紀錄形式(如電磁記錄)儲存本手冊之全部或一部內容。 AVerMedia 保留變更或改善產品規格及設計、零配件及驅動程式的權利,而無義務知會任何使用者或單位、組織關於此變 更或改善。請至 avermedia.com 取得本產品相關最新資訊或補充資料。 ® AVerMedia 是圓剛科技股份有限公司所擁有的商標。其他商標各分屬其他第三方公司所有,且均受商標或著作權等相關 法令保護。 彩盒包裝及內附手冊所述產品及配件之示意圖僅供參考,以實際外觀以產品出貨為準。 此產品採用了 Arphic 的「iFont」技術及字型 R33183 圓剛總公司 新北市中和區建一路 135 號 地址 www.avermedia.com 網址 +886-2-2226-3630 電話 規格 產品名稱 錄影盒 C281 產品型號 電源...
-
Page 9: Table Of Contents
Table of Content Chapter 1 Package Contents ..............2 Chapter 2 The Unit Parts ................4 Touch Button Control Panel ..............4 Infrared Sensor ..................4 LED Indicator ..................5 Connection Ports ................. 6 2.4.1 Front View ...................... 6 2.4.2 Rear View ...................... -
Page 10: Chapter 1 Package Contents
Thank you for purchasing the Capture Box. Please read this user manual carefully to ensure proper use of this product. We recommend you to keep it for future reference. Introduction The Capture Box, a stand-alone video capture box specially designed for TV gamers, allows you to ®... - Page 11 The accessories that come with the package may slightly vary depending on different sales regions. AVerMedia regularly releases the latest version of firmware for the Capture Box. Having the latest firmware enhances the functionality of the Capture Box To download the latest firmware file, please go to /www.avermedia.com and then enter the model name in Product Search field.
-
Page 12: Chapter 2 The Unit Parts
Chapter 2 The Unit Parts 2.1 Touch Button Control Panel The touch button panel found on the front of the unit provides quick access to commonly used functions # Buttons Descriptions Record Press to start / stop recording. Power Press to turn the unit on / into stand-by mode. 2.2 Infrared Sensor When using the remote control, aim it at the infrared (IR) sensor located at the front panel of the unit. -
Page 13: Led Indicator
2.3 LED Indicator The LED indicators on the front of the unit show the device’s status. Red LED indicator Green / Blue LED indicator While the device is… The Green/Blue LED indicator… On (Standard Mode) Glows solid green On (Real-time Mode) Glows solid blue Off / in standby mode Lights off... -
Page 14: Connection Ports
2.4 Connection Ports 2.4.1 Front View USB slot USB slot is for external USB storage device connection as well as for firmware upgrade via USB storage device. USB hub is not supported. 2.4.2 Rear View Component video output Component video input RCA Audio L/R output RCA Audio L/R input... -
Page 15: Chapter 3 Installation & First Time Setup
Chapter 3 Installation & First Time Setup 3.1 Hardware Installation Please follow the steps below to properly connect the Capture Box and your TV / video game consoles. The Capture Box supports one game console connection at a time only. Connecting more than one console to the Capture Box at the same time may result in video quality issues, even if only one console is on. - Page 16 When connecting with the Capture Box, your console’s audio output settings remain unchanged. If your amplifier or other audio devices support optical digital audio output, you can still output digital audio. Please follow the steps below to make digital audio cable connection and configure the audio output settings. For Xbox 360: Step 1 Connect one end of the digital audio cable (not included) to the DIGITAL AUDIO OUTPUT port on the...
- Page 17 Step 3 Connecting the Device to Your TV Using Composite Audio Cable Connect one end of the composite audio cable to the AUDIO OUT port on the rear of the device and the other end to the AUDIO IN (colored white and red) port on your TV. Step 4 Powering on Your Game Console Power on your game console.
- Page 18 Step 5 Installing the Power Adapter Slide the Power Adapter Outlet Module into the groove on the Power Adapter. Step 6 Connecting the Power Adapter Connect the Power Adapter connector to the DC-IN port on the rear of the device. Then plug the power adapter to a wall outlet.
- Page 19 Power off Capture Box and then make sure that the device is connected properly and with the proper cables. If there is still no video signal on TV, refer to FAQ section at www.avermedia.com for further troubleshooting. English-11...
-
Page 20: Storage Device Installation
Capture Box. If problems encountered while using USB flash drive to store recordings, refer to FAQ section at www.avermedia.com for further troubleshooting. 3.2.2 HDD Installation and Removal It is highly recommended to use a new unformatted hard drive or a hard drive formatted as NTFS file system. - Page 21 Step 2 Measuring HDD Height Using Measuring Card Use the measuring card to measure the height of your HDD (9.5mm or 12.5mm / 7mm or 9.5mm). Please refer to the Appendix C for the measuring card. Step 3 Adjusting the Rotary Knob Adjust the rotary knob attached to the inner side of the lid to fit the height of your HDD.
- Page 22 Using a 9.5mm HDD: Using a 12.5mm HDD: Using a 9.5mm HDD: Using a 7mm HDD: Step 4 Inserting the HDD Place the HDD on the slot with the sticker-side facing up and the HDD connector end facing to the left.
- Page 23 Step 5 Replacing the HDD Lid Place the HDD lid back and snap it into place. To remove the internal HDD Step 1 Removing the HDD Lid Removing internal HDD immediately after powering-off may cause personal injury due to heat. Please wait until the HDD cools down completely (it takes approximately 10 minutes) before any attempt to remove it.
- Page 24 Use your fingertip to flip open the HDD lid, located on the bottom of the Capture Box. Lift off the lid and set it aside. Step 2 Removing the HDD Pull the HDD out in the direction of the arrow. Then lift the HDD out of the slot. Step 3 Replacing the HDD Lid Place the HDD lid back and snap it into place.
-
Page 25: Setup Wizard
Make sure to install internal hard drive or external USB storage device beforehand. For the first-time initialization, a short duration of black screen (approximately 20 seconds) is followed by AVerMedia logo. The blinking green status light indicates that the Capture Box is starting up. Please wait until the welcome screen appears. - Page 26 Step 5. Unplug Capture Box from the power supply before installing an internal HDD. If your hard drive cannot be detected, refer to FAQ at www.avermedia.com for further troubleshooting. Step 4 Formatting Storage Device (Optional)
- Page 27 If you would like to select partition with , please format the partition into NTFS. If the problem persists, refer to FAQ at www.avermedia.com for further troubleshooting. Then use ▲/▼ to select a folder and press OK to enter.
-
Page 28: Supported Resolutions
3.4 Supported Resolutions The Capture Box supports Component (YPbPr) input resolution: Component (YPbPr) 480i/576i 480p/576p 720p (50 & 60Hz) 1080i (50 & 60Hz) 1080p (50 & 60Hz) 3.5 Video Output Settings for Game Consoles The Capture Box supports YPbPr input resolution up to 1080p. If you were using HDMI connection for your game console, you need to set the console’s video output to 1080p or below. - Page 29 Step 2 Select Component/D-terminal and confirm the selection. Then your TV screen goes blank immediately. Now use your TV remote to switch the TV input source to Component (YPbPr). The screen then comes back on again. Step 3 Check ALL the resolutions. Confirm the setting.
- Page 30 Step 5 Select Audio Input Connector/SCART/AV MULTI as audio output. Step 6 Confirm the setting. English-22...
-
Page 31: Video Output Settings For Xbox 360
3.5.2 Video Output Settings for Xbox 360 Before resetting video output for Xbox, make sure to properly connect the Capture Box with your Xbox. Make sure to remove the HDMI cable beforehand, if it was plugged in. Make sure to power off both the Capture Box and your Xbox beforehand. ... -
Page 32: Chapter 4 The Remote Control
Chapter 4 The Remote Control The descriptions below show the deployment of the keys on the remote control. On Real-time Mode, the remote keys are invalid, except for (mode), (start/stop recording), (stop recording), (snapshot), and (power). Press to switch between Standard Mode and Real-time Mode. (See p.26 for details). Descriptions Buttons Press to turn the unit on / into stand-by mode. - Page 33 Press to access the main menu. Press again to exit. Press the navigation keys to move among options. Press OK to confirm a selection. Press to play the last recorded file or view the last captured image. Press to start / stop recording. Press to start playing the selected file.
-
Page 34: Chapter 5 Gameplay Capture
Press to fast-forward (2x, 4x, 8x, 16x, 32x). Press to go to the next page. Press to delete the selected files. Press to display the disk information. Press again to hide it. Chapter 5 Gameplay Capture This chapter guides you to record gameplay, capture images, and instantly play files. 5.1 Live Preview Screen (Standard Mode &... - Page 35 Quick Snapshot During Gameplay - Press to capture current image. Instant Playback - Press to play the last recorded file or view the last captured image. - Press to stop the playback. Image Capture During Video Playback Way 1: - Press to capture current image.
- Page 36 Video / Snapshot Quality Adjustment Step 1 Press to display the video/snapshot quality adjustment screen. Step 2 Use ▲/▼ to select “Video Quality” or “Snapshot Quality” and press OK. Step 3 Use ▲/▼ to select desired option and press OK to confirm. Step 4 Press to exit.
-
Page 37: Gameplay Capture On Real-Time Mode
5.3 Gameplay Capture on Real-time Mode Descriptions OSD Menu Instant Recording During Gameplay - Press to activate instant recording - Press again or to stop recording. Quick Snapshot During Gameplay - Press to capture current image. Chapter 6 The OSD Menu Display Under the menu, you can check and manage both your recorded files and snapshots, and customize your preferences. -
Page 38: Recordings And Snapshots
MP4 (Codec: H.264 format with AAC audio) Image JPEG To convert captured videos from AVI to MP4 (Codec: H.264 format with MP3 audio) for editing, please go to www.avermedia.com and download “MP4 Converter” from “AP & Driver” section on the product information page. OSD Menu Descriptions Navigating - Use the navigation keys ◄/►/▲/▼... - Page 39 (1/2x). - Press to rewind at 2x, 4x, 8x, 16x, 32x speed. - Press to fast forward at 2x, 4x, 8x, 16x, 32x speed. - Press to play the file at normal (1x) speed when slow motion, rewind, or fast-forward is active. - Press to stop the playback.
-
Page 40: File Management
USB Storage Device Removal In order to avoid data loss, it is highly recommended to safely remove your external storage device. Please follow the steps below: Step 1 Press on the remote control. Step 2 Select the partition. Step 3 Press F2 to remove it. - Page 41 Descriptions on Editing Tool # Buttons Descriptions Copy files to USB disk Copy files to internal hard disk Select all Deselect all Delete OSD Menu Descriptions Navigating - Use ▲/▼ to select and OK to enter the folder in which you save the recordings and snapshots.
- Page 42 - Select and press OK to deselect all files. Step 2 - Select and press OK to copy selected file(s) to USB disk. - Press to cancel copying the files in a progress. Step 3 - Press OK. Copying Files from USB Disk to Internal Step 1 - On the right-side list, use ▲/▼...
- Page 43 Deleting Files Step 1 - Use ▲/▼ to highlight the file(s) that you want to delete. Press OK to select/unselect an item. - Select and press OK to select all files. - Select and press OK to deselect all files. Step 2 - Select and press OK to remove the file...
-
Page 44: Settings
information, including storage disk, recording resolution, duration, elapsed and remaining time, and file name. USB Storage Device Removal In order to avoid data loss, it is highly recommended to safely remove your external storage device. Please follow the steps below: Step 1 Press on the remote control. - Page 45 Date Format Use ▲/▼ to select date format. Press OK to confirm. Date and Time Use ◄/► to move among options and ▲/▼ to adjust date and time. Press OK to confirm. A/V Pass Through Use ▲/▼ to enable/disable A/V Pass Through. Press OK to confirm.
- Page 46 Video/Snapshot Quality Video Quality: Use ▲/▼ to toggle among various video quality options (Optimal /Good / Maximum recording length). Press OK to confirm. Snapshot Quality: Use ▲/▼ to toggle among various snapshot quality options (Best /Better / Good). Press OK to confirm.
- Page 47 Follow the steps below to upgrade the firmware via USB storage device: Step 1 To download the latest firmware binary package, please go to www.avermedia.com, and then enter the model name in Product Search field. Firmware file is available on the product information page.
- Page 48 connect it to the Capture Box. Step 3 Press F1 to start the firmware upgrade process. Press to abort the operation and return to the previous page. Step 4 The Capture Box automatically detects whether a newer version of firmware is available for upgrade.
-
Page 49: Appendix A How To Set Your Gameplay Snapshot As Ps3 Wallpaper
Appendix A How to Set Your Gameplay Snapshot as PS3 Wallpaper Start to give your PS3 menu screen a fresh and personalized look to show how cool you are! Please follow the steps below to set the image captured by the Capture Box as your PS3 background wallpaper. Step 1 Remove your USB storage device from the Capture Box, and then plug it into your PS3 console via USB port. - Page 50 Step 4 Select the image that you wish to use. Step 5 Press the Triangle button on your PS3 controller to bring up control panel. Then scroll to the right and select “Set as Wallpaper”. Step 6 Use the right joystick to zoom in/out and left joystick to frame the image.
-
Page 51: Appendix B Troubleshooting
To download the latest firmware for the Capture Box: Go to www.avermedia.com. Enter the model no. (C281) in Product Search field. The latest firmware file is available on the “AP & Driver” section on the product information page. Hard Drive Problem... - Page 52 Video Display Problems Actions Make sure that all the cables are firmly connected. Power off the Capture Box and then make sure that the device is connected with the proper cables (See 3.1 Hardware Installation in user manual for “No component input signal”...
- Page 53 *Different brands may have different naming for the “TV progressive” function. Example: “TruMotion” for LG, “Motion Flow” for Sony, etc. Refer to the operation manual that comes with your TV for details. If the problem still persists, refer to FAQ at www.avermedia.com for further troubleshooting. English-45...
-
Page 54: Appendix C Measuring Your Hdd Height Before Installation
Appendix C Measuring Your HDD Height Before Installation The device with measurement marked on the inner HDD lid may vary by region. Please read the instructions according to the device purchased. English-46... - Page 55 遊戲機影像輸出設定 HD 錄影盒支援色差端子輸入,最高可擷取 1080p 的高畫質影像來源。若您原本使用 HDMI 連接線連接遊 戲機,請先將遊戲機的影像輸入設定調整為 1080p 以下。 PS3 影像輸出設定 調整 PS3 影像輸入設定前,請先將 HD 錄影盒與遊戲機妥善連接。 請勿移除遊戲機原本連接的 HDMI 連接線,並確認遊戲機專用色差端子連接線已插入。 開始設定前,請先將 HD 錄影盒及 PS3 關機。 開始設定前,請先確認您電視機的支援解析度。可支援的解析度因電視機的種類而異,詳細資訊請參閱您電視 機隨附的說明文件。 步驟一 將 PS3 開機。 選擇 設定 > 顯示器設定 > 影像輸出設定。 步驟二...
- Page 56 步驟三 勾選所有解析度。 確認設定內容。 步驟四 選擇調整聲音輸出設定。 步驟五 選擇聲音輸出端子/SCART/AV MULTI 為聲音輸出 格式。 繁體中文-...
- Page 57 步驟六 確認設定內容。 Xbox 360 影像輸出設定 調整 Xbox 影像輸入設定前,請先將 HD 錄影盒與遊戲機妥善連接。 請先移除原本接在遊戲機後方的 HDMI 連接線。 開始設定前,請先將 HD 錄影盒及 Xbox 關機。 開始設定前,請先確認您電視機的支援解析度。可支援的解析度因電視機的種類而異。 詳細資訊請參閱您電視機隨附的說明文件。 步驟一 將 Xbox 開機。 前往我的 Xbox,然後選擇系統設定。 接著選擇 主機設定 > 顯示 > HDTV 設定。 步驟二 選擇 1080p 或低於 1080p 的解析度並確認。 繁體中文-...
- Page 58 關於遊戲機影像輸出的詳細資訊,請參閱您遊戲機隨附的說明文件。 遙控器 您可以使用遙控器進行各種功能操作,如下所述: 除以下按鍵之外,遙控器按鍵在即時模式下無作用: (開始/停止錄影)、 (停止錄影), (螢幕快照), 和 (待機)。 按 在標準模式及即時模式間切換 (詳細說明請參閱第 26 頁「錄影前畫面預覽(標準模式&即時模式)」 。 遙控器請使用碳鋅電池,避免電池漏電或侵蝕造成遙控器損害。 繁體中文-...
- Page 59 說明 按鍵 開機/待機。 開啟/關閉功能選單。 使用方向鍵選取項目。按 OK 確定選取。 回播上一個錄製完成的檔案,或是觀看上一張螢幕快照。 開始錄影/停止錄影。 開始播放所選檔案。 慢動作播放、快轉及倒轉時,按此鍵以一般速度(1x)播放。 停止播放。 停止錄影。 倒轉 (2x, 4x, 8x, 16x, 32x) 。 瀏覽檔案時,回到上一頁。 顯示影像品質設定頁面。再按一次即退出。 (請依照螢幕指示操作) (請依照螢幕指示操作) (請依照螢幕指示操作) 在標準模式及即時模式間切換 (詳細說明請參閱第 26 頁 「標準模式&即時模式」 。 ) 顯示錄影及播放等相關資訊。 回到上一層選單或是退出選單。 在遊戲進行中或影片回播時,按一次進行單張擷圖。 暫停播放。按 OK 或 繼續播放。 繁體中文-...
- Page 60 慢動作播放影片(1/2x)。再按一次可進入逐格播放(frame-by-frame)模式 (詳細說明請參閱第 27 頁「影片回播中擷取畫面」 。) 快轉 (2x, 4x, 8x, 16x, 32x)。 瀏覽檔案時,跳至下一頁。 刪除所選檔案。 顯示磁碟資訊。再按一次可隱藏資訊。 繁體中文-...
- Page 61 遊戲畫面擷取 本章節說明如何進行遊戲畫面錄製、螢幕快照、以及立即回播。 標準模式 & 即時模式 HD 錄影盒開機後預設為標準模式。若您想切換至即時模式,請按 遙控器上的 切換。再按一次 可 切回至標準模式。 在標準模式下,您可按 開啟功能選單,但在此模式下畫面會延遲 0.1 秒。 在即時模式下,您無法開啟選單、螢幕上也無資訊顯示,此模式下畫面為零秒差顯示,僅能使用錄影及螢 幕快照功能。 即時模式下進行遊戲畫面擷取 說明 即時錄影 - 按 開始錄製影片。 再按一次 或按 停止錄影。 螢幕快照 - 按 進行單張擷圖。 標準模式下進行遊戲畫面擷取 說明 即時錄影 - 按 開始錄製影片。 - 再按一次 或按 停止錄影。 螢幕快照...
- Page 62 步驟一 - 慢動作播放影片(1/2x)。再按一次進入逐格播放(frame-by-frame)模式。 或 - 按 暫停播放。再按 跳至上一個影格; 按 跳至下一個影格。 步驟二 - 按 擷取畫面。 快速疑難排解 下載 HD 錄影盒最新版本韌體: 前往圓剛官網 www.avermedia.com/tw。 在「產品搜尋」欄中,輸入產品型號 (C281)。 自產品資訊頁面的「軟體下載」區下載最新版本的韌體檔案。 硬碟相關問題 解決方法 檢查是否已設定儲存位置。 至主選單設定磁碟管理儲存位置設定 儲存錄影檔及螢幕快照的位置。 無偵測到硬碟 確認硬碟已妥善安裝並重新啟動 HD 錄影盒 。 將目前使用的硬碟格式化為 NTFS 檔案格式 。 ...
- Page 63 確認遊戲主機的畫面解析度是否已調整至 1080i 以下。 (詳細說明請參考使用手冊中的 3.5 遊戲機 影像輸出設定)。 電視畫面是綠色的,且出現雜音 檢查紅色和藍色的接頭是否已接緊。 確認音源線與色差端子線的紅色接頭是否 畫面顏色異常 已插入正確的孔位。 電視畫面呈現單色 檢查紅色和藍色的接頭是否已接緊。 檔案播放問題 解決方法 確認是否僅連接一台遊戲主機。 HD 錄影盒一次僅能連接一台遊戲機,若同 時連接多台遊戲主機,不論是否開啟,均會 造成畫面干擾。 確認遊戲主機的畫面解析度是否已正確調 整。 錄影檔的影像品質不佳 以 PS3 遊戲主機為例,請勾選 720p、1080i 和 1080p。若您僅勾選 1080i,當遊戲光碟 僅支援 720p 解析度時,PS3 會自動將解析 度降為預設值...
- Page 64 遊戲畫面延遲問題 解決方法 使用遙控器上的「MODE」鍵切換至「即時 模式」。 (詳細說明請參考使用手冊中的 5.1 標準模 式&即時模式)。 玩遊戲時畫面延遲 確認您電視的「TV progressive (循序掃 描)」功能已關閉。 *不同廠牌可能會使用不同的功能名稱,例如 LG 使用「TruMotion」; Sony 使用「Motion Flow」。 詳細說明請參閱您電視機隨附的說明文件。 若您的問題仍未解決,請至 www.avermedia.com 參考完整的常見問題集。 繁體中文-...
- Page 65 게임 콘솔을 위한 비디오 출력 설정 Capture Box 는 최대 1080p 의 YPbPr 입력 해상도를 지원합니다. HDMI 연결을 게임 콘솔용으로 사용하고 있을 경우, 콘솔의 비디오 출력을 1080p 이하로 설정해야 합니다. PS3 을 위한 비디오 출력 설정 PS3 에 대한 비디오 출력을 초기화하기 전에, 반드시 Capture Box 를 PS3 와 올바르게 연결하십시오. ...
- Page 66 단계 3 모든 해상도를 선택하십시오. 설정을 확인합니다. 단계 4 Set Audio Output Settings(오디오 출력 설정 설정)를 선택합니다. 단계 5 Audio Input Connector/SCART/AV MULTI(오디오 입력 커넥터/SCART/AV MULTI)를 오디오 출력으로 선택합니다. 한국어-...
- Page 67 단계 6 설정을 확인합니다. Xbox 360 을 위한 비디오 출력 설정 Xbox 에 대한 비디오 출력을 초기화하기 전에, 반드시 Capture Box 를 Xbox 와 올바르게 연결하십시오. HDMI 케이블이 연결되어 있는 경우 반드시 미리 제거하십시오. 초기화하기 전에 반드시 Capture Box 와 Xbox 의 전원을 모두 끄십시오. ...
- Page 68 콘솔의 비디오 출력 설정에 대한 자세한 내용은 게임 콘솔과 함께 제공되는 설정 지침을 참조하십시오. 리모컨 아래의 설명은 리모컨 키들의 배치 상태를 보여줍니다. Real-time(실시간) 모드에서 리모컨 키들은 (모드), (기록 시작/중지), (기록 중지), (스냅샷), (전원)을 제외하고 사용할 수 없습니다. 한국어-...
- Page 69 설명 버튼 누르면 장치를 켜거나 / 대기 모드로 전환합니다. * 대기 모드: 절전 대기 모드. 누르면 메인 메뉴에 액세스합니다. 다시 누르면 종료합니다. 옵션들 사이에서 이동하려면 탐색 키를 누릅니다. OK(확인)를 눌러 선택을 확인합니다. 누르면 마지막으로 기록한 파일을 재생하거나 마지막으로 캡처한 이미지를 보여줍니다.
- Page 70 누르면 재생을 일시정지합니다. 재생을 재시작하려면 OK(확인) 또는 을 누릅니다. 누르면 비디오를 슬로우 모션으로 재생(1/2 배속)합니다. 한 번 더 누르면 프레임별 모드로 들어갑니다(자세한 내용은 27 페이지 참조). 누르면 빨리 감기(2 배속, 4 배속, 8 배속, 16 배속, 32 배속)를 합니다. 누르면 다음 페이지로 이동합니다. 누르면...
- Page 71 게임 실행 중의 빠른 스냅샷 - 현재 이미지를 캡처하려는 경우에 을 누릅니다. - 여러 스냅샷을 찍으려면 을 길게 누릅니다. 1.3 표준 모드 하의 게임 실행 캡처 설명 게임 실행 중의 즉석 기록 - 즉석 기록을 실행하려면 을 누릅니다. - 기록을 중지하려면 을...
- Page 72 부록 B 문제 해결 캡처 박스 의 최신 펌웨어를 다운로드하려면: www.avermedia.com 으로 가십시오. 모델 번호(C281)를 Product Search(제품 검색) 필드에 입력합니다. 최신 펌웨어 파일은 제품 정보 페이지의 “AP & Driver(AP 및 드라이버)” 섹션에서 제공됩니다. 하드 드라이브 문제 조치 저장 대상이 올바르게 설정되어 있는지...
- Page 73 녹색 화면색과 윙윙거리는 잡음: 적색 커넥터와 청색 커넥터가 헐렁하지 않은지 확인하십시오. 두 적색 케이블 (비디오/적색과오디오/적색)이 올바른 화면색이 비정상적으로 표시됨 포트에 연결되어 있는지 확인하십시오. 단일 화면색: 적색 커넥터와 청색 커넥터가 헐렁하지 않은지 확인하십시오. 재생 문제 조치 콘솔 한 개만 캡처 박스에 연결되어 있는지...
- Page 74 비활성화되어 있는지 확인하십시오. *브랜드마다 “TV 프로그레시브” 기능 명칭이 다를 수 있습니다. 예: LG 의 경우 “TruMotion”, Sony 의 경우 “Motion Flow(모션 플로)” 등. 자세한 내용은 TV 사용 설명서를 참조하십시오. 문제가 여전히 지속될 경우 www.avermedia.com 에서 FAQ 를 참조하여 문제를 자세히 해결하십시오. 한국어-...
- Page 75 GPLv3 with GCC RLE libgcc1/libstdc++6 jpeg AVerMedia Technologies Inc. offers to provide source libjpeg8/libjpeg-tools code to you for a charge covering the cost of LGPLv2 performing such distribution, such as the cost of media, libts-1.0-0/tslib shipping and handling upon e-mail request to AVerMedia Technologies Inc.
- Page 76 M o d e l N o . C 2 8 1 P/N 300AC281-DW H M a d e i n T a i w a n...
Need help?
Do you have a question about the c281 and is the answer not in the manual?
Questions and answers