Table of Contents
Advertisement
Advertisement
Table of Contents

Related Manuals for Pioneer u-05-s


Summary of Contents for Pioneer u-05-s
- Page 1 Operating Instructions USB D/A Converter...
- Page 2 CAUTION Information for users on collection and disposal of old equipment and used batteries TO PREVENT THE RISK OF ELECTRIC SHOCK, DO NOT REMOVE COVER (OR BACK). NO USER-SERVICEABLE Symbol for These symbols on the products, packaging, and/or accompanying documents mean PARTS INSIDE.
- Page 3 A damaged power cord can cause a fire or give you an electrical shock. Check the power cord once in a while. When you find it damaged, ask your nearest PIONEER authorized service center or your dealer for a replacement. S002*_A1_En CAUTION The /I STANDBY/ON switch on this unit will not...
-
Page 4: Table Of Contents
Thank you for buying this Pioneer product. Please read through these operating instructions so that Note you will know how to operate your model properly. After you have finished reading the instructions, • The illustrations used in these operating instructions may put them in a safe place for future reference. -
Page 5: Before You Start
Before you start Warning What’s in the box Using the remote control Installation When using the remote control to operate this unit, the Install the unit on a surface that is level and secure. • Remote control x 1 • Do not use or store batteries in direct sunlight remote control should be pointed at the unit’s remote •... -
Page 6: Connections
Connections Rear panel Computer with USB port Connections to components furnished with digital output. Note Caution • A dedicated driver may have to be installed in your computer (see page 11). • When making or changing connections, be sure to AES/EBU OUT COAXIAL OUT OPTICAL OUT... -
Page 7: Front Panel
Connections Front panel Balanced headphone output connector (XLR3) (PHONES 2) Balanced headphone output connector (XLR4) (PHONES 1) Connect an XLR 3-pin headphone connector here. Supported Connect an XLR 4-pin headphone connector here. Supported headphones impedance 16 Ω to 600 Ω. headphones impedance 16 Ω... -
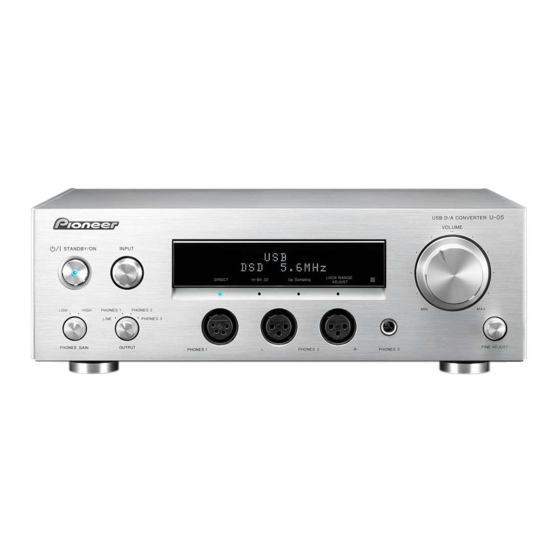
Page 8: Parts Names And Functions
Parts names and functions 1 STANDBY/ON Remote control Front panel Use to alternate power status between ON and STANDBY modes. 2 MUTE button During playback, press to temporarily mute the sound. 3 VOL +/− buttons Press these buttons to raise/lower the sound volume. 4 Direct input selector buttons Press one of the USB/COAX/OPT/AES EBU buttons to select the desired source. -
Page 9: Operation
Operation Basic operation Using headphones Settings Up Sampling setting This function raises the sampling frequency for Connect your headphones. Turn power ON. playback, making possible clear, highly transparent Direct setting Connect your headphones to the appropriate front- Press the front-panel /I STANDBY/ON button. -
Page 10: Changing Digital Filters
Operation • If the setting is changed to any value other than Changing digital fi lters Adjust the DAC locking range Setting auto power down the default “normal”, the front-panel LOCK RANGE Individual settings can be made for PCM and DSD This function allows adjustment for those times ADJUST indicator will light. -
Page 11: To Return Settings To Factory Defaults
For more information, and then press the main unit’s front-panel /I please consult the Pioneer website, where you STANDBY/ON. Playing music fi les located on a computer can find instructions regarding driver installation R E S E T ? and computer settings. -
Page 12: Additional Information
Try using a different coaxial or optical digital kHz produce no sound, or transmit the output signal properly. cable. • For more information, also consult the driver installation instructions found on the Pioneer website. intermittent sound. Remote control doesn’t work. • The remote control’s batteries are dead. -
Page 13: Precautions
Additional information Precautions Regular care and maintenance Specifi cations Note • Dust the unit occasionally with a soft dry cloth. If • These specifications and appearance recorded here may Line output required for severe soiling, soak a cleaning rag in a 1:6 When moving this unit be changed without notice. - Page 14 253 Alexandra Road, #04-01, Singapore 159936 TEL: 65-6472-7555 PIONEER ELECTRONICS AUSTRALIA PTY. LTD. 5 Arco Lane, Heatherton, Victoria, 3202, Australia, TEL: (03) 9586-6300 PIONEER ELECTRONICS DE MEXICO S.A. DE C.V. Blvd.Manuel Avila Camacho 138 10 piso Col.Lomas de Chapultepec, Mexico, D.F. 11000 TEL: 55-9178-4270 K002_B3_En ©...
Need help?
Do you have a question about the u-05-s and is the answer not in the manual?
Questions and answers