LG PQRCUSA0 Owners & Installation Manual
Hide thumbs
Also See for PQRCUSA0:
- Owners & installation manual (47 pages) ,
- Owners & installation manual (27 pages) ,
- Owner's manual (24 pages)
Table of Contents
Advertisement
Available languages
Available languages
LG
Wide Wired Remote Controller
Owner's & Installation Manual
Models:PQRCUSA0
IMPORTANT
• Please read this owner's & installation manual completely
before installing the product.
• Installation work must be performed in accordance with
the national wiring standards by authorized personnel
only.
• Please retain this owner's & installation manual for future
reference after reading it thoroughly.
LG
Advertisement
Chapters
Table of Contents

Related Manuals for LG PQRCUSA0


Summary of Contents for LG PQRCUSA0
- Page 1 Wide Wired Remote Controller Owner's & Installation Manual Models:PQRCUSA0 IMPORTANT • Please read this owner's & installation manual completely before installing the product. • Installation work must be performed in accordance with the national wiring standards by authorized personnel only.
-
Page 2: Table Of Contents
Wide Wired Remote Controller Owner’s & Installation Manual Safety Precaution Safety Precaution TABLE OF CONTENTS • The installation requires expert skills, and it should be installed by the service center or other shops specialized in the installation and recognized by our company. I Safety Precaution .....................3~4 I Part Description ....................5 •... -
Page 3: Part Description
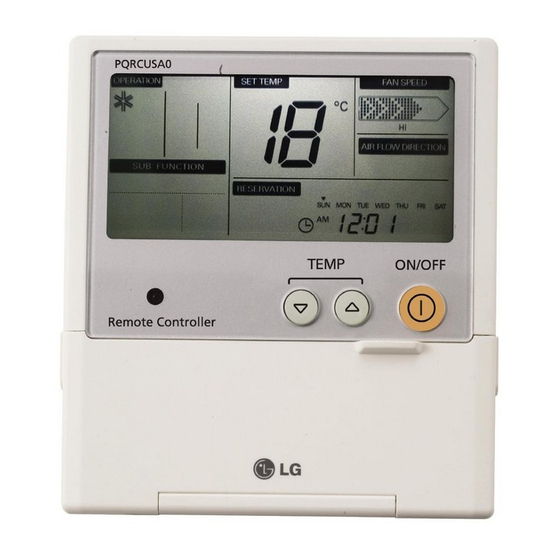
Safety Precaution Part Description Part Description Request to the service center or installation Do not give the shock using sharp and specialty store when the product becomes wet. pointed objects. • It will cause fire or electric shock. • It will cause breakdown by damaging parts. Name and Function of Remote Controller OPERATION INDICATION SCREEN... -
Page 4: Installation Instruction
Installation instruction Installation instruction 4. After fixing the top part of the Installation instruction remote controller to the installation board as shown in beside picture, press the bottom part to assemble 1. Connect the remote controller Wall Wall the controller to it’s board. cable to the wired remote Side Side... -
Page 5: Group Control
Installation instruction Installation instruction Group control Installer Setting -How to enter installer setting mode CAUTION 1. When installing more than 2 Installer setting mode is to set the detail function of the remote controller. units of air conditioner to one If the installer setting mode is not set correctly, it can cause problems to the product, user injury or wired remote controller, please property damage. -
Page 6: Installer Setting-Test Run Mode
Installation instruction Installation instruction <Installer Setting Code Table> Installer Setting -Test Run Mode Function Code Value After installing the product, you must run a Test Run mode. Test Run 01:Set For details related to this operation, refer to the product manual. Address Setting 00~FF : Address <ESP Step>... -
Page 7: Installer Setting-Setting Address Of Central Control
Installation instruction Installation instruction Installer Setting - Setting Address of Central Control Installer Setting -E.S.P. What is an E.S.P function? This is the function that decides the strength of the wind for each wind level and because this Press the button for 4 function is to make the installation easier, please do not use this function when using the remote seconds to enter the installer... -
Page 8: Installer Setting-Thermistor
Installation instruction Installation instruction Installer Setting -Thermistor Press button to save or release. Press button for 4 seconds to enter the installer setting mode until timer segment display “01:01”. Press button to exit or the system will automatically exit after 25 seconds Repeat pressing button to select without any input. -
Page 9: Installer Setting-Ceiling Height Selection
Installation instruction Installation instruction Installer Setting -Ceiling Height Selection Installer Setting -Static Pressure Setting This function is to adjust FAN Airflow rate according to ceilingheight (only cassette model) This function is applied to only duct type. Setting this in other cases will cause malfunction. Press button for 4 seconds to enter the installer setting... -
Page 10: Installer Setting-Group Setting
Installation instruction Installation instruction Installer Setting-Group Setting Installer Setting -Mode Override Setting This function is only for group control operation. Please don’t set this function in case of non-group In case of More than 2 indoor units connected to 1 outdoor unit, they are assigned as Master indoor control. -
Page 11: Installer Setting-Dry Contact Mode Setting
Installation instruction Installation instruction Installer Setting-Dry Contact Mode Setting Installer Setting-Zone State Setting This function allows the Dry contact-indoor unit operate under Auto Run mode or Manual mode with This function is only available on some products. remote controller. It is possible to setup Variable or Fixed option for Zone State of indoor. The initial setting is 'Variable' Press button for 4 seconds Press... -
Page 12: Installer Setting-Celsius/Fahrenheit Switching
Installation instruction Installation instruction Installer Setting-Celsius / Fahrenheit Switching Installer Setting-Zone Type Setting This function is used for switching the display between Celsius and Fahrenheit. This function is only available on some products. (Optimized only for U.S.A) It is possible to setup zone new type or old one of the product which is available to install the damper controller. -
Page 13: Installer Setting-Zone Number Setting
Installation instruction Installation instruction Installer Setting-Zone Number Setting Installer Setting -Optional Function Setting This function is only available on some products. For the optional product such as PLASMA PURIFICATION/DEHUMIDIFIER/ ELECTRIC HEATER and VENTILATION, ELEVATION GRILL. Zone Number is to set the number of installed zones. It's possible to control only in zone new type It is possible to set the items are installed or not Press button for 4 seconds... -
Page 14: Cooling Mode-Standard Operation
Owner's instruction Owner's instruction Cooling Mode - Power Cooling Owner's instruction It makes the room cool using pleasant and fresh air quickly Cooling Mode - Standard Operation Press button to turn on the Press button to turn on the indoor. indoor. -
Page 15: Dehumidification Mode
Owner's instruction Owner's instruction Dehumidification Mode Auto Operation Mode Press button to turn on the Press button to turn on the indoor. indoor. Press button to select Auto Press button to select Operation Mode. Dehumidification mode. The temperature setting can not be adjusted during operation Incase of operating under this mode. -
Page 16: Fan Mode
Owner's instruction Owner's instruction Fan Mode Temperature setting/ room temperature check Press button to turn on the We can simply adjust the desired indoor. temperature. • Press the buttons to adjust the desired temperature. Press button. : Increase 1˚C or 2˚F per one time pressing : Decrease 1˚C or 2˚F per one time pressing... -
Page 17: Sub Function: Plasma Purification
Owner's instruction Owner's instruction Ariflow Setting Sub function : Plasma Purification We can simply adjust the desired airflow rate Repeat pressing button until icon flash. Press buttons to set the desired airflow direction. ¡ (NONE) ¡ ¡ ¡ Operate or cancel Plasma •... -
Page 18: Sub Function: Electric Heater
Owner's instruction Owner's instruction Sub function : Electric Heater Sub function : Fan Auto Repeat pressing button Repeat pressing button until the icon flash. until icon flash. Operate or cancel Fan Auto Turn on/off ELECTRIC HEATER function by pressing button. by pressing button (the icon appears/disappears... -
Page 19: Function Setting: Child Lock
Owner's instruction Owner's instruction Function setting : Child Lock Function setting : Elevation Grill This function is to prevent children or other This function is to move the indoor filter people from using indoor. up/ down for cleaning filter. The setting is applied only to product that has this function. -
Page 20: Function Setting: Vane Angle Control
Owner's instruction Owner's instruction Function setting : Vane Angle Control Press button to complete and active the setting process. (Airflow direction This function is to adjust angle at which airflow is blow out. function will be released whenever setting vane angle) Press button. -
Page 21: Function Setting: Zone Control
Owner's instruction Owner's instruction Function setting : Zone Control Changing Current Time To turn on/off the zones by used of it Keep pressing button for 4 secs to enter Setting current time mode. Press button. Ex) Changing Current Time as 'Monday / AM 10:20'. -
Page 22: Programming: Setting Simple Reservation
Owner's instruction Owner's instruction Programming : Setting Simple Reservation In case of there is not any reservation setup on system, it is possible to make a SIMPLE reservation Press button to move to 'Minute' on indoor unit. setting mode. (the 'Minute' segment will flash) Press button to enter the... -
Page 23: Programming: Setting Sleep Reservation
Owner's instruction Owner's instruction Programming : Setting Sleep Reservation Programming : Setting ON Reservation This function is able to turn off Air conditioner when sleeping or after some hours. This function is able to turn air conditioner ON after a setting time. Press button. -
Page 24: Programming: Setting Off Reservation
Owner's instruction Owner's instruction Programming : Setting OFF Reservation Programming : Weekly Reservation This function is able to turn air conditioner OFF after a setting time. The weekly reservation is active after setting current time Press button. Press programming button to enter the Programming mode. -
Page 25: Programming: Holiday Reservation
Owner's instruction Owner's instruction Programming : Holiday Reservation Press up, down button to adjust the Minute on Start Time section. This function is to automatically stop the machine working on some days. Press button to enter the reservation setting mode. Press right button to move to 'Hour' Repeat pressing button to... -
Page 26: Ventilation Kit Control
Owner's instruction Owner's instruction Ventilation Kit Control Error code display function If there is a linkage between ventilator and air conditioner, it is able to control this ventilator. When the error occurred in the indoor unit, then the error code will be displayed on remote controller When the error occurred in the indoor unit, then the error code will be displayed on remote controller - "CH"... - Page 27 Panneau de commande à distance câblé Manuel d’installation et d’utilisation Modèles : PQRCUSA0 IMPORTANT • Veuillez lire ce manuel d’installation et d’utilisation dans son intégralité avant d’installer le produit. • L’installation doit être effectuée par une personne autorisée uniquement et conformément aux normes nationales de...
- Page 28 Manuel d’installation et d’utilisation du panneau de commande à distance câblé Mise en garde Mise en garde SOMMAIRE • L’installation nécessite des compétences avancées et doit être effectuée par le centre de services ou d’autres spécialistes agréés par notre société. I Mise en garde....................3~4 I Description ......................5 •...
-
Page 29: I Mise En Garde
Mise en garde Description Description Veillez à faire appel au centre de services ou à Veillez à n’utiliser aucun objet coupant ou un spécialiste si le produit prend l’eau. pointu pour toucher le produit. • Il existe un risque d’incendie ou d’électrocution. •... -
Page 30: I Instructions D'installation
Instructions d’installation Instructions d’installation 4. Après avoir fixé la partie supérieure Instructions d’installation du panneau de commande à distance au boîtier d’installation 1. Branchez le câble du panneau de comme indiqué ci-contre, appuyez commande à distance au boîtier sur la partie inférieure pour monter d'installation du panneau de le panneau de commande sur le 12V SIG GND... -
Page 31: Commande De Groupe
Instructions d’installation Instructions d’installation Commande de groupe Réglage-Comment accéder au mode Réglage AVERTISSEMENT 1. Si vous raccordez plus de 2 Le mode Réglage vous permet de régler en détail le fonctionnement du panneau de commande à unités de climatisation à un distance. - Page 32 Instructions d’installation Instructions d’installation <Tableau des codes du mode Réglage> Réglage-Mode Cycle test N° Fonction Code Valeur Après avoir installé le produit, vous devez effectuer un cycle de test. Cycle test 01:défini Pour plus d’informations sur cette opération, reportez-vous au manuel du produit. Réglage d’adresse 00~FF : adresse <Niveau ESP>...
-
Page 33: Réglage-Réglage Des Adresses Pour La Commande Centralisée
Instructions d’installation Instructions d’installation Réglage-Réglage des adresses pour la commande centralisée Réglage-ESP Qu’est-ce que la fonction ESP ? Il s’agit de la fonction préréglée qui adapte la force du vent. Veillez ne pas la modifier. Appuyez 4 secondes sur le bouton pour entrer dans le mode Réglage jusqu'à-ce le... -
Page 34: Réglage-Thermostat
Instructions d’installation Instructions d’installation Réglage-Thermostat Appuyez sur le bouton pour enregistrer ou annuler. Appuyez 4 secondes sur le bouton pour entrer dans le mode Réglage jusqu'à-ce le minuteur affiche « 01:01 ». Appuyez sur le bouton pour sortir. Sinon, la sortie se fera automatiquement Appuyez plusieurs fois sur le bouton après 25 secondes d’inactivité. -
Page 35: Réglage-Sélection De La Hauteur Du Plafond
Instructions d’installation Instructions d’installation Réglage-Sélection de la hauteur du plafond Réglage-Réglage de la pression statique Cette fonction permet d’ajuster le débit d’air de ventilation (FAN) en fonction de la hauteur du plafond Cette fonction concerne les produits avec conduit uniquement. (modèle à... -
Page 36: Réglage-Réglage De Groupe
Instructions d’installation Instructions d’installation Réglage-Réglage de groupe Réglage-Réglage MaÎtre/Esclave Dans le cas de 2 unités intérieures raccordées à une unité extérieure, les 2 unités intérieures sont Cette fonction sert uniquement à la commande de groupe. désignées comme maître et esclave. Veuillez ne pas l’utiliser en l'absence de groupe. -
Page 37: Réglage-Mode Contact Sec
Instructions d’installation Instructions d’installation Réglage-Mode Contact sec Réglage-Réglage du débit d'air Cette fonction permet à l’unité intérieure à contact sec de fonctionner en mode automatique ou Cette fonction n’est disponible que sur certains produits. manuel avec le panneau de commande à distance. Il est possible de régler le débit d’air intérieur sur Variable ou Fixe. -
Page 38: Réglage-Alternance Fahrenheit/Celsius
Instructions d’installation Instructions d’installation Réglage-Alternance Fahrenheit/Celsius Réglage-Type de zone Cette fonction vous permet d’alterner entre les degrés Celsius et Fahrenheit. Cette fonction n’est disponible que sur certains produits. (Optimisé uniquement pour les États-Unis) Il est possible de régler le type de zone pour le produit, nouvelle ou ancienne, disponible pour installer le contrôle du registre. -
Page 39: Réglage-Réglage Des Fonctions En Option
Instructions d’installation Instructions d’installation Réglage-Réglage du nombre de zones Réglage-Réglage des fonctions en option Cette fonction n’est disponible que sur certains produits. Pour les produits en option : purificateur d’air, déshumidificateur, chauffage électrique, ventilation, Le nombre de zones à définir correspond au nombre de zones installées. Il est uniquement possible grille d’élévation. -
Page 40: Mode Refroidissement (Fonctionnement Normal)
Manuel d’utilisation Manuel d’utilisation Mode Refroidissement (puissant) Manuel d’utilisation Rafraîchit rapidement la pièce avec de l’air frais. Mode Refroidissement (fonctionnement normal) Appuyez sur le bouton Appuyez sur le bouton pour allumer l’unité intérieure. pour allumer l’unité intérieure. Appuyez sur le bouton pour sélectionner le mode de Appuyez sur le bouton... -
Page 41: Déshumidification
Manuel d’utilisation Manuel d’utilisation Déshumidification Mode Fonctionnement automatique Appuyez sur le bouton Appuyez sur le bouton pour allumer l’unité intérieure. pour allumer l’unité intérieure. Appuyez sur le bouton pour Appuyez sur le bouton pour sélectionner le mode sélectionner le mode Fonctionnement automatique. -
Page 42: Mode Ventilation
Manuel d’utilisation Manuel d’utilisation Mode Ventilation Vérification de la température de consigne/de la pièce Appuyez sur le bouton Vous pouvez régler simplement la pour allumer l’unité intérieure. température souhaitée. • Appuyez sur les boutons pour régler la température souhaitée. Appuyez sur le bouton : augmente de 1°C ou 2°F par pression : diminue de 1°C ou 2°F par pression... -
Page 43: Réglage Du Débit D'air
Manuel d’utilisation Manuel d’utilisation Réglage du débit d’air Fonction secondaire : Plasma Vous pouvez régler simplement le débit d’air souhaité. Appuyez plusieurs fois sur le bouton jusqu’à-ce que Appuyez sur les boutons pour régler l’icône clignote. la direction du débit d’air. ¡... -
Page 44: Fonction Secondaire : Chauffage Électrique
Manuel d’utilisation Manuel d’utilisation Fonction secondaire : Chauffage électrique Fonction secondaire : Ventilation auto Appuyez plusieurs fois sur le Appuyez plusieurs fois sur le bouton jusqu’à-ce que bouton jusqu’à-ce que l’icône clignote. l’icône clignote. Validez ou annulez la fonction Activez/désactivez le chauffage Ventilation auto en appuyant sur électrique en appuyant sur le le bouton... -
Page 45: Réglage De La Fonction : Contrôle Parental
Manuel d’utilisation Manuel d’utilisation Réglage de la fonction : Contrôle parental Réglage de la fonction : Grille d’élévation Cette fonction permet de déplacer le filtre de Cette fonction permet d’empêcher les l’unité intérieure vers le haut ou le bas pour enfants ou d’autres personnes d’utiliser le nettoyer. -
Page 46: Réglage De La Fonction : Réglage De L'orientation De L'ailette
Manuel d’utilisation Manuel d’utilisation Réglage de la fonction : Réglage de l’orientation de l’ailette Appuyez sur le bouton pour terminer et activer la fonction (la fonction Cette fonction permet de régler l’orientation suivant laquelle l’air est soufflé. d'orientation du débit d'air est annulée à chaque modification de l’orientation de l’ailette). -
Page 47: Réglage De L'heure
Manuel d’utilisation Manuel d’utilisation Réglage de fonction : commande de zone Réglage de l’heure Pour activer / désactiver les zones à utiliser. Appuyez 4 secondes sur le bouton pour entrer dans le mode Réglage de l'heure Appuyez sur la touche ( Ex) Modification de la date et l’heure actuelles en «... -
Page 48: Programmation : Programmation Simple
Manuel d’utilisation Manuel d’utilisation Programmation : Programmation simple Si aucune programmation n’a été effectuée sur le système, il est possible d’effectuer une Appuyez sur le bouton pour passer programmation SIMPLE sur une unité intérieure. au réglage des minutes (le segment «... -
Page 49: Programmation : Veille
Manuel d’utilisation Manuel d’utilisation Programmation : Veille Programmation : Mise en marche Cette fonction permet d’éteindre le climatiseur lorsqu’il est en veille ou au bout de quelques heures. Cette fonction permet de mettre le climatiseur en marche à une heure définie. Appuyez sur le bouton Appuyez sur le bouton pour... -
Page 50: Programmation : Arrêt
Manuel d’utilisation Manuel d’utilisation Programmation : Arrêt Programmation : Programmation hebdomadaire Cette fonction permet d’éteindre le climatiseur à une heure définie. La programmation hebdomadaire est disponible une fois l’heure actuelle réglée. Appuyer sur le bouton de programmation pour Appuyez sur le bouton passer en mode de programmation. -
Page 51: Programmation : Vacances
Manuel d’utilisation Manuel d’utilisation Programmation : Vacances Appuyer sur les touches haut et bas pour ajuster les minutes de la section heure de démarrage. Cette fonction permet d’arrêter automatiquement l’appareil certains jours. Appuyez sur le bouton pour entrer dans le mode Programmation. -
Page 52: Fonction Affichage Du Code D'erreur
Manuel d’utilisation Manuel d’utilisation Commande du kit de ventilation Fonction affichage du code d'erreur S’il existe une connexion entre le ventilateur et le climatiseur, il est possible de commander ce Quand une erreur s'est produite sur l'unité intérieur, alors le code d'erreur sera affiché sur la télécommande ventilateur. - Page 53 P/No.: 3828A20860K Printed in Korea After reading this manual, keep it in a place easily accessible to the user for future reference.
Need help?
Do you have a question about the PQRCUSA0 and is the answer not in the manual?
Questions and answers