Table of Contents
Advertisement
Advertisement
Table of Contents

Related Manuals for Kärcher K 2.300


Summary of Contents for Kärcher K 2.300
-
Page 1: Manual De Usuario
K 2.300 OPERATOR MANUAL High Pressure Washer ....2 MANUAL DE USUARIO Limpiador de alta presión ....16 MANUEL D‘UTILISATION... -
Page 2: Table Of Contents
In the U.S. or Canada, please call death or serious injury.” 1-800-537-4129 for warranty issues and WARNING visit www.karcher-help.com for techni- indicates “a potentially hazardous situa- cal support and product assistance. tion which, if not avoided, could result in Please take a moment to register your death or injury.’’... -
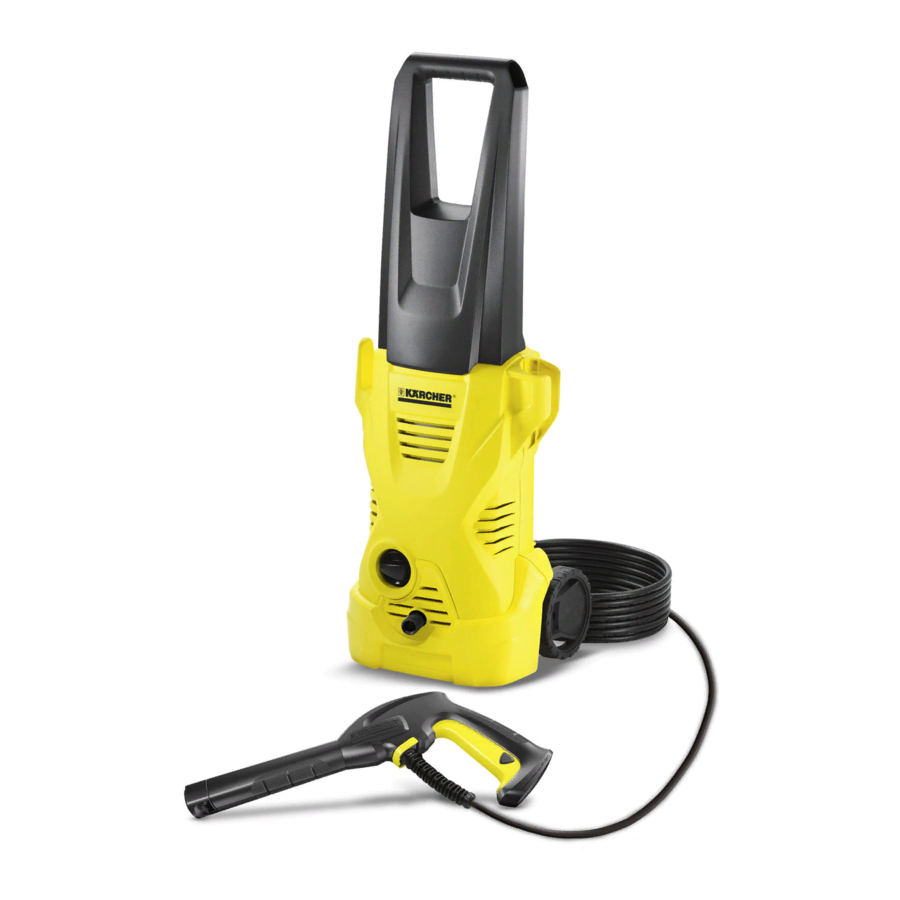
Page 3: Model Overview
MODEL OVERVIEW 1 Quick connect high pressure outlet 12 Power cord with Ground Fault Circuit 2 High pressure outlet Interrupter (GFCI) 3 ON/OFF switch 13 Wheels 4 Hose/Cord Hook 14 Trigger gun 5 Transport handle 15 Trigger gun safety lock 6 Spray Wand Storage 16 Key to disconnect the high pressure 7 Spray Gun Holder... -
Page 4: Important Safety Instructions
IMPORTANT SAFETY INSTRUCTIONS WARNING physical injuries to the operator and When using this product basic precau- irreversible damage to the machine. tions should always be followed, includ- WARNING – Risk of Electrocution ing the following: Inspect cord before using – Do not ... - Page 5 PONENTS RATED LESS THAN 1600 WATER SUPPLY PSI WORKING PRESSURE (INCLUD- (Cold Water Only) ING BUT NOT LIMITED TO SPRAY CAUTION GUNS, HOSE AND HOSE CONNEC- TIONS). When connecting the water inlet to the water supply mains, local regulations of BEFORE SERVICING, CLEANING OR ...
-
Page 6: Assembly Instructions
STEP 4: ASSEMBLY INSTRUCTIONS Fasten the quick connect to the high pressure outlet. Required tools Screwdriver, small size (not supplied) for connecting high pressure hose and trigger gun. Assembly STEP 1: STEP 5: Insert wheels into the body of the unit. Insert one end of the high pressure hose into the trigger gun until it locks audibly. - Page 7 We recommend that you test the GFCI as part of your startup procedure each time you use your pressure washer. To learn how to peform this test on your unit, visit http://www.karcherresidential.com/ gfci_test.php for detailed instructions for your type of GFCI. WARNING STEP 2: ...
-
Page 8: Using The Accessories
USING THE ACCESSORIES WARNING To avoid serious injury never point spray nozzle at yourself, other per- sons or animals. Always test an inconspicuous area before cleaning with high pressure. WORKING WITH DETERGENTS Dirtblaster® Detergents can only be applied at low This nozzle features a 0º... -
Page 9: Taking A Break
phon tube when done to flush any SHUTTING DOWN & remaining detergents from the injec- CLEAN-UP tion system. For best results see Cleaning Tips for STEP 1: specific information on how to clean Turn the switch to OFF (0) position different surfaces. -
Page 10: Winterizing And Long-Term Storage
pressure hose, warm water may leak CARE AND MAINTENANCE from the connector after operation. INSTRUCTIONS STEP 6: Push the housing of the quick con- Cleaning the water inlet filter nect toward the rear and disconnect the high pressure hose from the unit. STEP 1: ... -
Page 11: Cleaning Tips
remain on surface 1-3 minutes. Do not CLEANING TIPS allow detergent to dry on surface, if sur- CAUTION face appears to be drying, simply wet Before cleaning any surface an in- down surface with fresh water. If need- conspicuous area should be cleaned ed, use special wash brush attachment to test spray pattern and distance for (not included) to remove stubborn dirt. -
Page 12: Optional Cleaning Accessories
tom and from left to right. For best re- OPTIONAL CLEANING sults, wipe surface dry with a chamois or ACCESSORIES soft dry cloth. Optional accessories are available to Barbecue Grills, Outdoor Power further enhance your cleaning capabili- Equipment and Gardening Tools ties. - Page 13 Rotating Wash Brush (bayonet) Wet Sandblasting Kit (bayonet) For more effortless cleaning of all Why spend hours stripping old paint and smooth surfaces (painted, glass and rust by hand using harsh chemicals? Let plastic) try the Kärcher ® Rotating Wash the Kärcher ®...
-
Page 14: Troubleshooting
TROUBLESHOOTING WARNING Disconnect the unit from the power source before making any repair. Issue Cause Solution Motor will not start On/Off switch is in the “OFF” Turn switch to the “ON” (I) po- (0) position. sition Power cord is not plugged in. Plug in power cord. Electrical outlet does not sup- Try a different outlet. - Page 15 Call Customer Support drops per minute worn. is permissible). Oil drip. Oil seals are damaged or worn. Call Customer Support If you encounter any additional difficulties not listed, please visit our website. USA / Canada: Mexico: www.karcher-help.com www.karcher.com.mx English 15...
Need help?
Do you have a question about the K 2.300 and is the answer not in the manual?
Questions and answers