Table of Contents
Advertisement
GAS & ELECTRIC
COMBI OVENS
MODELS
ABC7E-208
ABC7E-240
ABC7E-480
ABC7G-NAT
For additional information on Vulcan-Hart or to locate an authorized parts
and service provider in your area, visit our website at www.vulcanequipment.com
VULCAN-HART
DIVISION OF ITW FOOD EQUIPMENT GROUP, LLC
WWW.VULCANEQUIPMENT.COM
INSTALLATION &
OPERATION MANUAL
ML-137716-000BP
ML-137716-000BW
ML-137716-000CD
ML-137715-NAT
3600 NORTH POINT BLVD.
BALTIMORE, MD 21222
FORM 47110 (April 2014)
Advertisement
Table of Contents

Related Manuals for Vulcan-Hart ABC7E-208


Summary of Contents for Vulcan-Hart ABC7E-208
- Page 1 ML-137716-000BW ABC7E-480 ML-137716-000CD ABC7G-NAT ML-137715-NAT For additional information on Vulcan-Hart or to locate an authorized parts and service provider in your area, visit our website at www.vulcanequipment.com VULCAN-HART 3600 NORTH POINT BLVD. DIVISION OF ITW FOOD EQUIPMENT GROUP, LLC BALTIMORE, MD 21222 WWW.VULCANEQUIPMENT.COM...
-
Page 2: Important For Your Safety
IMPORTANT FOR YOUR SAFETY THIS MANUAL HAS BEEN PREPARED FOR PERSONNEL QUALIFIED TO INSTALL GAS EQUIPMENT, WHO SHOULD PERFORM THE INITIAL FIELD START-UP AND ADJUSTMENTS OF THE EQUIPMENT COVERED BY THIS MANUAL. POST IN A PROMINENT LOCATION THE INSTRUCTIONS TO BE FOLLOWED IN THE EVENT THE SMELL OF GAS IS DETECTED. -
Page 3: Table Of Contents
TABLE OF CONTENTS GENERAL ................................4 INSTALLATION ..............................4 Unpacking ................................4 Installation Codes and Standards ........................4 Location ................................5 Door Opening ..............................5 Stacking Kits ..............................5 Leveling ................................5 Handling ................................5 Water Requirements ............................5 Water Quality Statement ..........................6 Water Conditioning ............................7 Plumbing Connections .............................7 Water Supply Connections ..........................7 Filter System ..............................8 Drain Connection .............................8 Gas Supply Connections ..........................8... -
Page 4: General
Before installing, verify that the electrical and/or gas supply agrees with the specifi cations on the data plate located on the lower front corner of the right side panel. If the supply and equipment requirements do not agree, do not proceed with the installation. Contact your dealer or Vulcan-Hart immediately. UNPACKING Each oven is inspected before leaving the factory. -
Page 5: Location
LOCATION Allow space for operating the oven. Do not obstruct the ventilation ports above the oven. To provide ventilation access, allow 1" clearance on the left side of the oven and 3" clearance on the right and 4" at the rear. A suitable amount of space (18" minimum) should be provided on the right side of the machine for service. -
Page 6: Water Quality Statement
WATER QUALITY STATEMENT The fact that a water supply is potable is no guarantee that it is suitable for steam generation. Proper water quality can improve the taste of the food prepared in the oven, reduce scale build-up or corrosion, and extend equipment life. -
Page 7: Water Conditioning
WATER CONDITIONING It is important to furnish the combi oven with treated water to reduce scale formation. Scale formation will reduce steam output, cause premature component failure, and shorten equipment life. Most water supplies contain scale producing minerals such as Calcium and Magnesium. As steam is generated, the minerals are deposited into the oven cavity. -
Page 8: Filter System
fl ushing, a sediment fi lter must be installed before use. If you have purchased a water fi lter system from Vulcan-Hart, please follow the instructions provided with the fi lter system. At the time of installation you must register your Combi Oven at www.vulcanhart.com/ fi... -
Page 9: Testing The Gas Supply System
NOTE: A straight gas connection is the ideal condition for the rated BTU/hr. fl ow capacity of the connector. If a straight connection is not possible and a fl exible gas connector is used, do not twist, kink or excessively fl... -
Page 10: Electrical Connection
ELECTRICAL CONNECTION Appliances equipped with a fl exible electric supply cord are provided with a three- prong grounding plug. It is imperative that this plug be connected into a properly grounded three- prong receptacle. If the receptacle is not the proper grounding type, contact an electrician. Do not remove the grounding prong from this plug. -
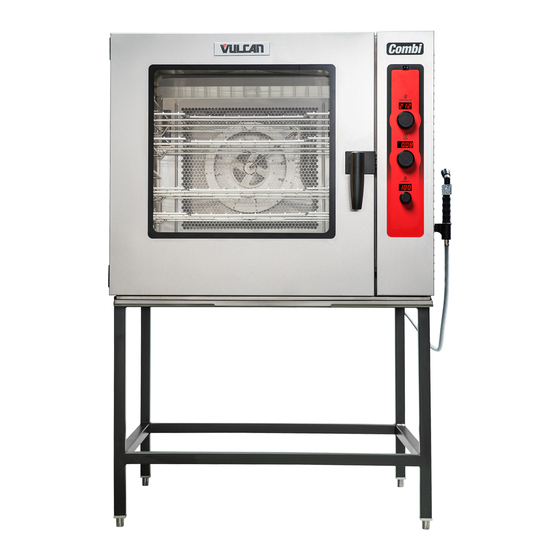
Page 11: Operation
OPERATION The oven and its parts are hot. Use care when operating, cleaning or servicing the oven. The cooking compartment contains live steam. Stay clear while opening the door. CONTROLS OFF/ON SWITCH - The “I” position is On and the “O” position is Off. TEMPERATURE DISPLAY - Displays the current cavity or set temperature. -
Page 12: Off/On
OFF/ON The “I” side of the switch is On and the “O” is Off. When the unit switch is turned on ,for both gas and electric models, the unit powers up and displays the last temperature setting. The unit will begin heating and fan operation immediately. -
Page 13: Time
TIME Time is displayed in “hours & minutes”. When the unit is fi rst powered on, the time display shows “--:--”. To increase time, turn knob to the right, and to decrease time, turn knob to the left. When the knob stops, the displayed time countdown then begins. -
Page 14: Daily Shutdown
DAILY SHUTDOWN 1. Place the Selector Knob to 0 (OFF). 2. Clean the oven interior (See Cleaning). 3. Leave door open. EXTENDED SHUTDOWN 1. Perform DAILY SHUTDOWN procedure. 2. Turn off the circuit breakers and/or gas supply. 3. Turn off the water supply. 4. -
Page 15: Stainless Steel Equipment Care And Cleaning
STAINLESS STEEL EQUIPMENT CARE AND CLEANING (Supplied courtesy of NAFEM. For more information, visit their web site at www.nafem.org) Contrary to popular belief, stainless steels ARE susceptible to 4. Treat your water. rusting. Though this is not always practical, softening hard water can do much to reduce deposits. -
Page 16: Cleaning
CLEANING The oven and its parts are hot. Always allow the oven to cool before cleaning. The Combi oven must be cleaned regularly to maintain performance and to prevent corrosion. Daily cleaning and rinsing of the cavity is necessary to remove the contaminants found in water and in food. Performing daily cleaning and rinsing in conjunction with proper water fi... -
Page 17: Oven Compartment
OVEN COMPARTMENT Daily 1. The oven cavity should be cooled below 140°F before beginning routine cleaning. 2. Remove any large pieces of food that may be in the oven cavity before starting a cleaning cycle. 3. Spray the inside of the oven compartment with approved detergent solution. NOTE: Use a mild oven detergent for cleaning. -
Page 18: Deliming The Cavity (Electric And Gas Units)
DELIMING THE CAVITY (ELECTRIC AND GAS UNITS) As with all steam related products, water fi ltration and regular fi lter replacements coupled with routine deliming are required. Your local Vulcan Service offi ce can recommend a water treatment system to meet the needs of your local water conditions. Contact your local Vulcan Service representative for water treatment offerings. -
Page 19: Maintenance
MAINTENANCE Disconnect the electrical power to the machine and follow lockout / tagout procedures. DOOR LOCKING AND GASKET INSPECTION During oven operation, if air or steam blows out from the top, sides, or underneath to door, the door may need adjustment. Inspect the door locking movement and the door gasket for issues. Door Locking Inspection When closing door, the locking action should be smooth with no binding and not require excessive force. - Page 20 NOTES – 20 – FORM 47110 (April 2014) PRINTED IN U.S.A.
Need help?
Do you have a question about the ABC7E-208 and is the answer not in the manual?
Questions and answers