Table of Contents
Advertisement
Quick Links
Advertisement
Table of Contents

Subscribe to Our Youtube Channel
Related Manuals for National 210


Summary of Contents for National 210
- Page 1 National Optical & Scientific Instruments Inc. 6508 Tri-County Parkway Schertz, Texas 78154 Phone (210) 590-9010 Fax (210) 590-1104 INSTRUCTIONS FOR MODEL 210 (Corded) MODEL 210-RLED (Rechargeable Cordless) COMPOUND MICROSCOPE Copyright © 1/14/2013 National Optical & Scientific Instrument Inc.
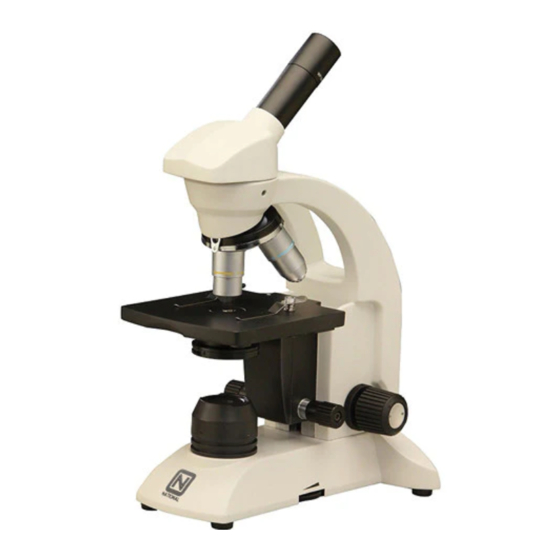
- Page 2 Eyepiece (ocular lens) Eyepiece tube Head of microscope Safety rack stop set screw Objective turret (nosepiece) Objective lens Stage clips Condenser lens Fine focus knob Stage Iris diaphragm Tension adjustment Coarse focus knob Illuminator field lens housing On/Off switch and fuse holder (back of base) Base Rheostat control...
-
Page 3: Operation
Built-in substage electric LED illuminator provides constant, reliable, pre-focused illumination equal to a 20-watt tungsten bulb. 210-RLED: Built-in substage electric LED illuminator provides constant, reliable, pre-focusing illumination equal to a 20 watt tungsten bulb. Powered by 3 rechargeable AA nickel metal hydride batteries, no power outlet or electrical cord is needed. - Page 4 2. Assure that light is available for illuminating the specimen. 210 Lighting Operation: a. Make certain that the main voltage of your microscope corresponds to the voltage of your power outlet, 120v AC. Insert plug into matching voltage output. b. Push rocker switch located at rear of base to ON position.
-
Page 5: Maintenance
MAINTENANCE WARNING 210: For your own safety, turn switch to OFF position and remove electrical plug from power source. 210-RLED: For your own safety, make certain that battery recharger is unplugged and removed from microscope jack before maintaining your microscope. -
Page 6: Mechanical Maintenance
National for “warranty repair”, make certain to examine the front lens element with a magnifying glass or eye loupe for the presence of such contaminants. If a microscope is returned to National for warranty repair, and it is determined that such contaminants are the problem, this is not covered under warranty and National will submit a cost estimate for cleaning. -
Page 7: Troubleshooting
disconnect the charger from the AC wall outlet and the output cord from recharging socket after 12 hours. Batteries and charger may feel warm when charging, and unplugging the recharger is a safety precaution. You may operate the microscope light even while it is being recharged. Simply flip light switch to “on” position and continue using microscope while the recharger is fully engaged. -
Page 8: Optional Accessories And Parts
OPTIONAL ACCESSORIES AND PARTS: #610-045R WF10x eyepiece w/reticle, 10mm/100div. #615-045 WF15x eyepiece w/pointer #760-045 DIN 60xR objective lens, N.A. 0.90 #800-001 Replacement LED light #802-003 Auto cut-off recharger for rechargeable LED microscopes #801-160 Replacement fuse, 0.5 amp, time delay #951 Dustcover, 16”...
Need help?
Do you have a question about the 210 and is the answer not in the manual?
Questions and answers