Table of Contents
Advertisement
Advertisement
Table of Contents
Troubleshooting

Related Manuals for FARFISA INTERCOMS ECHOS


Summary of Contents for FARFISA INTERCOMS ECHOS
- Page 1 ELECTRONIC CALL SYSTEM TECHNICAL MANUAL ECHOS 2012 EXHITO COMPACT...
- Page 2 INTRODUCTION Notice to the installer and user This edition contains helpful information on the operation and installa- Check the integrity of the product after removing it from the packing. tion of Farfisa video intercoms systems. Packing materials (such as plastic bags, cardboard, polystyrene In order to make the systems work properly it is necessary to install only foam, etc.) must be kept out of the reach of children.
-
Page 3: Table Of Contents
TECHNICAL MANUAL 2012 edition INDEX Page General characteristics Intercom/videointercom systems with reduced wires technology - Internal stations - External door stations - Power supplies and service modules - Installation instructions - Installation diagrams - intercoms - intercommunicating intercoms - videointercoms - intercommunicating videointercoms Traditional intercoms and videointercoms - Internal stations... -
Page 4: General Characteristics
* For audio compatibility we do not suggest to Electronic buzzer SR41 connect door stations MODY series with Call wires (second and last) internal devices ECHOS series. Additional speaker ** Series for up to 2 calls (MT11 - Gb2012) - Page 5 INTERCOMS VIDEOINTERCOMS SYSTEMS REDUCED WIRES TECHNOLOGY INDEX Page Internal stations - Echos series videointercoms - Exhito series videointercoms - Exhito series intercoms - Compact series videointercoms - Compact series intercoms - Project series intercoms External door stations - Agorà series push-button panels...
-
Page 6: Internal Stations
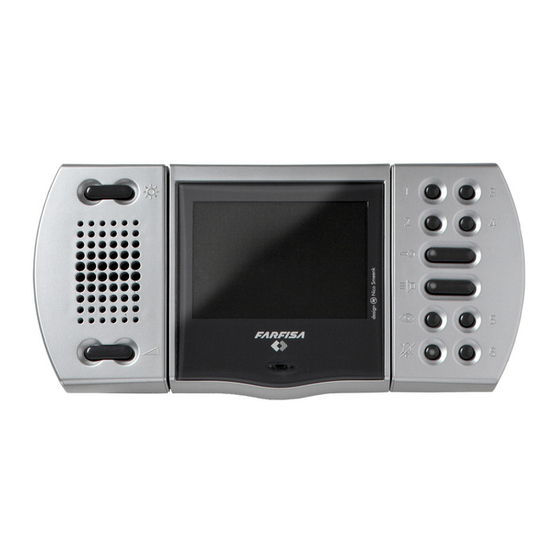
INTERNAL STATIONS ECHOS SERIES How to select the function for buttons from 1 to 6 VIDEOINTERCOMS Buttons from 1 to 6 can be used for several functions, that is: ” - intercommunicating calls; - control switching ON of the video intercom when more than one external door station or extra surveillance cameras are present on the system;... - Page 7 INTERNAL STATIONS Flush mounted version 9083 . Back-box for video intercoms ” EH9161CT and EH9161CW. 3 ” ” 4 - Plug-in back the terminal blocks on the video intercom paying attention to their position and direction in order to avoid degradation of the system.
- Page 8 INTERNAL STATIONS Table version TA9160 . Table adapter for Echos videointercoms. Complete with junction box and 2.4m connection cable with 20 wires. WA9100T/W Re-insert the two frontal plastic frames to the video intercom. TA9160 Surface mounted version WA9100T . Wall adaptor for the EH9161CT videointercom.
- Page 9 INTERNAL STATIONS Characteristics conversation with an external door station state it is necessary to install to the door a Image brightness adjustment or another intercommunicating equipment; proper sensor whose contacts must be a - the videointercom is in programming op- normally closed type (see page 4).
- Page 10 INTERNAL STATIONS ADJUSTMENTS -If required the communication the audio is OPERATIONS intermittent or distorted it is advisable to Brightness adjustment. adjust the microphone sensitivity by acting Call from the door station With the video intercom switched ON, press on the trimmer MIC.SENS. located on the Making a call from the door station the video left and right the button to adjust the...
- Page 11 INTERNAL STATIONS EXHITO SERIES WB3161 . Wall bracket for EX3100C, EX3160 and EX3160C video VIDEOINTERCOMS intercoms with terminal boards for connection to the system and an electronic circuit to convert the video signal from coax cable to a balanced twisted pair. "...
- Page 12 INTERNAL STATIONS Table version TA3160. Table adaptor with weighted base, junction box and 2.4m connection cable with 20 wires. Installation of video- intercom onto the wall bracket. Assembling of extra buttons to the videointercom EX3160 and EX3160C Taking out of button caps Junction box Remove the cover to the junction box and connect wires to the terminals matching the...
- Page 13 INTERNAL STATIONS EXHITO SERIES INTERCOMS Wall version " " 172.5 " " EX311 . White electronic intercom with two push-buttons, spiral cord, electronic micro- phone and possibility to insert an additional EX301 push-button and a SR41 or SM50 mod- ule. Wall-mountable with expansion plugs or wall box.
- Page 14 INTERNAL STATIONS EXHITO SERIES INTERCOMS 172,5 " 83.5 " Table version TA320 . Table adaptor with weighted base, junction box and 2.4m connection cable with 20 wires. EX321 . White colour intercom for 1+1 inter- com systems and intercommunicating systems connected to 1 or more external door stations.
- Page 15 INTERNAL STATIONS EX304 SR41 . Additional loudspeaker. It allows RL 36 . Electronic buzzer module. In the . Relay module. When installed inside to receive calls with off-hook handset, or in intercoms can be added for having a further call intercoms it allows to activate additional bells.
-
Page 16: Videointercoms
INTERNAL STATIONS COMPACT SERIES VIDEOINTERCOMS Installation " " " Fix the wall bracket by using 4 expansion plugs ÷ 150 cm 4 7" 11" aaaaaaaaaaaaa KM8111W . White flat video intercom with two buttons, one for control switch ON and one for door lock release, audio-video privacy, elec- tronic microphone, electronic modulated call note, terminal board for the connection to the... - Page 17 INTERNAL STATIONS PROJECT COMPACT SERIES SERIES INTERCOMS INTERCOMS 77.5 " " " " " " PT511EW . White electronic intercom with 1 push-button, spiral cord, electronic microphone and possibility to insert SR41 or SM50 module KM811W (description and characteristics of the mod- .
-
Page 18: External Door Stations
EXTERNAL DOOR STATIONS AGORA' SERIES External door station Surface mounting Door Stations with reduced width and thickness. AG20. Blank module Installation is easy and quick AGL20. because no recessed box is Light grey version. required. Front plate is in extruded anodized aluminium. - Page 19 EXTERNAL DOOR STATIONS Installation and Assembly of AGORA’ door stations. AG100V AG100A AGL100V AGL100A AG30... AG40... AG100V AG100A AG100T AGL100V AGL100A AGL100T max.8 max.4 max.2 À (MT11 - Gb2012)
- Page 20 EXTERNAL DOOR STATIONS The wires of connection cable must be connected to the calling terminal (not to the common terminal) Cut and keep insulated not used wire. "E" terminal. Cut the red wire to get "E" terminal only if required by the installation diagram.
- Page 21 EXTERNAL DOOR STATIONS ASSEMBLY MODULE SEQUENCE AG100V AG100V AGL100V AGL100V AG100A AG100A AGL100A AGL100A AG20 AG21 AG222 Insert the Push-buttons or blank modules starting from the top of the frontal plate AG21 AG222 AG100T AG100T AG100T AGL100T AGL100T AGL100T AG20 AG21 AG222 À...
- Page 22 EXTERNAL DOOR STATIONS ASSEMBLING DOOR STATIONS SIDE BY SIDE AG100V AG100T AGL100V AGL100T AG100A AGL100A Remove the side plastic caps (only from the interested side) to insert the spacers. AG100V AGL100V AG100T AG100A AGL100T AGL100A AG100T AGL100T AG100V AGL100V AG100A AGL100A À...
- Page 23 EXTERNAL DOOR STATIONS Composition of door stations and requested quantities of modules 1 ROW VIDEOINTERCOM push-button panels 2 ROW VIDEOINTERCOM push-button panels N. buttons AG100V AG40CED AG100T AG20 AG21 N. buttons AG100V AG40CED AG100T AG20 AG222 1 ROW INTERCOM push-button panels 2 ROW INTERCOM push-button panels N.
- Page 24 EXTERNAL DOOR STATIONS PROFILO SERIES Push-button panels in extruded aluminium and Module frames complete with back box steel push-buttons made up of modular ele- ments. Suitable for the most diverse installa- tion requirements. The careful selection of modules allows for multiple application oppor- tunities;...
- Page 25 EXTERNAL DOOR STATIONS PROFILO push-button panel Modules with integrated door speaker Video modules with integrated door speaker PL11PED PL10PED PL12PED PL40PED PL41PED PL42PED with 1 call button without call buttons with 2 call buttons without call buttons and with 1 call button and B\W with 2 call buttons and with B\W camera camera...
- Page 26 2 channels (reception and using the 2 supplied screws. Connect the conduc- transmission) (press for Echos series); tors of the diode module to the corresponding - aluminium front plate with transparent - adjust the trimmer until the whistling stops terminal on button module;...
-
Page 27: Proximity Reader For Access Control
EXTERNAL DOOR STATIONS PROXIMITY READER FOR ACCESS ACCESS CONTROL KEYPAD INSTALLATION CONTROL PL42PED PL12PED FC 52PL FP52PL Access control keypad with 12 digits and 2 This article allows for the activation of 2 relays relays for lock release. 4 programmable ac- by means of keytags or electronic ISO cards cess codes for each relay. - Page 28 EXTERNAL DOOR STATIONS Rain shelter Openings for cables. Fix lower part of the frame to the back box and make the electri- cal connections. Fix lower part of the frame to the rain shelter and make the electrical connections. Flush mounting and cables plac- ing.
- Page 29 EXTERNAL DOOR STATIONS 1 row push button Examples of compositions in intercom systems 1 ROW PUSH BUTTON PANELS 1 call button 6 call 2 call 4 call 8 call 10 call 11 call buttons 14 call buttons 17 call buttons 20 call buttons buttons buttons...
- Page 30 EXTERNAL DOOR STATIONS 2 row push button 2 ROW PUSH BUTTON PANELS Examples of compositions in intercom systems 6 call 8 call 14 call 16 call 20 call buttons 24 call buttons 32 call buttons 36 call buttons 40 call buttons buttons buttons buttons...
- Page 31 EXTERNAL DOOR STATIONS 1 row push button 1 ROW PUSH BUTTON PANELS Examples of compositions in videointercom systems 1 call button 2 call 4 call 6 call 8 call 10 call 11 call buttons 14 call buttons 17 call buttons 20 call buttons buttons buttons...
- Page 32 EXTERNAL DOOR STATIONS 2 row push button 2 ROW PUSH BUTTON PANELS Examples of compositions in videointercom systems 6 call 8 call 14 call 16 call 20 call buttons 24 call buttons 32 call buttons 36 call buttons 40 call buttons buttons buttons buttons...
- Page 33 EXTERNAL DOOR STATIONS MATRIX SERIES Stainless steel (AISI 316L) anti-vandalism push- Module frames complete with back box button panels especially studied to withstand burglary, penetration of solids and water jets (IP 45 protection degree against the penetration of external solids and water; IK09 against shocks). The Matrix push-button panels include back boxes, module frames, die-cast aluminium decorative frames, button modules, and modules with built-in...
- Page 34 (press for Echos series); of "receiver", stainless steel front plate and red - horizontal/vertical adjustment; operation LED. - adjust the trimmer until the whistling - red operation LED;...
- Page 35 EXTERNAL DOOR STATIONS Push-button modules ACCESS CONTROL KEYPAD FC52MAS . Electronic keypad with 12 keys and 2 relays for lock release and access control of door stations. 12 programmable access codes for each relay. Programmable door opening time from 1 up 99 sec. for each relay (or bistable operation of relay).
- Page 36 EXTERNAL DOOR STATIONS INSTALLATION Assembling modules side by side Flush mounting and cables plac- ing. Insertion of spacers between back boxes. Spacers and cable bushing (not supplied with the products) must Place the push-button panel back box at a be inserted before brick work. height of about 1.65m (5' 5") from the floor keeping the front edges flush-mounted and vertical to the finished plaster.
- Page 37 EXTERNAL DOOR STATIONS Fixing of frame to module frame. Connection of wires to module terminal boxes. Rain shelters aaaaaaaaaaaaaa aaaaaaaaaaaaaa aaaaaaaaaaaaaa aaaaaaaaaaaaaa aaaaaaaaaaaaaa aaaaaaaaaaaaaa aaaaaaaaaaaaaa aaaaaaaaaaaaaa aaaaaaaaaaaaaa aaaaaaaaaaaaaa aaaaaaaaaaaaaa aaaaaaaaaaaaaa aaaaaaaaaaaaaa aaaaaaaaaaaaaa aaaaaaaaaaaaaa aaaaaaaaaaaaaa aaaaaaaaaaaaaa Fixing of frame to back aaaaaaaaaaaaaa box.
-
Page 38: Examples Of Compositions In Intercom Systems
EXTERNAL DOOR STATIONS Examples of compositions in intercom systems 1 call button 3 call buttons 7 call buttons 2 call buttons 4 call buttons 6 call buttons 6 call buttons 8 call buttons 9 call buttons 10 call buttons 10 call buttons 12 call buttons 14 call buttons 16 call buttons... - Page 39 EXTERNAL DOOR STATIONS Examples of compositions in video intercom systems 3 call buttons 7 call buttons 1 call button 3 call buttons 5 call buttons 5 call buttons 7 call buttons 9 call buttons 9 call buttons 11 call buttons 13 call buttons 17 call buttons 19 call buttons...
- Page 40 EXTERNAL DOOR STATIONS MODY SERIES Module frames complete with back box Push-button panels in extruded aluminium made up " of modular elements. Suitable for the most diverse " installation requirements. MD71. 72. 73. 74. Plastic back boxes complete " with module frames. 304.5 MD81.82.83.804.84.86.808.89.812 .
- Page 41 EXTERNAL DOOR STATIONS 1 row push-button modules CAMERA Modules for electric door speaker (amplifier) " " " MD10ED MD11ED MD12ED without call buttons 1 call button 2 call buttons " Button modules MD 41D B/W camera module for 4+1 video systems without coaxial cable, including: - solid-state CCD camera, with auto iris, 3.6mm fixed optics and 6 infrared LED’s;...
- Page 42 EXTERNAL DOOR STATIONS AMPLIFIED DOOR STATIONS Dismounting and protection of name la- " " bels " " MD10ED . Module without call buttons, with Terminals front plate in anodized aluminium, amplified A Supply 13VAC-70mA Ground door speaker in two channels and control of 1 Reception-transmission;...
- Page 43 EXTERNAL DOOR STATIONS " aaaaaaaaaa Openings for cables. Place the push-button panel back box at a height of about 1.65m from the floor keeping the front edges flush-mounted and vertical to the finished plaster. Position the camera in such a way that sunlight or other direct or reflected light Mounting of button module.
- Page 44 EXTERNAL DOOR STATIONS Alignment of the panel. Hood covers Mounting of frame bottom and door speaker (amplifier). Modules insertion and wall fixing of rain shelter. Fixing of the hood cover between the back box and the module frame. Rain shelter Top fixing of the panel.
- Page 45 EXTERNAL DOOR STATIONS 1 row push-button Composition board of INTERCOM push-button panels. 2 diode Button and info or N° Dimensions Module with Back box and Hood Rain calls (mm / inches) door speaker module blank modules module frame covers shelters 1 MD11ED 1 MD71 1 MD81...
- Page 46 EXTERNAL DOOR STATIONS 1 row push-button Composition board of VIDEOINTERCOM push-button panels. N° Dimensions Camera Module with 2 diode Button and info or Back box and Hood Rain calls (mm / inches) module door speaker module blank modules module frame covers shelters 1 MD41D...
- Page 47 EXTERNAL DOOR STATIONS 2 row push-button Composition board of INTERCOM push-button panels. N° Dimensions Module with 2 diode Button and info or Back box and Hood Rain calls (mm / inches) door speaker module blank modules module frame covers shelters 124x213x19 1 MD10ED 4 241D...
- Page 48 EXTERNAL DOOR STATIONS 2 row push-button Composition board of VIDEOINTERCOM push-button panels. N° Dimensions Camera Module with 2 diode Button and info or Back box and Hood Rain calls (mm / inches) module door speaker module blank modules module frame covers shelters 124x304.5x19...
-
Page 49: Power Supplies And Service Modules
POWER SUPPLIES AND SERVICE MODULES Timed power supply Transformers Service module " " " " " " " " " 1181E PRS210ED RL37D . Timed supply for videointercoms, CCD cameras, electric lock and name-plate Transformer with electronic bell used to power When installed in 1+1 intercom and 4+1 video lights, etc. - Page 50 SERVICE MODULES Switcher module for intercommunicating systems 4-contact analog exchanger " " 107.5 " " " " 1443ED. Operating note 1473 The switch between door station or It can be mainly used in videointercom systems Used in systems with 2 or more door stations to intercommunicating devices is automatic 4+1 or intercom systems 1+1 were the intercom- automatically switch audio lines and door lock...
- Page 51 SERVICE MODULES " " " " " " " " " 1471E 1471 1472 . RELAY UNIT. . RELAY UNIT. . 2- CONTACT RELAY UNIT. It is used when it is not possible to actuate As 1471E, with lower number of terminals and As 1471E, with higher number of exchanges commands directly.
-
Page 52: Installation Instructions
INSTALLATION INSTRUCTIONS - The cable runs of intercom and video inter- Wires Background noise com installations must be kept separate from To avoid possible background noise over the 1) For the correct operation of the intercom the mains or any other electrical installation speech line, it is advisable: and videointercom system you must choose as required by the International Safety Stan-... -
Page 53: Installation Instructions
INSTALLATION INSTRUCTIONS VIDEO SIGNAL DISTRIBUTION WITH TWISTED PAIR CONNECTION WITH FLOOR DISTRIBUTORS The video wires of each video intercom are insulated from the riser. Connections are made on the DV2D or DV4D floor video signal distribu- If the distance between the camera and the last video intercom in the tor box. -
Page 54: Working
WORKING INSTRUCTIONS Videointercom systems Intercommunicating systems Intercom systems Check that the connections of the system are The switch between door station or For all the intercom systems, simply lift the intercommunicating devices is automatic after carried out correctly. handset to speak to the door station. receiving a call (from door station or from Put the system in use by connecting the power The call is indicated by a sound signal on the... -
Page 55: Installation Diagrams
INTERCOMS VIDEOINTERCOMS REDUCED WIRES TECHNOLOGY INSTALLATION DIAGRAMS Page 1+1 INTERCOMS - Si 21MR/1 Intercoms connected to 1 external door station - Si 21MR/2 Intercoms with private conversation connected to 1 external door station - Si 22MR/1 Intercoms connected to 2 automatically switched external door stations - Si 26MR/1 Intercom system with secondary door stations and 1 main common station (multiple entrance) - Si 26MR/2 One-way intercom system with secondary door stations and 1 main common station (multiple entrance) - Si 27MR/1 Intercom system with secondary door stations and 2 main common stations (multiple entrance) -
Page 56: Intercoms
Si 21MR/1-21MR/2 INTERCOMS WITH OR WITHOUT PRIVATE CONVERSATION CONNECTED TO 1 EXTERNAL DOOR STATION EXTERNAL DOOR STATIONS AGORA' series PROFILO series MATRIX series MODY series AG100A PL71÷PL73 MA71÷MA73 MD71÷MD74 AG100T PL81÷PL89 MAS61÷MAS63 ( MD84÷MD812 AG20 PL91÷PL99 * MA91÷MA93 * MD94÷MD912 * AG21 PL10PED÷PL12PED MAS10PED÷MAS12PED... - Page 57 Si 21MR/1 Si 21MR/2 a) INTERCOMS CONNECTED TO 1 EXTERNAL DOOR b) INTERCOMS WITH PRIVATE CONVERSATION CON- STATION NECTED TO 1 EXTERNAL DOOR STATION Note - In all SM50 cut the resistance R1 and in the intercom the jumper W1. KM811 EX321 SM50...
- Page 58 Si 22MR/1 INTERCOMS CONNECTED TO 2 AUTOMATICALLY SWITCHED EXTERNAL DOOR STATIONS EXTERNAL DOOR STATIONS AGORA' series PROFILO series MATRIX series MODY series AG100A PL71÷PL73 MA71÷MA73 MD71÷MD74 AG100T PL81÷PL89 MAS61÷MAS63 ( MD84÷MD812 AG20 PL91÷PL99 * MA91÷MA93 * MD94÷MD912 * AG21 PL10PED÷PL12PED MAS10PED÷MAS12PED MD10ED÷MD12ED AG222...
- Page 59 Si 22MR/1 INTERCOMS CONNECTED TO 2 AUTOMATICALLY SWITCHED EXTERNAL DOOR STATIONS EX321 EX311 KM811 PT511E EX321 EX311 KM811 PT511E Agorà Agorà Profilo Matrix Mody Profilo Matrix Mody AG100T AG100T PL2.. PL2.. 241DMA MAS2.. MAS2.. MD2.. 241DMA MD2.. 241D AG 00A AG 00A AG30 AG30...
- Page 60 Si 26MR/1 INTERCOM SYSTEM WITH SECONDARY DOOR STATIONS AND 1 MAIN COMMON STATION (multiple entrance) EXTERNAL DOOR STATIONS AGORA' series PROFILO series MATRIX series MODY series 1+X AG100A PL71÷PL73 MA71÷MA73 MD71÷MD74 AG100T 1+X PL81÷PL89 1+X MAS61÷MAS63 ( 1+X MD81÷MD812 AG20 1+X PL91÷PL99 * 1+X MA91÷MA93 * 1+X MD91÷MD912 *...
- Page 61 Si 26MR/1 INTERCOM SYSTEM WITH SECONDARY DOOR STATIONS AND 1 MAIN COMMON STATION (multiple entrance) “A” “B” KM811 EX321 KM811 EX321 “C-D..” Xn(A) Xn(B) PT511E PT511E EX311 EX311 KM811 EX321 KM811 EX321 PT511E PT511E EX311 EX311 Xn(A) Xn(B) secondary entrance "a" X3(A) X2(A) secondary entrance "b"...
- Page 62 Si 26MR/2 ONE-WAY INTERCOM SYSTEM WITH SECONDARY DOOR STATIONS AND 1 MAIN COMMON DOOR STATION Main DOOR STATION AGORA' series PROFILO series MATRIX series MODY series AG100A PL71÷PL73 MA71÷MA73 MD71÷MD74 AG100T PL81÷PL89 MAS61÷MAS63 ( MD81÷MD812 AG20 PL91÷PL99 * MA91÷MA93 * MD91÷MD912 * AG21 PL10PED÷PL12PED...
- Page 63 Si 26MR/2 ONE-WAY INTERCOM SYSTEM WITH SECONDARY DOOR STATIONS AND 1 MAIN COMMON DOOR STATION (multiple entrance) “A” “B” “C-D..” KM811 EX321 KM811 EX321 PT511E PT511E EX311 EX311 Agorà Agorà AG 00A AG 00A AG30 AG30 PL11PED PL11PED Profilo Profilo 1473 1473 MAS11PED...
- Page 64 Si 27MR/1 INTERCOM SYSTEM WITH SECONDARY DOOR STATIONS AND 2 MAIN COMMON STATIONS (multiple entrance) EXTERNAL DOOR STATIONS AGORA' series PROFILO series MATRIX series MODY series 2+X AG100A PL71÷PL73 MA71÷MA73 MD71÷MD74 AG100T 2+X PL81÷PL89 2+X MAS61÷MAS63 ( 2+X MD81÷MD812 AG20 2+X PL91÷PL99 * 2+X MA91÷MA93 * 2+X MD91÷MD912 *...
- Page 65 Si 27MR/1 INTERCOM SYSTEM WITH SECONDARY DOOR STATIONS AND 2 MAIN COMMON STATIONS (multiple entrance) “A” “B” KM811 EX321 KM811 EX321 “C-D..” Xn(A) Xn(B) PT511E PT511E EX311 EX311 KM811 EX321 KM811 EX321 PT511E PT511E EX311 EX311 Xn(A) X3(A) X2(A) Xn(B) X3(B) X2(B) secondary entrance "a"...
-
Page 66: One-Way System Diagrams
Si 211R/1 One-way system diagrams ONE-WAY INTERCOM SYSTEM Agorà AG 00A AG30 PL11PED MAS11PED MD11ED EX311 EX321 KM811 PT511E 127V PRS210ED 230V Mody Matrix Profilo Si 211R/5 ONE-WAY INTERCOM SYSTEM WITH INTERCOMMUNICATING SERVICE BETWEEN 2 INTERCOMS Agorà J1= 2-3 AG 00A AG30 PL11PED MAS11PED... - Page 67 Two-way intercommunicating system diagrams Si 212R/1 TWO-WAY INTERCOM SYSTEM WITH INTERCOMMUNICATING SERVICE BETWEEN 2 APARTMENTS Agorà J1= 1-2 AG 00A AG30 PL12PED MA12SPED MD12ED 1443ED PRS210 127V 127V PRS210ED 230V 230V Mody Matrix Profilo EX311 EX321 KM811 Note. In the door station AG100A cut the red wire to create the terminal “E” (see drawing 5b on page 18). Si 212R/3 TWO-WAY INTERCOM SYSTEM WITH INTERCOMMUNICATING SERVICE BETWEEN IN AN APARTMENT Agorà...
- Page 68 Si 214R/1 MULTI-WAY INTERCOM SYSTEM WITH A DOOR STATION AND SOME APARTMENTS WITH INTERCOMMUNI- CATING SERVICE EXTERNAL DOOR STATIONS AGORA' series PROFILO series MATRIX series MODY series AG100A PL71÷PL73 MA71÷MA73 MD71÷MD74 AG100T PL81÷PL89 MAS61÷MAS63 ( MD81÷MD812 AG20 PL91÷PL99 * MA91÷MA93 * MD91÷MD912 * AG21 PL10PED÷PL12PED...
- Page 69 Si 214R/1 Multi-way intercommunicating system diagrams MULTI-WAY INTERCOM SYSTEM WITH A DOOR STATION AND SOME APARTMENTS WITH INTERCOMMUNI- CATING SERVICE EX311 EX321 KM811 PT511E J1=2-3 KM811 EX321 ST701 1443ED EX321+ EX311+ EX301 EX301 127V 230V PRS210 EX311 ( C ) J1=2-3 EX321 KM811...
-
Page 70: Videointercoms
Notes - For audio compatibility we do not suggest to connect door stations MODY series with internal devices ECHOS series. - For the connection of name-plate lamps, read notes 6, 7 and 8 of the installation instructions on page 50. - Page 71 Si 41MR/2 MULTI-WAY MIXED INTERCOM AND VIDEOINTERCOM SYSTEM CONNECTED TO ONE EXTERNAL DOOR STATION Echos Compact DV2D DV4D Exhito Exhito KM811 PT511E EX321 EX311 KM811 EX321 EX311 PT511E Conversation privacy In case of conversation privacy func- tion, jumper W1 of the intercom and resistance R1 of module SM50 must be cut.
- Page 72 Notes - For audio compatibility we do not suggest to connect door stations MODY series with internal devices ECHOS series. - For the connection of name-plate lamps, read notes 6, 7 and 8 of the installation instructions on page 50.
- Page 73 Si 41MR/28 MULTI-WAY VIDEOINTERCOM SYSTEM CONNECTED TO ONE EXTERNAL DOOR STATION WITH SURVEIL- LANCE CAMERA Echos Compact DV2D DV4D Exhito Exhito Echos Compact DV2D DV4D Exhito Exhito CU.. AST.. CV01 APS.. 1 2 3 White TVT.. Black Green 1181E ADDITIONAL TERMINALS...
- Page 74 Notes - For audio compatibility we do not suggest to connect door stations MODY series with internal devices ECHOS series. - For the connection of name-plate lamps, read notes 6, 7 and 8 of the installation instructions on page 50.
- Page 75 Si 42MR/1 MULTI-WAY VIDEOINTERCOM SYSTEM CONNECTED TO TWO EXTERNAL DOOR STATIONS, ONE OF WHICH ONLY AUDIO Echos Compact DV2D DV4D Exhito Exhito Echos Compact DV2D DV4D Exhito Exhito PRS210 1181E entrance "a" entrance "b" AG100T AG100T PL2.. PL2.. 241DMA MA2..
- Page 76 - For wires dimensioning and video connection refer to the installation instructions and table on pages 50 and 51. - With Echos videointercoms series it is possible to monitor also the “b” entrance by connecting the terminal P1 of the Echos videointercoms to the terminal “4”...
- Page 77 Si 42MR/2 MULTI-WAY VIDEOINTERCOM SYSTEM CONNECTED TO TWO EXTERNAL DOOR STATIONS Echos Exhito DV2D DV4D Compact Echos Exhito DV2D DV4D Compact PRS210 1181E entrance "a" entrance "b" AG100T AG100T PL2.. PL2.. 241DMA MA2.. MA2.. 241DMA MD2.. Agorà MD2.. 241D Agorà...
- Page 78 - For wires dimensioning and video connection refer to the installation instructions and table on pages 50 and 51. - With Echos videointercoms series it is possible to monitor also the main entrance by connecting the terminal P1 of the Echos videointercoms to the terminal “5”...
- Page 79 Si 46MR/1 MULTI-WAY VIDEOINTERCOM SYSTEM WITH SECONDARY VIDEO STATIONS AND 1 MAIN COMMON VIDEO STATION (multiple entrance) “ C - D - .. ” “ A ” “ B ” Echos Echos Compact Compact DV2D DV2D xn(A) xn(B) DV4D DV4D...
- Page 80 Notes - For audio compatibility we do not suggest to connect door stations MODY series with internal devices ECHOS series. - For the connection of name-plate lamps, read notes 6, 7 and 8 of the installation instructions on page 50.
- Page 81 Si 46MR/2 MULTI-WAY VIDEOINTERCOM SYSTEM WITH SECONDARY DOOR STATIONS ONLY AUDIO AND 1 MAIN COMMON VIDEO STATION (multiple entrance) “ C - D - .. ” “ A ” “ B ” Echos Echos Compact Compact DV2D DV2D xn(A) xn(B)
- Page 82 Agorà door stations - For audio compatibility we do not suggest to connect door stations MODY series with internal devices ECHOS series. Attention. In the door station AG100V it is - For the connection of name-plate lamps, read notes 6, 7 and 8 of the necessary to cut and insulate the red wire installation instructions on page 50.
- Page 83 Si 46MR/9 ONE-WAY VIDEOINTERCOM SYSTEM WITH SECONDARY VIDEO STATIONS AND 1 MAIN COMMON VIDEO STATION “ A ” “ C - D - .. ” “ B ” Echos Echos Compact Compact Exhito Exhito Exhito Exhito 1181E 1181E Matrix Matrix...
- Page 84 - For audio compatibility we do not suggest to connect door stations Agorà door stations MODY series with internal devices ECHOS series. Attention. In the door stations AG100A and - For the connection of name-plate lamps, read notes 6, 7 and 8 of the AG100V it is necessary to cut and insulate installation instructions on page 50.
- Page 85 Si 46MR/15 ONE-WAY VIDEOINTERCOM SYSTEM WITH SECONDARY DOOR STATIONS ONLY AUDIO AND 1 MAIN COM- MON VIDEO STATION “ A ” “ C - D - .. ” “ B ” Echos Echos Compact Compact Exhito Exhito Exhito Exhito 1181E...
- Page 86 - For wires dimensioning and video connection refer to the installation instructions and table on pages 50 and 51. - With Echos videointercoms series it is possible to monitor also the (DS1) main entrances by connecting the terminals P1 and P2 of the Echos videointercoms respectively to the terminals “6”...
- Page 87 Si 47MR/1 MULTI-WAY VIDEOINTERCOM SYSTEM WITH SECONDARY VIDEO STATIONS AND 2 MAIN COMMON VIDEO STATIONS (multiple entrance) “ A ” “ B ” “ C - D - .. ” Echos Echos Compact Compact DV2D DV2D xn(A) xn(B) DV4D DV4D...
- Page 88 Working instructions. See page 52. Notes - For audio compatibility we do not suggest to connect door stations MODY series with internal devices ECHOS series. - For wires dimensioning refer to the installation instructions and table on pages 50. Agorà door station Note.
- Page 89 More than one application diagram can be overlaid on a multi-ways diagram. a) Application of 3 videointercoms and 1 intercom in parallel b) Application of 2 videointercoms and 1 inter- com in parallel EX311 EX311 KM811 KM811 Echos Compact 1281 Echos Exhito Exhito Compact EX321...
- Page 90 J1= 2-3 position 1-2 - Move jumper J12, on the back of Echos videointercoms to short circuits pin 1-2. - Set jumper J1, inside art.1443ED to position 2-3. - Instead a videointercom it is possible to install an intercom EX311, EX321 or KM811 wired as reported in the last example of this page.
- Page 91 - Move jumper J1, on the wall brackets WB3161 and WB8111 from position 2-3 to position 1-2 - Move jumper J12, on the back of Echos videointercoms to short circuits pin 1-2. - Set jumper J1, inside art.1443ED to position 1-2.
- Page 92 To make an intercommunicating call it is necessary: - with the videointercom switched OFF, pick up the handset (or press the button for Echos series) and be sure that there are not any other communications in progress; - press the push-button related to the videointercom or intercom to be called.
- Page 93 Si 414R/8 MULTI-WAY VIDEOINTERCOM SYSTEM WITH A DOOR STATION AND SOME APARTMENTS WITH INTERCOM- MUNICATING SERVICE EX3160+ KM8111+ EH9161+ WB3161 WB8111 9083 (WA9100) (TA9160) ( B ) J1 = 1-2 J1= 2-3 DV2D DV4D J1 = 1443ED EX3160+ EX3160+ EX321+ WB3161 WB3161 EX301...
- Page 94 (MT11 - Gb2012)
- Page 95 INTERCOMS VIDEOINTERCOMS TRADITIONAL INDEX Page Internal stations - Echos series videointercoms - Exhito series videointercoms - Exhito series intercoms - Compact series videointercoms - Compact series intercoms - Project series intercoms - Studio series intercoms - Studio series videointercoms External door stations...
- Page 96 . Back-box for video intercoms EH9160CT and EH9160CW. WA9100T . Wall adaptor for the EH9160CT videointercom. WA9100W . Wall adaptor for the EH9160CW videointercom. TA9160 . Table adapter for Echos videointercoms. Complete with EH9160C junction box and 2.4m connection cable with 20 wires. EH9100C (MT11 - Gb2012)
- Page 97 INTERNAL STATIONS Characteristics conversation with an external door station Orange LED. The LED lights-up when at Image brightness adjustment or another intercommunicating equipment; the terminal L+ is connected a positive - the videointercom is in programming op- voltage (8÷12Vdc). To signal an open-door Loudspeaker.
- Page 98 INTERNAL STATIONS ADJUSTMENTS function and increase the other one by to the door station, but continuing hearing the acting on the button or on the trimmer audio from the door station press shortly the Brightness adjustment. of the videointercom. button ;...
- Page 99 INTERNAL STATIONS EXHITO SERIES WB3160 . Wall bracket for EX3100C, EX3160 and EX3160C VIDEOINTERCOMS video intercoms with terminal boards for connection to the system. Terminals " Video signal input-output " Video ground (shielded coaxial) General ground Positive voltage input (18÷24Vdc) Microphone output Speaker and automatic switching OFF input Audio ground...
- Page 100 INTERNAL STATIONS EXHITO SERIES INTERCOMS Wall version " " 172.5 " " EX310 . White electronic intercom with two push-buttons, spiral cord, electronic micro- phone and possibility to insert an additional EX301 push-button and a SR41, RL36 or EX304 module (description and characteris- tics of the modules on page 13).
- Page 101 INTERNAL STATIONS EXHITO SERIES INTERCOMS TA320 Table version . Table adaptor with weighted base, junction box and 2.4m connection cable with 20 wires. Remove the cover of the junction box and connect wires to the termi- nals matching the colour of wire with that of the label.
- Page 102 INTERNAL STATIONS COMPACT SERIES VIDEOINTERCOMS 115.3 95.6 " " " " " KM 8100W KM 8600W KM 8800W KM 8100CW KM 8100W KM 8600W KM 8800W. . White colour videointercom . White colour videointercom White colour reflex videoin- with flat CRT, audio-video privacy, electronic with traditional cathode tube, audio-video pri- tercom, with audio-video privacy, electronic microphone and terminal board for the connec-...
- Page 103 INTERNAL STATIONS Installation Only for KM8100W and KM8800W models Fix the wall bracket at ap- proximately 1.5m (4' 11") distance from the floor. Fix the wall bracket by using 4 expansion plugs. aaaaaaaaa Only for KM8600W model ” 128.5 ” ”...
- Page 104 INTERNAL STATIONS COMPACT PROJECT SERIES SERIES INTERCOM INTERCOM 77.5 " " " " " " PT510EW. White electronic intercom with 1 KM810W. White electronic intercom with 1 button, spiral cord, electronic microphone, and button, spiral cord, electronic microphone, and possibility of installation of SR41 and SM50E possibility of installation of SR41, SM50E modules.
- Page 105 INTERNAL STATIONS COMPOSITION STUDIO SERIES COMPOSITION BOARD OF STUDIO SERIES INTERNAL STATIONS Wall version Intercom Monitor Videointercom ST720W intercom ST7100W B/W monitor ST7100W B/W monitor ST7100CW colour monitor ST7100CW colour monitor WB7100 wall bracket for monitor WB7100 wall bracket for monitor ST720W intercom WB700...
- Page 106 INTERNAL STATIONS INTERCOM Studio series Accessories " " ST 701. Single button module for ST720 intercoms. Maximum contact current is 0.1A. For higher currents use a relay. Note. For easier reference the 2 terminals of the " module are defined as C and P, but they have no "...
- Page 107 INTERNAL STATIONS ST 703. ST 715. ST 716. Ringing volume adjustment Switch module. It allows to acti- Switch module with LED. It allows switch. vate or deactivate one of the intercom functions to activate/deactivate/divert one of the inter- (for example call, door lock release, etc.). Maxi- com functions (for example call, door lock re- mum contact current is 0.1A.
- Page 108 INTERNAL STATIONS SM 50E TA 720W. Combination of additional modules . Private conversation module. Table adapter, white colour. Com- All modules described above can be installed When installed inside all the intercoms of the plete with junction box and 2.4m connection inside the ST 720 intercoms.
- Page 109 INTERNAL STATIONS MONITORS FIXING ELEMENTS " " With monitor ST7100 the video connection can be made with 75 Ohm coaxial cable or twisted pair. The choice between the two sys- 1 2 3 tems depends on the correct selection of video Y X P P 8 1 distributor and camera.
- Page 110 INTERNAL STATIONS INSTALLATION The modularity of the Studio articles permits the realisation of different WB 700. Bracket for fixing mechanically types of system. Some of the possible compositions are illustrated intercom ST 720 and/or accessories of Stu- below. dio line to monitor ST7100 or among them. - monitor only Complete with: - video intercom (see page 110)
- Page 111 INTERNAL STATIONS 2) Pass the connection cable through the hole on the back of the table adapter and block it with the cable clamp. 1 2 3 Y X P P 8 1 3) Connect the monitor cable to the bracket.
- Page 112 INTERNAL STATIONS VIDEO INTERCOM Installation steps for monitor ST7100 (or ST7100C), intercom ST720, brackets WB7100 and WB700 and table adapters (if required) for the realisation of an internal station with video intercom functions. 1 2 3 Wall version 2)Fix the 2 brackets to the wall following the indications of drawing 1 on page 108.
- Page 113 1 2 3 INTERNAL STATIONS 1 2 3 Y X P P 8 1 5) Connect the flat cable supplied with bracket WB700 to connector JP2 of bracket WB7100. 8) Connect the monitor cable to the bracket. 6) Hook the intercom base to bracket WB700 and connect the other end of the flat cable to connector JP2 of the intercom by passing the cable between the intercom base and the bracket.
- Page 114 INTERNAL STATIONS Table version 4) Screw the 2 metallic frames to the desk adapter TA7100 and hook the plastic frame to them. 1) Apply the 8 anti-slip rubber pads in their housings under the base of table adapters TA7100 and TA700. 5) Fix the table adapter TA700 to the 2 metallic frames.
- Page 115 EXTERNAL DOOR STATIONS PROFILO SERIES Module frames complete with back box Push-button panels in extruded aluminium and steel push-buttons made up of modular ele- ments. Suitable for the most diverse installa- tion requirements. The careful selection of modules allows for multiple application oppor- tunities;...
- Page 116 EXTERNAL DOOR STATIONS Push-button panel Video modules with integrated door speaker Modules with integrated door speaker PL41P PL42P PL40P with 1 call button and B\W with 2 call buttons and B\W without call buttons and PL11P PL12P PL10P camera camera with B\W camera PL41PC PL42PC...
- Page 117 EXTERNAL DOOR STATIONS Push-button panel Adjustments Video modules with integrated door speaker You can manually change the camera framing by unloosening and adjusting the horizontal and vertical screws in the de- ± 15° sired direction. PL40P. Modules complete with: 1 2 3 4 L+ M V H - CCD color camera with autoiris and fixed 3.6mm lens.
- Page 118 EXTERNAL DOOR STATIONS PROXIMITY READER FOR ACCESS INSTALLATION ACCESS CONTROL KEYPAD CONTROL PL42PCDG PL40PCDG FC 52PL FP52PL Access control keypad with 12 digits and 2 This article allows for the activation of 2 relays relays for lock release. 4 programmable ac- by means of keytags or electronic ISO cards cess codes for each relay.
- Page 119 EXTERNAL DOOR STATIONS Rain shelter Openings for cables. Fix lower part of the frame to the back box and make the electri- cal connections. Fix lower part of the frame to the rain shelter and make the electrical connections. Flush mounting and cables placing. Fixing of module frames to the upper side by Fixing of module frames to the upper side by the the 2 small screws included in the rain shelter.
- Page 120 EXTERNAL DOOR STATIONS 1 row push button 1 ROW PUSH BUTTON PANELS Examples of compositions in intercom systems 1 call button 6 call 2 call 4 call 8 call 10 call 11 call buttons 14 call buttons 17 call buttons 20 call buttons buttons buttons...
- Page 121 EXTERNAL DOOR STATIONS 2 row push button 2 ROW PUSH BUTTON PANELS Examples of compositions in intercom systems 2 call buttons 12 call 4 call 8 call 16 call 20 call 22 call buttons 28 call buttons 34 call buttons 40 call buttons buttons buttons...
- Page 122 EXTERNAL DOOR STATIONS 1 row push button 1 ROW PUSH BUTTON PANELS Examples of compositions in videointercom systems 1 call button 6 call 2 call 4 call 8 call 10 call 11 call buttons 14 call buttons 17 call buttons 20 call buttons buttons buttons...
- Page 123 EXTERNAL DOOR STATIONS 2 row push button 2 ROW PUSH BUTTON PANELS Examples of compositions in videointercom systems 2 call buttons 12 call 4 call 8 call 16 call 20 call 22 call buttons 28 call buttons 34 call buttons 40 call buttons buttons buttons...
- Page 124 EXTERNAL DOOR STATIONS MATRIX SERIES PUSH-BUTTONS MATRIX series Stainless steel anti-vandalism push-button panels Module frames complete with back box especially studied to withstand burglary, penetration of solids and water jets (IP 45 protection degree against the penetration of external solids and water; IK09 against shocks).
- Page 125 EXTERNAL DOOR STATIONS PUSH-BUTTONS MATRIX series Video modules with integrated door Modules with integrated door speaker speaker MAS10P. Amplified speaker unit with volume adjustment of 2 channels (reception MAS42. and transmission), steel front plate and red operation LED. Modules complete with: - CCD camera with autoiris, fixed 3.6mm lens and 6 MAS11P .
- Page 126 EXTERNAL DOOR STATIONS Adjustments ACCESS CONTROL KEYPAD You can manually change the camera framing by unloosening and adjusting the horizontal and vertical screws in the desired direction. (±15°) FC 52MAS . Electronic keypad with 12 keys and 2 relays for lock release and access control of door stations.
- Page 127 EXTERNAL DOOR STATIONS INSTALLATION Insertion of spacers between back boxes. Spacers and cable bushing (not supplied with the products) must be inserted before brick work. Flush mounting and cables placing. Place the push-button panel back box at a height of about 1.65m (5' 5") from the floor keeping the front edges flush-mounted and vertical to the finished plaster.
- Page 128 EXTERNAL DOOR STATIONS Fixing of frame to module frame. Connection of wires to module terminal boxes. Rain shelters aaaaaaaaaaaaaa aaaaaaaaaaaaaa aaaaaaaaaaaaaa aaaaaaaaaaaaaa aaaaaaaaaaaaaa aaaaaaaaaaaaaa aaaaaaaaaaaaaa aaaaaaaaaaaaaa aaaaaaaaaaaaaa aaaaaaaaaaaaaa aaaaaaaaaaaaaa aaaaaaaaaaaaaa aaaaaaaaaaaaaa aaaaaaaaaaaaaa aaaaaaaaaaaaaa aaaaaaaaaaaaaa aaaaaaaaaaaaaa Fixing of frame to back aaaaaaaaaaaaaa box.
- Page 129 EXTERNAL DOOR STATIONS Examples of compositions in intercom systems 1 call button 3 call buttons 7 call buttons 2 call 4 call 6 call 6 call buttons 8 call buttons 9 call buttons 10 call 10 call buttons buttons buttons buttons buttons 12 call buttons...
- Page 130 EXTERNAL DOOR STATIONS Examples of compositions in video intercom systems 3 call buttons 7 call buttons 1 call button 4 call 5 call 5 call buttons 6 call buttons 8 call buttons 9 call 9 call buttons buttons buttons buttons 10 call buttons 13 call buttons 14 call buttons...
- Page 131 EXTERNAL DOOR STATIONS MODY SERIES PUSH-BUTTONS Push-button panels in extruded aluminium made up Module frames complete with back box of modular elements. Suitable for the most diverse " " installation requirements. MD71. 72. 73. 74. Plastic back boxes complete with "...
- Page 132 EXTERNAL DOOR STATIONS PUSH-BUTTONS MODY series 1 row push-button modules ELECTRIC DOOR SPEAKER 25.5 Modules for electric door speaker (amplifier) " " " MD 10 MD 11 MD 12 without buttons 1 call button 2 call buttons MD 30. Button modules It consists of a double amplifier (receiver and transmitter) with adjustable volume of 2 chan- nels.
- Page 133 EXTERNAL DOOR STATIONS CAMERAS For the realisation of video intercom systems - Video intercom system with coaxial cable you must select the camera according to the - Video intercom system with twisted pair type of installation: Adjustments For system with coaxial cable For system with twisted pair If necessary, you can manually modify the cam- era position by means of the horizontal and...
- Page 134 EXTERNAL DOOR STATIONS PUSH-BUTTONS MODY series AMPLIFIED DOOR STATIONS ACCESS CONTROL KEYPAD PROXIMITY READER FOR ACCESS CONTROL " " " " " " " " " " MD 100. FC52P. 1 button module. " FP52. " Be used in all intercom, telephone, intercom- Access control keypad with 12 digits and 2 This article allows for the activation of 2 relays municating and video intercom systems.
- Page 135 EXTERNAL DOOR STATIONS PUSH-BUTTONS MODY series " aaaaaaaaaa Openings for cables. Place the push-button panel back box at a height of about 1.65m from the floor keeping the front edges flush-mounted and vertical to the finished plaster. Position the camera in such a way that sunlight or other direct or reflected light Mounting of button module.
- Page 136 EXTERNAL DOOR STATIONS PUSH-BUTTONS MODY series Alignment of the panel. Hood covers Mounting of frame bottom and door speaker (amplifier). Modules insertion and wall fixing of rain shelter. Fixing of the hood cover between the back box and the module frame. Rain shelters Top fixing of the panel.
- Page 137 EXTERNAL DOOR STATIONS 1 row push-button Examples of compositions of Mody push-button panels in intercom systems 1 call button 2 call 4 call 6 call 7 call 10 call 14 call 12 call 14 call 16 call buttons 19 call buttons buttons buttons buttons...
- Page 138 EXTERNAL DOOR STATIONS 1 row push-button Examples of compositions of Mody push-button panels in videointercom systems 1 call 2 call 4 call 6 call 10 call 7 call 10 call 12 call buttons 15 call buttons button buttons buttons buttons buttons buttons buttons...
- Page 139 EXTERNAL DOOR STATIONS 2 row push-button Examples of compositions of Mody push-button panels in intercom systems 2 call buttons 4 call 8 call 12 call 14 call 20 call 28 call 24 call 28 call 32 call buttons 38 call buttons buttons buttons buttons...
- Page 140 EXTERNAL DOOR STATIONS 2 row push-button Examples of compositions of Mody push-button panels in videointercom systems 2 call 4 call 8 call 12 call 20 call call 14 call 20 call 24 call buttons 30 call buttons buttons buttons buttons buttons buttons buttons...
- Page 141 EXTERNAL DOOR STATIONS UP series PUSH-BUTTONS UP series Surface mounted version Flush mounted version 42.5 " " " " " " UP 100. UP 11. Amplified push-button panel with 1 call button. Amplified push-button panel with 1 call button. Be used in all 4+1 intercom and intercommunicating systems. Be used in all 4+1 intercom and intercommunicating systems.
- Page 142 EXTERNAL DOOR STATIONS ErreP/R series PUSH-BUTTONS ErreP/R series AMPLIFIED DOOR STATIONS " " " " " R P 8 R P 4 R P 6 R P 2 R P 1 R P 1 2 R P 1 0 RP100. 1-button amplified door station. RP.
-
Page 143: Power Supplies
POWER SUPPLIES Power supplies are not provided with fuses, but they are protected against overloading or short- circuiting by a heat sensor (thermoprotector), to restore power, it is necessary to cut OFF the mains voltage for about one minute. Reconnect "... - Page 144 POWER SUPPLY AND CONTROL UNIT " " " 107.5 " " " " " " 1281. 1282E. 1281E. STABILIZED POWER SUPPLY WITH AUDIO-VIDEO TIMER. AUDIO-VIDEO POWER SUPPLY- SWITCHING REGULATOR. TIMER. Connected to the stabilized power supply Connected to the timer art.1282E, allows to art.1281, it allows a video intercom system to It allows to power in timed way (about 100 drive at low voltage a monitor (or 2 in parallel in...
- Page 145 SERVICE MODULES 1443E. INTERCOMMUNICATING MOD- ULE. Added inside the timer art.1282E, it allows for the intercommunicating service with privacy " " towards the external station. " " " " 1273TV. 1473. 7-CONTACT ANALOG EX- 4-CONTACT ANALOG CHANGER. CHANGER. It is used in systems with 2 or more video Used in systems with 2 or more door stations to entrances for switching automatically the video automatically switch audio lines and door lock...
- Page 146 SERVICE MODULES " " " " " " " " " 2443. GN30. AMPLIFIER-SWITCHER FOR IN- RL37. ELECTRONIC RINGING GENERA- RELAY MODULE. TERCOMMUNICATING SYSTEMS. TOR WITH 3 DIFFERENT SOUNDS. Relay module used to regenerate the elec- It is suitable for video intercom systems where It allows for differentiating calls from external tronic call for additional 3 intercoms or video it is necessary to have the intercommunicating...
- Page 147 SERVICE MODULES " " " " " " " " " 1471E. 1471. 1472. RELAY UNIT. RELAY UNIT. 2- CONTACT RELAY UNIT. It is used when it is not possible to actuate As 1471E, with lower number of terminals and As 1471E, with higher number of exchanges commands directly.
- Page 148 INSTALLATION INSTRUCTIONS General characteristics Background noise - The cable runs of intercom and video intercom installations must be To avoid possible background noise over the speech line, it is advis- kept separate from the mains or any other electrical installation as able: required by the International Safety Standards and the entire 5) not to lay intercom or telephone cables in the same runaway as the...
- Page 149 INSTALLATION INSTRUCTIONS VIDEO SIGNAL DISTRIBUTION WITH COAXIAL CABLE For the video signal use a TV 75Ω low loss coaxial cable. DV2-DV4. VIDEO SIGNAL DISTRIBUTORS. Monitors terminal board The resistance for terminate the video signal Technical data (75Ω) is located on the terminal board of the Power supply 12Vdc±2 monitor wall bracket.
- Page 150 INSTALLATION INSTRUCTIONS Technical data . VIDEO DISTRIBUTOR-AMPLIFIER. Power supply 21 ± 3Vdc Terminals It allows for the distribution of the video signal Operating current at max. load 250mA General ground coming from the cameras on 5 independent Gain at max. load from 0 to 3.5dB (adjustable) Positive power supply lines.
- Page 151 INSTALLATION INSTRUCTIONS VIDEO SIGNAL DISTRIBUTION WITH TWISTED PAIR If the distance between the camera and the last video intercom in the CONNECTION WITH FLOOR DISTRIBUTOR system is lower than 200 m, the connection can be made with The video wires of each video intercom are insulated from the riser. 2x0.35mm²...
- Page 152 INSTALLATION INSTRUCTIONS VIDEO SIGNAL CONVERSION FROM COAXIAL CABLE TO BALANCED LINE The Studio video intercom line allows for the realisation of video SYSTEMS WITH CCTV CAMERAS intercom systems by simply using a twisted pair and the camera MD41D. If the system includes colour cameras Matrix or Profilo series Installation or models for CCTV, you must use a video converter to transform the video signal from coaxial to balanced.
-
Page 153: Intercommunicating Intercoms
INTERCOMS Technical manual 11 Edition 2012 Installation diagrams INDEX Page Basic installation diagrams - Si 21MO/1 Intercoms connected to 1 external door station - Si 22MO/1 Intercoms connected to 2 automatically switched external door stations - Si 23MO/1 Intercoms connected to 3 automatically switched external door stations - Si 26MO/1 Intercom system with secondary door stations and 1 main common station (multiple entrance) - Si 26MO/2 One-way intercom system with secondary door stations and 1 main common station (multiple entrance) - Si 27MO/1 Intercom system with secondary door stations and 2 main common stations (multiple entrance) - Page 154 Si 21MO/1 INTERCOMS CONNECTED TO 1 EXTERNAL DOOR STATION Floor call This work diagram allows for differ- EXTERNAL DOOR STATIONS entiating the floor-call from the call from the push-button panel. PROFILO series MATRIX series MODY series PL71÷PL73 MA71÷MA73 MD71÷MD74 Floor-button PL81÷PL89 MAS61÷MAS63 ( MD81÷MD812...
- Page 155 Si 21MO/1 INTERCOMS CONNECTED TO 1 EXTERNAL DOOR STATION Compact Studio Project Exhito Mody Matrix Profilo PRS240 230V 127V (MT11 - Gb2012)
- Page 156 Si 22MO/1 INTERCOMS CONNECTED TO 2 AUTOMATICALLY SWITCHED EXTERNAL DOOR STATIONS EXTERNAL DOOR STATIONS Floor call PROFILO series MATRIX series MODY series This work diagram allows for differ- entiating the floor-call from the call PL71÷PL73 MA71÷MA73 MD71÷MD74 from the push-button panel. PL81÷PL89 MAS61÷MAS63 ( MD81÷MD812...
- Page 157 Si 22MO/1 INTERCOMS CONNECTED TO 2 AUTOMATICALLY SWITCHED EXTERNAL DOOR STATIONS Compact Studio Project Exhito PRS240 230V 127V Mody Matrix Profilo 1473 entrance "b" Mody Matrix Profilo entrance "a" (MT11 - Gb2012)
- Page 158 Si 23MO/1 INTERCOMS CONNECTED TO 3 AUTOMATICALLY SWITCHED EXTERNAL DOOR STATIONS EXTERNAL DOOR STATIONS Floor call PROFILO series MATRIX series MODY series This work diagram allows for differ- entiating the floor-call from the call PL71÷PL73 MA71÷MA73 MD71÷MD74 from the push-button panel. PL81÷PL89 MAS61÷MAS63 ( MD81÷MD812...
- Page 159 Si 23MO/1 INTERCOMS CONNECTED TO 3 AUTOMATICALLY SWITCHED EXTERNAL DOOR STATIONS Exhito Compact Studio Project PRS240 230V 127V Mody Matrix Profilo 1473 entrance "c" Mody Mody Matrix Matrix Profilo Profilo 1473 entrance "a" entrance "b" (MT11 - Gb2012)
- Page 160 Si 26MO/1 INTERCOM SYSTEM WITH SECONDARY DOOR STATIONS AND 1 MAIN COMMON STATION (multiple entrance) EXTERNAL DOOR STATIONS Floor call PROFILO series MATRIX series MODY series This work diagram allows for differ- entiating the floor-call from the call PL71÷PL73 MA71÷MA73 MD71÷MD74 from the push-button panel.
- Page 161 Si 26MO/1 INTERCOM SYSTEM WITH SECONDARY DOOR STATIONS AND 1 MAIN COMMON STATION (multiple entrance) “ A ” “ B ” “ C - D - .. ” xn(A) Xn(B) Exhito Compact Studio Project Exhito Compact Studio Project secondary entrance "b" secondary entrance "a"...
- Page 162 Si 26MO/2 ONE WAY INTERCOM SYSTEM WITH SECONDARY DOOR STATIONS AND 1 MAIN COMMON STATION (multiple entrance) Main DOOR STATION PROFILO series MATRIX series MODY series PL71÷PL73 MA71÷MA73 MD71÷MD74 PL81÷PL89 MAS61÷MAS63 ( MD81÷MD812 PL91÷PL99 * MA91÷MA93 * MD91÷MD912 * PL10P÷PL12P MAS10P÷MAS12P MD10÷MD124 PL21÷PL228...
- Page 163 Si 26MO/2 ONE WAY INTERCOM SYSTEM WITH SECONDARY DOOR STATIONS AND 1 MAIN COMMON STATION (multiple entrance) “ A ” “ B ” “ C - D - .. ” Exhito Compact Studio Project Exhito Compact Studio Project PRS240 PRS240 230V 230V 127V...
- Page 164 Si 27MO/1 INTERCOM SYSTEM WITH SECONDARY DOOR STATIONS AND 2 MAIN COMMON STATIONS (multiple entrance) EXTERNAL DOOR STATIONS Floor call This work diagram allows for differ- PROFILO series MATRIX series MODY series entiating the floor-call from the call from the push-button panel. PL71÷PL73 MA71÷MA73 MD71÷MD74...
- Page 165 Si 27MO/1 INTERCOM SYSTEM WITH SECONDARY DOOR STATIONS AND 2 MAIN COMMON STATIONS (multiple entrance) “ A ” “ B ” “ C - D - .. ” xn(A) Xn(B) Exhito Studio Project Exhito Studio Project Compact Compact secondary entrance "b" secondary entrance "a"...
- Page 166 Si 200L/7 STUDIO series INTERCOMMUNICATING INTERCOMS (2 to 7 us- COMPACT series INTERCOMMUNICATING INTERCOMS (max. ers) 2 users) Q.ty Article Description Q.ty Article Description ST 720W Studio series modular intercom KM810W Compact series intercom ST 701 Single button module ST 701 Single button module PRS226E Power supply-switcher...
- Page 167 Si 200L/7 Si 200L/8 STUDIO series INTERCOMMUNICATING INTERCOMS (2 to 7 EXHITO series INTERCOMMUNICATING INTERCOMS (2 to 8 us- ers) users) (MT11 - Gb2012)
- Page 168 Si 215L/5 5 INTERCOMMUNICATING INTERCOMS CONNECTED TO 1 EXTERNAL DOOR STATION WITH SINGLE CALLS EX320 INTERNAL STATIONS EXHITO series STUDIO series COMPACT series EX320 EX310 ST720W KM810W EX301 EX301 ST701 ST701 EXTERNAL DOOR STATIONS PROFILO series MATRIX series MODY series ST 720 PL71÷PL73 MA71÷MA73...
- Page 169 Si 215L/5 5 INTERCOMMUNICATING INTERCOMS CONNECTED TO 1 EXTERNAL DOOR STATION WITH SINGLE CALLS EX320 ST720 EX320 ST720 EX320 ST720 EX320 ST720 EX320 ST720 +EX301 +ST701 +EX301 +ST701 +EX301 +ST701 +EX301 +ST701 +EX301 +ST701 PRS226E C+ D Mody Matrix Profilo (MT11 - Gb2012)
- Page 170 Si 211L/5 5 INTERCOMMUNICATING INTERCOMS CONNECTED TO 1 EXTERNAL DOOR STATION WITH COMMON CALL. Call from external door station with alternate EX320 current. INTERNAL STATIONS EXHITO series STUDIO series COMPACT series EX320 EX310 ST720W KM810W EX301 EX301 ST701 ST701 SR41 SR41 SR41 SR41...
- Page 171 Si 211L/5 5 INTERCOMMUNICATING INTERCOMS CONNECTED TO 1 EXTERNAL DOOR STATION WITH COMMON CALL. Call from external door station with alternate current. SR41 EX320 ST720 EX320 ST720 EX320 ST720 EX320 ST720 EX320 ST720 +EX301 +ST701 +EX301 +ST701 +EX301 +ST701 +EX301 +ST701 +EX301 +ST701...
- Page 172 Si 211L/5S 5 INTERCOMMUNICATING INTERCOMS CONNECTED TO 1 EXTERNAL DOOR STATION WITH COMMON CALL EX320 INTERNAL STATIONS EXHITO series STUDIO series EX320 EX310 ST720W EX301 EX301 ST701 ST704 ST704 ST704 EXTERNAL DOOR STATIONS ST 720 PROFILO series MATRIX series MODY series PL71 MA71 MD71...
- Page 173 Si 211L/5S 5 INTERCOMMUNICATING INTERCOMS CONNECTED TO 1 EXTERNAL DOOR STATION WITH COMMON CALL PRS210 RL37 230V 127V EX320 ST720 EX320 ST720 EX320 ST720 EX320 ST720 EX320 ST720 +EX301 +ST701 +EX301 +ST701 +EX301 +ST701 +EX301 +ST701 +EX301 +ST701 +EX304 +ST704 +EX304 +ST704 +EX304...
- Page 174 Si 221L/5S 5 INTERCOMMUNICATING INTERCOMS CONNECTED TO 2 EXTERNAL DOOR STATIONS WITH COMMON CALL EX320 INTERNAL STATIONS EXHITO series STUDIO series EX320 EX310 ST720W EX301 EX301 ST701 ST704 ST704 ST704 EXTERNAL DOOR STATIONS ST 720 PROFILO series MATRIX series MODY series PL71 MA71 MD71...
- Page 175 Si 221L/5S 5 INTERCOMMUNICATING INTERCOMS CONNECTED TO 2 EXTERNAL DOOR STATIONS WITH COMMON CALL PRS210 RL37 230V 127V EX320 ST720 EX320 ST720 EX320 ST720 EX320 ST720 EX320 ST720 +EX301 +ST701 +EX301 +ST701 +EX301 +ST701 +EX301 +ST701 +EX301 +ST701 +EX304 +ST704 +EX304 +ST704 +EX304...
- Page 176 Si 261L/1S ONE-WAY INTERCOMMUNICATING SYSTEM WITH SECONDARY DOOR STATIONS AND 1 MAIN COMMON STATION (multiple entrance) INTERNAL STATIONS EXHITO series STUDIO series EX320 EX310 ST720W EX301 EX301 ST701 ST704 ST704 ST704 Main EXTERNAL DOOR STATIONS PROFILO series MATRIX series MODY series PL71÷PL73 MA71÷MA73 MD71÷MD74...
- Page 177 Si 261L/1S ONE-WAY INTERCOMMUNICATING SYSTEM WITH SECONDARY DOOR STATIONS AND 1 MAIN COMMON STATION (multiple entrance) “ A ” “ B ” EX310 EX320 ST720 +EX301 +EX301 +ST701 +EX304 +EX304 +ST704 EX320 ST720 EX310 +EX301 +ST701 +EX301 +EX304 +ST704 +EX304 PRS226E PRS226E Matrix...
- Page 178 Application diagrams APPLICATION DIAGRAMS FOR INTERCOMMUNICATING SYSTEM WITH SINGLE CALL FROM EXTERNAL STATION - To match with diagrams: Si 215L/5 2 INTERCOMMUNICATING INTERCOMS 3 INTERCOMMUNICATING INTERCOMS EX310 EX320 ST720 KM810 +ST701 +ST701 EX310 EX320 ST720 +EX301 +EX301 +ST701 EX320 EX320 EX310 to power supply to power supply...
- Page 179 Application diagrams 6 INTERCOMMUNICATING INTERCOMS EX320 ST720 +EX301 +ST701 ST720 EX320 - Do not forget to connect termi- to power supply nals C of the additional buttons. 7 INTERCOMMUNICATING INTERCOMS EX320 ST720 +EX301 +ST701 ST720 EX320 - Do not forget to connect termi- to power supply nals C of the additional buttons.
- Page 180 Application diagrams APPLICATION DIAGRAMS FOR INTERCOMMUNICATING SYSTEMS WITH COMMON ALTERNATE CURRENT CALL FROM EXTER- NAL STATION AND ELECTRONIC CALL FOR EXTENSIONS - To match with diagrams Si 211L/5 2 INTERCOMMUNICATING INTERCOMS 3 INTERCOMMUNICATING INTERCOMS SR41 SR41 EX310 EX320 ST720 KM810 +SR41 +SR41 +ST701...
- Page 181 Application diagrams 6 INTERCOMMUNICATING INTERCOMS SR41 EX320 ST720 +EX301 +ST701 +SR41 +SR41 ST720 EX320 - Do not forget to connect termi- nals C of the additional buttons to power supply and install the SR41 electronic buzzer in every intercom. SR41 7 INTERCOMMUNICATING INTERCOMS SR41 EX320...
- Page 182 Application diagrams APPLICATION DIAGRAMS FOR INTERCOMMUNICATING SYSTEMS WITH COMMON ELECTRONIC CALL FROM EXTERNAL STATION AND ELECTRONIC CALL FOR EXTENSIONS - To match with diagrams: Si 211L/5S; Si 221L/5S; Si261L/1S 2 INTERCOMMUNICATING INTERCOMS 3 INTERCOMMUNICATING INTERCOMS EX310 EX320 ST720 +EX304 +EX304 +ST701 +ST704 EX310...
- Page 183 Application diagrams APPLICATION DIAGRAMS FOR ONE-WAY INTERCOMMUNICATING SERVICES IN APARTMENT BUILDING SYSTEMS. ELEC- TRONIC CALL FROM THE DOOR STATION. - To match with diagrams: Si 21MO/1; Si 22MO/1; Si 23MO/1; Si 26MO/1; Si 27MO/1. 3 INTERCOMMUNICATING INTERCOMS PRS226E to riser EX320 ST720 EX310...
- Page 184 Application diagrams APPLICATION DIAGRAMS FOR ONE-WAY INTERCOMMUNICATING SERVICES IN APARTMENT BUILDING SYSTEMS. EXTERNAL CALL ON ELECTRONIC BUZZER. - To match with diagrams: Si 21MO/1; Si 22MO/1; Si 23MO/1; Si 26MO/1; Si 27MO/1. 3 INTERCOMMUNICATING INTERCOMS PRS226E to riser SR41 EX310 EX320 ST720 EX320...
- Page 185 Application diagrams WORKING INSTRUCTIONS ADDITIONAL BELL Basic systems For all the intercom systems, simply lift the handset to speak to the door If the ringing volume is not sufficient or if you need to chime the call in a station. The call is indicated by a sound signal on the loudspeaker of the different place, you can add an additional bell enabled by a relay.
-
Page 186: Troubleshooting
TROUBLESHOOTING PRELIMINARY CHECKS - Check for the presence of the mains voltage protector), to restore power, it is necessary to supply chapter). in the terminals 230Vac (or 127Vac) of the cut OFF the mains voltage for about one - Check that the cross section of the cables power supply. - Page 187 Working instructions Troubleshooting Additional diagrams - floor call - additional diagrams for Echos series - additional diagrams for Compact series - additional diagrams for one-way Exhito series - additional diagrams for multi-way Exhito series - additional diagrams for one-way Studio series...
- Page 188 Si 411O/1 ONE-WAY VIDEO INTERCOM SYSTEM CONNECTED TO ONE EXTERNAL DOOR STATION. Video connection with coaxial cable. INTERNAL STATIONS ECHOS series EXHITO series COMPACT series STUDIO series EH9100CT/CW EX3100C KM8100W ST7100CW EH9160CT/CW EX3160C KM8600W ST7100W 9083 EX3160 KM8800W ST720W WA9100T/W...
-
Page 189: Intercommunicating Videointercoms
- In order to use Profilo or Matrix push button panels, it is required to add CV01 video signal converter (please see on page 150). 230V - In order to use Exhito, Echos or Compact videointercoms, it is 127V 1281 required to add CV03 video signal converter (please see on page 199). - Page 190 - If the control switching ON is necessary, connect terminal 4 of the timer (dashed wire). - For audio compatibility we do not suggest to connect door stations MODY series with internal devices ECHOS series. - For the connection of name plate lamps read notes 6, 7 and 1281 8 of the installation instructions on page 146.
- Page 191 Si 41MO/1 VIDEO INTERCOM SYSTEM CONNECTED TO ONE EXTERNAL DOOR STATION ECHOS EXHITO STUDIO COMPACT ECHOS EXHITO STUDIO COMPACT 1281 1282E 230V 127V Matrix Mody Profilo MD30 MD41 MAS4. PL4.P (MT11 - Gb2012)
-
Page 192: Video Intercom System Connected To One External Door Station
For AC powered wires refer to the indications on page 146. - For audio compatibility we do not suggest to connect door stations MODY series with internal devices ECHOS series. - For one-way systems connect the twisted pair to the monitor bracket directly, without using the video distributor. - Page 193 Si 41MO/2 VIDEO INTERCOM SYSTEM CONNECTED TO ONE EXTERNAL DOOR STATION CV03 EXHITO COMPACT ECHOS DV2D DV4D STUDIO DV2D DV4D 1281 1282E 230V 127V Matrix Mody Profilo MD30 MAS4. PL4.P MD41D CV01 (MT11 - Gb2012)
- Page 194 - For audio compatibility we do not suggest to connect door stations module SM50E and: MODY series with internal devices ECHOS series. - (ST 720) - remove the mobile jumper inside the connector - For one-way systems connect the coaxial cable to the monitor bracket directly, without using the video distributor.
- Page 195 Si 41MO/3 MIXED INTERCOM AND VIDEO INTERCOM SYSTEM CONNECTED TO ONE EXTERNAL DOOR STATION ECHOS EXHITO STUDIO COMPACT ECHOS EXHITO Intercom without pri- vate conversation EX310 EX320 STUDIO COMPACT KM810 ST720 Intercom with private conversation EX310+ EX320+ KM810+ ST720+ SM50E...
- Page 196 - For audio compatibility we do not suggest to connect door MD2.. stations MODY series with internal devices ECHOS series. - For the connection of name plate lamps read notes 6, 7 and 8 of the installation instructions on page 146.
- Page 197 Si 41MO/5 VIDEO INTERCOM SYSTEM CONNECTED TO ONE EXTERNAL DOOR STATION WITH SURVEILLANCE CAMERA ECHOS EXHITO STUDIO COMPACT ECHOS EXHITO STUDIO COMPACT 1281 1282E 230V 127V CU.. AST.. APS.. TVT.. 1471 230V Profilo Mody Matrix (MT11 - Gb2012)
- Page 198 Notes - If monitoring function is required it is necessary to connect the dashed conductors and: to the video- - Echos series - verify that jumper J5, located on the back of videointercom, is in the intercoms position 2-3; - Exhito series (possibility of monitoring only the “a” entrance);...
- Page 199 Si 42MO/1 VIDEO INTERCOM SYSTEM CONNECTED TO TWO EXTERNAL DOOR STATIONS COMPACT EXHITO ECHOS STUDIO COMPACT ECHOS EXHITO STUDIO 1281 1282E 230V 127V “ “ “b“ Matrix Profilo Mody Mody Profilo Matrix MD30 MD30 MD41 MAS4. MAS4. MD41 PL4.P PL4.P...
- Page 200 - If monitoring function is required it is necessary to connect the dashed conductors and: intercoms - Echos series - verify that jumper J5, located on the back of videointercom, is in the position 2-3; - Exhito series (possibility of monitoring only the “a” entrance);...
- Page 201 Si 42MO/2 VIDEO INTERCOM SYSTEM CONNECTED TO TWO EXTERNAL DOOR STATIONS CV03 EXHITO COMPACT ECHOS DV2D DV4D STUDIO DV2D DV4D 1281 1282E 230V 127V “ “ “b“ Matrix Matrix Profilo Mody Mody Profilo MD30 MD30 MAS4. MD41D MAS4. MD41D PL4.P PL4.P...
- Page 202 - For audio compatibility we do not suggest to connect door stations MODY series with internal devices ECHOS series. - For the connection of name plate lamps read notes 6, 7 and 8 of the installation instructions on page 146.
- Page 203 Si 42MO/3 VIDEO INTERCOM SYSTEM CONNECTED TO TWO EXTERNAL DOOR STATIONS, ONE OF WHICH ONLY AUDIO ECHOS EXHITO STUDIO COMPACT ECHOS EXHITO STUDIO COMPACT 1281 1282E 230V 127V “ “ “b“ Matrix Profilo Mody Matrix Mody Profilo MD30 MD30 MAS1.P PL1.P...
- Page 204 - If monitoring function is required it is necessary to connect the dashed conductors and: - Echos series - verify that jumper J5, located on the back of videointercom, is in the position 2-3; - Exhito series (possibility of monitoring only the “a” entrance);...
- Page 205 Si 43MO/1 VIDEO INTERCOM SYSTEM CONNECTED TO THREE EXTERNAL DOOR STATIONS COMPACT ECHOS EXHITO STUDIO ST701 COMPACT EXHITO ECHOS STUDIO ST701 1281 1282E 230V 127V Matrix Mody Profilo MD30 1273TV MD41 MA4. PL4.P Matrix Profilo Mody Mody Profilo Matrix MD30 MD30 MA4.
- Page 206 - For audio compatibility we do not suggest to connect door stations MODY series with 1281E 127V internal devices ECHOS series. - If the control switching ON is necessary, connect terminal 4 of the timer (dashed wire). By adding 1281E to the schematics on page 205...
- Page 207 VIDEO INTERCOM SYSTEM WITH SECONDARY VIDEO STATIONS AND 1 MAIN COMMON VIDEO STATION (multiple entrance) “ A ” “ B ” “ C - D - .. ” COMPACT COMPACT EXHITO EXHITO ECHOS STUDIO ECHOS STUDIO xn(A) Xn(B) COMPACT EXHITO COMPACT...
- Page 208 5 C+ - For audio compatibility we do not suggest to connect door stations MODY series with 230V internal devices ECHOS series. 1281E 127V - If the control switching ON is necessary, connect terminal 4 of the timer (dashed wire).
- Page 209 VIDEO INTERCOM SYSTEM WITH SECONDARY VIDEO STATIONS AND 1 MAIN COMMON VIDEO STATION (multiple entrance) “ C - D - .. ” “ A ” “ B ” CV03 CV03 DV2D DV2D DV4D DV4D xn(A) Xn(B) ECHOS ECHOS EXHITO EXHITO COMPACT COMPACT STUDIO STUDIO DV2D DV2D DV4D DV4D 1281...
- Page 210 - For audio compatibility we do not suggest to connect door stations MODY series with 1281E 127V internal devices ECHOS series. - For the connection of name plate lamps read notes 6, 7 and 8 of the installation By adding 1281E to the schematics on page 209 instructions on page 146.
- Page 211 VIDEO INTERCOM SYSTEM WITH SECONDARY DOOR STATIONS ONLY AUDIO AND 1 MAIN COMMON VIDEO STATION (multiple entrance) “ C - D - .. ” “ A ” “ B ” COMPACT EXHITO COMPACT EXHITO ECHOS STUDIO ECHOS STUDIO xn(A) Xn(B) COMPACT COMPACT EXHITO...
- Page 212 230V 1281E 127V internal devices ECHOS series. - If the control switching ON is necessary, connect terminal 4 of the timer (dashed wire). - For the connection of name plate lamps read notes 6, 7 and 8 of the installation By adding 1281E to the schematics on page 211 instructions on page 146.
- Page 213 VIDEO INTERCOM SYSTEM WITH SECONDARY VIDEO STATIONS AND 1 MAIN COMMON STATION ONLY AUDIO (multiple entrance) “ C - D - .. ” “ A ” “ B ” COMPACT EXHITO COMPACT EXHITO ECHOS STUDIO ECHOS STUDIO xn(A) Xn(B) COMPACT EXHITO COMPACT...
- Page 214 8b 9b 10b 7b Notes - For audio compatibility we do not suggest to connect door stations MODY series with internal devices ECHOS series. - If the control switching ON is necessary, connect terminal 4 of the timer (dashed 230V wire).
- Page 215 Compact and Studio video intercoms you must move jumper J1 from position 2-3 1281 3D 4 C+ 2 to 1-2. 230V On the Echos series 1282E 127V videointercoms (EH9160) connect terminal X as shown in the installation diagram (MT11 - Gb2012)
- Page 216 8b 9b 10b 7b Notes - For audio compatibility we do not suggest to connect door stations MODY series with internal devices ECHOS series. - If the control switching ON is necessary, connect terminal 4 of the timer 230V (dashed wire).
- Page 217 M F H CV01 jumper J1 from position 2-3 to 1-2. 1281 3D 4 C+ 2 On the Echos series video- 230V 1282E 127V intercoms (EH9160) connect terminal X as shown in the installation diagram (MT11 - Gb2012)
- Page 218 Notes - For audio compatibility we do not suggest to connect door stations MODY series with internal devices ECHOS series. By adding 1281E to the schematics on page 217 - If the control switching ON is necessary, connect terminal 4 of the timer (dashed wire).
- Page 219 VIDEO INTERCOM SYSTEM WITH SECONDARY VIDEO STATIONS AND 2 MAIN COMMON VIDEO STATIONS (multiple entrance) “ C - D - .. ” “ A ” “ B ” COMPACT EXHITO COMPACT EXHITO ECHOS STUDIO ECHOS STUDIO xn(A) Xn(B) COMPACT EXHITO COMPACT...
-
Page 220: Troubleshooting
WORKING INSTRUCTIONS TROUBLESHOOTING Check that the connections of the system The probability of breakdown in the video-intercom The electric door lock does not function. systems is obviously greater than in the intercom Faulty lock. The cross section of the wires indi- are carried out correctly. -
Page 221: Additional Diagrams
Additional diagrams EXTENSION OF VIDEO INTERCOM SYSTEM All installation diagrams in this technical manual are drawn with only one video intercom for each user. It is possible to “personalise” the installation by properly matching the applications on the following pages (page 222 to 229) to the basic diagrams (page 189 to page 217). Such examples refer to applications with one video intercom entrance. - Page 222 Additional diagrams EXTENSION OF VIDEO INTERCOM SYSTEM Extension of ONE-WAY system Extension in one apartment of a MULTI-WAY system To realise a one-way system with several monitors and/or To realise a multi-way system with several video intercoms and/or intercoms in intercoms in parallel, with or without intercommunicating parallel in one apartment with or without intercommunicating service, you service, you must proceed as follows:...
- Page 223 Compact Studio push-button push-button Compact Studio Studio Exhito Exhito Project Studio Exhito Exhito Project Studio Studio Echos Echos Floor Floor ST720+ Intercom with push-button push-button SM50E+ Floor Floor ST720+ private conver- ST704 Intercom with push-button push-button SM50E+ sation...
- Page 224 ONE-WAY additional diagrams 1 VIDEO INTERCOM AND 1 INTERCOM WITH INTERCOMMUNI- 2 VIDEO INTERCOMS WITH INTERCOMMUNICATING SERVICE CATING SERVICE FOR ONE-WAY SYSTEMS FOR ONE-WAY SYSTEMS 1281 1471 230V 127V EX310 EH9160+9083 7 and X are terminals of the 1282E or PRS240 KM810 +ST701 EX320...
- Page 225 ONE/MULTI-WAY additional diagrams 1 VIDEO INTERCOM AND 1 INTERCOM WITH INTERCOMMUNI- 2 VIDEO INTERCOMS WITH INTERCOMMUNICATING SERVICE CATING SERVICE FOR ONE-WAY SYSTEMS FOR ONE-WAY SYSTEMS 1281 1471 230V 127V to terminal 7 of 1282E or PRS240 KM810+ KM8100+WB8600 ST701 KM8600+WB8600+8083 to terminal 7 of KM8800+WB8600 1282E or PRS240...
- Page 226 ONE-WAY additional diagrams 1 VIDEO INTERCOM AND 1 INTERCOM WITH INTERCOMMUNI- 2 VIDEO INTERCOMS WITH INTERCOMMUNICATING SERVICE CATING SERVICE 7 is a terminal of the 1282E or PRS240 EX310 EX3160+WB3160 EX3160+WB3160 EX3160+WB3160 7 is a terminal of the 1282E or PRS240 EX320 D = 100V-1A diode (type 1N4007).
- Page 227 MULTI-WAY additional diagrams 1 VIDEO INTERCOM AND 1 INTERCOM WITH INTERCOMMUNI- 2 VIDEO INTERCOMS WITH INTERCOMMUNICATING SERVICE CATING SERVICE RL37 2443 2443 230V 230V 230V 230V 127V 127V 127V 127V 7 9M GN30 1281 PRS210 PRS210 PRS210 EX3160+WB3160 EX3160+WB3160 EX3160+ EX320+ EX310+ WB3160...
- Page 228 ONE-WAY additional diagrams 1 VIDEO INTERCOM AND 1 INTERCOM WITH INTERCOMMUNI- 2 VIDEO INTERCOMS WITH INTERCOMMUNICATING SERVICE CATING SERVICE to terminal 7 of to terminal 7 of the 1282E or the 1282E or PRS240 PRS240 ST720+ ST701+ ST704 ST7100+ ST7100+ ST7100+ WB7100+ ST720+...
- Page 229 ONE-WAY additional diagrams 3 VIDEO INTERCOMS WITH INTERCOMMU- 1 VIDEO INTERCOM AND 3 INTERCOMS WITH INTERCOMMUNI- NICATING SERVICE CATING SERVICE RL37 PRS210 1281 to terminal IV 230V 230V 127V of the 1282E 127V 7 9M to terminal 7 of the 1282E or PRS240 ST720+ ST720+...
- Page 230 MULTI-WAY additional diagrams 1 VIDEO INTERCOM AND 1 INTERCOM WITH INTERCOMMUNI- 2 VIDEO INTERCOMS WITH INTERCOMMUNICATING SERVICE CATING SERVICE 230V 230V 127V 127V GN30 230V 230V 2443 127V 127V GN30 PRS210 PRS210 2443 PRS210 PRS210 D = 100V-1A diode (type 1N4007). D = 100V-1A diode (type 1N4007).
- Page 231 MULTI-WAY additional diagrams 3 VIDEO INTERCOMS WITH INTERCOMMUNICATING SERV- 3 VIDEO INTERCOMS AND 1 INTERCOM WITH INTERCOMMUNI- CATING SERVICE 2443 RL37 2443 RL37 1281 1281 230V 230V 230V 230V 127V 127V 127V 127V 7 9M 9R 7 9M PRS210 PRS210 D = 100V-1A diode D = 100V-1A diode (type 1N4007).
-
Page 232: Product List
Rain shelter for 12 modules (3 frames with 4 modules) DV4D 4-output video distributor MD222 Button module with 2 push-buttons, 2 row. Mody series EH9161CT Hands-free colour videointercom for Echos series EH9161CW Hands-free colour videointercom for Echos series MD224 Button module with 4 push-buttons, 2 row. Mody series EX301... - Page 233 Hood cover for 12 modules (3 frames with 4 modules) MD91 Rain shelter for 1 module. Mody series EH9100CW Hands-free colour videointercom for Echos series MD92 Rain shelter for 2 modules. Mody series EH9160CT Hands-free colour videointercom for Echos series MD93 Rain shelter for 3 modules.
- Page 234 Due to continuous technological evolution ACI FARFISA reserves the right to modify the products, technical specifications and installation diagrams contained in this manual at any time without prior notice. The diagrams and information contained in this manual have been carefully verified and are to be considered as reliable. However, ACI FARFISA is not responsible for any errors, inaccuracies or infringements to patents and third-party rights that may arise from using this manual.
- Page 235 TA720W Desk adapter for ST720W intercom Studio series TA7100W Desk adapter for Studio monitors TA9160 Desk adapter for Echos videointercoms UP11 Amplified door station with 1 button, flush mounted UP series UP12 Amplified door station with 2 buttons, flush mounted UP series UP100 Amplified door station with 1 button, surface mounted UP s.
- Page 236 ACI srl Via E. Vanoni, 3 60027 Osimo (An) Italy Tel. (+39) 071.7202038 Fax (+39) 071.7202037 info@acifarfisa.it www.acifarfisa.it...
Need help?
Do you have a question about the ECHOS and is the answer not in the manual?
Questions and answers