Table of Contents
Advertisement
Advertisement
Table of Contents

Related Manuals for Telstra SP817BB


Summary of Contents for Telstra SP817BB
- Page 1 ALL YOU NEED TO KNOW ABOUT YOUR NEW TELSTRA SP817BB CORDED PHONE PURCHASE...
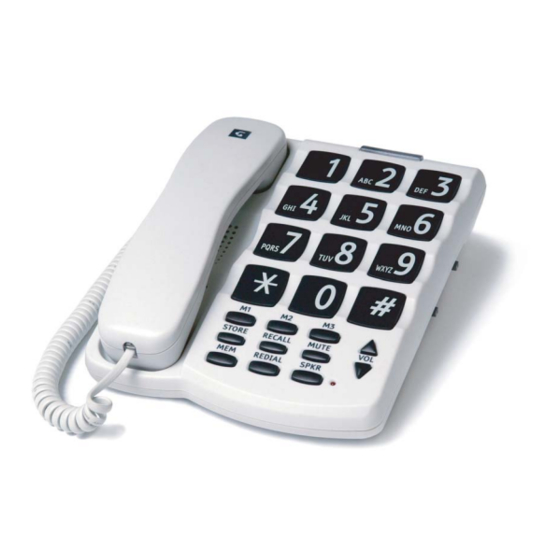
- Page 2 WELCOME You must be excited about your new phone. The buttons are bigger than others, which makes it easier to dial. There's a volume control to boost the receive volume level to make it easy for you to hear the phone. You can also turn up the ringing volume and there is a ring flasher to ensure you don't miss calls.
-
Page 3: Table Of Contents
WHAT’S INSIDE Introducing your new phone Before you get started Putting your phone together Plugging in Helpful tips to get you started Programing your most used numbers Voice Aid, Auxiliary input and other friendly features If you have a hearing aid Some important info Problem solving Know your phone inside out... -
Page 4: Introducing Your New Phone
INTRODUCING YOUR NEW PHONE... - Page 5 Handset connector (Not shown) Recall Button Access Telstra network features Store Button Store numbers in one-touch and two-touch memories Memory Button Store and dial two-touch memories Redial/Pause Button Redial last number called – Also used to insert pause when storing numbers...
- Page 7 Ringer Pitch / Ringer Off Switch Select low or high ringer pitch or switch ringer off Ringer Volume Switch Select low, medium or high ringer volume Desk/Wall Mounting Bracket Voice/Norm Switch Select Voice Aid or Volume Control Mode Auxiliary Input A 3.5mm socket for connection of disability activators e.g.
-
Page 8: Before You Get Started
BEFORE YOU GET STARTED Take a moment to check you have these items. They should all be included in the box your phone came in. Telephone Base Handset Desk/Wall Mounting Bracket Handset Cord Adaptor Plug Line Cord... -
Page 9: Putting Your Phone Together
PUTTING YOUR PHONE TOGETHER DESK STAND A reversible Desk/Wall Mounting Bracket is supplied with the telephone. This can be used as a desk stand to raise the angle of the telephone. For desktop installation attach the Desk/Wall Mounting Bracket as per the diagram below. - Page 10 WALL MOUNTING The telephone can be wall mounted on a standard telephone wall plate. To wall mount your telephone: 1. Remove and rotate the handset hook as follows: Push out hook Rotate hook Re-insert hook 2. Coil the Line Cord and fit inside the Desk/Wall Mounting Bracket as follows: approx 17cm approx 8cm (plugs into phone)
- Page 11 3. Attach the Desk/Wall Mounting Bracket to the base of the telephone as follows: 4. Plug the long end of the Line Cord into the telephone and the short end into the wall socket as follows:...
- Page 12 5. Place the telephone on the wall plate ensuring that the top post is inserted into the top slot on the back of the telephone. Ensuring the bottom post is aligned with either the bottom slot (Option 1) or the hole of the wall mounting bracket (Option 2) depending on the post spacing, push the telephone gently towards the wall plate and then firmly down to lock the phone in place on the wall plate as follows: Option 1...
-
Page 13: Plugging In
PLUGGING IN When you unpack the telephone you will need to ensure the Line Cord is plugged into the socket at the rear of the telephone and the handset is plugged into the socket on the side of the telephone. Plug the Line Cord into your telephone line socket, lift the handset and check for dial tone, then replace the handset. -
Page 14: Helpful Tips To Get You Started
HELPFUL TIPS TO GET YOU STARTED HANDSFREE OPERATION The telephone can be operated in Handsfree (Speaker) Mode which allows you to listen to the call and speak to the other party without using the handset. When using Handsfree Mode ensure you are facing the telephone and speak in a clear voice. - Page 15 ADJUSTING THE RINGER VOLUME The ringer has three levels, low L, medium M and high H. Set the Ringer Volume Switch to the desired position. ADJUSTING THE RINGER PITCH OR SWITCHING THE RINGER OFF The ringer pitch can be adjusted for High H or low L pitch or the ringer can be switched off.
-
Page 16: Programing Your Most Used Numbers
PROGRAMING YOUR MOST USED NUMBERS PROGRAMING THE ONE-TOUCH MEMORY BUTTONS (M1, M2, M3) Lift the handset or press SPKR, press STORE and dial the phone number, then press the desired memory location M1 to M3, then replace the handset or press SPKR. Hang up after programing each memory button. - Page 17 DIALLING FROM TWO-TOUCH MEMORY BUTTONS Lift the handset or press SPKR, wait for the dial tone, then press MEM and press the desired memory location 1 to 0. HOT KEY DIALLING This is a convenient feature that allows you to make a call without lifting the handset or pressing SPKR.
- Page 18 To program the desired level of Hot Key dialing – Lift the handset, press STORE, press VOL , press VOL , press MUTE then: press 1 for Level 1 press 2 for Level 2 press 3 for Level 3 press MEM for Level 4 Then replace the handset.
-
Page 19: Voice Aid, Auxiliary Input And Other Friendly Features
A power pack is needed when using an auxiliary switch with this telephone. For more information regarding the connection and use of an Auxiliary Input device and the supply of a power pack, call the Telstra Disability Enquiry Hotline on FREECALL™ on 1800 068 424 (a free call from most fixed phones). - Page 20 SPKR. PABX MODE If you are using your Telstra Big Button Telephone behind a PABX or KeySystem, you should program your phone for PABX operation. This will automatically insert a PABX access pause between the first and second digit when you use REDIAL.
- Page 21 HEADSET MODE You can replace the handset with a headset and your telephone can be programed for Headset Mode, which allows you to make and receive calls using the headset. To connect the headset, unplug the handset from your phone and plug the headset into the handset socket.
-
Page 22: If You Have A Hearing Aid
IF YOU HAVE A HEARING AID Your telephone provides boosted receive volume control to the handset for people who have difficulty hearing. If you have a hearing impairment but do not use a Hearing Aid, or if you use a Hearing Aid with its T-Switch set to normal (acoustic) mode, simply use the VOL and VOL keys to adjust the volume to a... - Page 23 SOME IMPORTANT INFORMATION RESETTING THE PHONE TO FACTORY DEFAULT To reset the telephone programing to factory default – Lift the handset, press STORE, press VOL , press VOL , press MUTE then dial #, #, #. Important – this will clear all memories and settings. IMPORTANT SAFETY INSTRUCTIONS Do not use the telephone during an electrical storm as it is possible to get a ®...
-
Page 24: Problem Solving
PROBLEM SOLVING IF THERE’S NO DIAL TONE Check that the telephone Line Cord is correctly plugged into the telephone socket at the back of your telephone and the other end is plugged into your wall socket. Check that the Handset Cord connectors at both ends are pushed in firmly until they click. -
Page 25: Know Your Phone Inside Out
Hearing aid compatibility Adjustable from –32dB to –8dB relative to 1A/m at 1kHz (Radial Field Strength) Headset wiring configuration As per Telstra T200/T400/T1000 wiring Auxiliary Input Wiring 3.5mm Mono phono plug, activated by momentary contact of the Tip/Sleeve Auxiliary Input Voltages Dry contact closure DC Connector Specification... - Page 26 If you are trying to access a Telstra Network Service and require assistance specifically related to the network service or would like to subscribe to the service, contact Telstra on 13 22 00 for residential or 13 20 00 for business.
- Page 27 VOLUNTARY PRODUCT WARRANTY In addition to your Statutory Rights and subject to the conditions below, VTech warrants that this product will be free from any defect in materials or workmanship under conditions of normal use for a period of 12 months from date of purchase.
- Page 28 FOR YOUR RECORDS Date of purchase: ........Place of purchase: ........Serial number: ........For Voluntary Product Warranty purposes proof of purchase is required so please keep your receipt. The benefits conferred by this Voluntary Product Warranty are in addition to other rights and remedies that are available to you under law, which cannot be excluded.
- Page 29 STATUTORY RIGHTS Our goods come with guarantees that cannot be excluded under the Australian Consumer Law. You are entitled to a replacement or refund for a major failure and compensation for any other reasonably foreseeable loss or damage. You are also entitled to have the goods repaired or replaced if the goods fail to be of acceptable quality and the failure does not amount to a major failure.
- Page 30 MAKE A NOTE OF YOUR STORED TELEPHONE NUMBERS HERE Name Number MEM, 1 MEM, 2 MEM, 3 MEM, 4 MEM, 5 MEM, 6 MEM, 7 MEM, 8 MEM, 9 MEM, 0...
- Page 31 TM and ® are trade marks and registered trade marks of Telstra Corporation Limited ABN 33 051 775 556...
- Page 32 FOR MORE INFORMATION: CALL 12 58880 VISIT telstra.com.au/disability VISIT A TELSTRA STORE OR PARTNER...
Need help?
Do you have a question about the SP817BB and is the answer not in the manual?
Questions and answers