Miele KWT 6321 UG Operating And Installation Instructions
Wine conditioning unit
Hide thumbs
Also See for KWT 6321 UG:
- Operating and installation instructions (60 pages) ,
- Operating and installation instructions (56 pages) ,
- Operating and installation instructions (60 pages)
Table of Contents

Related Manuals for Miele KWT 6321 UG


Summary of Contents for Miele KWT 6321 UG
- Page 1 Operating and installation instructions Wine conditioning unit To prevent the risk of accidents or damage to the appliance, it is essential to read these instructions before it is installed and used for the first time. en - AU, NZ M.-Nr. 09 886 940...
-
Page 2: Table Of Contents
Contents Guide to the appliance ..........4 Caring for the environment . - Page 3 Contents After Sales / Warranty ..........37 Warranty .
-
Page 4: Guide To The Appliance
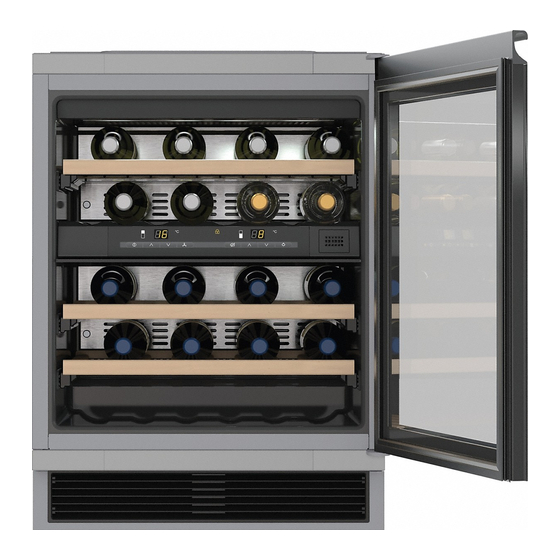
Guide to the appliance a For switching the entire g For switching the temperature and appliance on and off door alarms on and off b For setting the temperature in the h For setting the temperature in the upper wine conditioning zone lower wine conditioning zone (Y for warmer) (Y for warmer) - Page 5 Guide to the appliance a Lighting strip (in both wine conditioning zones) b Active AirClean filter c Control panel for the upper and lower wine conditioning zones / insulation plate for thermal separation of the zones d Insulation strip for thermal separation of the zones e Wooden shelves f Safety glass door with UV filter...
-
Page 6: Optional Accessories
The air filter behind the ventilation grille Care of stainless steel protects the cooling system from dust. – Each application of the Original Miele care product for stainless steel (in the bottle) forms a durable protective film that is stain and water resistant. -
Page 7: Caring For The Environment
Caring for the environment Disposal of the packing Disposing of your old material appliance The transport and protective packing Electrical and electronic appliances has been selected from materials which often contain materials which, if are environmentally friendly for disposal handled or disposed of incorrectly, and can normally be recycled. -
Page 8: Warning And Safety Instructions
They contain important notes on installation, safety, use and maintenance. Miele cannot be held liable for non-compliance with these instructions. Keep these instructions in a safe place and ensure that new users are familiar with the contents. - Page 9 The appliance is not suitable for use in areas where there is a risk of explosion. Miele cannot be held liable for damage resulting from improper or incorrect use of the appliance.
- Page 10 – ventilate the room where the appliance is located for several minutes, and – call Miele. The more coolant there is in an appliance, the larger the room it should be installed in. In the event of a leakage, if the appliance is in a small room, there is the danger of combustible gases building up.
- Page 11 If the connection cable is faulty, it must only be replaced by a Miele approved service technician to protect the user from danger. Do not connect the appliance to the mains electricity supply by a multi-socket unit or an extension lead. These do not guarantee the required safety of the appliance (e.g.
- Page 12 Repairs and other work by unqualified persons could be dangerous. Installation, maintenance work and repairs to electrical appliances must only be carried out by a Miele approved service technician. The manufacturer's warranty will be invalidated if the appliance is not repaired by a Miele approved service technician.
- Page 13 Do not operate any electrical equipment (e.g. an electric ice cream maker) inside the appliance. Danger of sparking and explosion! Use only genuine original Miele spare parts. If spare parts or accessories from other manufacturers are used, the warranty will be invalidated, and Miele cannot accept liability.
- Page 14 Warning and Safety instructions Cleaning and care Do not use any oils or grease on the door seal, as these will cause the seal to deteriorate and become porous with time. Do not use a steam cleaning appliance to clean this appliance. Pressurised steam could reach the electrical components and cause a short circuit.
- Page 15 Warning and Safety instructions Disposal of your old appliance Before disposing of an old appliance, first make the door lock unusable. This way you will prevent children from accidentally locking themselves in and endangering their lives. Be careful not to damage any part of the pipework whilst awaiting disposal, e.g.
-
Page 16: How To Save Energy
How to save energy Normal energy Increased energy consumption consumption Installation/Mainte In a ventilated room. In an enclosed, nance unventilated room. Protected from direct In direct sunlight. sunlight. Not situated near a heat Situated near a heat source source (radiator, oven). (radiator, oven). -
Page 17: Switching The Appliance On And Off
Switching the appliance on and off Before using for the first time Switching off ^ Clean the inside of the appliance and ^ Touch and keep your finger on the the accessories with lukewarm water On/Off sensor for the whole and a little washing-up liquid, and appliance until the temperature then dry with a soft cloth. -
Page 18: Switching Off For Longer Periods Of Time
Switching the appliance on and off Switching off for longer periods of time If the appliance is not going to be used for a longer period of time, e.g. whilst on holiday: ^ switch the appliance off, ^ disconnect the appliance from the By touching the sensors for setting the mains. -
Page 19: Temperature And Air Quality
Temperature and air quality Wine keeps on maturing depending on Safety device in case of low ambient the surrounding conditions. The length temperatures of time for which wine can be kept in To protect wine from low temperatures, good condition will therefore depend a safety thermostat ensures that the not only on the temperature but also on temperature in the appliance cannot fall... -
Page 20: Setting The Temperature
Temperature and air quality Insulation plate for thermal The two temperature zones are cooled alternately which means that, separation depending on the amount of wine being The appliance has a fixed insulation stored, it may take a few hours before plate which divides the cabinet into two the set temperatures are reached and different zones. -
Page 21: Temperature Display Brightness
Temperature and air quality ^ You can now change the brightness Temperature display brightness of the display by touching the The default brightness for the temperature setting sensors. You can temperature display is set to ^1. choose levels of brightness from 1 to To change the brightness of the 1: minimum brightness temperature display (the temperature... -
Page 22: Air Quality And Humidity
Temperature and air quality Air quality and humidity Switching on DynamicCooling A conventional refrigerator, with its low If you would like to use the wine humidity level, is not the best place to conditioning unit to store wine long store wine. It is very important to store term, we recommend that you keep the wine in an atmosphere with a high DynamicCooling function switched on. -
Page 23: Air Filtering With The Active Airclean Filter
The Active AirClean filter must be replaced after 12 months at the latest. New filters can be ordered from Miele (see end of this booklet for contact details). -
Page 24: Feature Lighting
– to make the lighting dimmer. closed. To switch the feature lighting off If the lights are damaged, please again: contact Miele to arrange for them to ^ Touch the feature lighting On/Off be repaired. sensor so that the indicator light goes out. -
Page 25: Storing Wine Bottles
Storing wine bottles Wooden shelves Vibration and movement have a negative effect on the maturing process, which can affect the taste of the wine. To avoid disturbing other bottles when removing a bottle of wine, store bottles of the same type beside each other on the same shelf. -
Page 26: Maximum Capacity
Storing wine bottles ^ To replace the shelf, click it into Maximum capacity place on the extended runners c. The notches on the wooden shelf fit into the retaining brackets. The magnetic strip should be pointing forwards. ^ Slide the wooden shelf back into the appliance as far as it will go. -
Page 27: Temperature And Door Alarm
Temperature and door alarm The unit is equipped with an alarm Switching the temperature alarm off system so that the temperature in both early temperature zones cannot rise or fall If the noise of the alarm disturbs you, unnoticed, thus possibly damaging the you can switch the alarm off early if you wine. -
Page 28: Automatic Defrosting
Automatic defrosting Condensate and frost can build up on the back wall of the appliance whilst the compressor is running. These are automatically removed and defrosted by the appliance. -
Page 29: Cleaning And Care
Cleaning and care Before cleaning Make sure that water cannot get into ^ Switch off the appliance. the electronic unit, ventilation grille ^ Disconnect the appliance from the or the lighting. mains. Switch off at the wall and Do not use a steam cleaner. Steam withdraw the plug from the socket, or switch off at the mains circuit could reach electrical components... -
Page 30: Ventilation Cut-Out
Cleaning and care ^ To clean stainless steel surfaces on Door seal the appliance, use the Original Miele ceramic and stainless steel cooktop Do not use any oils or grease on the cleaner. door seals as these will cause the... -
Page 31: Active Airclean Filter
^ Push the filter in and then release it. ^ Pull the filter out. The filter will lock into place automatically with an audible click. Active AirClean filters can be obtained from Miele (see end of this booklet for contact details). -
Page 32: Problem Solving Guide
Miele. If, after consulting this guide, you cannot remedy the problem, please contact Miele. Please note, however, that a call-out fee will be applied to unnecessary ser- vice visits where the problem could have been rectified as described in these operating instructions. - Page 33 Possible cause Remedy A dash is lit Only temperatures within up/flashing in the the range of the appliance temperature temperature display will be display. displayed. ^ Call Miele. "F0" or "F1" There is a fault. appears in the temperature display.
- Page 34 Problem solving guide Interior lighting Problem Possible cause Remedy ^ Call Miele. The interior lighting is not Do not remove the working. lighting covers. Should the covers be damaged or need to be removed due to damage, exercise caution. There...
- Page 35 Problem solving guide Other problems Problem Possible cause Remedy ^ Rectify the cause of the The alarm is The temperature in the zone sounding and the has risen higher or fallen lower alarm. The temperature temperature than the temperature set. This display will stop flashing and the alarm will stop.
-
Page 36: Noises
Noises Normal noises What causes them Brrrrr ... A humming noise is made by the motor (compressor). This noise can get louder for brief periods when the motor switches on. Blubb, blubb ... A gurgling noise can be heard when coolant is circulating through the pipes. -
Page 37: After Sales / Warranty
2 years. For more information on the See back cover for contact details. manufacturer's warranty specific to your country, please contact Miele. When contacting Miele, please quote the model and serial number of your See the end of this booklet for appliance. -
Page 38: Electrical Connection
Electrical connection All electrical work should be carried out Do not connect the appliance to the by a suitably qualified and competent mains electricity supply by an extension person in strict accordance with current lead or a plug adapter. Extension leads local and national safety regulations. -
Page 39: Installation
– The mains connection socket must not be located directly behind the Please contact Miele for information appliance and must be easily on which combinations are suitable accessible. for your appliance. – The plug and mains connection... -
Page 40: Climate Range
Installation Climate range The appliance is designed for use within a certain climate range (ambient temperatures) and should not be used outside this range. The climate range of the appliance is stated on the data plate inside the appliance. Climate range Ambient room temperature +10 °C to +32 °C... -
Page 41: Appliance Dimensions
Installation Appliance dimensions Before installation, ensure the building-in niche is the correct size. The specified ventilation cross-sections must be adhered to and the cut-out in the plinth facing for the ventilation grille supplied must be aligned centrally with the appliance in order to ensure the correct functioning of the appliance. The ventilation grille and foam block supplied must be fitted and used together. - Page 42 Installation View from above...
-
Page 43: Changing The Door Hinging
Changing the door hinging The door hinging should be changed by authorised service personnel only. Two people are needed for changing the door hinging. This appliance is delivered with right-hand door hinging. If you wish to use left-hand hinging, the hinges must be changed: Spread a suitable covering on the floor in front of the appliance to... - Page 44 Changing the door hinging ^ Take off the upper retaining bracket ^ Remove the hinge bracket at the top e and fit it to the opposite side. g and the cover cap h on the opposite side. ^ Push out the bushing. ^ Remove the retaining bracket at the bottom right f of the appliance and ^ Switch the positions of the cover cap...
- Page 45 Changing the door hinging ^ Unscrew the door opening angle limiter j from the lower hinge bracket i. ^ Screw the door opening angle limiter j onto the other hinge bracket k. ^ Place one washer over the hinge pin and the other washer between the door and the screw.
-
Page 46: Building-Under The Appliance
Building-under the appliance Preparing the appliance Due to the size and weight of the appliance, it is essential that The air filter prevents soiling of the installation is carried out by two compressor compartment to ensure people. efficient functioning of the appliance. - Page 47 Building-under the appliance ^ Position the appliance in front of the niche. ^ Unscrew the adjusting feet b clockwise to 4 mm less than the height of the niche. You can unscrew the adjusting feet using the spanner c supplied or an Allen key d.
-
Page 48: Aligning The Appliance To Taller Furniture Doors
Building-under the appliance Aligning the appliance to taller furniture doors If adjacent furniture doors a are taller Align the appliance horizontally and than the wine conditioning unit door, vertically. the wine conditioning unit can be If it is not level, the appliance can aligned to the unit doors using a filler distort. - Page 49 Building-under the appliance ^ Fix the bracket d to the back of the A bracket d (available from Miele) is filler panel b. required to secure the filler panel. ^ Pull the appliance as far as you need The filler panel can be fitted above or below the appliance as required.
-
Page 50: Placing The Appliance In The Niche
Building-under the appliance Placing the appliance in the Securing the appliance in the niche niche ^ The appliance stands forward of the Make sure that the electrical cable furniture doors evenly by 2 mm. does not become trapped or ^ Open the appliance door. damaged as you push the appliance into its niche. -
Page 51: Adjusting The Lateral Alignment Of The Appliance Door
Building-under the appliance ^ Close the door and check that the side edges of the door are aligned with the side walls of the appliance. Adjusting the lateral alignment of the appliance door If the appliance door is not aligned with the housing side walls, the appliance door can be adjusted using the screws underneath the hinges. - Page 52 Building-under the appliance ^ Fit the plinth facing g in position. The cut-out in the plinth facing must be aligned centrally with the appliance. ^ Fit the covers e. ^ Insert the foam block f supplied in ^ Insert the ventilation grille h in the the appliance plinth.
- Page 55 Miele Australia Pty. Ltd. ACN 005 635 398 ABN 96 005 635 398 Miele Center and Head Office Melbourne: 1 Gilbert Park Drive Knoxfield, VIC 3180 Miele Center and Office Melbourne: 206-210 Coventry Street South Melbourne, VIC 3205 Miele Center and Office Sydney:...
- Page 56 KWT 6321 UG en - AU, NZ M.-Nr. 09 886 940 / 02...
Need help?
Do you have a question about the KWT 6321 UG and is the answer not in the manual?
Questions and answers