Table of Contents
Advertisement
Advertisement
Table of Contents

Related Manuals for Simmons SD600


Summary of Contents for Simmons SD600
- Page 1 OWNER’S MANUAL OWNER’S MANUAL www.simmonsdrums.net SimmonsDrums.net...
-
Page 2: Safety Instructions
OWNER’S MANUAL SAFETY INSTRUCTIONS THE LIGHTNING FLASH WITH ARROWHEAD SYMBOL WITHIN AN EQUILATERAL TRIANGLE IS INTENDED TO ALERT THE USER TO THE PRESENCE OF UNINSULATED DANGEROUS VOLTAGE WITHIN THE PRODUCT’S ENCLOSURE THAT MAY BE OF SUFFICIENT MAGNITUDE TO CONSTITUTE A RISK OF ELECTRIC SHOCK TO PERSONS. THE EXCLAMATION POINT WITHIN AN EQUILATERAL TRIANGLE IS INTENDED TO ALERT THE USER TO THE PRESENCE OF IMPORTANT OPERATING AND MAINTENANCE(SERVICING) INSTRUCTIONS IN THE LITERATURE ACCOMPANYING THE PRODUCT. APPARATUS SHALL NOT BE EXPOSED TO DRIPPING OR SPLASHING AND THAT NO OBJECTS FILLED WITH LIQUIDS, SUCH AS VASES, SHALL BE PLACED ON THE APPARATUS. Read these instructions. 12. Use only with the cart, stand, tripod, Keep these instructions. bracket, or table specified by the Heed all warnings. manufacturer, or sold with the Follow all instructions. -
Page 3: Congratulations
POWER SUPPLY • Turn the power switch OFF when the SD600 is not in use. • The AC adapter should be unplugged from the AC outlet if the SD600 is not to be used for an extended period of time. -
Page 4: Table Of Contents
Auto Power Mode ........25 SD600 DRUM MODULE OPERATION Factory Reset . -
Page 5: Assembled Kit
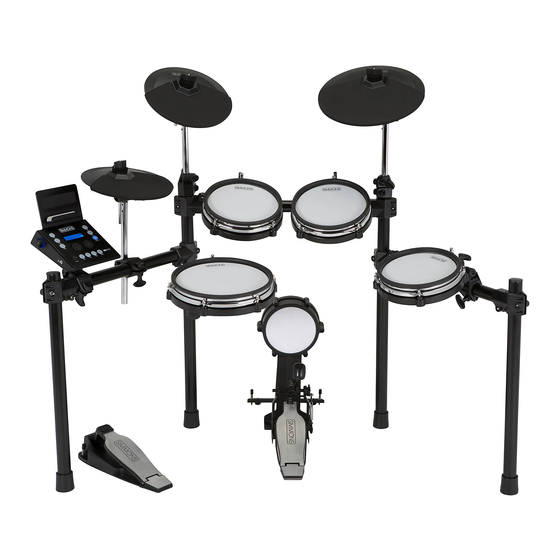
FINAL ASSEMBLED KIT... -
Page 6: Features
OWNER’S MANUAL FEATURES SD600 SOUND MODULE GENERAL FEATURES POLYPHONY • Voices - 64 SOUND • Drum Voices - 336 • Drum Kits - 35 Preset / 10 User • Songs - 3 Preset / 10 User EFFECTS • Reverb - Hall1, Hall2, Room1, Room2, Room3, Stage1, Stage2, Plate, Delay, Echo, Off. -
Page 7: Assembling Your Kit
ASSEMBLING YOUR KIT INSIDE THIS PACKAGE Before assembly, please make sure that all the items listed below are present. Cymbals Accessories Single Zone with Choke Single Zone Single Zone AC Adaptor Multi-pin Cable Harness 10” Crash Cymbal Pad 10” Hi-Hat Cymbal Pad 12”... - Page 8 5. Loosen L-rod wing nuts on tom clamps. Insert textured plastic of L-rod into tom clamps and tighten wing nuts. 6. Loosen wing nuts on pads. 7. Attach pads to L-rods and tighten wing nut on Tom Pads. NOTE: We recommend putting the SD600 on a drum rug to keep the components together.
- Page 9 ASSEMBLING YOUR KIT ATTACHING THE CYMBAL PADS 1. Insert each cymbal arm into the rack clamp. 2. Insert short hi-hat arm on the left-side arm’s cymbal clamp. 3. Remove wing nut from cymbal tilter. Place cymbal pad on tilter assembly. 4.
- Page 10 OWNER’S MANUAL ASSEMBLING YOUR KIT BASS DRUM AND HI-HAT PEDAL 1. Place the hi-hat pedal on the floor and to the left, as illustrated below. 2. Connect the kick drum beater pedal to the front of the kick drum pad. 3.
-
Page 11: Connections
CONNECTIONS CONNECTING THE SOUND MODULE AND PADS CAUTION! To prevent electric shock and damage to the device, make sure the power is switched OFF on the sound module and all related devices before making any connection. Using the provided cables, connect the 1/4” jacks to the The voice of the hi-hat pad is controlled by the hi-hat pedal. -
Page 12: Ac Adapter
‘closed hi-hat’. When it is in-between, it is “semi-open hi-hat.” Use the included hook-and-loop strips to retain cable to rack. AC ADAPTER The SD600 module uses an external power supply called an AC Adapter. This plugs into the back of the module. -
Page 13: Connecting Audio Equipment
2. The volume from the module is adjusted with the VOLUME knob. 3. You can connect a standard pair of headphones the SD600 module to listen to your electronic drum set without disturbing others. Connect the headphones to the 1/8” headphone jack located on the side panel of the drum module. -
Page 14: Connecting Midi Devices And Computers
MIDI messages through a single USB cable, USB is used only for MIDI messages (MIDI via USB). The SD600 module will appear as “SD600” in the USB device options of your software. NOTE: When the USB is connected to a computer, all... -
Page 15: Sd600 Drum Module Operation
SD600 DRUM MODULE OPERATION TOP PANEL Kit Button Record Button Save Button Used to enter the Record Enters the Save menu when Volume Knob it is available mode Song Button Edit Button Click Button Access Song Mode Enters Edit Mode on kits and Turns the Click/Metronome Songs. -
Page 16: Bottom Panel
Crash 2 / Tom 4 ¼” pad inputs for expanding your kits by connecting extra pads or triggers USB Port Used for connecting the SD600 module to a computer AUX Input Stereo 1/8” jack to connect CD or MP3 players to the module. -
Page 17: Quick Start Operations
QUICK START OPERATIONS TURNING THE POWER ON THE MODULE 1. Connect the AC Adapter to the drum module. 2. Press the power switch on the top panel to turn on the module. NOTE: There is an automatic power off function that turns off the module when the kit is not being used for a certain period of time. -
Page 18: Listening To The Demo Songs
LISTENING TO THE DEMO SONGS The demo songs help to show you the capabilities and sounds of the SD600 module. There are three demos in the module. You can also access these by pressing the SONG button and selecting one of the first three songs. -
Page 19: Kit Mode - Advanced
KIT MODE - ADVANCED EDITING A KIT 1. Press the KIT button. 2. Press the EDIT button to see the screen for the current sound 3. Strike a drum pad to view the Voice currently assigned 4. Press the EDIT button to move to the first parameter to be changed on the current sound. -
Page 20: Rename A Kit
OWNER’S MANUAL KIT MODE - ADVANCED RENAMING A KIT 1. Select a User Kit.( Preset Kits cannot not be renamed) 2. Press the -/+ buttons to choose the User kit for save. 3. Press the SAVE button to rename the User Kit. 4. -
Page 21: Song Mode
SONG MODE PLAYING A SONG 1. Press SONG, select a song number, then PLAY to play a song. 2. Press the PLAY button to stop playback of the song. NOTE: You can temporarily change the tempo of a song while playback is in progress. -
Page 22: Recording A Song
OWNER’S MANUAL RECORDING A SONG TO RECORD 1. Press the Song Button 2. Select a User Song 3. Press the Record button. You will hear the Click metronome sound count in. Begin playing the song after the count off. 4. After you record your song you can also rename the song, Press SAVE button to save and rename. -
Page 23: Utility Mode
UTILITY MODE The Utility mode is for the main functions of the module such as trigger setup for the pads, MIDI setup, and saving global settings. Trigger Settings You can set the parameters of each drum and cymbals pad in the Trigger menu. -
Page 24: Midi Local Settings
OWNER’S MANUAL UTILITY MODE MIDI NOTE The SD600 module can send pad strikes as MIDI notes to your computer or tablet. This screen allows you to customize the MIDI note number sent when each pad is struck. 1. Press the UTILITY button. The first parameter is for the trigger settings. -
Page 25: Auto Power Mode
UTILITY MODE AUTO POWER MODE Enable: If you don’t use the SD600 for 30 min, the module will automatically shut down. Disable: The module will not shut down automatically. (Default setting) FACTORY RESET There may be occasions where you want the module to return to the factory settings. -
Page 26: Appendix
OWNER’S MANUAL APPENDIX Voice List Voice List Bank Screen Name Bank Screen Name Kick 22x18 Map Snare 14x5 GtdRS Kick 20x14 Vntg Snare 14x5GtRSHi Kick 20x14 VnLo Snare 14x5 AL CS Kick 24x16 '60s Snare PiccUrb CS Kick 26x14Acylc Kick 20x20Bubga Toms 10"... - Page 27 APPENDIX Voice List Voice List Bank Screen Name Bank Screen Name Toms 16" Gated HiHat 14" P Opn Toms 16" VnMpLo HiHat 14" P sOpn Toms 16" Bubgna HiHat 14" S Clsd Toms 16" BubDmp HiHat 14" S Ped Toms 18"...
- Page 28 OWNER’S MANUAL APPENDIX Voice List Voice List Bank Screen Name Bank Screen Name Perc TmbLo Dyn Perc Beer Can 2 Perc Tumba Dyn Perc Boat Horn Perc Clave Perc Chainlink Perc Afr Shkr 1 Perc Chair 1 Perc Bata Ly Lo Perc Chair 2 Perc...
- Page 29 APPENDIX Voice List Voice List Bank Screen Name Bank Screen Name Perc BangZi E Kick 808 Kick 1 Perc MuYu-1 E Kick 808 Kick 2 Perc MuYu-2 E Kick Tekno Kick Perc BangZi2 E Kick Fuzzy Bass Perc XiangBan1 Perc PaiGu-Low E Snare SDS7Snare1...
- Page 30 OWNER’S MANUAL APPENDIX Voice List Voice List Bank Screen Name Bank Screen Name E Tom SDSV Tom 5 E Perc 808 Crash E Tom SDSV Tom 6 E Perc SDS7 Cymb E Tom SDSV Tom 7 E Perc SDSV Cym 1 E Tom SDSV Tom 8 E Perc...
-
Page 31: Kit List
APPENDIX Kit List Kit List Kit Name Kit Name Pop Life Modern Maple User Kit 1 Acrylic Fusion User Kit 2 User Kit 3 Classic Rock User Kit 4 Funk Rock 70's Rock User Kit 5 Gated Dreams User Kit 6 User Kit 7 Jazz User Kit 8... -
Page 32: Midi Implementation Charts
OWNER’S MANUAL APPENDIX MIDI Implementation Chart Function Transmitted Recognized Remarks Basic Default 10 CH Only 1-16 CH Channel Changed 1-16 CH Mode Default Mode 3 Mode 3 Messages Altered ********** Note 0~127 0~127 Number: True voice ********** 0~127 Velocity Note ON O 9nH,v=1-127 O 9nH,v=1-127 Note OFF... - Page 34 OWNER’S MANUAL...
-
Page 36: Warranty
OWNER’S MANUAL WARRANTY Two (2) Years limited warranty Subject to the limitations set forth below, Simmons® hereby represents and warrants that the components of this product shall be free from defects in workmanship and materials, including implied warranties of merchantability or fitness for a particular purpose, subject to normal use and service, for two (2) years to the original owner from the date of purchase.
Need help?
Do you have a question about the SD600 and is the answer not in the manual?
Questions and answers