Table of Contents
Advertisement
Quick Links
Advertisement
Table of Contents

Subscribe to Our Youtube Channel
Related Manuals for Sound Devices 970


Summary of Contents for Sound Devices 970
- Page 1 Rack Mount Production Audio Recorder User Guide and Technical Information Firmware rev. 2.02 E7556 State Rd. 23 and 33, Reedsburg, WI, USA www.sounddevices.com +1 (608) 524-0625 • Toll-Free: (800) 505-0625 • fax: +1 (608) 524-0655 support@sounddevices.com...
-
Page 3: Table Of Contents
Sound Devices File Format . . . . . . . . . . . . . . . . . . - Page 4 970 User Guide and Technical Information Network Grouping Grouped Settings . . . . . . . . . . . . . . . . . . . . . . . . . . . . . . . 27 Group Auto-Configuration .
-
Page 5: Limitation Of Liability
LATED TO OR ARISING OUT OF ITS CONTRACTS WITH ITS CUSTOMERS OR OTHER THIRD PARTIES. NOTWITHSTANDING AND WITHOUT LIMITING THE FOREGOING, IN NO EVENT SHALL SOUND DEVICES BE LIABLE FOR ANY AMOUNT OF DAMAGES IN EXCESS OF AMOUNTS PAID BY THE END USER FOR THE PRODUCTS AS TO WHICH ANY LIABILITY HAS BEEN DETERMINED TO EXIST. -
Page 7: Manual Conventions
970 User Guide and Technical Information Introduction The Sound Devices 970 is rack-mountable, 64 track audio recorder. The 970 records up to 64 chan- nels of monophonic or polyphonic, 24-bit WAV files from any of its 144 audio inputs. Connections include 64 channels of Ethernet-based Dante, 64 channels of optical and coaxial MADI, eight chan- nels of line-level analog, and eight channels of AES digital. -
Page 8: Panel Descriptions
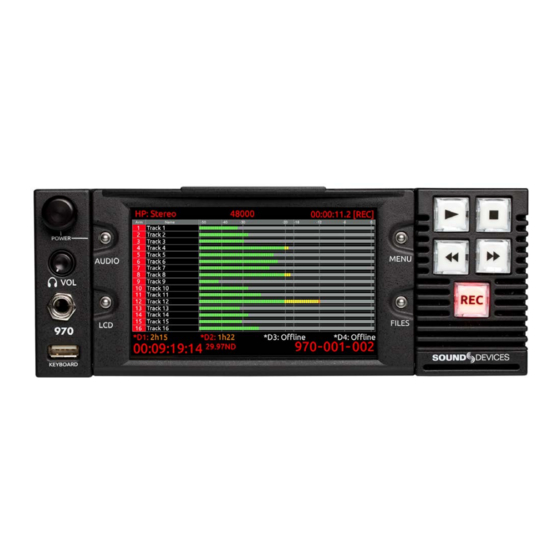
970 User Guide and Technical Information Panel Descriptions Front Panel Control Knob LCD Display The Control Knob can be both turned and 5-inch display; 800x480 resolution. pressed. Use the Control Knob to navi- FILES Button gate between menu settings and to select Displays the File List View. -
Page 9: Rear Panel
970 User Guide and Technical Information Fast Forward button Headphone Volume Knob When Stopped, press to cue up the next Adjusts the overall volume of the head- file for Playback. During Playback or phones. NOTE: the headphone output is Pause, press once to jump to the next Cue capable of ear-damaging levels. - Page 10 970 User Guide and Technical Information MADI I/O (BNC) Analog Audio Output (XLR) Input (top) accepts MADI (AES10) digital 2 channels of balanced, line-level analog audio. Output (bottom) provides MADI audio outputs. (AES10) digital audio. 64 channels. Ethernet (RJ-45) Timecode I/O (BNC) Attaches to 1G or 100M Ethernet net- Input (top) accepts SMPTE timecode.
-
Page 11: Pix-Caddy 2 And Pix-Caddy Cf (Optional)
PIX-CADDY CF is an accessory to connect approved CompactFlash cards to the front-panel drive bays (Supports poly WAV File Format only). When removed from a 970, the PIX-CADDY 2 operates as a high-speed drive interface to Mac OS and Windows computers via the onboard FireWire800, USB 3.0, or the optional PIX-DOCK Thunderbolt interface. -
Page 12: Menu And Navigation
970 User Guide and Technical Information Menu and Navigation Main View The Main View displays all audio input levels and provides configuration of Track Arming, Track Naming, Input Source selection, Input Gain, and Input Delay. The Main View by default displays 16 tracks at a time. -
Page 13: Lcd
Control Knob. Press LCD again to exit the LCD Control Panel. Menu Press the MENU Button (keyboard: F1) to enter the Setup Menu. Most settings of the 970 are ac- cessed and changed from the Setup Menu. Navigate between menu items by turning the Control Knob. -
Page 14: File List
970 User Guide and Technical Information File List Press FILES (keyboard: F2) to display a list of all of the recorded takes (File List). Takes are arranged chronologically and grouped by Reel. Turn the Control Knob to highlight an item. Press the PLAY Button to start playback of the highlighted take. - Page 15 970 User Guide and Technical Information The selected drive is displayed on the top of the screen. To view the contents of other drives, scroll to the top of the list. A box appears with a list of all available drives. Select the desired drive and press the Control Knob.
- Page 16 970 User Guide and Technical Information File functions are also available in the Take Details Screen: • Delete: Deletes the take or file (Confirmation dialog). (See “Deleting a File”, page • Notes, Scene, Take, Track Names, and Circled: Edit iXML / bEXT metadata of audio takes.
-
Page 17: Audio Inputs
1 and 2 XLR Analog Audio Inputs, respectively. Digital Inputs The 970 accepts digital audio from AES3, MADI, and Dante sources. The sample rate is determined by the [Audio - Sample Rate] when [Timecode/Sync - Sync Ref] is set to Internal. Otherwise, the sample rate is determined by the selected synchronization reference. - Page 18 Dante audio device on the same Dante network. Should they be necessary, sample rate converters are automatically activated for all Dante audio inputs. An input Source can be set to an available Dante channel from the 970 or from the Dante Controller application (Available from Audinate’s website: http://www.audinate.com/) running on a computer at- tached to the network.
-
Page 19: Choosing Audio Sources
970 User Guide and Technical Information Dante Redundancy When [Network - Dante Redundancy Mode] is set to On, the 970’s Primary and Secondary Ethernet ports both transmit Dante Audio data over separate networks. This provides a fail safe of the Dante system if one of the networks should fail. -
Page 20: Input Delay Control
970 User Guide and Technical Information The gain value of each analog input channel is common. Adjusting the input gain of a track with an analog input source will adjust the gain of all inputs that have that analog channel assigned as the input source. -
Page 21: Audio Outputs
Audio Outputs The 970 features a total of 82 unique output channels. Any of the internal 64 tracks can be routed to each of the 8 analog outputs, 8 AES3 outputs, and 64 MADI outputs. Internal tracks 1 through 64 are permanently routed to Dante outputs 1 through 64 respectively. -
Page 22: Ethernet
970 User Guide and Technical Information Ethernet The PRI and SEC Ethernet ports on the rear panel of the 970 are used for a variety of functions and features: • Dante (64-Channel Audio I/O over network) (See “Dante Audio Inputs”, page • Network Grouping... -
Page 23: Recording
• The Setup Menu is not accessible. If the 970 is not ready to record when a record command is given, the unit will enter a Record Pending state. In this state the Record Button will flash red, and the system will automatically enter record when it becomes ready. -
Page 24: Track Arming
When Setup Menu option [Timecode/Sync - Sync Ref] is set to Internal, the sampling rate is set from Setup Menu option [Audio - Sample Rate]. The current Sample Rate is displayed on the top- middle Main Screen. All digital input signal is sample rate converted to the 970’s sampling rate. External Synchronization... -
Page 25: Bit Depth
Frame Rate was already set to 23.97 in which case it will remain at 23.97. Bit Depth The 970 records either 16 or 24 bit WAV files. The bit depth for is set from the Setup Menu option [Audio - Bit Depth]. - Page 26 The sample rate that the file was originally recorded at (and that is stamped in the file’s header) will be ignored by 970 during playback, and the 970 will play the file at the current sample rate, as determined by Setup Menu option [Timecode/Sync - Sync Ref].
-
Page 27: Play List
Files can be added to a Play List to be played back in a specific order. Play List functions are accessed from the File Detail view of any file. By default, the 970 will play files in the order that they are ar- ranged in the File List. - Page 28 970 User Guide and Technical Information Add to Play List will add the file to the end of the Play List. Remove from Play List will remove the file from the Play List and decrease the position of all files above in the Play List. Empty Play List will clear the Play List completely (note that this function affects the entire Play List).
- Page 29 (audio or camera) run at different rates - the beginning of files from each may have zero offset, but by the end they drift apart. The 970 was designed with these problems in mind and includes the most comprehensive and powerful synchronization features available in a production recorder.
-
Page 30: Internal Ambient® Lockit: Timecode Generator
Freerun Auto Mute Functions the same as Freerun mode except timecode signal is muted from the timecode output when the 970 is in Stopped mode. This allows rec-run functionality when Rec Run mode is not suit- able (e.g. Multi-camera shoots). - Page 31 24h Run Auto Mute Functions the same as 24h Run mode except timecode signal is muted from the timeocde output when the 970 is in Stopped mode. This allows rec-run functionality when Rec Run mode is not suit- able (e.g. Multi-camera shoots).
- Page 32 The 970 features an advanced powering system with 2 redundant DC Inputs (on rear XLR4M con- nections) and PowerSafe technology. Two power sources can be attached simultaneously. When mul- tiple power sources are connected, the 970 uses only one source at a time. The order of precedence for power sources is: 1. DC Input 1 (Primary power source)
-
Page 33: Network Grouping
Setup Menu option [Network - Network Group] assigns the 970 to one of four available groups. In this section, the term “unit” refers to PIX 250i, PIX 270i, or PIX 260i Video Recorders, or the 970 Audio Recorder, unless otherwise specified. -
Page 34: Group Auto-Configuration
970 User Guide and Technical Information Group Auto-Configuration When changes are made to a Network Group, all units in the group must auto-configure. It is im- portant to allow all units in the group to complete auto-configuration before proceeding with any grouped operations (Transport control, settings changes, etc). -
Page 35: External Control
External Control RS422 The 970 conforms to the Sony P2 (9-pin) machine control standard over RS422. The 970 acts as a slave only, not as a master. To enable RS422 set [Remote Control - RS422] to On. The following table lists all commands supported by the 970 as well as how those commands are supported on three popular RS422 controllers. - Page 36 Setup Menu option The 970’s web IP address must be determined before accessing PIXNET: 1. Make sure that the 970 is powered on and connected to a network or directly to a computer via one of the rear panel Ethernet connectors.
- Page 37 27). Click on the Name to open the Unit Page for that particular unit. Address Bar Video Input Details Type in 970 IP Address to connect to Displays the resolution, frame rate, and PIXNET. source (SDI or HDMI) of incoming video signal.
- Page 38 970 User Guide and Technical Information PIXNET Unit Page The Unit page allows for near full remote control of the 970 via the web browser. All Units Page button Group Click to return to All Units Page. Displays current Group setting, quickly...
- Page 39 Not all 970 menu items or features are available from PIXNET. Clips Menu The Clips Menu is the PIXNET version of the 970 File List. From the Clips Menu, select a drive. The currently selected drive contents are displayed. Reel, File name and location, creation date, and file size are all displayed.
-
Page 40: Triggering Recording From External Timecode
Timecode/Sync Menu settings are displayed and can be edited directly from the web browser. Remote Menu The Remote Menu provides quick access via the web browser to the 970 Remote Control menu op- tions. Menu settings are displayed and can be edited directly from the web browser. -
Page 41: Gpio (General Purpose Input / Output)
The [Timecode/Sync - Auto Record Hold Off] feature is designed to eliminate these issues. When a hold off value is applied, the 970 will begin capturing the mo- ment timecode begins rolling but will only go into record if a valid timecode signal is present after the hold off time has elapsed. - Page 42 970 User Guide and Technical Information USB Keyboard The 970 supports standard USB keyboards connected to the USB A connector on the front panel. The keyboard can be used to navigate menus, enter text, and control 970 Transport functions. The follow- ing table shows common functions for an attached keyboard: Keyboards with integrated USB hubs are not supported.
-
Page 43: Storage And File Management
The 970 formats and writes to an exFAT filesystem. The exFAT filesystem is readable and writable by Mac OS X, Windows 8, Windows 7, and Windows Vista. Storage devices to be used with the 970 must be formatted by the 970. - Page 44 Once filled, they will be put into Ethernet File Transfer mode. File Management The 970 provides several tools for file management and metadata entry. File management of files to be recorded is managed in File Storage. File management for files previously recorded is handled in the File List.
-
Page 45: Folder Structure
Do not copy unsupported files from a computer (or any other host device) to a drive that is intended to be used by the 970. If this occurs, it is advisable to format the drive with the 970 before making new record- ings. - Page 46 Ethernet are dependent on network traffic and many other factors. To transfer files between the 970 and another network device: 1. Attach an Ethernet cable from either 970 Ethernet port to a computer or a LAN (Local Area Network) connection.
- Page 47 FileSafe Utility and the Sound Devices File Format During recording, the 970 will store data in a temporary file format with the extension .sda. When the recording is completed, the file is converted to its standard .wav format. In the event of unintend- ed drive removal or power loss during recording, these files can be recovered by the 970 recorder itself or with the FileSafe software utility.
-
Page 48: Metadata
970 User Guide and Technical Information Metadata 970 Broadcast Wave Files include iXML (revision 1.5) data and bEXT chunk data. For bEXT and iX- ML-aware software applications this data is available. For applications that don’t recognize bEXT or iXML, this information is ignored. The following chart details the supported metadata parameters. - Page 49 The reel can be considered a container for all assets generated during a recording session or day’s work. It is intended to indicate what reel the recording is part of. The 970 will create a folder at the root level for each Reel. Recorded files are placed inside the current Reel folder. This value is alpha- numeric.
- Page 50 970 User Guide and Technical Information Editing Metadata Metadata can be edited from the 970 before, during, or after recording. Metadata edits to a take will ripple to that same take on all drives. Metadata can be edited from the Take Details screen or from the Quick Metadata Screen.
- Page 51 970 User Guide and Technical Information 1. Press AUDIO to access the Main View. 2. Rotate the Control Knob to select the desired track. 3. Press the Control Knob to focus the highlighter on the selected track’s parameters. The high- lighter will become orange and focus on a single column in the track.
-
Page 52: Setup Management And Firmware Upgrades
The Setup Menu option [Quick Setup - Load Factory Settings] loads a setup that is saved internally to the 970 when it leaves the factory. It is possible to alter this “factory” setup, so that the Setup Menu option [Quick Setup - Load Factory Settings] will load a custom default. - Page 53 970 User Guide and Technical Information 5. The Setup Menu will be shown with a colored background. There will be check boxes next to each menu item. Navigate the menu with the Control Knob or keyboard arrows, as usual. 6. To change the visibility of an item in the Setup Menu, press the spacebar on the keyboard while the item is highlighted.
- Page 54 .prg file has been located, highlight the OK button and press the Control Knob to begin the firmware update. 5. The 970 will verify that the file is not corrupted, then it will update the firmware. When done the unit will need to be powered down and then back up.
-
Page 55: Setup Menu Options
970 User Guide and Technical Information Setup Menu Options The Setup Menu controls a wide range of parameters for the 970. The parameters are organized into categories, making the Setup Menu easy to navigate. The following tables show the parameter name, a description, options available, and the factory default setting where applicable. -
Page 56: Audio
970 User Guide and Technical Information Audio Parameter Name Description Options » Poly File Format Set recording to be mono or poly WAV files. • Mono • 44.1 kHz • 47.952k • 47.952kF » 48k Sample Rate The sample rate of recorded .wav files •... -
Page 57: Timecode/Sync
» Freerun • Freerun Auto Mute Sets the running mode for the internal timecode • Record Run Timecode Mode generator and/or the method which the 970 receives • 24h Run SMPTE timecode. • 24h Run Auto Mute • Ext TC (LTC) •... -
Page 58: Remote Control
» Active high When the function is true, the pin will be grounded. Network Parameter Name Description Options Sets name of 970. This must be unique within a This 970’s Name » 970 network. Grouping Sub-menu for network grouping settings. - Page 59 Parameter Name Description Options Determines power on and off method. When set to Always on, the 970 will turn on and off when external • Always On Power DC is applied. When Use Power Switch is selected the » Use Power Switch 970 is powered on and off using a key combination of AUDIO Button + Control Knob press.
- Page 60 970 User Guide and Technical Information Parameter Name Description Options Displays a dialog that shows all shortcut button combi- Shortcuts nations. This is not a setting, but a helpful reference. Displays a dialog indicating firmware version and Version Info serial number. This is not a setting, but a helpful refer- ence.
-
Page 61: Button Shortcuts
970 User Guide and Technical Information Button Shortcuts Button Combination Effect AUDIO + Control Knob rotate Change HP source. AUDIO + LCD From the Main View: Solo the highlighted channel in the headphones. LCD + Control Knob press Adjust LCD and button brightness. -
Page 62: Connector Pin Assignments
970 User Guide and Technical Information Connector Pin Assignments Connector Pin Assignments Notes 1–ground Pins 2 and 3 unused. When using a XLR4M (2) 2–float single power source, use Primary con- (Primary and Second- 3–float nector (top). (See “Powering”, page ary DC Input) 4–DC+... - Page 63 970 User Guide and Technical Information 1–Input 8 signal (+) 2–Input 8 Ground 3–Input 7 signal (-) 4–Input 6 signal (+) 5–Input 6 Ground 6–Input 5 signal (-) 7–Input 4 signal (+) 8–Input 4 Ground 9–Input 3 signal (-) 10–Input 2 signal (+) 11–Input 2 Ground...
- Page 64 970 User Guide and Technical Information 1–Digital Out 4 signal (+) 2–Digital Out 4 Ground 3–Digital Out 3 signal (-) 4–Digital Out 2 signal (+) 5–Digital Out 2 Ground 6–Digital Out 1 signal (-) 7–Digital In 4 signal (+) 8–Digital In 4 Ground 9–Digital In 3 signal (-)
-
Page 65: Specifications
Two, front-mounted Sound Devices approved 2.5-inch drives (PIX-CADDY 2) or CF cards mounted drives (PIX-CADDY CF) eSATAp conected drives Two, rear panel eSATAp ports for drives meeting Sound Devices specifications, supplies 5V @ 2A See Sound Devices’ website for a list of approved media: www.sounddevices.com/approved... -
Page 66: Usb Keyboard
970 User Guide and Technical Information Timecode and Sync Modes Supported Freerun, Frerun Auto Mute, 24 Hour run, 24 Hour run Auto Mute, Record run, External timecode, External timecode Halt Frame Rates 23.976, 24, 25, 29.97DF, 29.97ND, 30DF, 30ND Accuracy •... - Page 67 970 User Guide and Technical Information Declaration of Conformity According to EN ISO/IEC 17050-1:2004 Manufacturer’s Name: Sound Devices, LLC Manufacturer’s Address: E7556 State Rd. 23 and 33 Reedsburg, WI 53959 Declares under sole responsibility that the product as delivered Product Name:...
- Page 68 Sound Devices, LLC product, even if Sound Devices, LLC has been advised of the possibility of such damages.
- Page 69 Sound Devices hosts a user support forum. The URL is: http://forum.sounddevices.com Sound Devices cannot guarantee that a given computer, software, or operating system configuration can be used satisfactorily with the 970 Audio Recorder based exclusively on the fact that it meets our minimum system requirements.
- Page 72 970, v 2.02 - Printed in U.S.A.
Need help?
Do you have a question about the 970 and is the answer not in the manual?
Questions and answers