Table of Contents
Advertisement
Advertisement
Table of Contents

Related Manuals for Samsung SDS-V4040


Summary of Contents for Samsung SDS-V4040
-
Page 1: Channel Dvr
8 CHANNEL DVR User Manual SDS-V4040... -
Page 2: User Manual
Disclaimer Samsung Techwin makes the best to verify the integrity and correctness of the contents in this document, but no formal guarantee shall be provided. Use of this document and the subsequent results shall be entirely on the user's own responsibility. Samsung Techwin reserves the right to change the contents of this document without prior notice. -
Page 3: Important Safety Instructions
overview imporTAnT SAfeTy inSTruCTionS Read these operating instructions carefully before using the unit. Follow all the safety instructions listed below. Keep these operating instructions handy for future reference. Read these instructions. Keep these instructions. Heed all warnings. Follow all instructions. Do not use this apparatus near water. - Page 4 9. If this product fails to operate normally, contact the nearest service center. Never disassemble or modify this product in any way. (SAMSUNG is not liable for problems caused by unauthorized modifications or attempted repair.) 10. When cleaning, do not spray water directly onto parts of the product. Doing so may cause fire or electric shock.
-
Page 5: Before Start
• SAMSUNG retains the copyright on this manual. • This manual cannot be copied without SAMSUNG’s prior written approval. • We are not liable for any or all losses to the product incurred by your use of non-standard product or violation of instructions mentioned in this manual. -
Page 6: Table Of Contents
overview ConTenTS overview Important Safety Instructions Before Start Contents Features Part Names and Functions (Front) Part Names and Functions (Rear) Remote Control ConneCTinG wiTh oTher deviCe installation Checking the Installation Environment Connecting the Video, Audio and Monitor Connecting the USB Connecting the Camera (SDC-5440BC) Connecting the Network Live... - Page 7 SeArCh & pLAy Search Playback weB viewer Introducing Web Viewer Connecting Web Viewer (Mac) Using Live Viewer (Mac) Connecting Web Viewer (Windows) Using Live Viewer (Windows) Using Search Viewer Viewer Setup 103 About 104 Mobile Viewer BACKup viewer 106 SEC Backup Viewer Appendix 109 Product Specification (Camera) 110 Product Specification (DVR)
-
Page 8: Standards Approvals
overview feATureS The DVR employs H.264 video encoding for 8 channel inputs and G.711 audio encoding for 8 channels while simultaneously supports hard disc recording and playback. These DVRs also supports network connectivity, providing remote monitoring from a remote PC transferring video and audio data. -
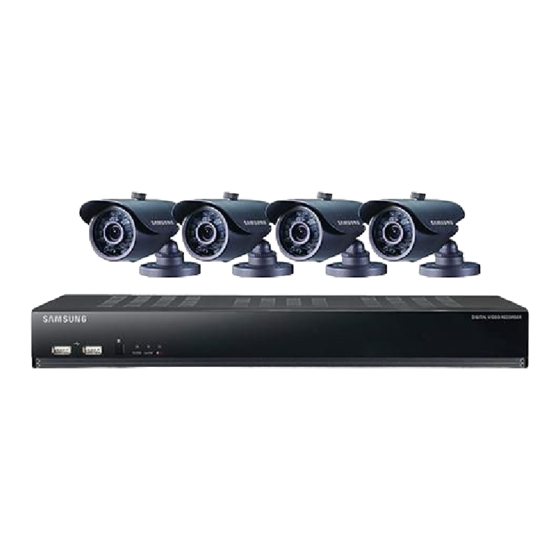
Page 9: Package Contents
package Contents Please unwrap the product, and place the product on a flat place or in the place to be installed. Please check the following contents are included in addition to the main unit. ❖ package DVR (1SET) Adapter (1EA) / Power Cable (1EA) Mouse (1EA) Remote Control (1EA) / Battery (2EA) SDC-5440BC (4SET) -
Page 10: Part Names And Functions (Front)
overview pArT nAmeS And funCTionS (fronT) Sdr-4101 Part Names Functions USB Port Connects the USB devices. Remote Control Input the remote control signal. Receiver POWER : Displays the power ON/OFF status. LED Indicator ALARM : Lights on when an event occurs. REC : Lights on when recording is in progress. -
Page 11: Part Names And Functions (Rear)
pArT nAmeS And funCTionS (reAr) Sdr-4101 DC 12 V DC 12 V VGA OUT VGA OUT SPOT SPOT COM COM 1 2 3 4 5 6 7 8 1 2 3 4 5 6 7 8 ALARM ALARM IN SERIAL SERIAL CONSOLE CONSOLE... -
Page 12: Remote Control
overview remoTe ConTroL SeArCh BACKup Displays the search menu. Displays the Backup Menu. mode Changes the screen mode. power Activates the DVR function. Displays the Exit pop up screen. numBer [0~+10] Used as the numeric input keys, or displays a single channel. - Page 13 Changing the remote Control id 1. Press the ID button of the remote control and check the ID displayed on the DVR screen. The factory default ID of the remote control is 00. 2. Enter 2 digits of your selection in order, while pressing the system [id] button. 3.
-
Page 14: Connecting With Other Device
Life (Unit: HOURS) [Figure 1] The followings are the recommendations when Samsung DVR is installed on a rack. 1. Please ensure that the rack inside is not sealed. 2. Please ensure the air is circulated through the inlet/outlet as shown in the picture. -
Page 15: Connecting The Video, Audio And Monitor
ConneCTinG The video, Audio And moniTor ConneCTinG The uSB 1. By factory default, a USB port is provided for external connection. 2. You can connect a USB HDD, USB memory or mouse to the USB port. 3. If a USB HDD is connected to the system, recognition and settings are available in “main menu > Setting the device >... -
Page 16: Connecting The Camera (Sdc-5440Bc)
connecting with other device ConneCTinG The CAmerA (SdC-5440BC) Equipped with the IR LED and the illumination sensor, enables you to monitor at night as well as in daytime. The camera is suitable for both internal and external use. Name Description Camera Sunshield Sunshield Adaptor Fixing the sunshield onto the camera. - Page 17 Connecting with dvr installing the camera The camera can be installed on the wall, ceiling, shelf or a desired position using the provided bracket. 1. Select a position where you want to install the camera. Make sure the selected position can sustain the weight of the camera. 2.
- Page 18 connecting with other device 3. Adjust the camera to target the video location by tightening camera bracket's screw and lock ring on the camera bracket . Lock Ring Left Right Down -180° +180° 4. Connect the camera cable to the camera. You should be careful when installing the camera outdoors because the cable connectors may be wet with moisture or pile up with impurities.
-
Page 19: Connecting The Network
ConneCTinG The neTworK Connecting to network through ethernet (10/100BaseT) RJ-45 Ethernet Cable (Direct Cable) Hub/Switcher NETWORK Windows Network Viewer Hub/Switcher English _19... - Page 20 connecting with other device Connecting to the network using the router Broadband Router xDSL or Cable Modem External Remote PC xDSL or Cable Modem NETWORK DDNS Server (Data Center) Connecting to network through AdSL ADSL MODEM RJ-45 Ethernet Cable (Direct Cable) NETWORK Windows Network Viewer...
-
Page 21: Live
live GeTTinG STArTed Starting the system 1. Connect the power cable of the DVR to the wall outlet. It takes about 10 seconds to display the start screen after booting. 2. You will see the initialization screen. The initialization process will last about 1 minute. If a new HDD is installed, the initialization process may take longer. -
Page 22: Locking All Buttons
live Login To access a DVR or restricted menu, you should have logged in to the DVR. 1. In live mode, right-click any area of the screen. 2012-01-01 01:10:25 You will see the context sensitive menu as in the right Scene Mode ... -
Page 23: Live Screen Configuration
Live SCreen ConfiGurATion icons on the Live Screen You can check the status or operation of the DVR with the icons on the live screen. 2012-01-01 00:00:01 CAM 01 Name Description Current Date, Time Displays the current time and date. Login Information When you are logged in, the “LOG ON”... - Page 24 live Name Description Camera Name/ Channel Displays the camera name and the changed channel, if any. Displays the resolution of the recording screen. (Page 55) Displays AUDIO ON/MUTE. Not displayed in video mode if deactivated. Camera Operation Displayed if a motion detected in the condition that the motion detection is set to <ON>.
- Page 25 Split mode menu The context sensitive menu in split mode differs, depending on the login/logout status. 2012-01-01 01:10:25 Scene Mode Spot Out Audio Off Freeze Stop Alarm Record Play Search Backup Main Menu Shutdown Hide Launcher Logout Menu Description Scene Mode Refer to “Live Mode”.
- Page 26 live Single mode menu The single mode menu is available only in Single Mode. The context sensitive menu for the One Channel mode, in Split mode is different from that of the Single mode. 2012-01-01 01:10:25 Full Screen Spot Out ...
-
Page 27: View The Launcher Menu
view the Launcher menu The Launcher menu appears on the bottom of the live screen. 1. In Live mode, right-click to display the context menu and 2012-01-01 01:10:25 select <Show Launcher>. 2. Move the cursor to the bottom and click a desired item in the Launcher menu. -
Page 28: Live Mode
CH11 CH12 CH15 CH16 live CH10 CH11 CH12 CH13 CH14 CH15 CH16 Live mode CH10 CH11 CH12 CH13 CH14 CH15 CH16 SDR-4101 display Live images from 8 channels in a total of 7 layout of split screens. Switching the screen mode CH10 CH11 CH12... - Page 29 CH19 CH10 CH11 CH12 CH13 In Single mode, If you have set <SEQ-Dwell Time> in “Setting the Device > Camera”, Auto Sequence will be conducted at the set interval. (Page 46) CH10 CH11 CH12 In a split mode, If you have set <Multi CH SEQ Time> in “Setting the Device > Monitor”, Auto Sequence will be CH13 CH14 CH15...
- Page 30 CH13 CH14 CH15 CH16 CH10 CH13 CH14 CH11 CH12 CH15 CH16 live CH10 CH11 CH12 Channel Setting CH13 CH14 CH15 CH19 CH10 CH11 CH12 CH10 CH11 CH12 CH13 CH16 You can display the channel in a desired area of a split screen. CH13 CH14 CH15...
-
Page 31: Spot Out
SpoT ouT The Spot Out monitoring is independent of the Live mode, which monitors a specific channel through the Spot Out port. Selecting a Spot out mode If an event occurs such as motion or alarm from the Spot Out port in connection with a monitor, you can select a output screen mode. -
Page 32: Audio On/Off
live Audio on/off You can turn the sound on/off corresponding to the channel in Live mode. Audio on/off in Single mode Click the audio icon ( ) on the screen, or press the [Audio] button on the remote control to turn it on/off. Only the channel where <Audio>... -
Page 33: Event Monitoring
evenT moniTorinG This will display the channel in sync with a specific event (Motion/Video Loss) if it occurs. In “monitor > event display”, set the event monitoring to ON/OFF and specify the event display time. (Page 51) • If multiple events occur simultaneously, the screen will switch to a split mode. - 2~4 events : 4-split mode - 5~9 events : 9-split mode • If the second event occurs within the set time of <event display>, the first event will last until the second... -
Page 34: Main Menu
main menu You can setup the system properties, devices, and options for recording, event, backup and network. SYSTem SeTuP You can setup Date/Time/Language, Permission, System Properties and Log. Date/Time/Language You can check and setup the current Date/Time and time related properties, as well as the language used for the interface on the screen. - Page 35 • Date : Sets the date that will appear on the screen. Date/Time/Language You can select the date format. Date/Time/Language Holiday • Time : Sets the time and its format that will appear on the screen. Date 2012-01-01 YYYY-MM-DD Select either one from <24 Hours, 12 Hours (am/Pm)>.
-
Page 36: Using The Calendar
main menu Setting Holiday You can set specific dates to Holidays according to your preferences. Holidays are applied to <Recording Schedule> and <alarm Schedule> too. Using the mouse may help make setup easier. 1. Use the up/down buttons ($%) in <Date/Time/Language> window to select <Date/Time/Language>, and press the [enTeR] button. - Page 37 Permission management You can set permissions of each user over the DVR's specific function and settings. Setting the administrator You can set and change Administrator’s ID and password. The administrator can use and set all menu items and functions. Using the mouse may help make setup easier. 1.
-
Page 38: Setting The Group
main menu Setting the Group You can create user groups and setup permissions for those user groups. You can register a user for each group in <user>. Using the mouse may help make setup easier. 1. Use the up/down buttons ($%) in <System> window to move to <Permission management>, and press Permission Management Group... -
Page 39: To Change The User Password
To restrict the user permissions If the admin restricts all permissions of an added group, the users belonging to that group can access only the default minimum menus and can change the user’s own password only. 1. Start the DVR. If all permissions are restricted, only the Login dialog should appear. -
Page 40: Setting The User
main menu Setting the user Users can be added only if a group was created in <Group> menu. Using the mouse may help make setup easier. 1. Use the up/down buttons ($%) in <System> window to move to <Permission management>, and press Permission Management User Admin... -
Page 41: Setting Permissions
Setting Permissions You can set restricted access for all general users. Items with restrictions will require logging in for use. Using the mouse may help make setup easier. 1. Use the up/down buttons ($%) in <System> window to move to <Permission management>, and press Permission Management Setup Admin... -
Page 42: System Management
main menu System management You can check the system version, update to a newer version, as well as data backup and initialization. Checking the System information You can check the current system version, broadcasting system, MAC address. You can update the system. Using the mouse may help make setup easier. - Page 43 5. Press <OK> in the “System upgrade” window. System Management While updating, it shows the progress. System Information Settings • Updating progresses with 3 steps as shown in the figure. System Information Software Version V1.0xh_yymmddhhmmss Broadcast Format S/W Upgrade NTSC ...
-
Page 44: Log Information
main menu Settings You can copy and import the DVR settings by using a storage media. Using the mouse may help make setup easier. 1. Use the up/down buttons ($%) in <System> window to move to <System management>, and press [enTeR] System Management Settings System Information... -
Page 45: Event Log
event Log Event log shows recorded events on alarms, motion detections and video loss. It also shows the log and its timestamp. Using the mouse may help make setup easier. 1. Use the up/down buttons ($%) in <System> window to move to <Log information>, and press [enTeR] button. -
Page 46: Setting The Device
main menu SeTTinG THe DeViCe You can configure the settings of: Camera, Storage Device, Remote Device and Monitor. Camera Setting the Camera You can set Video, Audio, Channel Name and Dwell Time of a Camera. Using the mouse may help make setup easier. 1. - Page 47 • Screen Setup : The video appeared on the screen may vary depending on the channel’s camera, configure the DVR display to your preferences. (Brightness)>, Select a channel and adjust the < (Contrast)>, and < (Color)> of the selected channel. <...
-
Page 48: Storage Device
main menu Storage Device You can check information on storage devices. Confirming Devices You can check storage devices and their free space, usage as well as status. Devices available are HDD, and USB devices (Memory, HDD). Using the mouse may help make setup easier. 1. - Page 49 Formatting You can format a storage device. Using the mouse may help make setup easier. 1. Use the up/down buttons ($%) in <Device> window to move to <Storage Device>, and press [enTeR] button. Storage Device Format Device HDD Alarm 2. Select <Format>. Device Select Used/Total...
- Page 50 main menu HDD alarm You can set alarm settings for HDD defects such as Check Alarm Output Port, Replace Alarm Output Port, and its duration. Using the mouse may help make setup easier. 1. Use the up/down buttons ($%) in <Device> window to move to <Storage Device>, and press [enTeR] button.
-
Page 51: Setting Display Position
• Video Out: You can set the video output mode. - Auto : The default is set to Composite. (In VGA mode, the “SAMSUNG” logo will be displayed) If a VGA source is connected, the source from the VGA will be displayed as main. (In Composite mode, the spot screen will be displayed) The monitor distributor is not supported. -
Page 52: Setting The Spot Out
main menu Setting the Spot Out You can set the DVR to output information / video apart from the monitor out. Using the mouse may help make setup easier. 1. Use the up/down buttons ($%) in <Device> window to Monitor move to <monitor>, and press [enTeR] button. -
Page 53: Setting The Recording
SeTTinG THe ReCORDinG You can setup scheduled recording, event recording and other recording related settings. Recording Schedule Make your reservation on a date and time to schedule the recording on specified time. Using the mouse may help make setup easier. 1. -
Page 54: Event Record Duration
main menu Recording Color Tags Color Function Description White No Recording No schedule / event recording Orange Continuous Scheduled recording only Blue Event Event recording only Green Both(Cont&Evnt) Both scheduled / event recordings Each press of a selected cell will cycle through <no Recording>-<Continuous>-<event>- <Both(Cont&evnt)>. - Page 55 ReC Quality & Resolution You can set resolution, FPS and quality of recordings by channel, and by recording type of standard / event. Setting Standard Recording Properties You can set each channel’s resolution, quality and fps for normal recordings. Using the mouse may help make setup easier. 1.
-
Page 56: Record Option
main menu Record Option You can set the recording to stop or overwrite when the HDD is full. Using the mouse may help make setup easier. 1. Use the up/down buttons ($%) in <Record> window to move to <Record Option>, and press [enTeR] button. Record Option 2. -
Page 57: Setting The Event
SeTTinG THe eVenT You can set recording options for motion and video loss event. motion Detection You can set target detection region and motion, as well as the alarm signal output. When the motion detection region is set, it detects motion within the area. Using the mouse may help make setup easier. -
Page 58: Video Loss Detection
main menu Video Loss Detection You can set the alarm to be generated on a camera disconnection, which causes a video loss. Using the mouse may help make setup easier. 1. Use the up/down buttons ($%) in <event> window to Video Loss Detection move to <Video Loss Detection>, and press [enTeR] button. -
Page 59: Backup
• Type : Sets the backup data format. - DVR : Saved data can be played back only by the DVR. - SEC : Saves data in the Samsung’s proprietary format with built-in viewer, which supports immediate playback on a PC. -
Page 60: Network Configuration
main menu 5. When the backup setup is done, press <OK>. If no available device is recognized for backup, <OK> button is not activated. The application may slow down during the backup. You can switch to the menu screen during the backup in operation, but playback of data is not available. When a memory device is used for backup, it is not available to use the full capacity of the media because the system consumes a portion of its capacity. -
Page 61: Setting The Protocol
• IP, Gateway, Subnet Mask, and DNS Connection Mode - For <Static iP> : You can directly input IP address, Connection Protocol Gateway, Subnet Mask and DNS. Connection Mode ADSL - For <Dynamic iP> : IP address, Gateway, and Subnet ... - Page 62 main menu notification In a multi-browser environment, the web port should be set to 80 (private port). Select one between 4505 and 4530 for RTSP • network Overview Router (External IP: 109.112.92.133, Cable/ADSL Modem Local IP: 192.168.1.1 Internet DDNS Server (www.samsungipolis.com) DVR 1 DVR 2...
- Page 63 • 1st Set Port Forwarding Setting Port Forwarding is 4520~4524 (4520, 4521, 4522, 4523, 4524) Port Forwarding is 80 SDR-4101 SDR-4101 192. 168. 1. 200 192. 168. 1. 200 4520 4520 • 2nd Set Port Forwarding Setting Port Forwarding is 4525~4529 (4525, 4526, 4527, 4528, 4529) Port Forwarding is 81 SDR-4101...
-
Page 64: Connecting And Setting The Network
main menu Connecting and Setting the network Networking may differ from the connection method, check your environment before setting the connection mode. When no router is used • Static iP mode - Internet connection : Static IP ADSL, leased line, and LAN Connection Mode environments allows connection between the DVR and Connection... - Page 65 When a router is used To avoid IP address conflict with the DVR's static IP, check followings : • Setting the DVR with a static iP - Internet connection : You can connect the DVR to a router which is connected to an ADSL/Cable modem or a router in a Local Area Network (LAN) environment.
- Page 66 main menu • Setting Router’s Port Forwarding 1. Set the protocol to <TCP>. Connection Mode 2. External Port Range : Enter the TCP Port set in the Protocol Connection <Port(TCP)> in <Protocol> menu of the connected DVR. Protocol Type If more than one DVRs are connected to the router, the ...
- Page 67 y Click <OK> for updating your router IP address. z Type your router Username & Password. If you haven’t changed them, skip this procedure, for it provides default value. 4. x Click <(4)Do it now> in Check List for choosing the ports.
- Page 68 main menu 5. After checking if the list is right, click <(5)Do it now> for updating your router. DDnS You can set the DDNS site for a remote user’s network connection. Using the mouse may help make setup easier. 1. Use the up/down buttons ($%) in <network> window to DDNS move to <DDnS>, and press [enTeR] button.
-
Page 69: Ddns Setting
DDnS Setting DDNS is a short form of Dynamic Domain Naming System. DNS (Domain Name System) is a service that routes a domain name consisting of user friendly characters (ex : www.google.com) to an IP address consisting of numbers (64.233.189.104). DDNS (Dynamic DNS) is a service that registers a domain name and the floating IP address with the DDNS server so that the domain name can be routed to the IP address even if the IP is changed in a dynamic IP system. -
Page 70: Live Transfer
main menu 4. After registration, you can see the list as below. 5. Select <iPOLiS> and fill Server Name out with your DDNS registration information. DDNS Site iPOLiS Server Name www.samsungip... Product ID SDR4101HOME Quick Connect Not Use ... -
Page 71: Mailing Service
mailing Service You can send an e-mail to a DVR-registered user at a specific time interval, or if an event occurs. If an event occurs with a channel where the camera’s video is set to <OFF> or the remaining recording count is set to <OFF>, only the text notification will be sent to the applicable email address. -
Page 72: Event Setting
main menu event Setting You can set the interval and type of the event that will be sent to the user. Using the mouse may help make setup easier. 1. In the <network> setting window, press the up/down ($%) button to move to <mailing Service> and press the Mailing Service Event [enTeR] button. -
Page 73: Recipient Setting
Recipient Setting You can add/remove a recipient(s) to/from the specified group and edit the group if necessary. Using the mouse may help make setup easier. 1. In the <network> setting window, press the up/down ($%) button to move to <mailing Service> and press the Mailing Service Recipient SMTP... -
Page 74: Search & Play
search & play search & play SeaRCH You can perform the search for recorded data by the time or by the search criteria such as an event. You can access the <Search> menu directly in Live mode. 1. In Live mode, right-click any area of the screen. 2012-01-01 01:10:25 The Live menu appears. -
Page 75: Event Search
• Zoom In : The map enlarges in detail. Time Search It will switch in the sequence of 24 hours - 16 hours - 8 hours 2012-01-01 Go to First Go to Last - 4 hours. Overlapped Data List1 Zoom In Zoom Out • Zoom Out : The map will switch in the reverse order of the 00:01... -
Page 76: Backup Search
search & play Backup Search Searches for backup data in the connected backup device. Only data in the format of DVR is included in the search. Refer to <Type> in “Backup > Setting the Backup”. (Page 59) Using the mouse may help make setup easier. 1. -
Page 77: Playback
PLaYBaCK Play You can play data stored in the HDD and backup a desired portion of the data. Using the mouse may help make setup easier. 1. In Live mode, click <Play> in the right-click menu or < > 2012-01-01 01:10:25 in the launcher menu, or press the Play button on the Scene Mode ... - Page 78 search & play using the Playback Button b c d e f g h i j k Part Names Functions Play Timeline Indicates the current playback point, and can be used to move. Skip Backward Moves backward by unit time. Backward Fast Used for quick backward playback.
-
Page 79: Web Viewer
Web Viewer introducing Web VieWer What is Web Viewer? Web Viewer allows remote access to your DVRs. You have access to live video, archived video etc. Product Features • Remote access from a standard browser • Supports 1, 4, 9 camera viewing formats • Gets JPEG, BMP format images to print and save to “Print or Save JPEG, BMP format images”. -
Page 80: Connecting Web Viewer (Mac)
Web Viewer connecting Web VieWer (MAc) ❖ Safari on MAc. If you want to use DVR Web Viewer with Safari Browser on a Mac, please refer to this user guide and install Multi Viewer with firmware upgrade if necessary. • Brower versions available: Safari 5.1.1 or later version • Silverlight: 4.0.60831.0 or later 1. -
Page 81: Using Live Viewer (Mac)
• if Microsoft Silverlight plug-in is already installed 1. Use a web browser to connect to the DVR. 2. If Silverlight plug-in is already installed, you will see the screen as shown. 3. If this is the case, perform Step 3 [tcP port & Web Viewer port settings] below. -
Page 82: Connecting Web Viewer (Windows)
Web Viewer connecting Web VieWer (WindoWS) 1. Open your web browser and type the IP address or URL of DVR into the URL address box. http://www.samsungipolis.com/HOMEDVR The basic URL of the DVR is as following in case of MAC address http://www.samsungipolis.com/User ID You can also use registered URL which setups up in the Setup menu of your DVR. -
Page 83: Using Live Viewer (Windows)
uSing liVe VieWer (WindoWS) The Live Viewer screen consists of following : a This displays the IP address and the model name of the connected DVR. b These menus consist of <liVe>, <SeArch>, <SetuP>, <About>. c These buttons are used for the screen split and full screen mode. d Shows the IP address and model name of the connected DVR. - Page 84 Web Viewer oSd information display The channel number, video size, and IP address of the connected DVR are displayed. This icon will appear if the audio signal is currently being output. The current date and time will be displayed according to the selected time information display setting <dVr time>...
- Page 85 connected dVr This displays the IP address and the status of the connecting DVR. Connection failure message No Response : Appears when the DVR does not respond. Access Denied : Appears when the maximum number of users is exceeded. The number of simultaneous connections are limited to 10. Setting the display of the oSd time information Select <dVr time>...
- Page 86 8-channel DVR Saving the live Screen on the Pc • cAPture : Saves the current screen into a BMP or JPEG file. The default saving path is “C:\Program Files\Samsung\DVR Web Viewer\SnapShot\Live”. To change the saving path, click <SAVE PATH ( )>...
- Page 87 • record : Saves the current image on the screen and saves it as a avi video file. To record it, it is required at least 1GB of available space. The default saving path is “C:\Program Files\Samsung\ DVR Web Viewer\VideoClip\Live”. To change the saving path, click <SAVE PATH ( )>...
-
Page 88: Using Search Viewer
Web Viewer uSing SeArch VieWer The Search Viewer screen consists of following : a This displays the IP address and the model name of the connected DVR. b These menus consist of <liVe>, <SeArch>, <SetuP>, <About>. c These buttons are used for the screen split and full screen mode. d Shows the IP address and model name of the connected DVR. - Page 89 Split-Screen You can change the split mode by clicking each number icon. SINGLE MODE QUAD MODE • Click < > button. The screen displays the selected camera connected to the DVR in “Single Mode”. • Click < > button. The screen displays the selected camera connected to the DVR in “QuAd Mode”.
- Page 90 Saving the live Screen on the Pc • cAPture : Saves the current screen into a BMP or JPEG file. The default saving path is “C:\Program Files\Samsung\DVR Web Viewer\SnapShot\Search”. To change the saving path, click <SAVE PATH ( )> button and then select the path you want.
-
Page 91: Searching The Recorded Video In The Calendar
Searching the recorded Video in the calendar If the video data has been recorded on a date, the date is distinguished in green. If you click the date, the recorded video information is displayed in the time line. When you click <today>, it will be synchronized with the system time (date) of the current PC. -
Page 92: Controlling Playback
Web Viewer controlling Playback a Fast backward : Reverse-plays faster(2x~64x). b reverse Play : Performs Reverse Play. c Play : Performs playback. d Fast Forward : Plays faster(2x~64x). e go to First : Moves the beginning time of recorded video in the time line. f Step backward : Performs one step reverseplay by one frame. - Page 93 • time Synchronization Setup Set the time synchronization. • display Date Format : Set the date type. Time : Select a time format to display on the screen. • dSt (daylight Saving time) DST is displayed an hour ahead of the standard time of the time zone.
- Page 94 Web Viewer • group Users are classified into groups and the permission can be set according to the group. First of all, add a group. • user You can add, change or remove a user or users. • Setup You can set the user permission. System Management For more information, refer to <System Management>...
- Page 95 device You can check a list of devices that are connected to the DVR and configure the necessary settings. Click <device> in the menu screen. For more information, refer to “Setting the device”. (Page 46) camera • camera You can configure the settings of the camera that is connected to the DVR.
-
Page 96: Remote Device
Web Viewer Storage device You can check and change the settings of the storage device. • device You will see a list of storage devices that are connected to the DVR. You can check the type, used/total, usage and status of the device. - Page 97 Monitor • Monitor You can configure the monitoring screen settings and set the output system. • Spot out With the monitor connected via the SPOT port, if there occurs an event such as Motion or Alarm, you can select a video output mode for external monitoring.
- Page 98 Web Viewer record For more information, refer to “Setting the recording”. (Page 53) recording Schedule If you set a recording schedule for a specific date and time, the recording will start at that specific time. - Apply to All CH : Click <Apply to All ch> to display the confirmation window.
- Page 99 rec Quality & resolution • Standard/event You can set the resolution, frame rate and recording quality for each channel. record option You can set the Disk End Mode. event For more information, refer to “Setting the event”. (Page 57) Motion detection You can set the motion detection mode and the sensitivity as well as the alarm output type and the duration.
- Page 100 Web Viewer • Motion region Set the target motion detection area Video loss detection You can set the alarm output time if a video loss occurs. Alarm Schedule You can schedule the alarm output according to the day of the week and the time. The default setting is Event Sync, which activates the alarm only if an event occurs.
- Page 101 network For more information, refer to “network configuration”. (Page 60) connection A remote user can access the DVR via the network to check the current mode and the IP address. • connection You can set the network connection route. • Protocol You can configure the protocol related settings.
- Page 102 Web Viewer live transfer A remote user can set the images of the DVR. • live transfer A remote user can set the image resolution of the transferred data. Mailing Service You can specify the SMTP server that sends a mail if an event occurs and set the recipient group and users. • SMtP You can set the server that sends mails and specify if you use the authentication process.
-
Page 103: About
• group You can add a group to receive the mail if an event occurs and set the permission to receive the event mail for each group. • recipient You can add a user or users who will receive the mail. About Click <About>. -
Page 104: Mobile Viewer
DVR (Digital Video Recorder) remotely and control the video playback in real time. using a Smartphone 1. Download the Samsung iPOLiS mobile app. On an Android phone, visit Play Store. On an iPhone, visit App Store. -
Page 105: Key Features
Name : Create a name for the DVR you are adding Model : Select the DVR model Host : If you are using Samsung iPolis DDNS, enter the host DDNS Host Address you wrote down earlier. It should be www.samsungipolis.com/Product ID... -
Page 106: Backup Viewer
backup viewer backup viewer Sec bAcKuP VieWer You can play a file that is backed up in the format of SEC. Backup in the format of SEC will involve in generating two files: one for the backup data and one for the viewer. If you run the backup file viewer, the backup data file will be automatically played. - Page 107 Name Description A toggle button. Each time you press this button, the audio output will toggle between activated and deactivated. Audio You can adjust the volume level from 0 to 100. Saves the current screen as an image file. Supported file formats include BMP and JPEG.
- Page 108 backup viewer Name Description Displays the next frame. This is available only if the playback is stopped. A toggle button. Press it once to start playing the video and switch the button Play mode to 'Pause', and press it again to switch the button mode to Play and stop playing temporarily.
-
Page 109: Appendix
appendix Product SPeciFicAtion (cAMerA) ❖ Sdc-5440bc Details Item SDC-5440BCN SDC-5440BCP Electrical Input Voltage DC 12V Power Consumption Video Imaging Device 1/3” CMOS Total Pixels 720 x 480 Scanning System Interlace Synchronization Internal Frequency H: 15,734 Hz, V: 59.94 Hz H : 15,625 Hz , V: 50 Hz Horizontal Resolution 600TVL Min. -
Page 110: Product Specification(Dvr)
appendix Product SPeciFicAtion(dVr) ❖ Sdr-4101 Details Item SDR-4101 Inputs 8 composite video 0.5-1 Vpp, 75 ohm Video Resolution 704x480 NTSC, 704x576 PAL Frame rate 240fps NTSC, 200fps PAL Live Resolution 704x480 NTSC, 704x576 PAL Multi Screen display 1, 4, 6, 8, 9, 13, PIP, Sequence Performance Embedded Linux... - Page 111 Details Item SDR-4101 Smart phone Android, i-phone (iPad included) Protocol support RTP, RTSP, HTTP, CGI Smart phone Transmission speed CIF Max 15fps(Single Channel)/ CIF Max 2fps(Quad Channel) Remote users Live(1) Maximum Internal HDD 500GB SATA HDD External HDD – Storage DVD Writer (Back-up) –...
- Page 112 appendix Details Item SDR-4101 Ethernet 1 RJ45 10/100 Base-T Serial interface – USB 2.0, 2 ports (Front) Connections e-SATA – Application Supoort Mouse, Remote Controller PTZ Protocol support – General Input Voltage /Current 100 ~ 240 VAC ±10%; 50/60 Hz, Autoranging Electrical Power consumption ADP-4812 Adaptor (1EA), 12V, 48W...
-
Page 113: Default Setting
deFAult Setting This returns the factory default settings. The settings are made as follows; • Use System/Load Factory Default in MENU The default password can be exposed to a hacking thread so it is recommended to change the password after installing the product. Note that the security and other related issues caused by the unchanged password shall be responsible for the user. - Page 114 appendix Category Details Factory Default Event Display Display Monitor Multi CH SEQ Time 5sec Device Monitor Video Output Display Position Setup Live Mode Mode Play Mode Recording Schedule Both(Cont&Evnt) PRE Event Event Record Duration POST Event 1 min Resolution CIF(S) NTSC: 7 fps Standard Frame Rate...
- Page 115 Category Details Factory Default Connection Mode Static IP Bandwidth 2Mbps 192.168.1.200 Connection Gateway 192.168.1.1 Connection Mode Subnet Mask 255.255.255.0 168.126.63.1 Protocol Type Protocol Port (TCP) 4520~4524 Webviewer Port DDNS DDNS Site Network Resolution CIF(S) Live Transfer Quality Server Port SMTP Use Authentication Secure Transfer Never...
-
Page 116: Troubleshooting
appendix troubleShooting Symptom Countermeasures The system does not turn on and the indicator on the y Check if the power supply system is properly connected. front panel does not work at all. y Check the system for the input voltage from the power source. y If the problem persists even after you have taken the above actions, check the power supplier and replace it with a new one if neccessary. - Page 117 Symptom Countermeasures A message of “Need to reset date/time.” Is displayed y This message is displayed if there occurs a problem with the time on the screen. setting of the internal clock or an error in the clock itself. Contact the retailer or the service center for more information. The time bar is not displayed in Search mode.
- Page 118 appendix Symptom Countermeasures Recording does not work. y If your player does not display a Live image at all, that indicates recording does not work so first check if you see an image on the screen. y Recording does not work if the recording settings are not properly configured.
-
Page 119: Open Source License Report On The Product
The software included in this product contains copyrighted software that is licensed under the GPL/LGPL. You may obtain the complete Corresponding Source code from us for a period of three years after our last shipment of this product by sending email to help.cctv@samsung.com If you want to obtain the complete Corresponding Source code in the physical medium such as CD-ROM, the cost of physically performing source distribution might be charged. - Page 120 no WArrAntY normally distributed (in either source or binary form) with the major components (compiler, kernel, and so on) of the operating system on 11. BECAUSE THE PROGRAM IS LICENSED FREE OF CHARGE, which the executable runs, unless that component itself accompanies the executable.
-
Page 121: Terms And Conditions
Preamble and how to view a copy of this License. If the interface presents a list of user commands or options, such as a menu, a prominent item in the list meets this criterion. The GNU General Public License is a free, copyleft license for software and other kinds of works. - Page 122 5. conveying Modified Source Versions. substantial commercial, industrial or non-consumer uses, unless such uses represent the only significant mode of use of the product. You may convey a work based on the Program, or the modifications to produce it from the Program, in the form of source code under the “Installation Information”...
- Page 123 8. termination. recipients. “Knowingly relying” means you have actual knowledge that, but for the patent license, your conveying the covered work in a country, or You may not propagate or modify a covered work except as expressly your recipient’s use of the covered work in a country, would infringe one or provided under this License.
- Page 124 16. limitation of liability. When a program is linked with a library, whether statically or using a shared library, the combination of the two is legally speaking a IN NO EVENT UNLESS REQUIRED BY APPLICABLE LAW OR combined work, a derivative of the original library. The ordinary General AGREED TO IN WRITING WILL ANY COPYRIGHT HOLDER, OR ANY Public License therefore permits such linking only if the entire OTHER PARTY WHO MODIFIES AND/OR CONVEYS THE PROGRAM...
- Page 125 d) If a facility in the modified Library refers to a function or a table of of your choice, provided that the terms permit modification of the work data to be supplied by an application program that uses the for the customer’s own use and reverse engineering for debugging such facility, other than as an argument passed when the facility is modifications.
-
Page 126: Openssl License
so as to satisfy simultaneously your obligations under this License and convey the exclusion of warranty; and each file should have at least the any other pertinent obligations, then as a consequence you may not “copyright” line and a pointer to where the full notice is found. one line distribute the Library at all. - Page 127 (online or textual) provided with the package.Redistribution and use in source and binary forms, with or without modification, are permitted provided that the following conditions are met: 1. Redistributions of source code must retain the copyright notice, this list of conditions and the following disclaimer. 2.
- Page 128 Correct Disposal of This Product (Waste Electrical & Electronic Equipment) (Applicable in the European Union and other European countries with separate collection systems) This marking on the product, accessories or literature indicates that the product and its electronic accessories (e.g. charger, headset, USB cable) should not be disposed of with other household waste at the end of their working life.
- Page 130 SAMSUNG TECHWIN AMERICA Inc. SAMSUNG TECHWIN EUROPE LTD. 100 Challenger Rd. Suite 700 Ridgefield Park, NJ 07660 Samsung House, 1000 Hillswood Drive, Hillswood Business Toll Free : +1-877-213-1222 Direct : +1-201-325-6920 Park Chertsey, Surrey, UNITED KINGDOM KT16 OPS Fax : +1-201-373-0124 TEL : +44-1932-45-5300 FAX : +44-1932-45-5325 www.samsungsv.com...
Need help?
Do you have a question about the SDS-V4040 and is the answer not in the manual?
Questions and answers