Sign In
Upload
Manuals
Brands
DURKOPP ADLER Manuals
Sewing Machine
559 -
DURKOPP ADLER 559 - Manuals
Manuals and User Guides for DURKOPP ADLER 559 -. We have
4
DURKOPP ADLER 559 - manuals available for free PDF download: Instruction Manual, Parts List, Operating, Installation And Servicing Instructions, Operating Instructions Manual
DURKOPP ADLER 559 - Instruction Manual (258 pages)
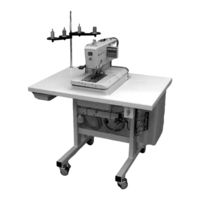
Sewing Automat
Brand:
DURKOPP ADLER
| Category:
Sewing Machine
| Size: 4.8 MB
Table of Contents
Deutsch
5
Table of Contents
5
1 Produktbeschreibung Bestimmungsgemäßer Gebrauch
7
Kurzbeschreibung
7
Unterklassen
8
Produktstruktur
9
2 Technische Daten
10
3 Bedienung
11
Nadeln, Garne und Gimpen
11
Bedienung 3.1 Nadeln, Garne und Gimpen
11
Abnehmen und Auflegen der Klammerplatten
12
Nadel Wechseln
13
Oberfaden Einfädeln
14
Unterfaden Einfädeln
15
Gimpenfaden Einfädeln
16
4 Automat Hoch- und Herunterschwenken
16
Ober- und Unterfadenspannung
17
6 Schneidblöcke und Messer Wechseln
19
7 Handtaster
20
8 Stoffanschläge Einstellen
20
9 Einschalten - Ausschalten - Einfädelmodus
21
Einschalten
21
Ausschalten
21
Einfädelmodus
21
10 Steuerung
22
Allgemeines
22
Index der Bedienfeldtasten
22
Hauptebene des Menüsystems
23
Werte der Hauptebene Direkt Anwählen
23
Knopflochprogramm Auswählen
23
Fadenspannung in der Hauptebene Anpassen
24
Schnittlänge in der Hauptebene Anpassen
24
Der Tagesstückzähler
24
Bedienung des Menüs
25
Auswahl eines Menüpunktes
25
Editieren eines Wertes
25
Liste der Menüpunkte und Untermenüpunkte
26
Programmierung eines Knopfloches
29
Nähvorgang
30
Einschalten
30
Auswahl eines Knopflochprogrammes
30
Nähen
31
11 Hinweismeldungen
32
Nadel nicht in Grundstellung
32
Druckwächter
32
Fadenriss
32
Hinweismeldungen 11.1 Nadel nicht in Grundstellung
32
Einfädelmodus
33
12 Fehlermeldungen
33
13 Wartung
34
Reinigung
34
Wartung 13.1 Reinigung
34
Ölen
35
Kontrolle
36
Lieferumfang
39
Allgemeines und Transportsicherungen
39
Tischplatte mit Bemaßungen
40
Transportöse
41
Montage Hauptschalter
41
Montage der Steuerung
42
Potentialausgleich
43
Montage des Absaugbehälters
44
Aufstellen des Knopflochautomaten
45
Arbeitshöhe Einstellen
45
Garnständer Befestigen
45
Pedal Anschließen
46
Gestell Sichern
46
Wartungseinheit Anschließen
47
Betriebsdruck Einstellen
47
Schmierung
48
Ölvorratsbehälter Füllen
49
Installation der Maschinensoftware Allgemeines
50
Laden des Programms
50
Näheinrichtung Einstellen
51
Dongle-Update Per Internet
51
Nähtest
52
Allgemeines
55
Notwendige Programmeinstellung
55
Absteckpunkte Einstellen
56
Allgemeines
56
Greifer- und Spreizerexzenter
57
Fadengeberscheibe
58
Überstichexzenter
59
Positionierung Nadelstange
60
Greiferbock Ausrichten
61
Nadelstange Parallel zum Greiferbock Ausrichten
63
Querbewegung der Stofftrageplatte
65
Längsbewegung der Stofftrageplatte
67
Klammerplatten
69
Eingesetzte Klammerplatten
69
Klammerplatten Ausrichten
70
Spreizung Einstellen
71
Höhe der Stoffklemmen
73
Verriegelungsblech Einstellen
74
Verrastung der Klammerplatten
75
Einstellen des Stoffklemmdrucks
76
Einstellen der Nahtbreite
77
Nahtbreite Voreinstellen
77
Nadelnullstellung
80
Schneidmesser (Augenmesser)
81
Position des Schneidmessers
81
Messer Parallel zum Schneidblock Einstellen
83
Schneidblockeinstellung
84
Schalter für das Schneidsystem Einstellen
85
Schneiddruck
86
Schneiddauer
86
Greiferhöhe
87
Schleifenhub Einstellen
88
Nadelstangenhöhe
90
Greiferabstand zur Nadel
91
Nadelschutz
92
Spreizer
93
Spreizerplatte
94
Stichplatte
95
Oberfadenmesser Einstellen
96
Stoffklemmen Einstellen
98
Fadenanzugsfeder
99
Wartung
100
Anhang
101
Einstellarbeiten ohne Kopfdeckel
101
Austausch der Steuerung
102
Sicherungen IM Steuerkasten
102
Aktivieren des Servicemenüs
103
Anwählen eines Menüpunktes/ Untermenüpunktes
103
Multitest
103
Servicemenü (Technikerebene)
103
Verlassen des Servicemenüs
103
Liste der Menü- und Untermenüpunkte
104
Menüpunkte 500 (Konfiguration Knopflochautomat)
105
Menüpunkte 520 (Spannungsdaten für Oberfadenspannungseichung)
106
Menüpunkte 550 (Konfiguration Bedienung)
106
Menüpunkte 600 (Multitest)
108
Fehlermeldungen
116
Beheben von Störungen
121
English
128
1 Description of Product
130
Brief Description
130
Use in Accordance with the Requirements
130
Subclasses
131
Structure of Product
132
2 Technical Data
133
Needles, Threads and Gimps
134
3 Operation
134
Removing and Inserting the Clamping Plates
135
Needle Change
136
Threading the Needle Thread
137
Threading the Looper Thread
138
4 Swivelling the Automat up and down
139
Threading the Gimp Thread
139
Needle and Looper Thread Tension
140
5 Thread Tension
140
6 Changing of Cutting Blocks and Knives
142
7 Push Button
143
8 Setting the Cloth Stops
143
Switching off
144
Switching on
144
9 Switching on - Switching off - Threading Mode
144
Threading Mode
144
10 Control
145
General Notes
145
Index of the Control Panel Keys
145
Direct Editing of the Values in the Main Level
146
Main Level of the Menu System
146
Selecting the Buttonhole Program
146
Adjusting the Cutting Length in the Main Level
147
Adjusting the Thread Tension in the Main Level
147
The Counter
147
Editing of a Value
148
Operating the Menu
148
Selection of a Menu Item
148
List of Menu and Submenu Items
149
Programming a Buttonhole
152
Selection of a Buttonhole Program
153
Sewing Operation
153
Switching on
153
Sewing
154
11 Information Messages
155
Needle Not in Basic Position
155
Pressure Monitor
155
Thread Breakage
155
12 Error Messages
156
Threading Mode
156
Cleaning
157
13 Maintenance
157
Oiling
158
Control
159
Scope of Delivery
162
General Notes and Securing Devices
162
Lifting Eye Bolt
164
Assembly of the Main Switch
164
Assembly of the Control
165
Potential Equalization
166
Assembly of the Waste Container
167
Installation of the Automatic Buttonholer
168
Adjusting the Working Height
168
Attaching the Thread Stand
168
Connecting the Pedal
169
Connecting the Maintenance Unit
170
Adjusting the Operating Pressure
170
Lubrication
171
Installing the Sewing Software General
173
Loading the Program
173
Setting the Sewing Equipment
174
Dongle-Update Via the Internet
174
Sewing Test
175
General Notes
178
Necessary Program Setting
178
Adjusting the Locking Positions
179
General Notes
179
Looper and Spreader Eccentric
180
Rotary Thread Take-Up Disc
181
Throw Eccentric
182
Needle Bar Positioning
183
Aligning the Looper Turret
184
Aligning the Needle Bar Parallel to the Looper Turret
186
Transversal Motion of the Fabric Support Plate
188
Longitudinal Motion of the Fabric Support Plate
190
Clamping Plates
192
Inserted Clamping Plates
192
Adjusting the Spreading
194
Height of the Fabric Clamps
196
Adjusting the Locking Sheet
197
Arrest of the Clamping Plates
198
Adjusting the Fabric Clamping Pressure
199
Adjusting the Seam Width
200
Presetting the Seam Width
200
Needle Zero Position
203
Cutting Knife (Eyelet Knife)
204
Position of the Cutting Knife
204
Adjusting the Knife Parallel to the Cutting Block
206
Cutting Block Adjustment
207
Adjusting the Switch for the Trimming System
208
Cutting Pressure
209
Cutting Duration
209
Looper Height
210
Adjusting the Looping Stroke
211
Needle Bar Height
213
Distance between Looper and Needle
214
Needle Guard
215
Spreader
216
Spreader Plate
217
Throat Plate
218
Adjusting the Needle Thread Knife
219
Adjusting the Fabric Clamps
221
Thread Controller Spring
222
Maintenance
223
Annex
224
Adjusting Operations Without Head Cover
224
Fuses in the Control Box
225
Exchange of the Control
225
Service Menu (Technician Level)
226
Activating the Service Menu
226
Selection of a Menu Item/Submenu Item
226
Multitest
226
Quitting the Service Menu
226
List of Menu and Submenu Items
227
Menu Items 500 (Configuration Automatic Buttonholer)
228
Menu Items 520 (Tension Data for the Needle Thread Calibration)
229
Menu Items 550 (Configuration Operation)
229
Menu Items 600 (Multitest)
231
Error Messages
239
Troubleshooting
244
Advertisement
DURKOPP ADLER 559 - Operating, Installation And Servicing Instructions (70 pages)
Automatic single-chainstitch eyelet machine
Brand:
DURKOPP ADLER
| Category:
Sewing Machine
| Size: 1.25 MB
Table of Contents
Installation Instructions
1
Operating Instructions
1
Service Instructions
1
Table of Contents
3
1 General Notes
5
Necessary Program Setting
5
2 Adjusting the Locking Positions
6
General Notes
6
Hook and Spreader Eccentric
7
Rotary Thread Take-Up Disc
8
Throw Eccentric
9
3 Needle Bar Positioning
10
4 Aligning the Hook Support
11
5 Aligning the Needle Bar Parallel to the Hook Support
13
6 Transversal Motion of the Fabric Support Plate
15
7 Longitudinal Motion of the Fabric Support Plate
17
8 Clamping Plates
19
Inserted Clamping Plates
19
Aligning the Clamping Plates as to the Fabric Support Plate
20
Adjusting the Spreading
21
Height of the Fabric Clamps
23
Adjusting the Locking Sheet
24
Arrest of the Clamping Plates
25
Adjusting the Fabric Clamping Pressure
26
9 Adjusting the Seam Width
27
Presetting the Seam Width
27
Needle Zero Position
30
10 Cutting Knife (Eyelet Knife)
31
Position of the Cutting Knife
31
Adjusting the Knife Parallel to the Cutting Block
33
Cutting Block Adjustment
34
Cutting Pressure
35
Cutting Duration
35
11 Hook Height
36
12 Adjusting the Looping Stroke
37
13 Needle Bar Height
39
14 Distance between Hook and Needle
40
15 Needle Guard
41
16 Spreader
42
17 Spreader Plate
43
18 Throat Plate
44
19 Adjusting the Needle Thread Knife
45
20 Adjusting the Fabric Clamps
47
21 Thread Controller Spring
48
22 Maintenance
49
23 Annex
50
Adjusting Operations Without Head Cover
50
Fuses in the Control Box
51
Exchange of the Control
51
24 Service Menu (Technician Level)
52
Activating the Service Menu
52
Selection of a Menu Item/Submenu Item
52
Multitest
52
Quitting the Service Menu
52
List of Menu and Submenu Items
53
Menu Items 500 (Configuration Automatic Buttonholer)
54
Menu Items 550 (Configuration Operation)
55
Menu Items 600 (Multitest)
56
25 Error Messages
61
26 Troubleshooting
66
DURKOPP ADLER 559 - Parts List (107 pages)
Brand:
DURKOPP ADLER
| Category:
Sewing Machine
| Size: 5.53 MB
Advertisement
Dürkopp Adler 559 - Operating Instructions Manual (36 pages)
Automatic single-chainstitch eyelet machine
Brand:
Dürkopp Adler
| Category:
Sewing Machine
| Size: 1.38 MB
Table of Contents
General Safety Instructions
4
Table of Contents
5
1 Description of Product
7
Use in Accordance with the Requirements
7
Brief Description
7
Subclasses
8
Structure of Product
9
2 Technical Data
10
3 Operation
11
Needles, Threads and Gimps
11
Operation 3.1 Needles, Threads and Gimps
11
Removing and Inserting the Clamping Plates
12
Needle Change
13
Threading the Needle Thread
14
Threading the Looper Thread
15
Threading the Gimp Thread
16
4 Swivelling the Automat up and down
16
5 Thread Tension
17
Needle and Looper Thread Tension
17
6 Changing of Cutting Blocks and Knives
19
7 Push Button
20
8 Setting the Cloth Stops
20
9 Switching on - Switching off - Threading Mode
21
Switching on
21
Switching off
21
Threading Mode
21
10 Control
22
General Notes
22
Index of the Control Panel Keys
22
Main Level of the Menu System
23
Direct Editing of the Values in the Main Level
23
Selecting the Buttonhole Program
23
Adjusting the Thread Tension in the Main Level
24
Adjusting the Cutting Length in the Main Level
24
The Counter
24
Operating the Menu
25
Selection of a Menu Item
25
Editing of a Value
25
List of Menu and Submenu Items
26
Programming a Buttonhole
29
Sewing Operation
30
Switching on
30
Selection of a Buttonhole Program
30
Sewing
31
11 Information Messages
32
Needle Not in Basic Position
32
Pressure Monitor
32
Thread Breakage
32
Threading Mode
33
12 Error Messages
33
13 Maintenance
34
Cleaning
34
Maintenance 13.1 Cleaning
34
Oiling
35
Control
36
Advertisement
Related Products
DURKOPP ADLER 556
DURKOPP ADLER 550-532
DURKOPP ADLER 550-12-33
DURKOPP ADLER 550-12-34
DURKOPP ADLER 550-12-23
DURKOPP ADLER 550-12-24
DURKOPP ADLER 550-12-26
DURKOPP ADLER 580 -
DURKOPP ADLER 540 - 100
DURKOPP ADLER 530
DURKOPP ADLER Categories
Sewing Machine
Sewing Machine Accessories
Accessories
Controller
Scanner
More DURKOPP ADLER Manuals
Login
Sign In
OR
Sign in with Facebook
Sign in with Google
Upload manual
Upload from disk
Upload from URL