Table of Contents
Advertisement
Advertisement
Table of Contents

Related Manuals for Sony HDVF-L750


Summary of Contents for Sony HDVF-L750
- Page 1 LCD COLOR VIEWFINDER HDVF-L750 HDVF-L770 OPERATION MANUAL [English] 1st Edition...
-
Page 2: Table Of Contents
Table of Contents Precautions..........3 Overview ............ 4 Functions of Parts and Controls....5 Attaching to the Camera......8 Turning on the Viewfinder ...... 10 Adjusting the Viewfinder Position ..10 Adjusting the Height and Tilting/ Panning...........10 Adjusting the Front-Back Position (HDVF-L770 only) ......12 Adjusting the Screen ...... -
Page 3: Precautions
On installation Precautions • Allow adequate air circulation to prevent internal heat build-up. Do not place the unit on surfaces (rugs, blankets, etc.) Handling the screen or near materials (curtains, draperies) that may block the ventilation holes. • The LCD panel fitted to this unit is manufactured with •... -
Page 4: Overview
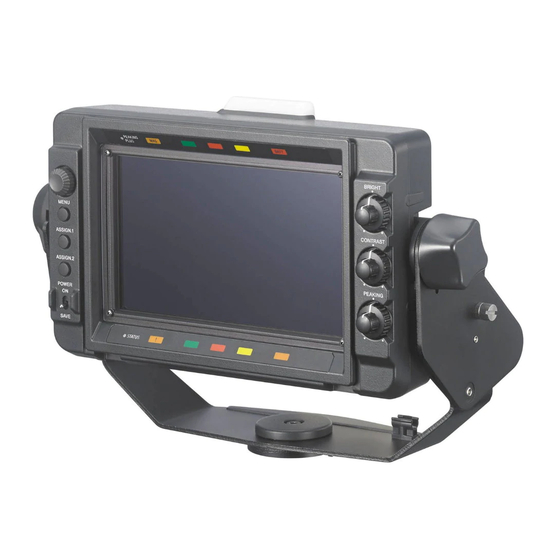
Assignable switches are provided on the front (2 switches) and on the left and right handles (2 switches each, HDVF-L770 only) for frequently used functions. The HDVF-L750/HDVF-L770 is a 7.0-inch LCD viewfinder. Tally indicators This viewfinder has the following features. -
Page 5: Functions Of Parts And Controls
Functions of Parts and Controls HDVF-L770 qh qj HDVF-L750 qh qj Functions of Parts and Controls... - Page 6 An error message (see page 26) may be displayed at the same time. Turn off the power and contact your Sony The threshold battery voltage value at which this service representative. indicator begins flashing can be set by the camera. For details, refer to the manual for the camera.
- Page 7 (DC 10.5 V to 17.0 To attach the viewfinder to the camera, mount the V). In this case, contact your Sony service representative. viewfinder in the V-wedge shoe attachment attached on top of the camera.
-
Page 8: Attaching To The Camera
Remove the four plastic caps from the camera. • When attaching the viewfinder to the HXC-D70 or PMW-320/350/400/500, use the shoe conversion bracket (supplied) (see page 9). (HDVF-L750 only) Plastic caps For how to change the position of the viewfinder attached to the camera, see “Adjusting the Viewfinder Position”... - Page 9 HDVF-L770 Button Lever HDVF-L770 Attaching the shoe conversion bracket (HDVF-L750 only) When attaching the viewfinder to the HXC-D70 or Connect the CAM connector to the camera’s VF PMW-320/350/400/500, use the shoe conversion bracket connector. (supplied). Clamp the connecting cable with the cable clamp as Remove the cover on the handle of the camera, then shown in the following figure.
-
Page 10: Turning On The Viewfinder
Turning on the Adjusting the Viewfinder Viewfinder Position When the camera is turned on and the POWER switch of Adjusting the Height and Tilting/ the viewfinder is set to ON, power is supplied to the Panning viewfinder. The image will be displayed several seconds after supplying power to the viewfinder. - Page 11 (toward the lock position) to secure the position of the viewfinder. 10 cm (4 inches) HDVF-L750 Adjust the height of the viewfinder by loosening the lift fixing screw, then fix it by fastening. The height of the viewfinder can be adjusted in 2 Maximum adjustment range: 10 cm (4 inches) levels.
-
Page 12: Adjusting The Front-Back Position (Hdvf-L770 Only)
Adjust the viewfinder angle. Adjusting the Front-Back Position (HDVF-L770 only) Tilting adjustment You can adjust the front-back position of the viewfinder by sliding or rotating the mounting position of the mounting wedge and upper and lower plates at the bottom of the viewfinder. -
Page 13: Adjusting The Screen
Slide or rotate the mounting wedge, lower plate, and/ Adjusting the Screen or upper plate as required, then tighten the screws. When the mounting wedge is slid forward: The viewfinder moves 15 mm (19/32 inches) toward Note the camera operator from the factory default position. -
Page 14: Attaching Accessories
To attach the hood, hook the hood to the groove the viewfinder. The angle of the hood can be changed up to 45° upward. Groove HDVF-L750 HDVF-L770 Outdoor hood (optional) Tighten the screw to fix the viewfinder. Screw... -
Page 15: Attaching A Number Plate
Attaching a Number Plate Using the Focus Assist Insert the tabs on the sides of the number plate into each Function slit in the up-tally lamp. HDVF-L770 For details on menu operations, see “Using the Menu” on page 18. Number plate (supplied) PEAKING PLUS Function This function can be used to sharpen the edges of an... - Page 16 • HUE PHASE: Hue center position Adjust the amount of correction with the PEAKING • HUE WIDTH: Hue range control. • SAT WIDTH: Saturation range Only the edges of the object within the area selected – direction: in step 3 will be sharpened. Narrows the effective range Turn the control clockwise to make the edges sharper.
-
Page 17: Magnification Function
Adjust the amount of correction with the PEAKING MODE1: Standard magnified display control. The edges of the object that coincides with the color detected in step 4 are sharpened within the area selected in step 3. Turn the control clockwise to make the edges sharper. -
Page 18: Using The Menu
to item select mode. Press the MENU switch again Using the Menu to change to page select mode. Select menu items. Many of the viewfinder’s functions can be set by a menu With the mark positioned to the left of a menu item operation. - Page 19 The setting is entered and the menu returns to item select mode. If you press the MENU switch before pressing the MENU control, the setting returns to the value that was previously set and then the menu returns to item select mode.
-
Page 20: List Of Menu Items
List of Menu Items • “– – –” appears to the left of settings that cannot be Notes selected. • Some settings cannot be selected unless the previous menu item is set to “ON.” Page Menu Item Settings Function (default in [ FUNCTION ASSIGN. - Page 21 Page Menu Item Settings Function (default in [ [OFF]/ON FUNCTION KNEE For turning the KNEE correction circuit ON or OFF. (This setting does not affect the camera’s output signals.) [OFF]/ON MONOCHROME For selecting color display (OFF) or black-and-white display (ON). (This setting does not affect the camera’s output signals.) CHROMA –99 to [0] to 99...
- Page 22 Page Menu Item Settings Function (default in [ –99 to [0] to 99 HUE WIDTH For specifying the hue range of which edge enhancement is PEAKING to be performed. –99 to [0] to 99 SAT WIDTH For specifying the saturation range of which edge enhancement is to be performed.
- Page 23 Page Menu Item Settings Function (default in [ WAVEFORM Displays a simplified input signal waveform as a sub display. The right illustration is an example of the waveform monitor when a color bar Selected signal is input. LINE Note The waveform monitor allows for easy checking of an image waveform.
- Page 24 Page Menu Item Settings Function (default in [ [OFF]/ON PRESET PRESET For selecting whether to enable the settings of the BRIGHT, CONTRAST, PEAKING controls and the chroma level in the FUNCTION menu, or to enable the preset “PRST BRIGHT,” “PRST CONTRAST,” “PRST PEAKING,” and “PRST CHROMA”...
- Page 25 Page Menu Item Settings Function (default in [ [ZEBRA]/FALSE ZEBRA/FALSE SELECT Switches the support function for setting exposure. ZEBRA/FALSE [OFF]/ON Toggles between the normal display (OFF) and the ZEBRA/ FALSE COLOR display (ON). ZEBRA SELECT [1]/2/BOTH Sets the type of ZEBRA display (ZEBRA1, ZEBRA2, or both of them).
-
Page 26: Error Message
Storage temperature –20°C to +60°C (–4°F to +140°F) DEVICE ERROR Other device errors Mass HDVF-L770: 3.0 kg (6 lb 9.8 oz) (not including hood) HDVF-L750: 1.7 kg (3 lb 12 oz) (not including hood) Error Message / Specifications... - Page 27 External dimensions HDVF-L750 HDVF-L770 Unit: mm (inches) Unit: mm (inches) 295 (11 308.6 (12 147 (5 167 (6 381.5 (15 310 (12 342.5 (13 62 (2 310 (12 62 (2 When the optional VFH-790 is installed. When the optional VFH-790 is installed.
- Page 28 EXPIRATION OF THE WARRANTY, OR FOR Pink 41.3% to 45.3% ANY OTHER REASON WHATSOEVER. Green 30.3% to 34.3% • SONY WILL NOT BE LIABLE FOR CLAIMS OF Blue 2.5% to 4.0% ANY KIND MADE BY USERS OF THIS UNIT OR MADE BY THIRD PARTIES. Purple 0% to 2.5%...
- Page 29 The material contained in this manual consists of information that is the property of Sony Corporation and is intended solely for use by the purchasers of the equipment described in this manual. Sony Corporation expressly prohibits the duplication of any...
- Page 30 Sony Corporation HDVF-L750 (SY) HDVF-L770 (SY) © 2014 4-543-739-11(1)