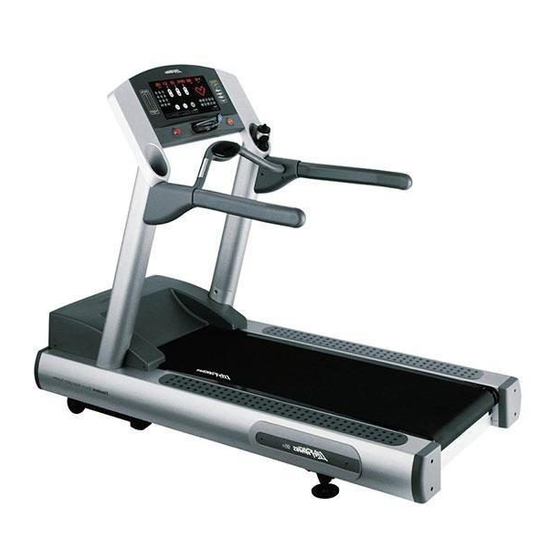
Life Fitness 93T Operation Manual
Life fitness operation manual treadmill 93t
Hide thumbs
Also See for 93T:
- Parts manual (18 pages) ,
- Assembly instruction manual (17 pages) ,
- General assembly (16 pages)
Table of Contents
Advertisement
Advertisement
Table of Contents
Troubleshooting

Related Manuals for Life Fitness 93T


Summary of Contents for Life Fitness 93T
- Page 1 93T Treadmill o p e r a t i o n m a n u a l...
- Page 2 800.735.3867 (Toll-free within U.S.A., Canada) LIFE FITNESS ASIA PACIFIC LTD Room 2610, Miramar Tower 132 Nathan Road Tsimshatsui, Kowloon HONG KONG Telephone: (+852) 2891.6677 FAX: (+852) 2575.6001 LIFE FITNESS ATLANTIC BV LIFE FITNESS BENELUX Bijdorpplein 25-31 2992 LB Barendrecht THE NETHERLANDS Telephone: (+31) 180.646.666...
- Page 3 Before using this product, it is essential to read this ENTIRE operation manual and ALL installation instructions. members on how to use it correctly and safely. Avant d'utiliser ce produit, il est indispensable de lire ce manuel d'utilisation dans son INTÉGRALITÉ, ainsi que TOUTES les instructions d'installations.
-
Page 4: Table Of Contents
Fit Test Fat Burn Cardio Maximizing Workouts on a Life Fitness Treadmill ..... . .28 Selecting an Intensity Level Using InstaPace... - Page 5 Specifications ..........44 Life Fitness 93T Treadmill Specifications ......44 ©...
- Page 6 Life Fitness Treadmill: See "Specifications" in this manual for product specific features. Life Fitness STRONGLY recommends seeing a physician for a complete medical exam before undertaking an exercise program, particularly if the user has a family history of high blood pres- sure or heart disease, or is over the age of 45, or smokes, has high cholesterol, is obese, or has not exercised regularly in the past year.
-
Page 7: Getting Started
To disconnect, turn power OFF at the ON/OFF switch, then remove plug from electrical outlet. • Never operate a Life Fitness product if it has a damaged power cord or electrical plug, or if it has been dropped, damaged, or even partially immersed in water. Contact Life Fitness Customer Support Services. - Page 8 Handrails may be held to enhance stability as needed, but are not for continuous use. • Never mount or dismount the treadmill while the running belt is moving. Use the handrails whenever additional stability is required. In case of an emergency, such as tripping, grasp the handrails, and place the feet on the side platforms.
- Page 9 électrique. • Ne jamais faire fonctionner un produit Life Fitness dont la fiche ou le cordon d'alimentation est endommagé, ni aucun appareil qui serait tombé ou aurait été endommagé ou même partiellement plongé dans l'eau. Appeler le service clientèle de Life Fitness.
- Page 10 • Ne jamais faire fonctionner d'appareil Life Fitness dont les orifices d'aération seraient blo- qués. Les garder exempts de peluches, de cheveux ou de toute obstruction. • Ne jamais rien insérer dans les ouvertures de cet appareil. Si un objet tombe à l'intérieur de l'appareil, couper l'alimentation électrique, débrancher le cordon de la prise et le récupérer...
-
Page 11: Setup
ROUNDING NSTRUCTIONS This Life Fitness product must be properly grounded. If the unit malfunctions or breaks down, proper grounding provides a path of least resistance for the electric current, which reduces the risk of shock to anyone touching or using the equipment. Each unit is equipped with an electrical cord, which includes an equipment grounding conductor and a grounding plug. -
Page 12: Wax Bag Instructions
NSTRUCTIONS To install the wax bag, turn the power off at the ON/OFF switch, and unplug the unit from the electrical outlet. Remove the access panel. Remove the two screws (A) securing the wax bag access panel (B), located on the user left side of the unit. Remove the panel and set it aside. Install the wax bag. -
Page 13: Power Switch
An unbalanced unit may cause striding belt misalignment. A bubble level is recommended to ensure proper leveling. OWER WITCH Located on the front panel at the base of the treadmill, the ON/OFF switch has two positions: "I" (one) for ON and "0" (zero) for OFF. ETTING THE LOCK The unit contains a clock, which is used for system maintenance and event tracking. -
Page 14: Centering The Belt
Then, turn the treadmill ON. Have one person stand on the platforms on either side of the treadmill belt. Do not stand on the belt at this time. Press the QUICK START key, and increase the speed to 4.0 miles per hour (MPH), or 6.4 kilometers per hour (KPH), using the SPEED UP arrow. -
Page 15: Fitness Networking
The two interchangeable type RJ45 networking ports (A) are located on the back of the display console. These network ports, located behind the display console rear access door, allow the treadmill to be connected to a fitness entertainment system and/or a fitness network, such as FitLinxx®. -
Page 16: Power Cord Routing
To plug the power cord into an outlet in rear of the treadmill, use Hole Pattern 2 for outlets locat- ed at the rear of the machine. -
Page 17: The Display Console
ISPLAY ONSOLE The computerized display console on the treadmill allows the user to tailor a workout to personal fitness abilities and goals and to monitor progress. With this easy-to-use console, the user can track fitness improvement from one workout to the next. -
Page 18: Display Console Descriptions
PAUSE: Press this key to stop the belt and hold the current workout. Continue the workout by pressing the PAUSE key a second time or by pressing the ENTER key. The Life Fitness Treadmill is equipped with a manual emergency stop system. Use either of the two features described below to stop the treadmill immediately. -
Page 19: Reading Rack And Accessory Trays
A circular-shaped STOP button is located on the right side of the panel below the display console. Press the button to stop the striding belt and end the current workout. 2.3 R EADING ACK AND The display console design includes a built-in reading rack (A) allowing a book or magazine to be supported during the workout. -
Page 20: Heart Rate Zone Training® Exercise
† , and its value depends on the workout. The Life Fitness Treadmill features exclusive workouts designed to take full advantage of the benefits of Heart Rate Zone Training® exercise. FAT BURN targets a recommended heart rate that is 65 percent of the theoretical maximum †... -
Page 21: Heart Rate Monitoring
HEST TRAP The Life Fitness Treadmill is equipped with Polar® telemetry, a heart rate monitoring system in which electrodes, pressed against the skin, transfer heart rate signals to the treadmill console. These electrodes are attached to a chest strap that the user wears during the workout. The chest strap is optional. -
Page 22: The Optional Heart Rate Chest Strap
4.1 W ORKOUT VERVIEWS The following workouts are preprogrammed for the Life Fitness Treadmill. QUICK START is the fastest way to begin exercising. After the QUICK START key is pressed, a MANUAL workout begins. FAT BURN is a low-intensity workout for burning the body’s fat reserves. The user wears a heart rate chest strap. -
Page 23: Workout Descriptions
4.3 W ORKOUT ESCRIPTIONS QUICK START HILL Press QUICK START Begin workout MANUAL Select MANUAL Enter weight Enter time Enter incline RANDOM Enter speed Begin workout * Target Heart Rate (THR) is a percentage of the theoretical maximum. For example, a 40-year-old user's THR for the CARDIO workout is 144. -
Page 24: Hill
The Life Fitness-patented HILL workout offers a variety of configurations for interval training. Intervals are periods of intense cardiovascular exercise separated by regular periods of lower- intensity exercise. The WORKOUT PROFILE window represents these high and low intervals as columns of light, which together have the appearance of hills and valleys. -
Page 25: Random
The treadmill Fit Test program is another exclusive feature of this versatile treadmill. The Fit Test workout measures cardiovascular fitness and can be used to monitor improvements in endurance every four to six weeks. - Page 26 UGGESTED Treadmill Fit Test Level NOTE: Treadmill will incline to 5% after a one minute warm-up. Suggested exertion levels should be used as a guideline for setting up the Fit Test program. The goal is to elevate the user's heart rate to a level that is between 60%-85% of their theoretical maximum heart rate (220-age).
- Page 27 Very Low <28 Life Fitness developed this rating scale based on VO2 max percentile distributions referenced in American College of Sports Medicine's "Guidelines for Exercise Testing and Prescription" (6th Ed. 2000). It is designed to provide a qualitative description of a user's VO2 max estimation, and a means of assessing initial fitness level and tracking improvement.
-
Page 28: Fat Burn
Throughout the workout, the user wears a chest strap. The console continuously monitors and displays the heart rate, adjusting the intensity level of the treadmill to reach and maintain the target*. This system eliminates over- and under-training, and it maximizes the aerobic benefits of exercise by using the body's fat stores for fuel. -
Page 29: Maximizing Workouts On A Life Fitness Treadmill
The steps for setting up a HILL or RANDOM workout include selecting a level. The word “level” refers to a range of incline percentages. The treadmill features 20 levels, with Level 1 having the lowest average incline grade and Level 20 having the highest. -
Page 30: Logging On To The Network
N TO THE ETWORK When the treadmill is connected to a network, the MESSAGE CENTER displays a prompt to log on with a personal ID number. Press ENTER. Then, for each digit of the ID number, use the ARROW keys to scroll through the displayed numerals, and press ENTER when the correct... -
Page 31: The Manager's Configuration
’ ANAGER ONFIGURATION 5.1 E ’ NTERING AND SING THE ANAGER ONFIGURATION To enter the Manager's Configuration, press and hold down the PAUSE key and press the CLEAR key twice. Continue to hold down the PAUSE key until the MESSAGE CENTER dis- plays the words “SERVICE MENU”. -
Page 32: Configuration Settings
Polar®-compatible Heart Rate Zone Training strap for monitoring the heart rate. This feature is not available on this model. 10.0 (MPH) for U.S. This is the fastest speed at which the treadmill can operate. 12.0 for international 0.5 (MPH) This is the slowest speed at which the treadmill can operate. -
Page 33: Using The Start Message Setup
SING TART ESSAGE This configuration allows for a custom start-up message to be displayed before the default “Select Workout or Press Quick Start” message. The custom message can contain up to 52 characters. REATING A TART ESSAGE After entering the Manager’s Configuration, scroll to the START MESSAGE SETUP option and press ENTER. -
Page 34: Using The Standby Setup
Use the TIME ARROW key to change the hours, and use the INCLINE ARROW key to change the minutes. Press Enter. The MESSAGE CENTER dis- plays an “auto on” value, which is the time of day, in hours and minutes, at which the treadmill automatically switches on. -
Page 35: Service And Technical Data
At no time should cleaner be applied directly to any part of the equip- ment; use non-abrasive cleaner on a soft cloth and then wipe the unit. Contact Life Fitness cus- tomer Support Services for more details (See Section 6.7 - “How to Obtain Product Service”). -
Page 36: Preventive Maintenance Schedule
Machine Level *Inspect Striding Belt Inspect Centered Frame, Toe Guards, Endcaps Tinsel Visually Inspect if Treadmill has been Moved Replace Tinsel if Changing Belt and Deck *Use bubble level to inspect CHEDULE MONTHLY QUARTERLY DISPLAY CONSOLE ASSEMBLY Inspect HANDLEBAR ASSEMBLY... -
Page 37: Troubleshooting The Treadmill
Using a voltmeter, verify power at outlet. If no power exists, reset circuit breaker at panel. Replace line cord. Contact Life Fitness Customer Support Services*. Inspect power connection at wall outlet and at machine for proper contact. Verify that circuit breaker is not open. - Page 38 Remove any debris or objects that may cause inter- ference with the treadmill. Reposition tinsel on the outside of the striding belt. Plug treadmill into a dedicated amp circuit. Check all electrical connections for proper attachment. Contact Life Fitness Customer Support Services*.
- Page 39 Move all possible obstructions off display console and handlebar. Move all possible obstructions off display console and handlebar. Contact Life Fitness Customer Support Services*. Contact Life Fitness Customer Support Services*. Contact Life Fitness Customer Support Services*. Contact Life Fitness Customer Support Services*.
-
Page 40: Troubleshooting The Optional Heart Rate Chest Strap
Make sure the chest strap trans- mitter is within three feet (one meter) of the heart rate receiver. Contact Life Fitness Customer Support Services* for instructions on how to have the chest strap replaced. Move the treadmill a few inches... -
Page 41: How To Adjust And Tension The Striding Belt
Do not move treadmill or place hands under treadmill while it is plugged into an electrical outlet! ENSIONING A 5/16-inch hex key wrench is required for this task. The Life Fitness Treadmill has access holes in the rear roller guards which allow access to the tensioning bolts. These tensioning bolts make it possible to adjust the tracking and centering of the striding belt (A) without removing the guards. -
Page 42: Tensioning An Existing Striding Belt
ENSIONING AN XISTING Enter the Manual workout and operate the treadmill for five minutes at 5.0 MPH (8.0 KPH). NOTE: DO NOT RUN OR WALK ON BELT. Reduce the speed to 2.0 MPH (3.2 KPH). Walk on the treadmill. Tightly grip the handrails and apply force with feet on the striding belt near the motor cover against the moving belt direction. -
Page 43: Cleaning The Wax Nozzle
6.6 C LEANING THE The MESSAGE CENTER periodically displays a wax reminder message, if the WAX REMINDER setting is enabled in the MANAGER’S CONFIGURATION. When this message appears, take the following steps: A. Remove panel on right side to access nozzle (A). B. -
Page 44: How To Obtain Product Service
2. Locate and write down the serial number of the unit, which is located on a plate near the power switch. 3. Contact the nearest Life Fitness Customer Support Services group: For Product Service within the United States and Canada: Telephone: (+1) 847.451.0036... -
Page 45: Specifications
PECIFICATIONS 7.1 L 93T T ITNESS Designed use: Maximum user weight: Speed range: Elevation range: Drive train: Motor type: Motor size: Power requirements: Rollers: Striding Belt: Waxing system: Deck type: Shock Absorbtion System: Ergo Front Handrail: Side handrails: Stop systems:... - Page 46 M051-00K58-B081...