Bowflex TreadClimber TC20 Assembly & Owners Manual
Hide thumbs
Also See for TreadClimber TC20:
- Service manual (95 pages) ,
- Owner's manual (57 pages) ,
- Assembly manual (28 pages)

Related Manuals for Bowflex TreadClimber TC20


Summary of Contents for Bowflex TreadClimber TC20
- Page 1 TC20 AS SEMB LY / O WN E R’ S M A N UA L This product is compliant with the applicable CE requirements.
-
Page 2: Table Of Contents
Portland, OR 97230 USA | ® indicates trademarks registered to Nautilus, Inc. in the United States. These marks may be registered in other nations or otherwise protected by common law. Bowflex, the B logo, TreadClimber, G.O. Coach, Nautilus, Schwinn, and Universal are trademarks owned by or licensed to Nautilus, Inc. -
Page 3: Important Safety Instructions
Important Safety Instructions This icon means a potentially hazardous situation which, if not avoided, could result in death or serious injury. Obey the following warnings: Read and understand all Warnings on this machine. Carefully read and understand the Assembly instructions. Read and understand the complete Manual. Keep the Manual for future reference. -
Page 4: Safety Warning Labels And Serial Number
Safety Warning Labels and Serial Number Safety Key under Motor Cover • • on inside of Treadles Serial Number Product Speci cation under Motor Cover -Moving parts can crush and cut. -Keep guards in place. -Lock out power before servicing. under Motor Cover 002-2268 Assembly / Owner’s Manual... -
Page 5: Grounding Instructions
Grounding Instructions This product must be electrically grounded. If a malfunction occurs, correct grounding decreases the risk of electric shock. The power cord is equipped with an equipment-grounding conductor, and must be connected to an outlet that is properly installed and grounded. The electrical wiring must comply with all applicable local and provincial standards and requirements. -
Page 6: Specifications / Before Assembly
Machine Mat The Bowflex™ TreadClimber™ Machine Mat is an optional accessory that helps keep your workout area clear and adds a layer of protection to your floor. The rubber machine mat provides a non-slip, rubber surface which limits static discharge and reduces the possibility of display or running errors. -
Page 7: Parts
Parts ( 4 BOXES ) Box 1 Item Description Item Description Console / Handlebar Assembly Heart Rate Strap Junction Cover, Right Safety Key Junction Cover, Left Power Cord Rear Cover Transport Handle Document Kit Cylinder Lubrication Kit Motor Cover Hardware Card Box 2 Item Description... - Page 8 Box 3 Item Description Item Description Base Assembly Upright, Left Upright, Right Box 4 Item Description Item Description Side Cover, Right Side Cover, Left Pivot Cover Assembly / Owner’s Manual...
-
Page 9: Hardware / Tools
Hardware / Tools Hardware Item Description Item Description Button Head Hex Screw, M8x20 Phillips Head Screw, Self Tapping M4x16 Lock Washer, M8x14 Flat Washer, M8x24 Hex Head Screw, M8x20 Phillips Head Screw, M4x10 Flat Washer, M8x18 Flat Washer, M4x10 Tools Included Not Included 5 mm... -
Page 10: Assembly
Assembly Some components of the machine can be heavy or awkward. Use a second person when doing the assembly steps involving these parts. Do not do steps that involve heavy lifting or awkward movements on your own. 1. Cut open the end of Box 2 and move the Treadle Assembly into your new fitness area Note: Do not cut the Shipping Zip-Tie until instructed. - Page 11 2. Attach the Transport Handle to the Base Assembly Note: Hardware is pre-installed and not on Hardware Card (*). Do not fully tighten until all hardware has been installed. 5 mm Assembly / Owner’s Manual...
- Page 12 3. Attach the Treadle Assembly to the Base Assembly 13 mm Assembly / Owner’s Manual...
- Page 13 4. Attach the Side Covers to the Treadle Assembly Note: Do not fully tighten until all hardware has been installed. Assembly / Owner’s Manual...
- Page 14 5. Attach the Pivot Covers and Spacers to the Treadle Assembly Note: Do not fully tighten until all hardware has been installed. Assembly / Owner’s Manual...
- Page 15 6. Insert the Lower I/O Cable into the Base Assembly and then Route to Front. Note: Be sure to route the cable into the side opening of the Base Assembly. Do not crimp the Lower I/O Cable. * Treadles removed for clarity. Assembly / Owner’s Manual...
- Page 16 7. Attach the Junction Covers and Uprights to the Console/Handlebar Assembly Note: Do not crimp the Console I/O Cable. In order to avoid possible serious injury, when inserting the tube ends into the Console/Handlebar Assembly be careful to avoid fingers or hands being caught or pinched.
- Page 17 8. Connect the I/O Cable to the Console I/O Cable Note: Do not crimp the I/O Cable. 9. Attach the Console/Handlebar/Upright Assembly to the Base Assembly Note: Do not crimp the I/O Cables. This step may require two people. Do not fully tighten until all hardware has been installed. In order to avoid possible serious injury, when inserting the tube ends into the Base Assembly be careful to avoid fingers or hands being caught or pinched.
- Page 18 10. Attach Cylinders to Uprights and then Treadles Note: The settings dial on the cylinders must be up, with the white arrow to the inside of the machine. Attach to Uprights before the Treadles. Once securely attached, cut the Shipping Zip-Tie at the front of the Treadles. The Treadles do not have a locking mechanism and can move freely.
- Page 19 11. Attach the Motor Cover to the Base Assembly Note: Be sure the safety tabs on the Motor Cover snap onto the Base Assembly. Assembly / Owner’s Manual...
- Page 20 12. Secure the Motor Cover to the Base Assembly Assembly / Owner’s Manual...
- Page 21 13. Pivot the Rear Cover onto the Treadle Assembly and Install the Hardware Note: Be sure the safety tabs on the upper-inside of the Rear Cover snap onto the Base Assembly. Assembly / Owner’s Manual...
- Page 22 14. Connect Power Cord to Treadle Assembly Note: The TC20 TreadClimber fitness machine is designed to plug directly into a properly wired and grounded outlet. Be sure to use the ® appropriate Power Cord for your region. 15. Final Inspection Inspect your machine to ensure that all fasteners are tight and components are properly assembled.
-
Page 23: Moving Your Machine
Adjustments Moving Your Machine The TreadClimber fitness machine weighs approximately 91 kg ( 200 lbs ) when fully assembled and requires caution when being moved. Use the ® Transport Handle found under the front of the machine to move it. To get access to the Transport Handle, turn the Levelers until you have sufficient clearance between the machine and floor. -
Page 24: Important Safety Instructions
Read and understand all Warnings on this machine. If at any time the Warning stickers become loose, unreadable or dislodged, contact your local Bowflex distributor for replacement stickers. To reduce the risk of electrical shock or unsupervised usage of the equipment, always unplug the power cord from the wall outlet and/or the machine and wait 5 minutes before cleaning, maintaining or repairing the machine. - Page 25 • Do not over exert yourself during exercise. Operate the machine in the manner described in this manual. • Perform all regular and periodic maintenance procedures recommended in the Owner’s Manual. • Read, understand, and test the Emergency Stop Procedure before use. •...
-
Page 26: Features
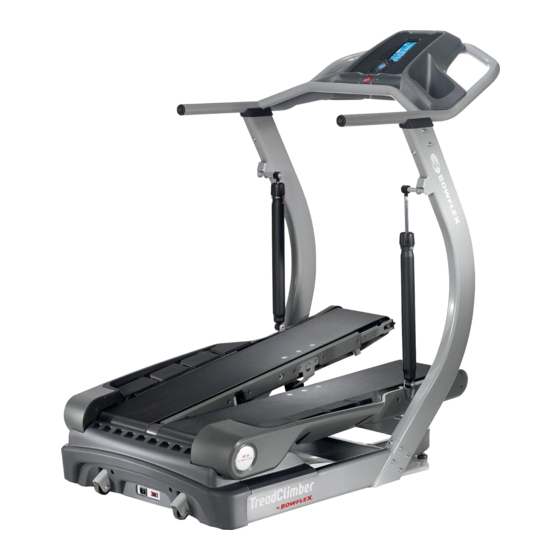
Features Console Smart phone / MP3 player holder Safety Key Port Handlebars Bottle Holder Walking Belt Adjustment Bolt Workout Cylinder Treadle Transport Handle Walking Belt Guide Leveler Walking Belt Side Foot Support Platform Transport Wheel Power Switch Heart rate monitoring systems may be inaccurate. Over exercising may result in serious injury or death. If you feel faint stop exercising immediately. - Page 27 Console Decrease button Push to lower the speed of the belts, decrease a value, select a User, or scroll through a list of options G.O. Coach™ button Push to start a G.O. Coach™ workout, or push and hold for 2 sec- LCD Display onds to configure a G.O.
- Page 28 Landmark structure displays Three landmark structures (a mountain, tower, and a building) segmented into blocks to show your workout progress. Time display Counts in minutes and seconds the total time of your workout (e.g. 24:22 minutes). During a Quick Start workout, the Time display will count up from “00:00”.
- Page 29 Hydraulic Workout Cylinder Your TreadClimber machine uses Hydraulic Cylinders to absorb your steps and cushion your joints, decreasing your overall fatigue and reduc- ® ing muscle strain. The displacement of the Treadles is adjusted by the dials on the Hydraulic Cylinders. The MIN setting is the minimum amount of Treadle movement, the MAX is the maximum movement.
-
Page 30: Chest Strap
Remote Heart Rate Monitor Monitoring your Heart Rate is one of the best procedures to control the intensity of your exercise. The Console reads the telemetry HR signals from the Heart Rate Chest Strap Transmitter that operates in the 4.5kHz - 5.5kHz range. Note: The heart rate chest strap must be an uncoded heart rate strap from Polar Electro or an uncoded POLAR compatible model. - Page 31 Heart Rate Calculations Your maximum heart rate usually decreases from 220 Beats Per Minute (BPM) in childhood to approximately 160 BPM by age 60. This fall in heart rate is usually linear, decreasing by approximately one BPM for each year. There is no indication that training influences the decrease in maximum heart rate.
- Page 32 ® ® SelectTech dumbbells, and follow the Bowflex™ Body Weight Loss Guide that comes with your machine. ® Consistency Busy work schedules, family obligations and daily chores can make it difficult to fit regular exercise into your life. Try these tips to increase your chances of success: Schedule your workouts the same way you schedule meetings or appointments.
- Page 33 Dynamic Knee Bend Stand with the feet together. Raise the heel of one foot toward the gluteals. Release the stretch by putting the foot on the floor. Each repetition of the sequence should take 1 to 3 seconds. Repeat as a continuous, controlled, fluid sequence 10 or 20 times.
- Page 34 Dynamic Side Reach Stand with the feet apart, the knees slightly bent and the arms at the sides of the body. Reach with one hand above the head and lean over to the opposite side. Release the stretch by returning to the start position. Then reach with the other hand to the opposite side.
- Page 35 Workout Schedule Here is a beginner, intermediate and advanced sample workout schedule. With each of these sample workout schedules, do not move on to the next week until the current week feels easier and comfortable. Week 1 Week 2 Week 3 Week 4 Week 5 Beginner...
- Page 36 Workout Log Use this log to track your workouts and progress. Tracking your workouts helps you stay motivated and achieve your goals. Date Cylinder Distance Time Calories Average Setting Speed REVI REVISION REV DESCR TER (OR COMPARABLE) PROTOTYPE Workout Cylinder (for reference only) Cylinder Reference Setting: 147.5mm...
- Page 37 Cool-Down * When you are done using your TreadClimber fitness machine, consider doing these relaxing stretches, which will help your body recover from the ® workout and make you more flexible: Lying Leg Raise Lie on the floor face up with the legs slightly bent. Lift one leg up toward the ceiling, keeping the knee straight.
- Page 38 Dynamic Heel Drop Place the ball of one foot on the edge of a step or staircase. Place the other foot slightly in front. Lower the heel of the back foot as far as comfortably possible, keeping the knee straight. Release the stretch by lifting the heel as high as comfortably possible.
-
Page 39: Operations
Operations Before You Start 1. Place the TreadClimber fitness machine in your workout area. ® Place the machine on a clean, hard, level surface, free from unwanted material or other objects that may hamper your ability to move freely. A rubber mat can be used below the machine to prevent the release of static electricity and protect your flooring. - Page 40 Auto Shut-Off (Sleep Mode) If the Console does not receive any input for five minutes, it will go into Sleep Mode and shut off. All workout values will be cleared. Note: The Console does not have an On/Off switch. Push the START button to start (wake up) the Console. Quick Start Workout With the Quick Start Workout, you have 30 minutes to work your way to the top of a landmark structure.
-
Page 41: Pausing Or Stopping
4. Use the Increase or Decrease buttons to adjust the weekly workout value. The default weekly workout values are: Time = 90:00 minutes, Distance = 4.5 miles, Calories = 1350 calories. When adjusted, push the START button to save the new workout value. To exit the G.O. - Page 42 Results When a workout ends, the Console will show your workout results. They are shown in sequence (time, distance, calories, average heart rate, and aver- age speed) three times. Console Service / Setup Mode The Console has a Service / Setup Mode. Some options in the Service / Setup Mode can be adjusted to your preferences, but most are helpful for service of the machine.
-
Page 43: Maintenance
5 or more hours every month We recommend that you use one of the following: • Lube-N-Walk Treadmill Lubrication Kit (available from your Bowflex distributor or your local specialty fitness dealer) ® ® • 100% pure silicone, available at most hardware and auto parts stores. - Page 44 7. Take care to clean up any excess lubricant from the Treadles. We also recommend a periodic inspection of the Treadle surfaces below the belts. If the decks appear worn, contact your local Bowflex distributor. To decrease the possibility of slipping, be sure the Treadle area is free from grease or oil. Clean off any excess oil from the machine surfaces.
-
Page 45: Walking Belt Alignment
Walking Belt Alignment The walking belts need to be adjusted if they are out of center enough to cause a rubbing or scraping sound. Adjustments can be made at the Front Roller of each Treadle. Adjusting the Walking Belts – While operating the machine, notice where the belts run on each Treadle. The Walking Belt Adjustment Bolts are on the front end of each Roller. -
Page 46: Maintenance Parts
Maintenance Parts Console / Handlebar Assembly Right Junction Cover Cylinder Power Cord Safety Key Heart Rate Strap Rear Cover Right Side Cover Right Upright Left Junction Cover Left Upright Treadle Assembly Cylinder Pivot Cover Base Motor Cover Left Side Cover Handle Assembly / Owner’s Manual... - Page 47 Maintenance Parts (Treadle Assembly) Drive Belt Treadle Stop Drive Motor Front Roller Lower Walking Belt Guide Walking Belt Adjustment Walking Screw Belt Adjustment Bracket Walking Belt Guide Right Side Foot Platform IGUS Bushing A/C Inlet Motor Control Board Rear Roller Assembly / Owner’s Manual...
-
Page 48: Troubleshooting
If chest strap is known to work with other devices and no sources of interfer- ence are present, or console has been tested with a Pulse Simulator and is not receiving the signal, contact your local Bowflex distributor for a replace- ment HR receiver. - Page 49 Condition/Problem Things to Check Solution Belts stop turning while in use Safety key Plug Safety Key into Console (See Safety Key -Emergency Stop Procedures within Features section). Motor overload Unit may be overloaded and drawing too much current, causing unit to shut power down to protect motor.
-
Page 50: Body Weight Loss Guide
By focusing on the main three elements of the Bowflex™ Body Weight Loss Guide- quality, balance, and consistency- you’ll be able to reach and maintain your weight loss and fitness goals for the next six weeks and beyond. - Page 51 – You can swap out any type of protein, vegetables or smart carbs for the suggested meal options. For example: • Turkey for tuna • Any fish or seafood for chicken • Cooked vegetables instead of salad • Eat your calories –...
- Page 52 Here’s an overview of what an ideal day looks like: (See Portion Size Guide for proper serving sizes) Breakfast Snack #1 smart rich fruit protein carb carbs smart protein carb veggies protein/fat Lunch Snack #2 healthy smart protein carb smart protein carb veggies...
- Page 53 Breakfast Options Fruit Smart Carb Protein/Fat Fruit and Nut Oatmeal Cook Berries or banana Plain oats Nuts and milk plain oats in water. Top with fruit, (Regular or quick-cook) nuts, milk, cinnamon, and honey. Egg Muffin Cook egg/s. Toast Tomato English muffin or sandwich thin Egg, ham, and cheese bread and top with 1 slice of cheese, 1 slice of ham, and...
- Page 54 1 string cheese Energy or protein bar with <200 calories* *See www.Bowflex.com/Resources for brand recommendations Optional Treats You have the choice of replacing Snack #2 with a 100-150 calorie treat. You can have an optional treat every day but for optimal health it is recom- mended to limit small splurges to 3-4 times per week.
- Page 55 Portion Size Guide Each of the items listed are for one serving MALE FEMALE PROTEIN 237ml (1 cup) = baseball 2 eggs 1 egg 142g (5oz) chicken, fish, lean meat, or tofu 85g (3oz) chicken, fish, or lean meat 158ml (2/3 cup) beans or lentils* 118ml (1/2 cup) beans or lentils* 237ml (1 cup) greek yogurt* 118ml (1/2 cup) greek yogurt*...
- Page 56 Grocery List BREAD & GRAINS 100% whole wheat bread Tips: Look for 100% whole wheat as the first ingredient. Look for 4g of Sprouted grain breads fiber per slice or 5g per 2 slices of light or diet bread. Aim for bread with Light or whole wheat english muffins less than 100 calories per slice.
- Page 57 • 7 Day Meal Planning Form • Additional Dinner Options • Pre and Post Workout Fueling Guide Questions & Support • Ask questions, post suggestions, and connect with our online Bowflex™ Dietitian on the Bowflex Facebook page Recipes • www.wholeliving.com • www.eatingwell.com •...
- Page 58 Assembly / Owner’s Manual...
- Page 59 Assembly / Owner’s Manual...
- Page 60 8006545.111514.C...