Table of Contents
Advertisement
Quick Links
Advertisement
Table of Contents

Related Manuals for AEG 49002VMN


Summary of Contents for AEG 49002VMN
- Page 1 EN User manual 49002VMN...
-
Page 2: Table Of Contents
15. EUROPEAN GUARANTEE ........... . 34 FOR PERFECT RESULTS Thank you for choosing this AEG product. We have created it to give you impeccable performance for many years, with innovative technologies that help make life simpler –... -
Page 3: Safety Information
ENGLISH 1. SAFETY INFORMATION Before the installation and use of the appliance, careful- ly read the supplied instructions. The manufacturer is not responsible if an incorrect installation and use cau- ses injuries and damages. Always keep the instructions with the appliance for future reference. 1.1 Children and vulnerable people safety WARNING! Risk of suffocation, injury or permanent disability. -
Page 4: Safety Instructions
• Never try to extinguish a fire with water, but switch off the appliance and then cover flame e.g. with a lid or a fire blanket. • Do not store items on the cooking surfaces. • Do not use a steam cleaner to clean the appliance. -
Page 5: Electrical Connection
ENGLISH Electrical connection • Do not change the specification of this appliance. WARNING! • Make sure that the ventilation open- Risk of fire and electrical shock. ings are not blocked. • Do not let the appliance stay unatten- • All electrical connections should be ded during operation. -
Page 6: Care And Cleaning
• Do not put flammable products or 2.3 Care and Cleaning items that are wet with flammable WARNING! products in, near or on the appliance. Risk of injury, fire or damage to • Do not let sparks or open flames to the appliance. -
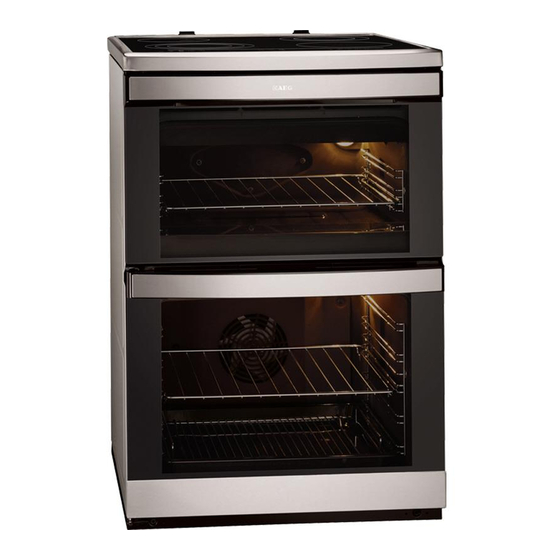
Page 7: Product Description
ENGLISH • Remove the door catch to prevent children and pets to get closed in the appliance. 3. PRODUCT DESCRIPTION 3.1 General overview Grill Oven lamp Fan and heating element Shelf positions 3.2 Cooking surface layout 145 mm Cooking zone 1200 W 120/180 mm Steam outlet Cooking zone 700/1700 W... -
Page 8: Before First Use
To bake and roast or as a pan to col- To put in the deep roasting pan. lect fat. • Roasting pan grid 4. BEFORE FIRST USE WARNING! Press the + or - button to set the correct Refer to the Safety chapters. -
Page 9: Hob - Daily Use
ENGLISH 5. HOB - DAILY USE WARNING! Refer to the Safety chapters. 5.1 Control panel layout Use the sensor fields to operate the appliance. The indicators and display show which function operates. Sensor field Function To activate and deactivate the hob. To lock / unlock the control panel. -
Page 10: Power Management
10 www.aeg.com Display Description The cooking zone operates. The STOP+GO function operates. The Automatic Heat Up function operates. There is a malfunction. A cooking zone is still hot (residual heat). The Lock / The Child Safety Device operates. The Automatic Switch Off operates. -
Page 11: Residual Heat Indicator
ENGLISH Set the heat setting for the cooking prevents an accidental change of the zone. You can also set it after you heat setting. activate the timer. This function does not deactivate the timer function. To activate the timer or change the set time, touch + or - on the hob Set the heat setting. -
Page 12: Hob - Helpful Hints And Tips
12 www.aeg.com than 10 seconds (a pan, a cloth, etc.). Touch for 4 seconds. An acoustic signal sounds and the hob Set the heat settings in less than 10 deactivates. Remove the object or seconds. You can operate the hob. -
Page 13: Hob - Care And Cleaning
ENGLISH Heat Use to: Time Hints set- ting Simmer rice and milkbased 25-50 Add the minimum twice as dishes, heating up ready- much liquid as rice, mix milk cooked meals dishes part procedure through Steam vegetables, fish, meat 20-45 Add some tablespoons of liquid Steam potatoes 20-60... -
Page 14: Control Panel
14 www.aeg.com 8.1 Control panel Num- But- Function Description Display To show the current settings of the oven. – Setting but- To set the temperature and time. tons Selection/ To move between the oven functions and Clock function clock functions. - Page 15 ENGLISH Number Name Description Heat indicator Shows the heat setting. Temperature/Clock Shows the temperature and the time in mi- indicator nutes. Keep warm indica- Shows that keep warm function is active. Cooking time/End Shows the time setting for clock functions. time/Period of op- eration Clock function indi-...
- Page 16 16 www.aeg.com Oven function Application Pizza Setting To make pizza, quiche or pie. Set the oven temperature 20-40 °C lower than for Con- ventional. Low temperature To prepare lean and tender roasted food. cooking Rotitherm To cook large pieces of meat. The grill el-...
-
Page 17: Grilling Set
ENGLISH 8.13 The child safety device • If an oven function operates. • If you do not change the oven temper- Refer to "Hob - daily use" chapter and ature. "The child safety device" section. The last temperature you set flashes in the temperature display. -
Page 18: Oven - Clock Functions
18 www.aeg.com To roast larger pieces of meat or poul- try on one level: Put the roasting pan grid in the deep roasting pan. The supports of the roasting pan grid must point up. Put the deep roasting pan in the ap- pliance and on the necessary shelf level. -
Page 19: Oven - Helpful Hints And Tips
ENGLISH Press a button to stop the acoustic Activating Heat+Hold signal. Set the time with the clock functions Duration and/or End With Minute Minder , you must activate the oven to set the Use Selection again and again clock function. until the display shows the symbol Keep warm With Duration... - Page 20 20 www.aeg.com • Cakes and pastries at different heights perature setting. The differences do not always brown equally at first. If equalize during the baking procedure. this occurs, do not change the tem- Tips on baking Baking results Possible cause...
- Page 21 ENGLISH Approx Cook Temperature Food Shelf Position Time [°C] (mins) Cakes: Rich Fruit 140 - 150 120 - 150 Cakes: Ginger- 140 - 150 80 - 90 bread Cakes: Meringues 90 - 100 150 - 180 Cakes: Flapjack 160 - 170 25 -30 Cakes: Short- 130 - 150...
- Page 22 22 www.aeg.com Approx Cook Temperature Food Shelf Position Time [°C] (mins) Vegetables: Roast 180 - 190 60 - 90 Potatos Yorkshire Pudding 220 - 210 25 - 40 Large Yorkshire Pudding 210 - 220 15 - 25 Individual Roasting Meat,...
- Page 23 ENGLISH Approx Cook Temperature Food Shelf Position Time [°C] (mins) Roasting: Meat, see Roastinh 170 - 190 Poultry Chart 10.8 Hot air Baking Shelf Positions are not critical but ensure that oven shelves are evenly spaced when more than one is used (e.g. shelf positions 1 and 3) Approx Cook Temperature...
-
Page 24: Pizza Setting
24 www.aeg.com 10.9 Pizza Setting Food Shelf Position Temperature Approx. Cook Time (min) Apple Pie 160 - 180 50 - 60 Plate Tart 180 - 200 25 - 50 Pizza, frozen Follow manufacturer`s instructions Pizza, home made 200 - 230... - Page 25 ENGLISH Always pre-heat the empty oven with the grill functions for 5 mi- nutes. • Set the shelf in the shelf level as recommended in the grill- ing table. • Always set the pan to collect the fat into the first shelf level. 10.13 Top oven •...
- Page 26 26 www.aeg.com Food Temperature Shelf Position Quantity [kg] Time (min) [°C] Beef: Topside per cm of beef or filler - 180 - 190 6 - 8 thickness medium Beef: Topside per cm of beef or filler - 170 - 180...
-
Page 27: Oven - Care And Cleaning
ENGLISH Final de- Shel Time in Type of food frosting Comments minutes mins Meat, 1000g 100-140 20-30 Turn half way through. Meat, 500g 90-120 20-30 Turn half way through. Trout, 150g 25-35 10-15 Strawberries, 30-40 10-20 300g Butter, 250g 30-40 10-15 Cream, 2 x Cream can be whipped even... -
Page 28: Removing/Installing Shelf Supports
28 www.aeg.com Removing the shelf supports Pull the front of the shelf support away from the side wall. Pull the rear end of the shelf sup- port away from the side wall and re- move it. Installing the shelf supports 11.3 Cleaning the top oven... -
Page 29: Cleaning The Door Glass
ENGLISH 11.4 Main oven 11.5 Cleaning the door glass panels The door glass on your product can be different in type and shape from the example you see in the diagram. The number of glasses can also be different. Removing the glass: Push the door trim at one side to re- move it. -
Page 30: What To Do If
30 www.aeg.com 12. WHAT TO DO IF… WARNING! Refer to the Safety chapters. Problem Possible cause Remedy The appliance does not The fuse in the fuse box Control the fuse. If the operate is released fuse is released more than one time, refer to a qualified electrician. -
Page 31: Installation
ENGLISH Problem Possible cause Remedy and number come on There is an error in the Disconnect the appli- appliance ance from the electrical supply for some time. Disconnect the fuse from the electrical system of the house. Connect again. If comes on again, speak to the After Sales Service... -
Page 32: Electrical Installation
32 www.aeg.com 13.4 The anti-tilt protection CAUTION! You must install the anti-tilt pro- tection. If you do not install it, the appliance can tilt. Make sure you install the anti-tilt protection at the correct height. Set the correct height and area for... -
Page 33: Great Britain & Ireland - Guarantee/Customer Service
ENGLISH 13.6 Covering terminal board The recommended cross-section area is six square millimetres (6 mm²). When you refit the mains terminal cover, make sure that the lower tabs are loca- ted inside the bottom edge of the aper- ture, before you fix the two screws into the top edge of the mains terminal cov- Make sure that the cover is securely fas- tened. -
Page 34: European Guarantee
34 www.aeg.com Exclusions ceipt or guarantee documentation is re- quired for in guarantee service calls. • Damage, calls resulting from trans- port, improper use, neglect, light Customer Care.Please contact our Cus- bulbs, removable parts of glass, plas- tomer Care Department: Electrolux Ma- tic. - Page 35 ENGLISH The provisions of this European Guaran- tee do not affect any of the rights gran- ted to you by law. 16. WWW.ELECTROLUX.COM Albania +355 4 261 450 Rruga “Kavajës”, ish-parku auto- buzëve, Tiranë Belgique/België/Bel- +32 2 7162444 Raketstraat 40, 1130 Brussel/ gien Bruxelles Česká...
-
Page 36: Environment Concerns
36 www.aeg.com Polska +48 22 43 47 300 ul. Kolejowa 5/7, 01–217 Wars‐ zawa Portugal +35 12 14 40 39 39 Quinta da Fonte - Edifício Gon- çalves Zarco - Q 35 -2774-518 Paço de Arcos Romania +40 21 451 20 30 Str. - Page 37 ENGLISH...
- Page 38 38 www.aeg.com...
- Page 39 ENGLISH...
- Page 40 www.aeg.com/shop...