Table of Contents

Related Manuals for Jensen JiTS-260i


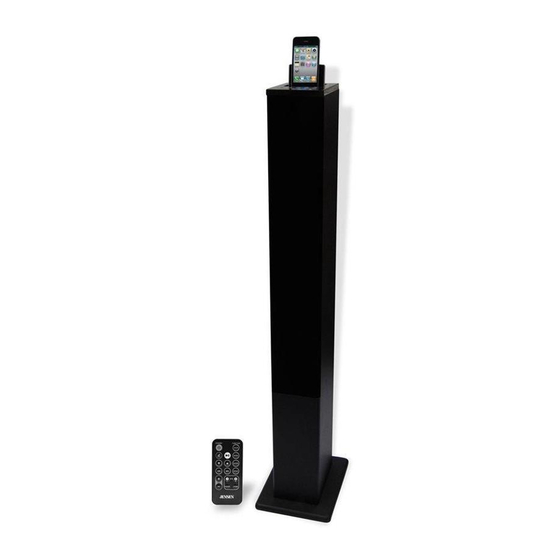
Summary of Contents for Jensen JiTS-260i
- Page 1 DOCKING TOWER SPEAKER FOR iPod AND iPhone USER MANUAL JiTS-260i (iPhone/iPod Not Included) PLEASE READ THIS USER MANUAL COMPLETELY BEFORE OPERATING THIS UNIT AND RETAIN THIS BOOKLET FOR FUTURE REFERENCE.
-
Page 2: Dear Jensen® Customer
The serial number of this product is found on its back cover. You should note the serial number of this unit in the space provided as a permanent record of your purchase to aid in identification in the event of theft of loss. Model Number: JiTS-260i Serial Number:... -
Page 3: Important Safety Instructions
WARNINGS WARNING: To reduce the risk of fire or electric shock, do not expose this appliance to rain or moisture. CAUTION: Use of controls or adjustments or performance of procedures other than those specified may result in hazardous radiation exposure. CAUTION - TO REDUCE THE RISK OF ELECTRIC SHOCK, DO NOT REMOVE COVER (OR BACK). -
Page 4: Important Notes
14)Unplug this apparatus during lightning storms or when unused for long periods of time. 15)Refer all servicing to qualified service personnel. Servicing is required when the apparatus has been damaged in any way, such as power-supply cord or plug is damaged, liquid has been spilled or objects have fallen into the apparatus, the apparatus has been exposed to rain or moisture, does not operate normally, or has been dropped. -
Page 5: Compliance With Fcc Regulations
COMPLIANCE WITH FCC REGULATIONS This device complies with Part 15 of the FCC Rules. Operation is subject to the following two conditions: (1)this device may not cause harmful interference, and (2)this device must accept any interference received, including interference that may cause undesired operation. -
Page 6: Installation
INSTALLATION 1.MAIN BODY 6.TWEETER 2.BASE 7.REMOTE SENSOR 3.WASHER 8.LOUD SPEAKER 4.SCREW 9.SUBWOOFER 5.SPEAKER COVER 1.) Attach the wooden base to the main tower using the supplied 4 screws and washers as shown in the above diagram. 2). Tighten all screws securely and then place the tower speaker on a flat floor. 3.) The speaker cover can be removed for cleaning. -
Page 7: Location Of Controls
LOCATION OF CONTROLS MAIN UNIT 1.VIDEO OUT Jack 2.AUX 1 Input L/R RCA Connectors 3.Main POWER ON/OFF Switch 4.AUX 2 Input Jack AUX IN 1 5.FUNCTION Button 6.POWER ON/STANDBY Button 7.VOLUME Down (-) Button AUX IN 1 8.VOLUME Up (+) Button 9.Docking Bay Cover 10.iPod/iPhone Docking Bay 11.iPod/iPhone Docking connector... -
Page 8: Remote Control
REMOTE CONTROL 1.POWER ON/STANDBY Button 2.MUTE Button 3.iPod Menu Up/Down / Button 4.Skip Backward Button 5.Skip Forward Button 6.VOLUME +/- Buttons 7.FUNCTION Button 8.iPod MENU Button 9.Play/Pause Button 10.iPod ENTER Button 11.REPEAT Button 12.BASS +/- Buttons 13.iPod Function Button 14.SHUFFLE Button 15.Infrared Transmitter 16.Battery Compartment GETTING STARTED... -
Page 9: Remote Control Battery Installation
REMOTE CONTROL BATTERY INSTALLATION The remote control operates on one CR2025 battery (included). To activate the remote control, remove the insulation tab inserted in the battery compartment. To remove the tab, pull it in the direction of the arrow in the illustration as shown. When the operation of the remote control becomes intermittent or unsatisfactory, replace the original battery with a new 3-volt lithium battery. -
Page 10: Listening To Your Iphone/Ipod
LISTENING TO YOUR iPhone/iPod PLAYBACK 1.Push down on the back of the docking bay cover to open it and expose the docking bay. 2.Use the iPod adaptor included with your iPod (if needed) and insert it into the docking area. No adaptor is required if you use an iPhone. -
Page 11: Video Output
3. Connect the other end of the cable to VIDEO IN of your television or video display. 4. Power on the TV set and the unit, press the FUNCTION button repeatedly or iPod button directly on JiTS-260i remote control to select iPod mode. The Red indicator lights on the FUNCTION button. -
Page 12: Auxiliary Input
LISTENING TO AUDIO FROM A TV/DVD PLAYER/VCR OR DVR You can connect this unit to other external audio devices using the AUX IN 1 RCA jack located on the back of the unit. AUX IN 1 AUX IN 1 AC 120V~ 60Hz 1. -
Page 13: Care And Maintenance
MUTE (Remote Control Only) Press the MUTE button on remote control to mute the sound output from speaker temporarily, function LED will be flashing. - Press the MUTE button again to resume to normal speaker playback. RESETTING If the system does not respond or exhibits erratic or intermittent operation, you may have experienced an electrostatic discharge (ESD) or a power surge that triggered the internal microcontroller to shut down automatically. -
Page 14: Troubleshooting Guide
TROUBLESHOOTING GUIDE Symptom Possible Problem Solution The unit is disconnected from Reconnect to the AC outlet. the AC outlet. The unit does not Try the unit on another outlet. The AC outlet has no power. respond (no power) Press the POWER Switch on MAIN POWER Switch in the OFF the back of the unit to ON position... -
Page 15: Specification
SPECIFICATION Power requirement: Main Unit AC 120V~, 60Hz Power Consumption Remote Control 1 X 3V CR2025 Lithium Battery "Made for iPod" and “Made for iPhone” mean that an electronic accessory has been designed to connect specifically to iPod and iPhone respectively, and has been certified by the developer to meet Apple performance standards. - Page 16 90 DAY LIMITED WARRANTY AND SERVICE VALID IN THE U.S.A ONLY SPECTRA MERCHANDISING INTERNATIONAL, INC. warrants this unit to be free from defective materials or factory workmanship for a period of 90 days from the date of original customer purchase and provided the product is utilized within the U.S.A. This warranty is not assignable or transferable.
- Page 17 TORRE DE ALTAVOCES CON ACOPLAMIENTO PARA iPod Y iPhone MANUAL DEL USUARIO JiTS-260i (No incluye iPod/iPhone) POR FAVOR LEA CUIDADOSAMENTE ESTE MANUAL DEL USUARIO EN SU TOTALIDAD, ANTES DE OPERAR ESTA UNIDAD Y GUARDE EL FOLLETO PARA REFERENCIA POSTERIOR.
- Page 18 En la cubierta inferior de este producto encontrará su número de serie. Es aconsejable anotar el número de serie de este producto en el espacio suministrado, como un registro permanente de su compra para ayudar en la identificación en caso de robo o pérdida. Modelo Número: JiTS-260i Número de Serie:...
-
Page 19: Importantes Instrucciones De Seguridad
ADVERTENCIA ADVERTENCIA: Para reducir el riesgo del fuego o de la descarga eléctrica, no exponer este aparato a la lluvia o a la humedad. PRECAUCIÓN: El uso de procedimientos para controles, ajustes o funcionamiento diferentes a los especificados, podría resultar en peligro de exposición a la radiación PRECAUCIÓN - PARA REDUCIR EL RIESGO DE CHOQUE ELÉCTRICO, NO REMUEVA LA TAPA (O PARTE TRASERA). -
Page 20: Notas Importantes
14)Envíe la unidad para servicio solamente con personal calificado. El aparato necesita servicio cuando ha sido dañado de cualquier forma, como por ejemplo daños en el enchufe o cable eléctrico, se han derramado líquidos dentro del aparato o el aparato fue expuesto a la lluvia o humedad, no funciona con normalidad, o por una caída. - Page 21 CONFORMIDAD CON LAS REGULACIONES FCC Este aparato cumple con lo estipulado en la Parte 15 de los Reglamentos de la FCC. Su operación queda sujeta a las dos condiciones siguientes: (1)este dispositivo no puede causar interferencia dañina, y (2)este dispositivo deberá aceptar cualquier interferencia recibida, incluyendo interferencia que pudiera causar operación no deseada NOTA : Al someterlo a pruebas se confirmó...
- Page 22 INICIO 1.COMPONENTE PRINCIPAL 6.ALTAVOZ DE AGUDOS 2.BASE 7.SENSOR REMOTO 3.ARANDELA 8.AMPLIFICADOR 4.TORNILLO 9. BAJOS 5.CUBIERTA DEL ALTAVOZ 1.) Una la base de madera a la torre principal, usando los 4 tornillos y arandelas según el diagrama anterior. 2). Ajuste todos los tornillos con firmeza y luego coloque la torre de altavoces sobre una plataforma plana.
-
Page 23: Ubicación De Los Controles
UBICACIÓN DE LOS CONTROLES UNIDAD PRINCIPAL 1.Conector de la SALIDA DE VIDEO 2.Conectores de la Entrada AUX 1 RCA DERECHO/IZQUIERDO 3.Interruptor Principal de ENCENDIDO/APAGADO AUX IN 1 4.Conector de Entrada AUX 2 5.Botón de FUNCIÓN 6.BOTÓN DE ENCENDIDO /EN ESPERA. AUX IN 1 7.Botón para bajar VOLUMEN (-) 8.Botón para subir VOLUMEN (+) -
Page 24: Control Remoto
CONTROL REMOTO 1.BOTÓN DE ENCENDIDO /EN ESPERA. 2.BOTÓN DE SILENCIO 3.Botón para subir/bajar EN EL MENÚ DEL IPOD 4.Botón para saltar hacia atrás 5.Botón para saltar hacia adelante 6.Botones de VOLUMEN +/- 7.Botón de FUNCIONES 8.Botón de MENÚ del iPod 9.BOTÓN Reproducir/pausa 10.Botón ACEPTAR iPod... - Page 25 INSTALACIÓN DEL CONTROL REMOTO DE LA BATERÍA La unidad de control remoto funciona con una batería de litio CR2025 (Incluida). Para activar el control remoto, quite la pestaña de aislamiento insertada en el compartimiento de las baterías. Para quitar la pestaña, jale siguiendo la flecha como aparece en la ilustración. Cuando el funcionamiento del control remoto sea intermitente o poco satisfactorio, reemplace la batería original con una batería nueva de 3 voltios.
- Page 26 PARA ESCUCHAR SU iPhone/iPod REPRODUCCIÓN 1.Empuje hacia abajo en la parte posterior de la cubierta de la bahía de acoplamiento para abrirla y exponer la bahía de acoplamiento. 2.Utilice el adaptador de iPod incluido con su iPod (si lo necesita), e insértelo en el área de acoplamiento.
-
Page 27: Salida De Video
3. Conecte el otro extremo del cable a la ENTRADA DE VIDEO de su televisor o pantalla de video. 4. Encienda el televisor y la unidad, oprima el botón de FUNCIÓN repetidamente directamente en el control remoto del JiTS-260i para seleccionar modalidad de iPod. Las luces rojas del indicador en el botón de FUNCIÓN. -
Page 28: Entrada Auxiliar
PARA ESCUCHAR EL AUDIO DE TV/REPRODUCTOR DE DVD/VCR O DVR Puede conectar esta unidad a otros dispositivos externos de audio usando el conector ENTRADA AUX 1 RCA ubicado en la parte posterior de esta unidad. (Cables de conexión no incluidos) AUX IN 1 Conectores de salida de Audio para... -
Page 29: Cuidado Y Mantenimiento
SILENCIO (Únicamente en el control remoto) - Oprima el botón de SILENCIO en el control remoto para silenciar temporalmente la salida de sonido a los altavoces, la luz LED de función estará parpadeando. - Oprima el botón de SILENCIO una vez más para reiniciar la reproducción normal en los altavoces REINICIO Si el sistema no responde o su operación es intermitente o errática, podría haber... -
Page 30: Solucionador De Problemas
SOLUCIONADOR DE PROBLEMAS Síntoma Posible problema Solución La unidad está desconectada Reconéctelo al tomacorriente AC. del tomacorriente AC La unidad no Pruebe la unidad en otro tomacorriente El tomacorriente AC no tiene corriente. responde (no hay Oprima el interruptor de ENCENDIDO/ Interruptor de la UNIDAD corriente) APAGADO en la parte posterior de la... - Page 31 ESPECIFICACIÓN Necesidades de corriente: Unidad Principal CA 120V CA~, 60Hz Consumo de energía Control remoto 1 batería de Litio 3V CR2025 “Hecho para iPod” y “Hecho para iPhone” significa que el accesorio electrónico fue diseñado para conectarse específicamente a iPod y iPhone, respectivamente, y que ha sido certificado por el desarrollador para cumplir con los estándares de desempeño de Apple.
- Page 32 GARANTÍA Y SERVICIOS DE COBERTURA LIMITADA POR 90 DÍAS VÁLIDA EN LOS ESTADOS UNIDOS SOLAMENTE SPECTRA MERCHANDISING INTERNATIONAL, INC. garantiza por un período de 90 días, que esta unidad se encuentra libre de materiales o mano de obra de fábrica defectuosos, desde la fecha de la compra original por parte del cliente, y siempre que el producto sea utilizado dentro de los Estados Unidos.