Motorola MTP830 S Feature User Manual
Hide thumbs
Also See for MTP830 S:
- Feature user manual (146 pages) ,
- Product information manual (106 pages) ,
- Quick start manual (2 pages)
Table of Contents
Advertisement
Quick Links
Mobile Release 5.14.3
MTP830 S
FEATURE USER GUIDE
H.E.R.T.Z Elektronik GmbH
Strausberger Straße 8h (Pappelhain)
15378 Rüdersdorf bei Berlin (OT Herzfelde)
Telefon: 033434 766-0
Fax: 033434 766-76
E-Mail: info@hertz-elektronik.de
Internet: www.hertz-elektronik.de
October 2012
*68015000597*
EN
68015000597-D
© 2012 Motorola Solutions, Inc. All rights reserved.
Advertisement
Chapters
Table of Contents

Related Manuals for Motorola MTP830 S


Summary of Contents for Motorola MTP830 S
- Page 1 MTP830 S FEATURE USER GUIDE H.E.R.T.Z Elektronik GmbH Strausberger Straße 8h (Pappelhain) 15378 Rüdersdorf bei Berlin (OT Herzfelde) Telefon: 033434 766-0 Fax: 033434 766-76 E-Mail: info@hertz-elektronik.de Internet: www.hertz-elektronik.de October 2012 *68015000597* 68015000597-D © 2012 Motorola Solutions, Inc. All rights reserved.
-
Page 3: Table Of Contents
Contents 1 General Information ........................... 1-1 1.1 Safety Information ..........................1-1 1.2 Copyrights............................1-1 1.3 Icon Conventions..........................1-2 1.4 Using this Guide..........................1-3 2 Getting Started ............................2-1 2.1 Product Technical Information ......................2-1 2.2 Before Power On ..........................2-1 2.2.1 Attaching the Antenna ...................... - Page 4 Feature User Guide 3.2.8 DGNA Auto Select Group......................3-4 3.2.9 Viewing DGNA Talkgroups....................... 3-4 3.2.10 Broadcast Call Initiated by User....................3-4 3.2.11 Initializing Broadcast Call ....................... 3-5 3.2.12 Phone and PABX Calls ......................3-5 3.2.13 Private Call........................... 3-5 3.2.14 Making a Private Call ......................3-5 3.2.15 Assistance Call ........................
- Page 5 5.4 Messages ............................5-7 5.4.1 New Message ......................... 5-7 5.4.1.1 Sending a Message to Private/Phone..................5-8 5.4.1.2 Sending a Message to Group ....................5-8 5.4.1.3 Sending a Store and Forward Message .................. 5-8 5.4.1.4 Delivery Report ........................ 5-9 5.4.1.5 Configuring Delivery Report ..................... 5-10 5.4.2 Inbox ..........................
- Page 6 Feature User Guide 5.6.7 DMO SCK ........................... 5-28 5.6.7.1 Changing DMO SCK....................... 5-29 5.6.8 Covert Mode ........................5-29 5.6.8.1 Activating Covert Mode ....................5-30 5.6.8.2 Setting to Vibrate in Covert Mode ..................5-30 5.7 Man Down ............................ 5-30 5.7.1 Setting Man Down......................... 5-31 5.8 Setup............................
- Page 7 5.8.9.7 Setting Automatic Update for the Time and Date ..............5-48 5.8.10 Energy Economy ......................... 5-48 5.8.10.1 Enabling Energy Economy....................5-49 5.8.10.2 Viewing Energy Economy Status..................5-49 5.8.11 Transmission Power Class ..................... 5-49 5.8.11.1 Selecting RF Power ....................... 5-49 5.8.12 Accry (Accessory) Setup ....................... 5-50 5.8.12.1 Selecting Accessory.......................
- Page 8 Feature User Guide 6.2 Dialing through Soft Numeric Keypad ....................6-1 6.3 Phone and PABX Calls ........................6-2 6.3.1 Making a Phone or PABX Call ....................6-2 6.4 Phone/PABX Speed Dial ........................6-2 6.4.1 Using Phone/PABX Speed Dial ....................6-3 6.5 MS-ISDN............................
- Page 9 List of Figures Figure 3-1 Trunked Mode Operation ......................3-2 Figure 3-2 Direct Mode Operation....................... 3-8 Figure 3-3 Repeater Mode Operation ......................3-20...
- Page 11 List of Tables Table 1-1 Special Notations ........................1-3 Table 2-1 Product Technical Information ..................... 2-1 Table 2-2 Battery Icons ..........................2-4 Table 2-3 Controls and Indicators....................... 2-6 Table 2-4 Display ........................... 2-8 Table 2-5 Colors of the SOFT Keys......................2-8 Table 2-6 Status Icons..........................
-
Page 13: General Information
Accordingly, any copyrighted Motorola computer programs contained in the Motorola products described in this document may not be copied or reproduced in any manner without the express written permission of Motorola. © 2012 Motorola Solutions, Inc. All Rights Reserved. -
Page 14: Icon Conventions
Feature User Guide European Union (EU) Waste of Electrical and Electronic Equipment (WEEE) directive The European Union's WEEE directive requires that products sold into EU countries must have the crossed out trashbin label on the product (or the package in some cases). As defined by the WEEE directive, this cross-out trashbin label means that customers and end-users in EU countries should not dispose of electronic and electrical equipment or accessories in household waste. -
Page 15: Using This Guide
There is no warning level associated with a note. SUGGESTION implies a recommendation or tip from Motorola that does not require to be followed, but might be helpful. There is no warning level associated with SUGGESTION. -
Page 17: Getting Started
Getting Started This chapter contains basic information on how to use the radio. 2.1 Product Technical Information Table 2-1 Product Technical Information Description Value 4.2 V Maximum Voltage Maximum Current 0.5 A Maximum RF Power 1 or 1.8 Watt (Adjustable) Maximum Speaker Load 0.5 Watts at 8 Ohms Antenna Impedance... -
Page 18: Installing The Battery
Feature User Guide Turn clockwise until snug. 2.2.2 Installing the Battery Procedure Steps Remove the battery from its protective clear plastic case. Insert the battery top into the compartment as illustrated. -
Page 19: Removing The Battery
• Motorola approved chargers provide optimum performance. Other chargers may not fully charge your Motorola Lithium- Ion battery or may reduce the life of the battery. • The battery can heat up during charging. After charging, make sure that the battery and the... -
Page 20: Charging Indicators
Feature User Guide 2.2.5 Charging Indicators When your radio is turned on while charging, it displays an icon of the battery in charging. When your radio is turned off while charging, it displays the icon of the battery in charging and backlights the display. Table 2-2 Battery Icons Battery Capacity Battery Charge Progress... -
Page 21: Controls And Indicators
2.3 Controls and Indicators 2.3 Controls and Indicators... -
Page 22: Table 2-3 Controls And Indicators
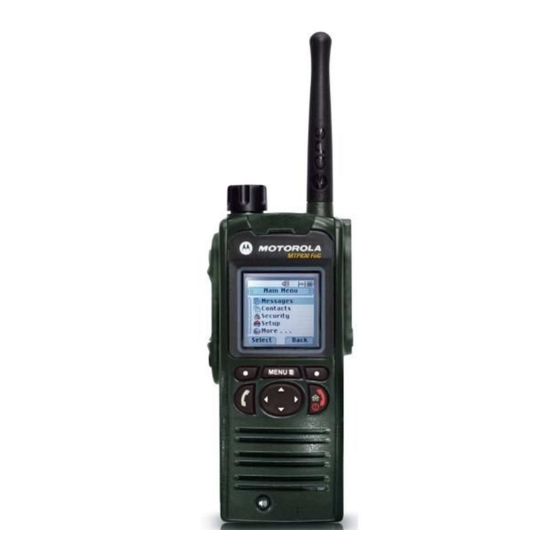
Feature User Guide Table 2-3 Controls and Indicators Annotation Description EMERGENCY button Press and hold EMERGENCY button to enter Emergency operation. When your radio is off, press and hold to power on in Emergency Mode. ROTARY KNOB • Rotate to set the volume. •... - Page 23 2.3 Controls and Indicators Table 2-3 Controls and Indicators (cont'd.) Annotation Description ACCESSORY CONNECTOR Provides connection for accessories and cable for data transfer. ANTENNA TOP MICROPHONE Activated during Simplex, high audio calls such as Group Calls. EXTERNAL ANTENNA CONNECTOR Used with the digital car kit to connect the RF signal to the external antenna. DISPLAY Provides alphanumeric text and images within 65,536 colors and 130 x 130 pixels with backlight, scalable fonts, and contrast.
-
Page 24: Display
Feature User Guide A detailed list of compatible accessories is included in Accessory Leaflet, part number: 68015000601. To obtain the document, contact your service provider. 2.4 Display This section presents the radio's home screen elements. Table 2-4 Display Annotation Description Status icon area Text display area SOFT key area... -
Page 25: Status Icons
2.5 Status Icons Display Setting Time and Date on the Display 2.5 Status Icons Status icons appear when your radio is engaged in certain activities or when you have activated certain features. Table 2-6 Status Icons Icon Description Trunked Mode Operation In Service (Signal Strength) —... - Page 26 Feature User Guide Table 2-6 Status Icons (cont'd.) Icon Description DMO Repeater Communication Mode — Displayed when the Repeater or GW + Rep option in DMO Mode is selected. This icon has the following states: • Solid — while the radio has detected the repeater (for example when the radio receives a presence signal).
- Page 27 2.5 Status Icons Table 2-6 Status Icons (cont'd.) Icon Description Battery Charging — Indicates that the battery is charging. See the section “Charging Battery”. RF Power — Indicates the High RF Power is enabled. Shows the signal strength. More bars indicate a stronger signal. Emergency —...
-
Page 28: Powering On The Radio
Feature User Guide Table 2-6 Status Icons (cont'd.) Icon Description • when receiving voice in Simplex Private Calls, • during encrypted Duplex Private Calls. SDS End-to-End Encryption Solid, when the E2E status of an SDS message, or the E2E status of a message recipient address. -
Page 29: Unlocking Your Radio
2.7 Unlocking Your Radio Your radio performs a self-check and registration routine. After successful registration, your radio is in service. Your radio powers on without visible and audible notification if Covert Mode is activated. 2.7 Unlocking Your Radio Your radio may be locked at power up. To unlock it after powering on, enter the code at the prompt. Your radio enters the default home display. -
Page 30: Locking/Unlocking The Keys/Buttons
Feature User Guide Procedure Steps Radio displays Unit Blocked Enter PUK. Enter 8–digit PUK (Personal Unblocking Key) number. The PUK is an eight-digit master code provided by your service provider. Enter the new PIN code twice. 2.8 Locking/Unlocking the Keys/Buttons Press MENU key and Left NAVIGATION key. -
Page 31: Setting Vertical Flip
2.10 Setting Vertical Flip Place your radio 30 centimeters to 60 centimeters away from you. In a noisy environment, you move the radio closer to you for better transmission. 2.10 Setting Vertical Flip When and where to use: The feature is useful for a user who has to wear the radio on shoulder, belt, or lapel and at the same time wishes to read the display upside down. -
Page 32: Selecting A Talkgroup
Feature User Guide In this mode, the radio does not transmit under any circumstances except for the Emergency Calls. All the functions and keys which cause transmission, for example registration to the network, changing talkgroup or folder, sending SDS messages, or pressing the PTT button are disabled. Any transmission trial causes the radio to display Not Allowed In TXI Mode notification and to play a tone. -
Page 33: Activating Talkgroup Scanning
2.15 Activating Talkgroup Scanning Prerequisites: Timed Talkgroup Change is assigned to One-Touch button. Procedure Steps Press and hold the One-Touch button. Your radio switches the talkgroup for a predefined amount of time. To start a group call press PTT. Your service provider can assign a function to the second press of the One-Touch button to: •... -
Page 34: Dialing Through Soft Numeric Keypad
Feature User Guide Scan 2.16 Dialing through Soft Numeric Keypad Prerequisites: Direct Private Number Dialing is assigned to a right NAVIGATION key. Procedure Steps From the home screen, press and hold right NAVIGATION key. Step result: Your radio displays dialing number prompt. Rotate the ROTARY KNOB or press up/down NAVIGATION key to choose the number, then press the knob or right NAVIGATION key to go to the next digit. -
Page 35: One-Touch Button Feature
2.19 One-Touch Button Feature 2.19 One-Touch Button Feature To use One-Touch Button feature press and hold an assigned key to activate one of the following features: Table 2-7 One-Touch Button Features Feature Description Backlight Switches backlight settings. TMO Talkgroup Scan Turns on/off the Talkgroup Scan feature in TMO Mode. -
Page 36: Terminal Temporary Disable/Enable
It is recommended to Permanent Disable your radio only when you do not expect to recover it. If it is recovered then a Permanent Disable radio can be reactivated by returning it to Motorola. 2.22 High/Low Audio Toggle The user is able to switch from the external earpiece to the main speaker using SPEAKER CONTROL key and is not required to disconnect the external earpiece or PHF. -
Page 37: Using Low Audio
2.22.2 Using Low Audio Procedure Steps Hold your radio in a vertical position with its top microphone 5–10 centimeters away from your mouth. Speak into the top microphone and listen through the internal speaker. Keep the antenna at least 2,5 centimeters from your head and body. 2.22.2 Using Low Audio When and where to use: Use it when placing and receiving a Phone, PABX, and Duplex Private calls. -
Page 38: Text Entry Icons
Feature User Guide Unlocking Your Radio 2.24.1 Text Entry Icons In the text entry screen, icons tell you which text entry mode and method you are using. A character counter displayed on the text entry icon, indicates the amount of characters that can be entered. Press and hold right NAVIGATION key or press and hold ROTARY KNOBto toggle through the text entry modes. -
Page 39: Home Display Text Message
2.25 Home Display Text Message 2.25 Home Display Text Message Your radio is provided with a feature that allows your service provider to send special text messages to the display. The message stays on the home screen until a new message is received. Power cycle your radio to replace the Home Display message to the predefined one. -
Page 41: Modes
Modes This chapter contains information on available modes that the radio can operate in. 3.1 Using Networks Procedure Steps From the home screen, press MENU key. Select More . . . → Networks. Select one of the following: • Trunked Mode •... -
Page 42: Entering Tmo Mode
Feature User Guide Figure 3-1 Trunked Mode Operation 3.2.1 Entering TMO Mode Procedure Steps From the home screen, press Optns. Select Trunked Mode. 3.2.2 Selecting a Talkgroup From the home screen, use one of the following methods: • Select Optns → TG by abc. Enter a talkgroup name and select the talkgroup name from the list. •... -
Page 43: Making A Group Call In Tmo
3.2.3 Making a Group Call in TMO 3.2.3 Making a Group Call in TMO The Group Call is received by all members of the selected group who have their units turned on and are in range. Procedure Steps Press and hold the PTT button. Wait for the Talk Permit tone (if configured) and then speak into the microphone. -
Page 44: Dynamic Group Number Assignment (Dgna)
Feature User Guide 3.2.6 Dynamic Group Number Assignment (DGNA) DGNA allows the network operator to dynamically manage talkgroups on your radio over the air interface. Using DGNA, the network operator can: • Add talkgroups. • Attach or select newly added talkgroups. •... -
Page 45: Initializing Broadcast Call
3.2.11 Initializing Broadcast Call If the type of the encryption is defined by the SIM Card, the Broadcast Call is always clear. Otherwise if the radio uses other encryption service the type of the encryption used for that Call is up to the encryption settings of that service. -
Page 46: Assistance Call
Feature User Guide Procedure Steps From the home screen, press and hold right NAVIGATION key and enter the number. If Private is not the first type of call presented, press Ctype repeatedly to select it. When you are in the following mode: a. -
Page 47: Local Site Trunking
3.3 Local Site Trunking When call priority is changed to emergency: • The display indicates that an Emergency Group Call has been received. • The radio plays a special audio alert. If a Group Call is modified into an Emergency Group Call, no emergency related features are triggered. If call modification requested by your service provider cannot be followed by the radio (due to its settings), the radio rejects it and displays Service Not Available message. -
Page 48: Exiting Local Site Trunking
Feature User Guide 3.3.2 Exiting Local Site Trunking When the link with the central network controller is reestablished, your radio exits Local Site Trunking, and the following occurs: • Your radio plays an Exiting Local Site Trunking tone. • Any call in progress during Local Site Trunking is dropped. •... -
Page 49: Selecting A Talkgroup
3.4.2 Selecting a Talkgroup 3.4.2 Selecting a Talkgroup From the home screen, use one of the following methods: • Select Optns → TG by abc. Enter a talkgroup name and select the talkgroup name from the list. • Select Optns → TG by Folder. Select a folder and then a talkgroup name. •... -
Page 50: Receiving A Group Call In Idle
Feature User Guide Procedure Steps Press and hold the PTT button. Wait for the Talk Permit tone (if configured) and then speak into the microphone. Release the PTT button to listen. 3.4.4 Receiving a Group Call in Idle Procedure Steps The radio receives a Group Call. -
Page 51: Private Call With Presence Check
3.4.7 Private Call With Presence Check Procedure Steps From the home screen, press and hold right NAVIGATION key and enter the number. If Private is not the first type of call presented, press Ctype repeatedly to select it. When you are in the following mode: a. -
Page 52: Communication Through Gateway
Feature User Guide When the radio connects to a repeater, it plays a tone and displays the Repeater available message. When the radio looses connection with the repeater, it plays a tone and displays the Repeater not available message. Messages and sounds are configured by the service provider. -
Page 53: Selecting Dmo Group Call Options
3.4.11 Selecting DMO Group Call Options 3.4.11 Selecting DMO Group Call Options When and where to use: Helps to communicate with other radio users on the same talkgroup through the Gateway or Repeater. Procedure Steps From the home screen, press Optns. Press Config. -
Page 54: Emergency Mode
Feature User Guide Your radio can still receive: • Group calls. • Messages — stored in the Inbox. • Private call attempts — stored in the Missed Calls list, without the option to respond. When no danger to safety exists anymore (for example, you leave the RF sensitive area), you can deactivate the Transmit Inhibit Mode and the radio returns to standard operation. -
Page 55: Emergency Group Call
3.6.1 Emergency Group Call If the radio user wishes to finish Emergency Call, a confirmation pop-up appears to avoid unintentional disconnects. 3.6.1 Emergency Group Call While in the Emergency Mode, you are able to initiate and receive an Emergency Group Call. This special call is initiated by pressing the EMERGENCY button. -
Page 56: Emergency Alarm
Feature User Guide 3.6.4 Emergency Alarm The Emergency Alarm is a special status message sent to the infrastructure on entering the Emergency Mode. The radio may wait for infrastructure acknowledgment for this alarm and attempt retries. Each time the radio enters the Emergency Mode, it sends an Emergency Alarm. When an Emergency Alarm is sent successfully, your radio plays Emergency Alarm Sent tone. -
Page 57: Entering Emergency Mode
3.6.7 Entering Emergency Mode When the user is in the Emergency Mode, pressing EMERGENCY button restarts the Alternating Hot Microphone. 3.6.7 Entering Emergency Mode Press and hold the EMERGENCY button or enter the Emergency number and press SEND key to enter the Emergency Mode. -
Page 58: Receiving An Emergency Group Call
Feature User Guide Procedure Steps Press and hold the PTT button. Wait for the talk permit tone (if configured) and talk. Release the PTT button to listen. To cancel the Emergency Group Call, release the PTT button before the Talk Permit tone is played. 3.6.10 Receiving an Emergency Group Call A radio receives an Emergency Group Call from the selected pre-programmed group. -
Page 59: Initializing Disaster Alert Call
3.6.12 Initializing Disaster Alert Call 3.6.12 Initializing Disaster Alert Call Procedure Steps From the home screen, press MENU key. Select More . . . → Services → Disaster Alert. Step result: Your radio enters Disaster Alert Mode and it displays Disaster Alert icon. To start the call press PTT. -
Page 60: Repeater Mode
Feature User Guide • The control room terminates the Silent Ambience Listening. • The Ambience Listening is disconnected due to another reason. If you turn off the radio in the Silent Emergency Mode, the radio switches to pseudo power off state. In this state, the radio appears to be turned off. -
Page 61: Setting Monitor Option
3.7.2 Setting Monitor Option 3.7.2 Setting Monitor Option Procedure Steps From the home screen, press Optns. Press Monitor. Select one of the following: • Off — Your radio works as a repeater only, no operation is available. • Receive Only — Allows you to listen. •... -
Page 63: Gps Location Service
If the Location Reports are sent via SDS with User Defined Data Type-4 as a transport layer, either the ETSI LIP or Motorola LRRP GPS Location Protocol is used. The LRRP GPS protocol either use SDS-TL (for added reliability) or Simple GPS with no SDS-TL (for saving air interface resources). GPS Protocol Identifiers are: •... -
Page 64: Enhancing Gps Performance
Feature User Guide Location reports are sent in TMO and can also be provisioned to be sent in DMO. If the radio is provisioned to provide user indications, the feature operational status is indicated on the radio display. Depending on the radio configuration, viewing the radio position and the status of the visible satellites is available. The position may consist of longitude and latitude, UK, or Irish grid coordinates. -
Page 65: Enabling Gps
4.2 Enabling GPS 4.2 Enabling GPS Procedure Steps From the home screen, press MENU key. Select More . . . → Location → Interface. Select On. Your service provider can enable this feature. 4.3 GPS Icon When your radio receives a valid GPS location data, it displays a GPS icon. During Emergency Mode, your radio does not display the GPS icon even when receiving GPS location data. - Page 66 Feature User Guide • Longitude — expressed in degrees, minutes, and seconds. • Number of satellites — used to calculate the location. In general, more satellites make for better accuracy. The maximum is 12 satellites. • Easting — refers to the eastward-measured distance expressed in meters. •...
-
Page 67: Viewing Your Position
4.5 Viewing Your Position 4.5 Viewing Your Position Procedure Steps From the home screen, press MENU key. Select More . . . → Location → Position. Scroll to view the results about the last time your location was calculated. To refresh your position: •... - Page 68 Feature User Guide • When your GPS antenna is covered (for example, by your hand or other object) or facing the ground • In temperature extremes outside the operating limits of your radio Even where location information can be calculated in such situations, it may take longer to do so. Therefore, in any emergency situation, confirm your location with your dispatcher.
-
Page 69: Main Menu
Main Menu This chapter contains information on items in the main menu. You can enter the menu items during a call. If you are viewing a menu when a new call starts, the radio exits the menu. 5.1 Scrolling through the Menu Procedure Steps From the home screen, press MENU key. -
Page 70: Menu Structure
Feature User Guide Table 5-1 Menu Icons (cont'd.) Menu Icon Description Security Lets you turn on/off and verify security features, and change passwords. Setup Allows you to customize your radio. More... Contains additional setup menu items. 5.3 Menu Structure Table 5-2 Menu Structure Menu Messages New Message... - Page 71 5.3 Menu Structure Table 5-2 Menu Structure (cont'd.) Menu Vibrate Remote Control Man Down Setup Vibrate Vibe then Ring Vibe Only Ring Only Details... Duplex Calls Vibe then Ring Vibe Only Ring Only Simplex Calls Vibe then Ring Vibe Only Ring Only Group Call Vibe On...
- Page 72 Feature User Guide Table 5-2 Menu Structure (cont'd.) Menu Normal Tone Clear to send Tone On Tone Off Periodic Alert Alert Period D-PTT Tones D-PTT Mode Tone Style Single Double Triple Display Flip Display Text Size Standard Zoom Extra Zoom Screen Saver Auto Disabled...
- Page 73 5.3 Menu Structure Table 5-2 Menu Structure (cont'd.) Menu EE Selection RF Power Hi RF Power Normal RF Pwr Accry Setup CORE RSM/PHF CORE Earpiece Other RSM/PHF Other Earpiece RSM Earpiece Book on Book on Accept Book on Reject Rotary Knob Rotary Mode Dual Volume...
- Page 74 Feature User Guide Table 5-2 Menu Structure (cont'd.) Menu More . . . Group Setup Scan Scanning On/Off Select List Active List Scan Lists My Groups [New Folder] My Info My Private Num My Phone Num Radio Info Recent Calls Dialed Received Missed...
-
Page 75: Messages
5.4 Messages Table 5-2 Menu Structure (cont'd.) Menu Disaster Call 5.4 Messages This feature allows you to send and receive text messages. A message can contain up to 1000 characters, depends on your service provider setting. 5.4.1 New Message This menu item allows you to create a new message. -
Page 76: Sending A Message To Private/Phone
Feature User Guide 5.4.1.1 Sending a Message to Private/Phone Procedure Steps From the home screen, press MENU key. Select Messages → New Message. Enter your message and press Send. If needed, select Private/Phone. Type recipient number or press abc to choose it from your contacts. Press Send, or SEND key, or the PTT button. -
Page 77: Delivery Report
5.4.1.4 Delivery Report Procedure Steps From the home screen, press MENU key. Select Messages → New Message. Press MENU key and select Message Setup → On/Offline users. Enter your message and press Send. If asked for the Target selection, select one of the following: •... -
Page 78: Configuring Delivery Report
Feature User Guide 5.4.1.5 Configuring Delivery Report Procedure Steps From the home screen, press MENU key. Select Messages → New Message. Press MENU key and select Delivery Report. Select one of the following: • None — Radio does not request any delivery report. •... -
Page 79: Receiving New Message
5.4.2.2 Receiving New Message • Inbox Full — Select Ok. 5.4.2.2 Receiving New Message Procedure Steps New message received. Step result: Your radio displays an animation and plays a New Mail Received tone. Select one of the following: • Read — opens the entire message. •... -
Page 80: Storing A Number From A Message
Feature User Guide 5.4.2.5 Storing a Number from a Message Prerequisites: Embedded Number feature is enabled by your service provider. When and where to use: You can save the sender's or embedded number from the message to a new or existing contact. Procedure Steps From the home screen, press MENU key. -
Page 81: Making A Group Call On A Talkgroup Of The Message Originator
5.4.2.7 Making a Group Call on a Talkgroup of the Message Originator Procedure Steps From the home screen, press MENU key. Select Messages → Inbox. Highlight the required message and select Read. Press the PTT button. Radio displays a list of the numbers (including the senders number). To call, highlight to the required number and press the PTT button or SEND button. -
Page 82: Outbox
Feature User Guide 5.4.3 Outbox It stores all sent messages. Table 5-4 Outbox Icons Icon Description Delivery in Progress Delivery Accomplished Delivery Failed Messages sub-menu indicates the number of the messages. If the indication is for example 2, it means that two messages are in the Outbox. -
Page 83: Sending A User-Defined Template
5.4.6.1 Sending a User-Defined Template 5.4.6.1 Sending a User-Defined Template Procedure Steps From the home screen, press MENU key. Select Messages → Templates. Highlight the required template name and press Send. Do one of the following: • Enter the number or press abc to select the name from your contact list. Press Send. •... -
Page 84: Sending Predefined Templates
Feature User Guide Select Messages → Predefined. Highlight the required template and press MENU key. Select View. 5.4.7.2 Sending Predefined Templates Procedure Steps From the home screen, press MENU key. Select Messages → Predefined. Highlight the required template and press Send, the PTT button, or the SEND key. You can edit the predefined template before you send it. -
Page 85: Targeted Status
5.4.8.3 Targeted Status Procedure Steps From the home screen, press MENU key. Select Messages → Send Status. Do one of the following: • Highlight the required status message and press Select, the PTT button, or the SEND key. • Enter 5 digit status message number and press Send. If the radio displays Status list is empty, you can enter 5 digit status message and press SendTo. -
Page 86: Sending A Targeted Status Message
Feature User Guide 5.4.8.4 Sending a Targeted Status Message Procedure Steps From the home screen, press MENU key. Select Messages → Send Status. Do one of the following: • Highlight the required status message and press Select, the PTT button, or the SEND key. •... -
Page 87: Creating A Contact
5.5.1 Creating a Contact Table 5-5 Contact Types (cont'd.) Contact Icon Description Other Pickers Indicate more than one number in a contact. • # (number) — each contacts entry must contain a number. • Speed # — accept the default Speed Dial number or change it. 5.5.1 Creating a Contact Procedure Steps From the home screen, select Contcs. -
Page 88: Editing A Contact
Feature User Guide 5.5.2 Editing a Contact Procedure Steps From the home screen, press Contcs. Highlight the contact you want to edit. Press MENU. Press Edit. Highlight one of the following entries and press Change to edit: • Name • Type •... -
Page 89: Deleting A Contact
5.5.4 Deleting a Contact 5.5.4 Deleting a Contact Procedure Steps From the home screen, select Contcs. Highlight a contact you want to delete. Press MENU. Select Delete contact. Select Yes. 5.5.5 Checking Capacity When and where to use: To see how many numbers are stored in the radio. 5-21... -
Page 90: Dialing Through The Contact List
Feature User Guide Procedure Steps From the home screen, select Contcs. Press MENU. Select Capacity. Select one of the following: • Private • Phone / PABX • Contact 5.5.6 Dialing through the Contact List Procedure Steps From the home screen, press Contcs. To highlight the required contact, use up and down NAVIGATION keys or by entering up to 12 characters of the contact name. -
Page 91: Protecting The Radio With A Pin Code
5.6.1.1 Protecting the Radio with a PIN Code Unlocking Your Radio Changing PIN Code 5.6.1.1 Protecting the Radio with a PIN Code Procedure Steps From the home screen, press MENU → Security → PIN Protect. Select On. Enter 4-digit PIN code. By default it is 0000 (four zeros). To increase security, set your own PIN code. -
Page 92: Changing Pin Code
Feature User Guide Procedure Steps Radio displays Unit Blocked Enter PUK. Enter 8–digit PUK (Personal Unblocking Key) number. The PUK is an eight-digit master code provided by your service provider. Enter the new PIN code twice. 5.6.1.3 Changing PIN Code Procedure Steps From the home screen, press MENU key. -
Page 93: Keypad Lock Notification
5.6.2.1 Keypad Lock Notification The EMERGENCY button is always operative. Locking/Unlocking the Keys/Buttons 5.6.2.1 Keypad Lock Notification When the keypad is locked, your service provider can configure one of the following instructions: • None — no notification is displayed. • Notification Only — Keys Locked is displayed. •... -
Page 94: Viewing Air Encryption State
Feature User Guide In the TMO Mode, when Air Encryption is enabled on you radio but cannot be supported due to an infrastructure failure, the following icon appears on the display: . When encryption is not available in the DMO Mode, the radio displays: . This menu item allows you only to view air encryption state. -
Page 95: Verifying K Validity
5.6.4.1 Verifying K Validity 5.6.4.1 Verifying K Validity Procedure Steps From the home screen, press MENU key. Select Security → K Validity. Your radio displays: • K is Valid — the infrastructure can authenticate your radio. • K is Invalid — the infrastructure is unable to authenticate your radio. Please call your service provider to restore the key to your radio. -
Page 96: Verifying Dmsck Validity
Feature User Guide 5.6.6.1 Verifying DMSCK Validity Procedure Steps From the home screen, press MENU key. Select Security → DMSCK Validity. Your radio displays: • DMSCK is Valid — your radio can work encrypted in DMO Mode. • DMSCK is Invalid — your radio cannot work encrypted in DMO Mode. Please contact your service provider to restore SCKs to your radio. -
Page 97: Changing Dmo Sck
5.6.7.1 Changing DMO SCK 5.6.7.1 Changing DMO SCK Procedure Steps From the home screen, press MENU key. Select Security → DMO SCK. Press Next. Radio displays Change to version . Select one of the following: • Yes — to change the key. Your radio displays Key version changed. •... -
Page 98: Activating Covert Mode
Feature User Guide 5.6.8.1 Activating Covert Mode Procedure Steps From the home screen, press MENU key. Select Security → Covert Mode. Select one of the following: • On — all tones are set to off, and the backlight and the LED are disabled immediately. The group audio is routed to the earpiece. -
Page 99: Setting Man Down
5.7.1 Setting Man Down 5.7.1 Setting Man Down Procedure Steps From the home screen, press MENU key. Select Man Down. Select one of the following: • On — Activates the feature. • Off — Deactivates the feature. 5.8 Setup This sub-menu allows you to change your radio configuration. 5.8.1 Vibrate This sub-menu allows you to determine if your radio vibrates, or rings, or both vibrates and rings when receiving a call. -
Page 100: Setting Default Vibrate
Feature User Guide 5.8.1.1 Setting Default Vibrate Procedure Steps From the home screen, press MENU key. Select Setup → Vibrate. Select one of the following: • Vibe then Ring • Vibe Only • Ring Only 5.8.1.2 Setting Detail Vibrate Procedure Steps From the home screen, press MENU key. -
Page 101: Setting Ring Style
5.8.2.1 Setting Ring Style 5.8.2.1 Setting Ring Style Procedure Steps From the home screen, press MENU key. Select Setup → Ring Style. Select one of the following: • Duplex — To set the new ring style to all duplex calls. •... -
Page 102: Setting Volume
Feature User Guide Volume Adjustment Mode 5.8.3.1 Setting Volume Procedure Steps From the home screen, press MENU key. Select Setup → Set Volume. Select one of the following: • Duplex Vol — sets the volume level for duplex ringtones. • Simplex Vol — sets the volume level for simplex ringtones. •... -
Page 103: Setting Language
5.8.4.1 Setting Language 5.8.4.1 Setting Language Procedure Steps From the home screen, press MENU key. Select Setup → Language. Select desired language. 5.8.5 Data Setup This menu item allows you to set up your radio to transmit and receive data from the external device. To connect your radio accessory connector to the external device, use cable FKN4897. -
Page 104: Audio Profile
Feature User Guide 5.8.6.1 Audio Profile When there is a need of different audio quality and adaptive audio parameters, you can modify them accordingly to the working environment. An audio profile adjusts the audio parameters of the radio to fit its current operating environment. -
Page 105: Setting Howling Suppression
5.8.6.4 Setting Howling Suppression 5.8.6.4 Setting Howling Suppression Procedure Steps From the home screen, press MENU key. Select Setup → Audio → Howling Suppr.. Select required setting. On powering on, the Howling Suppression is disabled. 5.8.6.5 Audio Toggle You can control audio routing (speaker/earpiece) for any private or group call through the dedicated SPEAKER CONTROL key. -
Page 106: Setting Volume Adjustment Mode
Feature User Guide Set Volume 5.8.6.8 Setting Volume Adjustment Mode Procedure Steps From the home screen, press MENU key. Select Setup → Audio → Volume Adj. Mode. Select one of the following: • Individual — You can set Duplex, Simplex, Earpiece, Speaker and Keypad per your preferences in MENU →... -
Page 107: Setting Keypad Tone
5.8.7.2 Setting Keypad Tone 5.8.7.2 Setting Keypad Tone Procedure Steps From the home screen, press MENU key. Select Setup → Tones → Keypad Tone. Select one of the following: • On — Activates keypad tone. • Off — Deactivate keypad tone. 5.8.7.3 All Tones You can activate/deactivate all tones. -
Page 108: Setting Talk Permit
Feature User Guide 5.8.7.6 Setting Talk Permit Procedure Steps From the home screen, press MENU key. Select Setup → Tones → Talk Permit. Select one of the following: • No Tone — No tone heard upon pressing the PTT button. •... -
Page 109: Setting Periodic Alert
5.8.7.10 Setting Periodic Alert 5.8.7.10 Setting Periodic Alert Procedure Steps From the home screen, press MENU key. Select Setup → Tones → Periodic Alert. Select one of the following: • Alert — Activates/deactivates periodic tone. • Period — Indicates the time between each periodic tone. 5.8.7.11 D-PTT Tones This menu item contains the settings for the Double PTT feature. -
Page 110: Setting Vertical Flip
Feature User Guide Display Setting Time and Date on the Display 5.8.8.1 Setting Vertical Flip When and where to use: The feature is useful for a user who has to wear the radio on shoulder, belt, or lapel and at the same time wishes to read the display upside down. -
Page 111: Setting Screen Saver
5.8.8.3 Setting Screen Saver Procedure Steps From the home screen, press MENU key. Select Setup → Display → Text Size. Select one of the following: • Standard — Default size of the text. • Zoom — Larger size of the text. Keep in mind that less text can be displayed. •... -
Page 112: Setting Wallpaper
Feature User Guide Procedure Steps From the home screen, press MENU key. Select Setup → Display → Backlight. Select one of the following: • Auto — Backlight is triggered by turning on the radio, by pressing any key on device or on the accessory that is connected to it. -
Page 113: Time And Date
5.8.9 Time and Date Procedure Steps From the home screen, press MENU key. Select Setup → Display → Contrast. Use left and right NAVIGATION key to change the value. Press Ok. 5.8.9 Time and Date This sub-menu controls the displayed time and date on the home screen. If the Home Display Text Message feature is enabled, the time and date cannot be displayed. -
Page 114: Setting Time And Date On The Display
Feature User Guide 5.8.9.1 Setting Time and Date on the Display Procedure Steps From the home screen, press MENU key. Select Setup → Time & Date → Display. Select one of the following: • Time & Date — Your radio displays time and date. •... -
Page 115: Setting Date Format
5.8.9.4 Setting Date Format Procedure Steps From the home screen, press MENU key. Select Setup → Time & Date → Set → Set Time. Enter current time using NAVIGATION keys. Press Done. 5.8.9.4 Setting Date Format Prerequisites: If MENU → Setup → Time & Date → Display is set to Time & Date or Date Only. Procedure Steps From the home screen, press MENU key. -
Page 116: Setting Time Offset
Feature User Guide 5.8.9.6 Setting Time Offset Procedure Steps From the home screen, press MENU key. Select Setup → Time & Date → Set → Time Offset. Enter time offset using NAVIGATION keys. You can adjust the offset value, with 15 minute steps, up to 14 hours ahead or behind. Press Done. -
Page 117: Enabling Energy Economy
5.8.10.1 Enabling Energy Economy 5.8.10.1 Enabling Energy Economy Procedure Steps From the home screen, press MENU key. Select Setup → Energy Economy → EE Selection. Select one of the following: • On — Activates Energy Economy feature. • Off — Deactivates Energy Economy feature. 5.8.10.2 Viewing Energy Economy Status Procedure Steps From the home screen, press MENU key. -
Page 118: Accry (Accessory) Setup
• CORE Earpiece — select an earpiece from the list of the CORE accessories. • Other RSM/PHF — select an accessory from the list of the non-Motorola accessories. • Other Earpiece — select an earpiece from the list of the non-Motorola accessories. -
Page 119: Editing Book On Settings
5.8.13.1 Editing Book On Settings RUA/RUI 5.8.13.1 Editing Book On Settings Procedure Steps From the home screen, press MENU key. Select Setup → Book on Setup. Select one of the following: • Book on Accept — Radio accepts all the book on requests. •... -
Page 120: Setting Rotary Knob Mode
Feature User Guide 5.8.14.1 Setting Rotary Knob Mode Procedure Steps From the home screen, press MENU key. Select Setup → Rotary Knob → Rotary Mode. Select one of the following: • Dual — Both modes are available. Turn the ROTARY KNOB to adjust the volume or press and then turn to switch to different talkgroup. -
Page 121: Setting Rotary Knob Wrap Around
5.8.14.4 Setting Rotary Knob Wrap Around From the home screen, press MENU key. Select Setup → Rotary Knob → In Keypad Lock. Select one of the following: • Lock None — Scrolling and volume setting functionality is available. • Lock Volume — ROTARY KNOB can be only used for scrolling. •... -
Page 122: Setting Rotary Knob Talkgroup Selection
Feature User Guide Only when Wrap Around is set to On and the Scroll Range is set to Scroll To Next, you are able to scroll through all the talkgroups and folders. 5.8.14.6 Setting Rotary Knob Talkgroup Selection Procedure Steps From the home screen, press MENU key. -
Page 123: Scan
5.9.1 Scan 5.9.1 Scan This menu item allows you to activate/deactivate scanning, view the active scan list, and edit the scan lists. This feature is available only for the TMO Mode. Your radio joins any group call as long as this group is defined in the scan list and scan is turned on. -
Page 124: Setting Scan Lists
Feature User Guide Procedure Steps From the home screen, press MENU key. Select More . . . → Group Setup → Scan → Active List. If Scanning is Off is displayed, go to More . . . → Group Setup → Scan → Scanning → On to enable scanning. -
Page 125: Editing Scan Lists
5.9.1.4 Editing Scan Lists Procedure Steps From the home screen, press MENU key. Select More . . . → Group Setup → Scan → Scan Lists. Highlight required scan list and press MENU to see additional settings: • Rename — Enter new name for that scan list. •... -
Page 126: Adding A Talkgroup To A Favorite Folder
Feature User Guide Select More . . . → Group Setup → My Groups. Select[New Folder]. Enter the name and select Ok. 5.9.2.2 Adding a Talkgroup to a Favorite Folder Procedure Steps From the home screen, press MENU key. Select More . . . → Group Setup → My Groups. Select <FolderName>. -
Page 127: Deleting A Talkgroup From The Favorite Folder
5.9.2.4 Deleting a Talkgroup from the Favorite Folder 5.9.2.4 Deleting a Talkgroup from the Favorite Folder Procedure Steps From the home screen, press MENU key. Select More . . . → Group Setup → My Groups. Select required favorite folder. To delete one talkgroup, highlight it and select Delete. -
Page 128: Viewing/Modifying Personal Information
Feature User Guide 5.10.1 Viewing/Modifying Personal Information Procedure Steps From the home screen, press MENU key. Select More . . . → My Info. Select one of the following: • My Private Num — displays your radio private number. • My Phone Num — displays your radio phone number. To modify the displayed phone number, select Edit. -
Page 129: Calling From Recent Calls
5.11.2 Calling from Recent Calls Select one of the following: • Dialed • Received • Missed Select View on the required call. Press down NAVIGATION key to bypass first two steps. Call time information is only available if the time and date are set in the radio. Call duration is not available in the missed calls list. -
Page 130: Deleting Recent Calls
Feature User Guide From the home screen, press MENU key. Select More . . . → Recent Calls. Select Dialed, Received or Missed. Press Store. If Store is not assigned to the left SOFT key, the number is already stored in your contact list. To store the number as a new entry, select [New Contact]. -
Page 131: Logging On
5.12.1 Logging On RUA/RUI Book On 5.12.1 Logging On Procedure Steps From the home screen, press MENU key. Select More . . . → RUI → Log on. Highlight: • User ID and press Select to enter User ID List. If you are a new user on this radio, select [New User ID] and enter your user ID. -
Page 132: Selecting Your Network
Feature User Guide Entering TMO / DMO Mode Selecting Network Operation Mode 5.13.1 Selecting Your Network Procedure Steps From the home screen, press MENU key. Select More . . . → Networks → Networks Sel → Home Only. Your radio registers to the first network on the allowed network list. 5.13.2 Using the Select Net Registration When and where to use: Use this feature to migrate to another predefined network, when you are out of the range of your network and your... -
Page 133: Using Any Network
5.13.4 Using Any Network Procedure Steps From the home screen, press MENU key. Select More . . . → Networks → Networks Sel → Foreign Net. 5.13.4 Using Any Network When and where to use: Your radio has lost its home network coverage and can register to any network. Only clear authentication is supported on any network. -
Page 134: Selecting Network Operation Mode
Feature User Guide Procedure Steps From the home screen, press MENU key. Select More . . . → Networks → Networks Sel and choose one of the following option: • Migrate To — Selects the required network form the list. To view the network ID press MENU key then press Select. -
Page 135: Viewing Your Position
5.14.1 Viewing Your Position GPS Location Service 5.14.1 Viewing Your Position Procedure Steps From the home screen, press MENU key. Select More . . . → Location → Position. Scroll to view the results about the last time your location was calculated. To refresh your position: •... -
Page 136: Viewing Data Statistics
Feature User Guide To transfer data from a standard computer over the air, connect the computer via the data cable FKN4897 with your radio. Your service provider has to setup additional applications on your computer. If set up by your service provider it is possible to accelerate the transmission by using the Multi-Slot Packet Data (MSPD) Service. -
Page 137: Features
Features 6.1 Private Call The Private Call, also called point-to-point, or individual call, enables calling between two individuals. No other radio can hear the conversation. This call type can be carried out in two ways: • Duplex call (if the system allows), in TMO Mode. Both parties can speak at the same time. •... -
Page 138: Phone And Pabx Calls
Feature User Guide Procedure Steps From the home screen, press and hold right NAVIGATION key. Step result: Your radio displays dialing number prompt. Rotate the ROTARY KNOB or press up/down NAVIGATION key to choose the number, then press the knob or right NAVIGATION key to go to the next digit. -
Page 139: Using Phone/Pabx Speed Dial
6.4.1 Using Phone/PABX Speed Dial This feature is available only in TMO Mode. 6.4.1 Using Phone/PABX Speed Dial Procedure Steps From the home screen, enter the predefined Phone/PABX speed dial number and # key. Press SEND key. 6.5 MS-ISDN This feature adds to the radio ISDN number. You can choose between MS-ISDN and ISSI to address the call, send the message or pre-defined templates. -
Page 140: Wap Browser
Feature User Guide WAP Push WAP Box 6.8.1 WAP Browser The Openwave Mobile Browser is a WAP-complaint user agent. The WAP browser provides all of the basic services of a computer-based web browser. Whenever any preemptive display interrupts the browser session, the browser needs manual reactivating to return. -
Page 141: Creating A Bookmark Through Navigate Pane
6.8.4.1 Creating a Bookmark through Navigate Pane 6.8.4.1 Creating a Bookmark through Navigate Pane Procedure Steps Enter the browser and browse to the required page. Press Menu to enter the browser menu. Select Mark Page. The screen displays the title and URL of the marked page. To save it: a. -
Page 142: Saving A Page
Feature User Guide Enter the browser. Scroll to Bookmarks pane. Scroll to the required bookmark and select Go. The bookmark downloads the selected page from the web. 6.8.4.4 Saving a Page When and where to use: Save a page for off-line browsing. Procedure Steps Enter the browser and browse to the required page. -
Page 143: Disabled Browser Entry
6.8.6 Disabled Browser Entry When re-entering the browser with previously available Packet Data, the radio displays the last browsed page, or the last page to which you navigated off-line. 6.8.6 Disabled Browser Entry Browser entry is disabled: • During any type of voice call, except Ambience Listening Call •... -
Page 144: Browser Menu Panes Overview
Feature User Guide Table 6-1 Browser Keys Usage (cont'd.) Key Press Action MENU key Brings up the browser menu. END key Press to deactivate the browser. SEND key Disabled in browser active state. ROTARY KNOB EMERGENCY button Deactivates the browser. The radio enters Emergency Mode. -
Page 145: Advanced
6.8.10 Advanced... • Forward — for navigating to the document located one step forward in the navigation history. If there is no forward history, this item is disabled. • Reload — for reloading the current document. • Advanced... — see following section. 6.8.10 Advanced... -
Page 146: Working With The Options Pane For A Selected Bookmark
Feature User Guide 6.8.11.1 Working with the Options Pane for a Selected Bookmark Procedure Steps From the Bookmarks pane select More..Scroll to a bookmark. Press MENU to open the Options pane for that bookmark. Select one of the following: •... -
Page 147: History Pane
6.8.12 History Pane 6.8.12 History Pane This pane displays the list of recently visited pages (up to nine history entries can be listed). Each history entry shows its title, if present. Otherwise, No Title is displayed. 6.8.12.1 Navigating to the Recently Visited URL Procedure Steps Select the URL. -
Page 148: Text Input Pane
Feature User Guide • Details — for displaying the image details. • Show Image — for showing the image on its own page. 6.8.16 Text Input Pane Prerequisites: This pane is visible when the browser menu is opened and text entry field is active. When and where to use: To input the text for the URL. -
Page 149: New Wap Messages
6.8.17.1 New WAP Messages WAP Box 6.8.17.1 New WAP Messages Types of the WAP Messages and their priorities: Your service provider sets the priority of the message. • Push Message – High — animation and the icon (blinking) are displayed with the New WAP Message tone. –... -
Page 150: Viewing A Wap Message
Feature User Guide 6.8.17.2 Viewing a WAP Message Procedure Steps From the home screen, press MENU key. Select Messages → WAP Box. Select the required message. Select Go to to view the message in the browser. 6.9 Call-Out This feature allows you to receive call-out alerts. When the Call-Out messages are received the radio, it interrupts current services and attends to the call-out alert without any further delay. -
Page 151: Call-Out Modes Interaction
6.9.2 Call-Out Modes Interaction 6.9.2 Call-Out Modes Interaction Call-Out feature operation is different in other modes: • TXI Mode — you can read the message but you cannot respond to it. You have an option to leave the TXI Mode by pressing soft key or reject the Call-Out message. •... -
Page 153: Appendix A Tones
Appendix A: Tones Table A-1 Radio Tones Tone Name Default Tone Diagram [Hz] 2400 2100 Back to Coverage 1800 1000 Back to Full Service [ms] [Hz] 2400 2100 1800 1000 Clear-to-send [ms] [Hz] 2400 2100 1800 1000 Bad Key Pressed [ms] [Hz] 2400... -
Page 154: Low Battery Alert
Feature User Guide Table A-1 Radio Tones (cont'd.) Tone Name Default Tone Diagram [Hz] 2400 2100 Entering/Exiting Local Site 1800 1000 Trunking 400[ms] [Hz] 2400 2100 Receiving/Sending 1800 1000 Emergency Alarm 400[ms] [Hz] 2400 2100 1800 1000 Emergency Alarm Failed 600[ms] [Hz] 2400... -
Page 155: Appendix B Led Indications
Appendix B: LED Indications Table B-1 LED Indications Indication Status In use Solid green Blinking green In service Solid red Out of service Blinking red Connecting to the network Entering DMO Solid orange Transmit inhibit in service Channel busy in DMO Blinking orange Incoming call No indication... -
Page 157: Appendix C Troubleshooting
Appendix C: Troubleshooting Your radio displays the following messages: Table C-1 Displayed Messages Message Message Description ...-Received Call received but not answered, or rejected. Your radio could not perform talkgroup attachment. It keeps on Attachment Failed trying. If it does not succeed, try another talkgroup. Your radio could not register on an authenticated system (for Authenticate Failure example, the Authentication Key is incorrect, or authentication is... - Page 158 Feature User Guide Table C-1 Displayed Messages (cont'd.) Message Message Description Insufficient visible satellites Your radio is in the process of determining your location. This process may take several minutes to complete. Invalid ID The entered number is not valid. Invalid Shortcut Position The entered number is not valid.
- Page 159 Appendix C Troubleshooting Table C-1 Displayed Messages (cont'd.) Message Message Description There is only one programmed entry in the scrolling list. Single TalkGroup Only Overheating, Please Turn Radio Off Your radio turns off. Keep it turned off for 5 minutes. Party Busy Called radio is busy.
-
Page 161: Appendix D Maintenance
A battery is an expendable part and may need replacing during the life of the radio. To ensure maximum service life of your radio, always replace the battery with a genuine Motorola replacement. In order to ensure maximum life for your battery: •... -
Page 162: Additional Battery Warnings/Cautions
Feature User Guide D.5 Additional Battery Warnings/Cautions • Battery storage above 60° C and below -20° C is not recommended. • To prevent injury, do not allow metal objects to touch the battery contacts. • Do not disassemble. • Do not throw in fire. •...