
Related Manuals for Windsor Voyager 2 VGR2


Summary of Contents for Windsor Voyager 2 VGR2
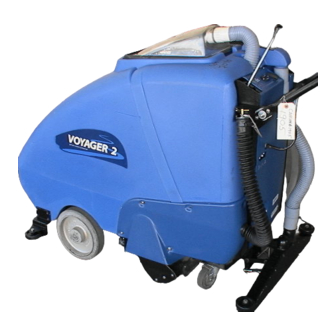
- Page 1 WWW.MANUALS.WS MODEL POWER SOURCE VGR2 BATTERY Beginning with Serial# 1000081028 Read instructions before operating the machine. WWW.MANUALS.WS 98953 05/05/05...
-
Page 2: Table Of Contents
DATE OF PURCHASE - _________________________ SERIAL NUMBER - ____________________________ SALES REPRESENTATIVE - ____________________ DISTRIBUTOR NAME - _________________________ ©Copyright 2001 Windsor Industries, Printed in U.S.A. TABLE OF CONTENTS Data Log / Table of Contents ......2 Propel Handle Assembly........14 Technical Specifications ........3 Drive and Brush Assembly ........16... -
Page 3: Technical Specifications
TECHNICAL SPECIFICATIONS WWW.MANUALS.WS ITEM MEASURE Electric Propelling Motor (1)-1/4 hp DC (186 watts) with solid state variable speed forward and reverse with safety shut-off. Electric Vacuum Motors (2)- 3 stage, 1.3 hp (970 watts), 5.7 inch (14.5cm) diameter motors in parallel, provide 152 cfm (4.25m/min.), 74 inches (188 cm) water lift total. -
Page 4: Safety Precautions
IMPORTANT SAFETY INSTRUCTIONS WWW.MANUALS.WS When using a battery powered appliance, basic precaution must always be followed, including the following: READ ALL INSTRUCTIONS BEFORE USING THIS MACHINE. To reduce the risk of fire, electric shock, or injury: WARNING: Do not use outdoors or expose to moisture. Do not operate in standing water. -
Page 5: Battery Installation & Removal
WORK. REMOVAL OF BATTERIES BEFORE REMOVING BATTERY TRAY PLEASE FOLLOW THE INSTRUCTION SHEET 98439. If you did not receive this sheet please contact Windsor Industries for this instruction sheet. FOLLOW PROCEDURES CAREFULLY, BE SURE TO KEEPS HANDS AND CAUTION: FEET 1. -
Page 6: Battery Information
BATTERY INFORMATION WWW.MANUALS.WS BATTERY CHANGING PROCEDURE: VIEW: Looking down on machine. Charge the batteries once battery level indicator is near the level “0”. Do not let the batteries NOTE: Following you will completely drain before changing. Avoid charging find the recommended the batteries before the amber light comes on. -
Page 7: Operation Controls
OPERATION CONTROLS WWW.MANUALS.WS SEE BELOW 1. Brush Height Adjustment. Raises and adjusts the height if the brush. 2. Vac Shoe Lift Lever. Lifts the vac shoe up or down and switches vac motor off and on. 3. Battery Charge Meter. Indicates the level of charge that the batteries are holding. -
Page 8: Operations
OPERATIONS WWW.MANUALS.WS Fill the solution tank to the desired level according to the marked gauge on the clear hose on the right side of the tank. TOP VIEW OF TANK DO NOT FILL PAST THE INLET LIP. SOLUTION TANK CAUTION: RECOVERY TANK IF A BUCKET IS USED TO FILL THE TANK, BE SURE IT IS CLEAN. -
Page 9: Accessory Tools And Maintenance
ACCESSORY TOOLS & MAINTENANCE WWW.MANUALS.WS ACCESSORY 1. Attach the auxiliary solution hose to the output nipple A. 2. Disconnect hose at vac shoe using and connect vac hose using coupler (22071) that is included with Voyager machine. 3. Turn the solution control valve B to 4. - Page 10 3/8" (9.5mm) softened. Use a screw driver blade or other flat head long. metal tool to seal damaged area. Vacuum Motor Carbon Brushes Replacement (Windsor) VACUUM MOTOR REMOVAL End Cap 1. Turn main power off.
-
Page 11: Maintenance
MAINTENANCE WWW.MANUALS.WS SOLUTION PUMP REMOVAL 1. Turn main power off. 2. Disconnect the two pump wire leads. 3. Remove (4) screws holding the pump to the main frame. 4. Lift the pump out to access solution inlet and disconnect from the pump head. Refer to the pump drawing page 16 for replacement parts. - Page 12 MAINTENANCE WWW.MANUALS.WS MANIFOLD / SPRAY JETS To prevent clogged jets due to alkaline build-up, the spray system should be flushed with 1 gallon of clean hot water at the end of each work day. The VOYAGER2 is equipped with “quick change” jets that can be easily removed for cleaning.
-
Page 13: Service Schedule
MAINTENANCE WWW.MANUALS.WS SERVICE SCHEDULE MAINTENANCE DAILY WEEKLY QUARTERLY Check recovery dome and gasket for damage and cleanliness Check batteries after charging, add water if necessary Check brush – should be clean with no lint or strings attached Inspect vac shoe for blockage; remove fibers with coat hanger, etc. -
Page 14: Propel Handle Assembly
PROPEL HANDLE ASSEMBLY WWW.MANUALS.WS VIEW: CONNECTION DETAIL Color Position Blue Black Brown 20 WWW.MANUALS.WS Orange 20 White 20 VGR2 98953 10/19/02... - Page 15 PROPEL HANDLE ASSEMBLY WWW.MANUALS.WS SERIAL NO. PART NO. DESCRIPTION NOTES: FROM 27551 COVER, PROPEL HANDLE 70406 SCREW, 10B X 3/8 PHSM BLK 87018 WASHER, #10 X 9/16 OD 57236 NUT, 10-32 HEX NYLOCK BLK 71116 SUPPORT, LEVER PIVOT 67271 ROD, HANDLE LEVER PILOT 51186 LEVER, PROPEL CTRL HANDLE 66184...
-
Page 16: Drive And Brush Assembly
DRIVE & BRUSH ASSEMBLY WWW.MANUALS.WS TO BELT #35 PAGE 20 WWW.MANUALS.WS VGR2 98953 10/19/02... - Page 17 DRIVE BRUSH ASSEMBLY WWW.MANUALS.WS PART SERIAL NO. DESCRIPTION NOTES: FROM 89078 WHEEL, 10” X 2 –1/2” BORE 81003 FLANGETTE, 1” BEARING PAIR 70305 SCREW, 5/16-18 X 3/4 HHCS 57113 NUT, 5/16-18 NYLOCK PLTD 81002 BEARING, 1” BORE 29156 DIFFERENTIAL 48052 KEY, 1/4 X 1/4 X 2-1/2 87008 WASHER, 1/4 ID X 1-1/4 OD...
-
Page 18: Pump, Vac, Manifold And Brush Motor Assemblies
PUMP, VAC, MANIFOLD & BRUSH MOTOR ASSEMBLIES WWW.MANUALS.WS Replacement of Motor brushes (#28) CAUTION: TURN POWER OFF. 1. Using a standard head screw driver, remove cap covering brush inlet. 2. Using a pair of needle nose pliers, gently remove brush (including spring) and replace with new part. - Page 19 SPRING, 0.6 OD X 2.0L COMPR 53782 VAC MOTOR ASM, 36VDC 140658 BRUSH SET, VAC MTR 53204 SERVICE ONLY 140686 BRUSH SET, 24V/36V VAC WINDSOR SERVICE ONLY 66095 PLUG, 1/8 MPT HEX BRASS 54139 MANIFOLD ASM, VGR 3-JET 87067 WASHER, 5/16 LOCK INT STR.
-
Page 20: Rear Tower Electrical Assemblies
REAR TOWER ELECTRICAL ASSEMBLIES WWW.MANUALS.WS DETAIL “A” REAR TOWER CUTAWAY NOTE: SUPPLIED WITH RELAY REF. 84140 – VALVE ASM. PARTS BREAKDOWN TO #*45 PAGE TO #*38 PAGE SUPPLIED W/ VALVE ASM. INSTALLED ON OUTSIDE OF SEE DETAIL “A” COVER. NOTES: LOCATE @ PORT MARKED “P”... - Page 21 REAR TOWER ELECTRICAL ASEMBLIES WWW.MANUALS.WS PART SERIAL DESCRIPTION NOTES: 40038 HOSEBARB, 1/4 MPT X 3/8 H 45DEG. 51184 LOCK, HANDLE ADJ. 57125 NUT, 5/16-24 HEX JAM 62561 PLATE, NEGATIVE POST 67005 RIVET, 1/8 OD WHT AL 70162 SCREW, 10-32 X 3/8 PHMS SS 70228 SCREW, 10-32 X 1/4 PHMS SS 70289...
-
Page 22: Handle, Microswitch And Cable Assemblies
HANDLE, MIRCOSWITCH AND CABLE ASSEMBLIES WWW.MANUALS.WS VIEW: LEFT SIDE OF VIEW: RIGHT SIDE REAR PANEL OF REAR PANEL SHOWN. REF. REF. REF. REF. REF. REF. REF. REF. REF. REF. BRUSH HOUSING REF. BRUSH & REVERSE SWITCH NOTE: FOR BRUSH AND REVERSE SWITCHES, ALIGN THE TWO SWITCHES AND CHECK TO SEE THAT THE ACTUATOR TABS ARE EVEN TO WITHIN 1/16 INCH. - Page 23 HANDLE, MICROSWITCH & CABLE ASSEMBLIES WWW.MANUALS.WS PART SERIAL QTY DESCRIPTION NOTES: 48030 KNOB, PT17/20 BLACK 38186 HANDLE, BRUSH/VAC CONTROL 27559 CLEVIS, 3/8-16 UNC ROD END 51170 LEVER ASM, HANDLE PIVOT 70117 SHOULDER BOLT, 5/16 OD X 1.0 L 73220 SPACER, EPB CABLE/CASE HARD 87013 WASHER, 1/4 ID X 5/8 OD SS 87025...
-
Page 24: Control Panel Assemblies
CONTROL PANEL ASSEMBLY WWW.MANUALS.WS NOTE: HARDWARE SUPPLIED WITH METER. WWW.MANUALS.WS VGR2 98953 10/19/02... - Page 25 CONTROL PANEL ASSEMBLY WWW.MANUALS.WS PART SERIAL QTY DESCRIPTION NOTES: 27710 COVER, REAR VOYAGER 2 TRIMMED 54144 METER, 36V BATTERY CHARGE LEVEL 72130 SWITCH, SPST 2-POSITION ROCKER 70056 SCREW, 6-32 X 1/2 PPHMS OPEN 57109 NUT, 7/16-28 PANEL 54092 METER, 0-60 VDC HOUR 57132 NUT, 3/8-27 DRESS PANEL 57116...
-
Page 26: Vac Shoe Assembly
VAC SHOE ASSEMBLY WWW.MANUALS.WS NOTE: #24 SPRINGS ATTACH TO #17 EYEBOLT. VAC SHOE ASM. (REF) REAR MAIN FRAME GREASE WWW.MANUALS.WS VGR2 98953 10/19/02... -
Page 27: Vac Shoe Assembly
VAC SHOE ASSEMBLY WWW.MANUALS.WS SERIAL PART NO. DESCRIPTION NOTES: 70351 SCREW, 10-32 X 3/8 HHTR W/ STAR 62391 PLATE, VAC SHOE COVER 35124 GASKET, VGR VAC SHOE PLATE 85031 VAC SHOE, VGR2 28” 87003 WASHER, 3/8 ID X 7/8 OD SS 89059 WHEEL, PT20 SQUEEGEE BUMPER 70368... -
Page 28: Tank, Cover And Hardware
TANK, COVER & HARDWARE ASSEMBLY WWW.MANUALS.WS 47 34 69AB 13AB WWW.MANUALS.WS VGR2 98953 06/28/03... - Page 29 04082 ADAPTOR, Y-FITTING MODIFIED 70088 SCREW, 10-32 X 1/2 PPHMS 500009 LABEL, WARNING EXPLOSION 66380 PLATE, SPACER 70114 SCR, #10 X 3/4 TYPE B WWW.MANUALS.WS 50917 LABEL, TANK RIGHT 50918 LABEL, TANK LEFT 50941 LABEL, WINDSOR LOGO VGR2 98953 06/28/03...
-
Page 30: Wiring Diagram
WIRING DIAGRAM VOYAGER 2 WWW.MANUALS.WS WWW.MANUALS.WS VGR2 98953 10/19/02...