Table of Contents
Advertisement
Advertisement
Table of Contents

Related Manuals for Safety 1st onBoard 35 Air


Summary of Contents for Safety 1st onBoard 35 Air
- Page 1 4358-5480 US S1 onBoard Air 10/1/10 10:46 AM Page 1...
- Page 2 3 child fatalities; nearly all of which are caused by head trauma. These are frightening facts, but Safety 1st has been by your side for 25 years providing innovative products to help protect your child from becoming a statistic. It is in this tradition that we proudly announce Air Protect™...
- Page 3 4358-5480 US S1 onBoard Air 10/1/10 10:27 AM Page 5 A. Before You Begin ....Pages 5-10 D. General Vehicle Installation . . .Pages 32-40 A-1 Thank You... D-1 Understanding Your Vehicle A-2 Registration and Safety Notices D-2 Vehicle Seating Position...
-
Page 4: Registration And Safety Notices
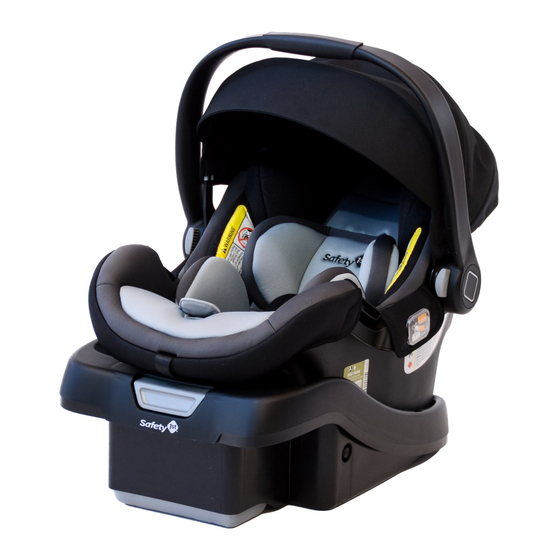
4358-5480 US S1 onBoard Air 10/1/10 10:27 AM Page 7 A-2 Registration and Safety Notices A-1 Thank You... Thank you for choosing this car seat, referred to throughout Please complete the postage-paid registration card that this manual as a child restraint. The DJG family is committed came with your child restraint, and send it to us. - Page 5 4358-5480 US S1 onBoard Air 10/1/10 10:27 AM Page 9 Back View A-3 Understanding Your Child Restraint Front View Handle Adjustment Base Release Handle Lever Carrier (shell) Handle Lock Indicator Removable Base Angle Indicator Harness System Detail Chest Clip Harness Straps Buckle Tongue Carry Handle Harness Release...
- Page 6 4358-5480 US S1 onBoard Air 10/1/10 10:27 AM Page 11 Bottom of Carrier Top of Base Base Belt Path Base/Carrier Lock Bar Openings LATCH Belt Belt Lock Off Plates LATCH Storage Door Belt Lock Off Plates Base Adjustment Lever Lock Base Release Lever Harness Tightening Strap...
-
Page 7: Vehicle Seating Position
4358-5480 US S1 onBoard Air 10/1/10 10:27 AM Page 13 B-3 Child Restraint Use Failure to follow these warnings can result in the This child restraint must only be used when serious injury or death of your child. To help you the child weighs between 4-35 lbs. - Page 8 4358-5480 US S1 onBoard Air 10/1/10 10:27 AM Page 15 C-1 Remove and Install the Carrier to Base C-2 Canopy Use and Installation Thread Plastic Strip To Remove Carrier from Completely thread the Base plastic strip in the channel From the back of the in front of the canopy.
-
Page 9: Carrier Use
4358-5480 US S1 onBoard Air 10/1/10 10:27 AM Page 17 WARNING: C-3 Carrier Use Read ALL instructions before using child restraint as To Adjust Carrying Handle a carrier. NEVER use carrier unless child is properly secured. Squeeze both adjustment levers on each side of For use as a carrier by children weighing less than 35 handle. -
Page 10: Child Restraint To Fit Child
4358-5480 US S1 onBoard Air 10/1/10 10:27 AM Page 19 C-4 Child Restraint Use C-5 Preparing Child Restraint to Fit Your Child This child restraint is to be used rear-facing with children weighing 4-35 lbs (1.8-15.9 kg) AND 32 inches (81.2 cm) tall Make these adjustments with your child in the child or less. - Page 11 4358-5480 US S1 onBoard Air 10/1/10 10:27 AM Page 21 Unbuckle Harness Choose new location and push the metal clip Press red button. Pull buckle through pad and carrier. tongues out. Place harness Make sure the buckle is straps over sides of child facing out.
- Page 12 4358-5480 US S1 onBoard Air 10/1/10 10:27 AM Page 23 Check Harness Height From the bottom, pull the metal clip through the With child in the child carrier and insert it into the restraint, check the location middle slot. of the harness slot. Follow the guidelines below to determine the correct harness/headrest height.
-
Page 13: Securing Child In Child Restraint
4358-5480 US S1 onBoard Air 10/1/10 10:27 AM Page 25 Rethread harness into new C-6 Securing Child in Child Restraint harness slot location. Make sure harness straps Position Harness do not twist. Straps Over the Child’s Shoulders. From the back of the child restraint, refasten the harness straps to the splitter plate. -
Page 14: Removing Child From Child Restraint
4358-5480 US S1 onBoard Air 10/1/10 10:27 AM Page 27 Tighten Harness C-7 Removing Child From Child Restraint Pull on harness Loosen Harness tightening strap to tighten harness snugly. Press on harness release NOTE: A snug strap should lever while pulling on both not allow any slack. -
Page 15: Head/Hip Roll Use
4358-5480 US S1 onBoard Air 10/1/10 10:27 AM Page 29 C-8 Head/Hip Roll Use C-9 Reclining the Base The base has 3 recline positions. Use any of these to help To Remove Head/Hip you achieve the recline angle needed for the weight of your Roll child. -
Page 16: Removing Pad For Cleaning
4358-5480 US S1 onBoard Air 10/1/10 10:27 AM Page 31 Cleaning Pad C-11 Removing Pad for Cleaning Hand wash pad with warm sudsy water, rinse clean and air dry. Spot clean the harness straps. Do not use bleach or You must remove the harness system to remove the use other harsh cleaners. -
Page 17: Installing Harness System
4358-5480 US S1 onBoard Air 10/1/10 10:27 AM Page 33 C-12 Installing Harness System D-1 Understanding Your Vehicle Your vehicle’s features may be considerably different than Thread the Harness those pictured here. Consult your vehicle owner’s manual to Straps help identify your vehicle’s specific features and locations. Starting on the left side, insert harness in the harness slot, going through... -
Page 18: Choosing Latch Or Vehicle Belts
4358-5480 US S1 onBoard Air 10/1/10 10:27 AM Page 35 D-2 Vehicle Seating Position D-3 Choosing LATCH or Vehicle Belts Some seating positions in your vehicle may not be safe for LATCH Anchor Bars The LATCH System this child restraint. Some vehicles do not have a seating position that can be used safely with this child restraint. -
Page 19: Knowing Your Vehicle Belts
4358-5480 US S1 onBoard Air 10/1/10 10:27 AM Page 37 D-4 Knowing Your Vehicle Belts ELR lap-only vehicle belts MUST NOT be used Review your vehicle’s owner manual for vehicle seat belt use with this child restraint. with child restraints. This is your best source for information concerning your vehicle. -
Page 20: Using The Locking Clip
4358-5480 US S1 onBoard Air 10/1/10 10:27 AM Page 39 Locate Locking Clip D-5 Using the Locking Clip Location Grasp both vehicle belts A locking clip will not fix all types of vehicle seat belt together just behind the problems. Review section D-4 and your vehicle’s owner latch plate and unbuckle. - Page 21 4358-5480 US S1 onBoard Air 10/1/10 10:27 AM Page 41 Check Vehicle Belt D-7 Storing LATCH System Tightness Grasp the child restraint at the vehicle belt path Failure to securely store the LATCH system with one hand. Push and and completely close and lock the storage pull the child restraint from door can result in serious injury or death.
- Page 22 4358-5480 US S1 onBoard Air 10/1/10 10:27 AM Page 43 E-1 Rear-Facing Installation with Base E-2 Installing Base with LATCH Belt lock off MUST be used when using this base. See your vehicle owner’s manual for information on designated LATCH positions and anchor locations. Do not use the LATCH system along with the vehicle lap or lap/shoulder belt.
- Page 23 4358-5480 US S1 onBoard Air 10/1/10 10:27 AM Page 45 Lift Up Belt Lock Off Connect LATCH to Plate “B” Vehicle LATCH Anchor NOTE: The LATCH’s red release button MUST face away from child restraint and the arrows on connectors MUST face up. Fasten one LATCH belt connector to the anchor Remove LATCH...
- Page 24 4358-5480 US S1 onBoard Air 10/1/10 10:27 AM Page 47 Check for Proper Close and Lock the Lock Recline Check the angle indicator. Close both “A” and “B” lock The ball should be off plates and lock. Push between the two marks down on the lock off cover on the indicator that and while locking.
- Page 25 4358-5480 US S1 onBoard Air 10/1/10 10:27 AM Page 49 Unlock the Belt Lock E-4 Installing Base with Vehicle Belts Lift up on the belt lock off lock. Remove the lock from the Belt lock off MUST be used when using this base. plates.
- Page 26 4358-5480 US S1 onBoard Air 10/1/10 10:27 AM Page 51 Tighten Vehicle Belt Push down FIRMLY on the Failure to securely attach carrier to base can base and pull up on the result in serious injury or death. shoulder belt to tighten belt. Tip: Push base down and towards the vehicle seat Check for Proper...
- Page 27 4358-5480 US S1 onBoard Air 10/1/10 10:27 AM Page 53 E-5 Rear-Facing Installation without Base E-6 Installing Carrier with Vehicle Belts Place Child Restraint in Vehicle Rear-Facing Center the base in the chosen seating position. Check the angle indicator. The ball should be between the two marks on the indicator that matches the weight of...
-
Page 28: Warranty
4358-5480 US S1 onBoard Air 10/1/10 10:27 AM Page 55 Check the Angle Warranty Indicator Dorel Juvenile Group, Inc. (DJG) warrants this product to the original The ball should be between retail purchaser as follows: the two marks on the This product is warranted against defective materials or indicator that matches the workmanship for one year from the date of original purchase. -
Page 29: Replacement Parts Order Form
4358-5480 US S1 onBoard Air 10/1/10 10:27 AM Page 57 Replacement Parts Order Form Complete the form below. Your model number with color code and manufacturer date code MUST be included on the form to ensure proper replacement parts. Your model number with color code and the date code can be found on a sticker on the side of child restraint. -
Page 30: Replacement Parts List
4358-5480 US S1 onBoard Air 10/1/10 10:27 AM Page 59 Replacement Parts List NOTE: If requested color is not available, similar color will be substituted. Part Cost Quantity Total Cost Buckle Strap/Buckle . .$6.99 X ______= $ ______________ Harness Strap ..$2.00 X ______= $ ______________ Pad Set .