Table of Contents

Related Manuals for CDA hc9620


Summary of Contents for CDA hc9620
- Page 1 Ceramic Hob Manual for Installation, Use and Maintenance Customer Care Department • The Group Ltd. • Harby Road • Langar • Nottinghamshire • NG13 9HY T : 01949 862 012 F : 01949 862 003 E : service@cda.eu W : www.cda.eu...
- Page 2 Appliance information: Please enter the details on the appliance rating plate below for reference, to assist CDA Customer Care in the event of a fault with your appliance and to register your appliance for guarantee purposes. Appliance Model...
- Page 3 IMPORTANT INFORMATION FOR CORRECT DISPOSAL OF THE PRODUCT IN ACCORDANCE WITH EC DIRECTIVE 2002/96/EC. At the end of its working life, the product must be taken to a special local authority waste collection centre or to a dealer providing appliance recycling services. Disposing of a household appliance separately avoids possible negative consequences for the environment and health.
-
Page 4: User Information
User Information Please note: • Ceramic hobs become hot and remain hot during and immediately after use. Do not touch the hob until it has been allowed to cool. • Keep children away from the appliance when in use. • Never put cooking foil or plastic materials on the ceramic surface when the hob is hot. -
Page 5: Using Your Hob
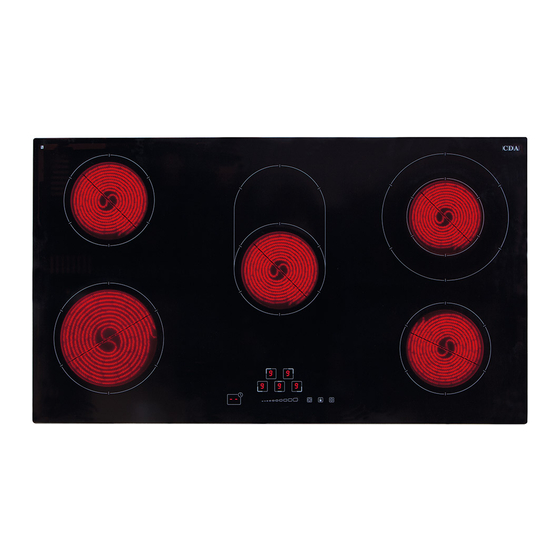
Using Your Hob Fig. 1 Zones: 1. Front left: 1.8kW - 200mm 2. Rear left: 1.2kW - 165mm 3. Rear right: 1.0/2.2kW - 140/220mm dual 4. Front right: 1.2kW - 165mm 5. Centre: 1.1/2.0kW - 165-270mm dual... - Page 6 Control panel Fig. 2 Touch control 1. Heating zone controls (including displays) 2. Timer control and display 3. Slider control 4. Booster key 5. Key lock 6. On/Off key...
- Page 7 Using the touch controls The controls respond to touch, so you don’t need to apply any pressure. Use the ball of your finger, not its tip. You will hear a beep each time a touch is registered. Make sure the controls are always clean, dry, and that there is nothing (e.g.
- Page 8 How to Use the Hob The ceramic surface of the hob allows fast transmission of heat vertically from the heating elements under the glass to the pans on the hob top. The heat does not spread horizontally, so the hob top remains relatively cool only a few centimetres from the zone in use.
- Page 9 control” to control the power level, by touching anywhere along its length. You can change the heat setting at any time during cooking. To use more than one heating zone, just repeat a similar procedure for each zone you wish to use (as above). To switch heating zones off Activate the “Heating zone control”...
- Page 10 and the zone indicator will show the heat level selected. While the “Heating zone control” is still flashing, touch the “Dual zone” once and this will switch to both areas heating up. While in this setting the zone indicator will flash between the power setting Touch the “Dual zone”...
- Page 11 To lock the controls: Touch the key lock control . If all heating zones are switched off the timer indicator will show “Lo“: If one or more heating zones is switched on the timer indicator will flash between “Lo” and “--“. To unlock the controls: Touch and hold the key lock control for approx.
-
Page 12: Using The Timer
Using the Timer You can use the timer in two different ways: • You can use it as a minute minder. In this case, the timer will not turn any cooking zone off when the set time is up. • You can set it to turn a cooking zone off after the set time. You can set the timer for up to 99 minutes. - Page 13 To cancel the beeper: touch the “Timer” display once. To cancel the timer • Touch the “Heating zone control” for the zone. • Touch the “Timer” display to select the timer function. • Use the slider to reduce the units of the time to zero. •...
- Page 14 To cancel the beeper • Touch the “Timer” display once. To cancel the minute minder • Touch the “Timer” display to select the timer function. • Use the slider to reduce the units of the time to zero. • Touch the “Timer” display again to confirm the units setting. •...
-
Page 15: Efficient Use Of Your Hob
Efficient Use of Your Hob The hob is equipped with zones of different sizes, designed to accommodate most shapes and sizes of pan. For best results, only use pans with flat bottoms and choose appropriate zones depending on the sizes of the pans. The most efficient use of the hob is shown below, where the pans and zones are correctly chosen. -
Page 16: Care And Maintenance
Choose pans which are between the sizes recommended in the table above, and with bases that are as non-reflective as possible, e.g. dull and dark. Only pans recommended for use on ceramic hobs should be used. Pans with aluminium bases may leave silver streaks or spots on the hob. - Page 17 difficult to remove. All cleaner residues should be removed with a damp cloth. Types of residues Clean with Cleaning advice Cleaning sponge and Wipe over the zone to be cleaned with a sponge and hot Light soft cloth water, and then wipe off with a soft dry cloth. Accumulated baked-on stains/ Cleaning sponge or Wipe over the zone to be cleaned with a sponge and hot...
-
Page 18: Mains Electricity Connection
• The mains cable is not user replaceable so must only be replaced by a qualified electrician or service engineer. Consult CDA for advice if the mains lead needs to be replaced. • The marking of the current rating of... -
Page 19: Fitting The Hob
the socket outlet. • Assembly and electrical connection should be carried out by specialised personnel. • When installing this product we recommend you seek the help of another individual. Fitting the Hob Unpacking the hob: Take care not to lose or mishandle any parts. Fitting position of the hob: This appliance must be installed a minimum of 50mm from any back wall and a minimum of 180mm away from any adjacent vertical surfaces,... - Page 20 Wall furniture requirements: The minimum height of any cabinet immediately above the hob is 900mm. The minimum height of any adjacent units (including light pelmets) is 400mm, unless they are manufactured from a material resistant to fire (steel, for example) Notes: •...
-
Page 21: How To Install The Hob
How to Install the Hob How to install the hob: Overall dimensions of the hob: width 900mm depth 520mm Worktop cut-out dimensions: width 870mm depth 490mm 1. Make the required hole in the worktop. Before doing this, you must 60mm check the instructions supplied with any cooker hood to ensure that you 490mm... - Page 22 3. Secure the hob to the worktop using the fixing brackets and screws supplied, as shown in (Fig. 7). Remove any excess sealant after tightening the brackets. Do not over-tighten the fixing brackets. WORKTOP WORKTOP BRACKET BRACKET Fig. 7...
- Page 23 NOTES:...
- Page 24 Please contact our Customer Care Department for Service on the details below. Customer Care Department • The Group Ltd. • Harby Road • Langar • Nottinghamshire • NG13 9HY T : 01949 862 012 F : 01949 862 003 E : service@cda.eu W : www.cda.eu...