
Related Manuals for NETGEAR CG3100


Summary of Contents for NETGEAR CG3100
-
Page 1: User Manual
Wireless Cable Gateway CG3100 User Manual 350 East Plumeria Drive San Jose, CA 95134 April 2011 202-10840-01 v1.0... -
Page 2: Technical Support
P/N: Part Number TBD v1.0 Technical Support Thank you for choosing NETGEAR. To register your product, get the latest product updates, get support online, or for more information about the topics covered in this manual, visit the Support website at http://support.netgear.com . -
Page 3: Table Of Contents
Table of Contents Chapter 1 Connect to the Internet Gateway Front Panel ......... . 6 Gateway Rear Panel . - Page 4 NETGEAR Wireless Cable Gateway Chapter 5 Advanced Settings Wireless Settings ..........32 MAC Filtering .
-
Page 5: Chapter 1 Connect To The Internet
For information about the topics covered in this manual, visit the Support website at http://support.netgear.com For help installing the gateway, see the Wireless Cable Gateway CG3100 Quick Install Guide For optimal performance, place the gateway vertically in the stand. Note:... -
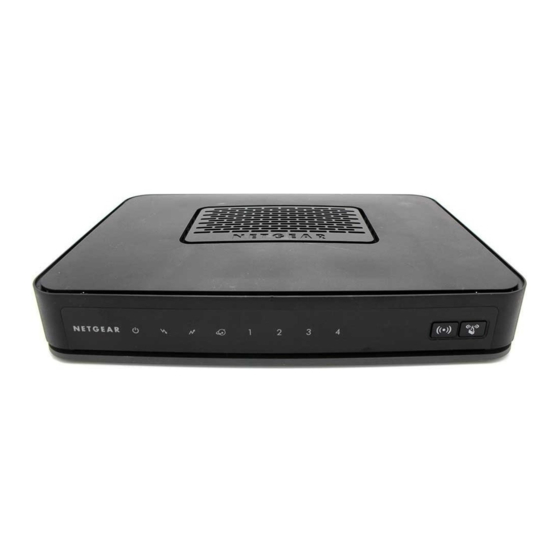
Page 6: Gateway Front Panel
NETGEAR Wireless Cable Gateway Gateway Front Panel Figure 1. Gateway front view You can use the LEDs to verify status and connections. The following table lists and describes each LED and button on the front panel of the gateway.. Description •... -
Page 7: Gateway Rear Panel
NETGEAR Wireless Cable Gateway Gateway Rear Panel Coaxial Power Power On/Off port cable adapter button connector input Voice ports Ethernet LAN ports Figure 2. Gateway rear panel The rear panel includes the following connections, viewed from left to right: Two voice/phone ports. WIth VoIP service, connect one or two handsets to these ports. -
Page 8: Check The Installation Requirements
NETGEAR Wireless Cable Gateway Check the Installation Requirements Check the requirements listed below before installing the gateway: Local Computer. During installation, you need a local computer to connect to the • gateway via Ethernet. This computer should be set up to access the cable modem Internet service. -
Page 9: Log In To Your Gateway
NETGEAR Wireless Cable Gateway Verify the following: a. The power light is lit after turning on the gateway. b. The Internet light is solid green, indicating a link has been established to the cable network. c. The LAN LED is lit for the port where you connected the computer. -
Page 10: Connect To The Internet And Voip
NETGEAR Wireless Cable Gateway To view the gateway’s settings for the Internet connection, see the following section, View on page 10. the Gateway Status Connect to the Internet and VoIP If you have VoIP service, connect the phone to Voice Port 1 . -
Page 11: Chapter 2 Wireless Configuration
Wireless Configuration This chapter describes how to use the Wireless Settings screens to add devices and to view and change (if needed) your wireless network settings. This chapter includes: • Push 'N' Connect (WPS) Wireless Setup • Basic Configuration • MTA Configuration •... -
Page 12: Connecting Devices
NETGEAR Wireless Cable Gateway Connecting Devices To wirelessly connect to the gateway, a computer or wireless device requires the same wireless settings as the gateway. The default wireless network name (SSID) for the gateway is shown on the product label. -
Page 13: Pin Connection
NETGEAR Wireless Cable Gateway Select Add WPS Client and then click Next. The Add WPS Client screen displays: Any computer or wireless device that wirelessly connects to the gateway is a client. After it is added as a client, it will be able to automatically connect to the gateway. -
Page 14: Basic Configuration
NETGEAR Wireless Cable Gateway Select WPS Settings and then click Next. The Add WPS Client screen displays. Any computer or wireless device that will wirelessly connect to the gateway is a client. After it is added as a client, it will be able to automatically connect to the gateway. - Page 15 NETGEAR Wireless Cable Gateway your ISP. If you are using static IP addressing, this setting matches the cable network that follows. Network Configuration Cable. You can define settings for the WAN side of your gateway in this section. Dynamic IP / Static IP. Select Dynamic IP If you want to get the settings dynamically from your ISP.
-
Page 16: Mta Configuration
NETGEAR Wireless Cable Gateway MTA Configuration Select Configuration > MTA Status to display the Multimedia Terminal Adaptor (MTA) Status screen. This page refreshes every 15 seconds to update the status. MTA Provision Status. Shows which of your telephone lines are active and registered with your service provider. -
Page 17: Wireless Configuration
NETGEAR Wireless Cable Gateway Wireless Configuration You can manually configure the wireless settings and security for your gateway from the Wireless Configuration screen. If you are located near the gateway, use an Ethernet cable to connect your computer to the gateway while you are changing the wireless settings. -
Page 18: Wep Security
NETGEAR Wireless Cable Gateway In the Security Options section of the Wireless Settings screen, leave the default setting or select one of the WPA settings: WPA-PSK. This setting provides the TKIP • encryption type and a pre-shared key passphrase. WPA2-PSK. This setting provides the AES •... - Page 19 NETGEAR Wireless Cable Gateway In the Security Options section of the Wireless Settings screen, select the WEP radio button. Select the Authentication from the drop-down list.The default is Automatic. Depending on the encryption strength that you want, select one of these WEP Encryption...
-
Page 20: Wi-Fi Multimedia
NETGEAR Wireless Cable Gateway Wi-Fi Multimedia You can use the Multimedia page to set up wireless multimedia Quality of Service (QoS). Log in to the gateway as described in on page 9. Log In to Your Gateway In the main menu, under Setup, select Wi-Fi Multimedia. -
Page 21: Chapter 3 Content Filtering
Content Filtering This chapter describes how to use content filtering s for the gateway. This chapter includes: • View or Email Logs • Block Keywords, Sites, and Services • Services... -
Page 22: View Or Email Logs
The gateway allows you to restrict access to Internet content based on functions such as Web address keywords and Web domains. A domain name is the name of a particular website. For example, for the address www.NETGEAR.com, the domain name is NETGEAR.com. - Page 23 NETGEAR Wireless Cable Gateway To block keywords, select the Keyword Blocking Enable check box. Type the keyword and then click Add Keyword. If the keyword XXX is specified, the URL • www.zzzyyqq.com/xxx.html is blocked. If the keyword .com is specified, only •...
-
Page 24: Services
NETGEAR Wireless Cable Gateway Services You can use the Services screen to disable certain gateway features. Select Content Filtering > Services. To disable a feature, clear its check box. Click Apply for your changes to take effect. The following Services are available in this screen: Firewall Features. -
Page 25: Chapter 4 Manage Your Network
Manage Your Network This chapter describes how to perform network management tasks with your gateway. When you log in to the gateway (see on page 9), these tasks are grouped Log In to Your Gateway under Maintenance. This chapter includes: •... -
Page 26: Gateway Status
NETGEAR Wireless Cable Gateway Gateway Status Select Maintenance > Gateway Status to see hardware and firmware details about the gateway and basic status information. The following table describes the fields displayed in this screen. Information: Modem Status Field Description Standard Specification DOCSIS 3.0... -
Page 27: Connection Status
NETGEAR Wireless Cable Gateway Connection Status Select Maintenance > Connection Status to view connection status information. Use the Connection screen to track the gateway’s initialization procedure, and to get details about the downstream and upstream cable channel. The time is displayed after the gateway is initialized. -
Page 28: Change Passwords
NETGEAR Wireless Cable Gateway Change Passwords For security reasons, the gateway has its own user names and passwords. NETGEAR recommends that you change the default passwords to more secure passwords. The ideal passwords should contain no dictionary words from any language, and should be a mixture of both upper and lower case letters, numbers, and symbols. -
Page 29: Event Log
NETGEAR Wireless Cable Gateway To restore the saved configuration settings from a backup file, click Browse, locate • and select the previously saved backup file. Then click Restore. A message notifies you when the gateway has been restored to previous settings. Then, the gateway restarts, which takes about one minute. -
Page 30: Diagnostic Ping Utility
NETGEAR Wireless Cable Gateway Diagnostic Ping Utility Select Maintenance > Diagnostics. To start a ping test, enter the IP address in the Diagnostics screen, and click the Ping button. The Ping Results are displayed: To return to the Diagnostics screen and stop the test, click Back and then click Abort Test. -
Page 31: Chapter 5 Advanced Settings
Advanced Settings This chapter describes how to customize your network through the advanced settings on your gateway. When you log in to the gateway (see on page 9), these tasks Log In to Your Gateway are grouped under Advanced. This chapter includes: •... -
Page 32: Wireless Settings
NETGEAR Wireless Cable Gateway Wireless Settings Select Advanced > Wireless Settings to display the following screen where you can configure the wireless radio settings, and other advanced settings: The following table describes the fields in the Advanced Wireless Settings screen. -
Page 33: Mac Filtering
NETGEAR Wireless Cable Gateway MAC Filtering By default, the gateway allows any connected PC to access the Internet through. The MAC Filtering screen lets you block specific computers, based on their MAC address, from access to the Internet on selected days and times. -
Page 34: Port Blocking
NETGEAR Wireless Cable Gateway Port Blocking You can use port blocking to block outbound traffic on specific ports. Outbound traffic rules control access to outside resources from local users.The default rule is to allow all access from the LAN side to the outside. You can use port blocking to add predefined or custom rules to specify exceptions to the default rule. -
Page 35: Port Forwarding
NETGEAR Wireless Cable Gateway Port Forwarding A firewall has default rules for inbound traffic (WAN to LAN) and for outbound traffic. Port forwarding affects the inbound rules. These rules restrict access from outsiders. By default, the gateway blocks access from outside except responses to requests from the LAN side. -
Page 36: Considerations For Port Forwarding
NETGEAR Wireless Cable Gateway Considerations for Port Forwarding If the IP address of the local server PC is assigned by DHCP, it might change when the • PC is rebooted. To avoid this, you can assign a static IP address to your server outside the range that is assigned by DHCP, but in the same subnet as your LAN. - Page 37 NETGEAR Wireless Cable Gateway Select Advanced > Port Triggering. For each port trigger, enter the settings in the Port Trigger List: Trigger Range. To specify the range of outgoing ports that will be monitored to trigger • the incoming port forwarding rule, enter the Start Port and End Port.
-
Page 38: Dmz Host
NETGEAR Wireless Cable Gateway DMZ Host You can use the DMZ Host screen to set up a default DMZ computer. Specifying a default DMZ computer allows you to set up a PC that is available to anyone on the Internet for services that you have not defined. -
Page 39: Reserving An Ip Address For Dhcp Use
NETGEAR Wireless Cable Gateway Select Advanced > LAN IP. Specify these settings: LAN IP Address. The factory default • setting is 192.168.1.1. Subnet Mask. The network number • portion of an IP address. Unless you are implementing subnetting, use 255.255.255.0 as the subnet mask. -
Page 40: Remote Management
NETGEAR Wireless Cable Gateway Remote Management With remote management, you can allow a user or users on the Internet to configure, upgrade, and check the status of the gateway. Use very secure passwords if you enable remote management. Note: Passwords should contain no dictionary words from any language, and should be a mixture of letters (both upper and lower case), numbers, and symbols. - Page 41 Port Number fields Web browser access normally uses the standard HTTP service port 80. NETGEAR recommends that you use a different port number for remote management, as using port 80 will prevent the use of a Web Server on your LAN, and can be more readily discovered by hackers.
-
Page 42: Universal Plug And Play (Upnp)
NETGEAR Wireless Cable Gateway Universal Plug and Play (UPnP) Universal Plug and Play (UPnP) helps devices, such as Internet appliances and computers, access the network and connect to other devices as needed. UPnP devices can automatically discover the services from other registered UPnP devices on the network. With UPnP you can specify: Advertisement Period. -
Page 43: Chapter 6 Troubleshooting
Troubleshooting This chapter gives information about troubleshooting your NETGEAR Wireless Cable Gateway. For the common problems listed, go to the section indicated. Have I connected the gateway correctly? • Go to on page 44. Basic Functions I cannot access the gateway configuration with my browser. -
Page 44: Basic Functions
NETGEAR Wireless Cable Gateway Basic Functions After you have turned on power to the gateway, you should do the following: Check to see that the Power LED is on. Check that the numbered Ethernet LEDs come on momentarily. After a few seconds, check that the local port link LEDs are lit for any local ports that are connected. -
Page 45: Connect To The Main Menu
NETGEAR Wireless Cable Gateway Connect to the Main Menu If you are unable to access the gateway’s main menu from a computer on your local network, check the following: Check the Ethernet connection between the computer and the gateway as described in •... -
Page 46: Troubleshoot The Isp Connection
NETGEAR Wireless Cable Gateway Troubleshoot the ISP Connection If your gateway is unable to access the Internet and your Cable Link LED is on, you may need to register the cable MAC address and/or device MAC address of you gateway with your cable service provider. -
Page 47: Test The Path From Your Pc To A Remote Device
NETGEAR Wireless Cable Gateway Wrong network configuration. • Verify that the Ethernet card driver software and TCP/IP software are both installed and configured on your PC or workstation. Verify that the IP address for your gateway and your workstation are correct and that the addresses are on the same subnet. - Page 48 NETGEAR Wireless Cable Gateway To reduce interference when using more than one access point, NETGEAR • recommends using 5 channel spacing between adjacent access points (for example, use Channels 1 and 6, or 6 and 11). The time it takes to establish a wireless connection can vary depending on both your security settings and the gateway location.
-
Page 49: Appendix A Technical Specifications
Technical Specifications This chapter includes: • Factory Default Settings • Technical Specifications... -
Page 50: Factory Default Settings
NETGEAR Wireless Cable Gateway Factory Default Settings You can return the gateway to its factory settings. On the bottom of the gateway, press and hold the Restore Factory Settings button for over 7 seconds. The gateway resets, and returns to its factory settings. Your device will return to the factory configuration settings shown in the following table. -
Page 51: Technical Specifications
NETGEAR Wireless Cable Gateway Factory Default Settings (Continued) Wireless Wireless communication Enabled SSID name As shown on the product label. Security WPA/WPA2 Broadcast SSID Enabled Transmission speed Auto Country/region Depends on the country where the product is sold. RF channel... - Page 52 NETGEAR Wireless Cable Gateway Technical Specifications (Continued) Interface Local: 10BASE-T, 100/1000BASE-Tx, RJ-45 USB 2.0/1.1 function 802.11n/g/b Internet: DOCSIS 3.0. Downward compatible with DOCSIS 2.0, 1.1 and 1.0 Technical Specifications...
-
Page 53: Appendix B Notification Of Compliance
Hereby, NETGEAR Inc., declares that this Radiolan is in compliance with the essential requirements and other relevant provisions of Directive 1999/5/EC. Español Por medio de la presente NETGEAR Inc. declara que el Radiolan cumple con los requisitos [Spanish] esenciales y cualesquiera otras disposiciones aplicables o exigibles de la Directiva... - Page 54 [Swedish] väsentliga egenskapskrav och övriga relevanta bestämmelser som framgår av direktiv 1999/5/EG. Íslenska Hér með lýsir NETGEAR Inc. yfir því að Radiolan er í samræmi við grunnkröfur og aðrar [Icelandic] kröfur, sem gerðar eru í tilskipun 1999/5/EC. Norsk NETGEAR Inc. erklærer herved at utstyret Radiolan er i samsvar med de grunnleggende krav [Norwegian] og øvrige relevante krav i direktiv 1999/5/EF.
-
Page 55: Index
Index Numerics remote management gateway front panel 192.168.1.1, default IP address gateway rear panel backing up the configuration file IP address Basic Settings IP addresses, auto-generated blocking keywords PCs based on MAC address sites blocking ports IP address IP settings LEDs troubleshooting cable channel... - Page 56 NETGEAR Wireless Cable Gateway technical specifications troubleshooting ISP connection LEDs ping utility TCP/IP network Universal Plug and Play (UPnP) keys passphrase Wi-Fi Protected Setup (WPS) Push ’N’ Connect wireless access point card access list wireless network planning wireless security Wireless Security Options...