Grizzly G0561 Owner's Manual
7"x 12" metal-cutting bandsaw
Hide thumbs
Also See for G0561:
- Owner's manual (52 pages) ,
- Owner's manual (60 pages) ,
- Owner's manual (60 pages)
Table of Contents
Advertisement
Advertisement
Table of Contents

Related Manuals for Grizzly G0561


Summary of Contents for Grizzly G0561
- Page 1 7"x 12" METAL-CUTTING BANDSAW OWNER'S MANUAL COPYRIGHT © MAY, 2006 BY GRIZZLY INDUSTRIAL, INC. WARNING: NO PORTION OF THIS MANUAL MAY BE REPRODUCED IN ANY SHAPE OR FORM WITHOUT THE WRITTEN APPROVAL OF GRIZZLY INDUSTRIAL, INC. #PC8297 PRINTED IN TAIWAN...
- Page 2 ���� ������ �������� �������� ������ ������������ �� ��� ������ ������ ���������� ����������� ��� ������� �� ���� ������������������ ������� �� ����� ���������� ��� ������ ��� ������������ ����� �� ���� ������ ��� ������ �� ������� �������� ������� ��������� ����������� ������������� �� ������ ���...
-
Page 3: Table Of Contents
INTRODUCTION ... 3 Foreword ... 3 Contact Info ... 3 Machine Data Sheet ... 4 Identification ... 6 SECTION 1: SAFETY... 7 Safety Instructions for Machinery ... 7 Safety Instructions for Metal Cutting Bandsaws ... 9 SECTION 2: CIRCUIT REQUIREMENTS ... 10 110/220V Operation ... - Page 4 Blade Tension & Tracking ... 34 Squaring the Blade ... 35 Blade Guide Bearings ... 36 Electrical Components ... 37 G0561 110V & 220V Wiring Diagram ... 38 G0561 Cabinet/Base ... 39 G0561 Bow/Motor ... 40 G0561 Gear Box ... 41 Parts List ...
-
Page 5: Introduction
INTRODUCTION Foreword We are proud to offer the Model G0561 7" x 12" Metal-Cutting Bandsaw. This machine is part of a growing Grizzly family of fine metalworking machinery. When used according to the guide- lines set forth in this manual, you can expect years of trouble-free, enjoyable operation and proof of Grizzly’s commitment to customer satis-... -
Page 6: Machine Data Sheet
Customer Service #: (570) 546-9663 · To Order Call: (800) 523-4777 · Fax #: (800) 438-5901 MODEL G0561 7" X 12" METAL CUTTING BANDSAW Product Dimensions: Weight... 330 lbs. Length/Width/Height... 48 x 16 x 40 in. Foot Print (Length/Width)... 38 x 13 in. - Page 7 The information contained herein is deemed accurate as of 6/23/2006 and represents our most recent product specifications. Model G0561 Due to our ongoing improvement efforts, this information may not accurately describe items previously purchased. G0561 7" x 12" Metal-Cutting Bandsaw PAGE 2 OF 2...
-
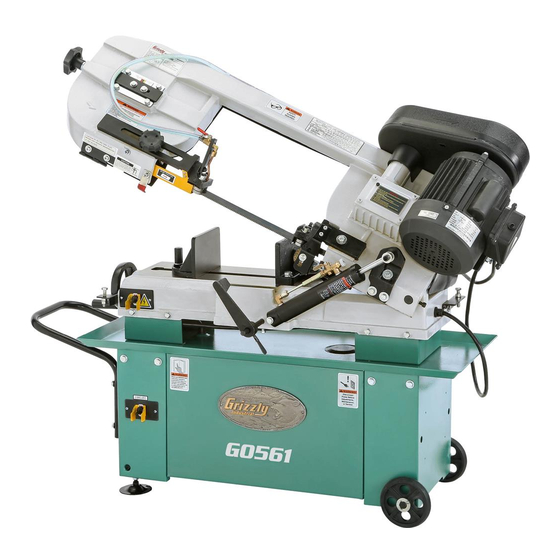
Page 8: Identification
Identification Figure 1. Main view of machine features. A. Blade Tension Handle B. Blade Guide Adjustment Knob C. Coolant Control Valve D. Motor ON/OFF Switch E. 1 HP Motor Feed ON/OFF Valve Lever G0561 7" x 12" Metal-Cutting Bandsaw... -
Page 9: Section 1: Safety
NOT safety glasses. 3. ALWAYS WEAR AN NIOSH APPROVED RESPIRATOR WHEN MACHINERY THAT PRODUCES DUST. G0561 7" x 12" Metal-Cutting Bandsaw 4. ALWAYS USE HEARING PROTECTION WHEN MACHINERY. Machinery noise can cause permanent hearing damage. - Page 10 Make sure you know what type of dust you will be exposed to and always wear an approved respirator. ADJUSTING KEYS DAMAGED PARTS LOCK MOBILE BASES USED) BEFORE OPERATING G0561 7" x 12" Metal-Cutting Bandsaw...
-
Page 11: Safety Instructions For Metal Cutting Bandsaws
No list of safety guidelines can be complete. Every shop environment is different. Like all machines there is danger associated with the Model G0561. Accidents are frequently caused by lack of familiarity or failure to pay attention. Use this machine with respect and caution to lessen the possibility of operator injury. -
Page 12: Section 2: Circuit Requirements
220V Circuit ... 15 Amps -10- Wiring for 220V The Model G0561 can be rewired to operate on a 220V power source. The motor must be rewired according to the wiring diagram on the motor label. The wiring configuration can also be found on the inside of the motor wire cover, as well as on Page 38. -
Page 13: Grounding
If the plug will not fit the outlet, have the proper outlet installed by a qualified electrician. G0561 7" x 12" Metal-Cutting Bandsaw Extension Cords We do not recommend the use of extension cords. Instead, arrange the placement of your equipment and the installed wiring to eliminate the need for extension cords. -
Page 14: Section 3: Setup
Phillips Head Screwdriver #2 ... 1 • Level ... 1 The Model G0561 was carefully packed when it left our warehouse. If you discover the machine is damaged after you have signed for delivery, please immediately call Customer Service at (570) 546-9663 for advise. -
Page 15: Inventory
(Pulley Cover) ...2 • Flat Washers ⁄ " (Pulley Cover) ...4 • Knob ⁄ "-20 x ⁄ " (Pulley Cover) ...1 • Hex Nuts ⁄ "-16 ...2 G0561 7" x 12" Metal-Cutting Bandsaw Figure 3. Loose parts inventory. ⁄ " -13-... -
Page 16: Hardware Recognition Chart
Hardware Recognition Chart -14- G0561 7" x 12" Metal-Cutting Bandsaw... -
Page 17: Cleanup
Take precautions from this hazard by only using cleaning solvents in a well ventilated area. G0561 7" x 12" Metal-Cutting Bandsaw Site Considerations Floor Load The weight and footprint size for your machine is located in the machine data sheet. Most floors are suitable for your machine. -
Page 18: Shipping Bracket
Hex Bolt Stop Rod Figure 6. Installed work stop. Slide the work stop over the rod. Measuring from the outside of the blade, tighten the thumbscrew to set the work stop at your desired length. G0561 7" x 12" Metal-Cutting Bandsaw... -
Page 19: Wheels & Leveling Feet
Figure 8. Adjust the feet to level the bandsaw as need- G0561 7" x 12" Metal-Cutting Bandsaw Hex Nut & Flat Washer Figure 8. Leveling feet installed. Chip Screen The chip screen is designed to prevent chips and cut-offs from entering the coolant tank. -
Page 20: Pulley Cover
(see Figure 11). Hazard! Figure 12 Secured pulley cover lid. Close the pulley cover lid and secure with the knob (see Figure 12). ⁄ " Phillips head screws and four flat Knob G0561 7" x 12" Metal-Cutting Bandsaw ⁄ "-... -
Page 21: V-Belt
V-Belt The V-Belt on the Model G0561 may have come installed and only need to be tensioned or reposi- tioned for your desired RPM. The following steps will take you through both processes. To tension or change the V-belt position:... -
Page 22: Vertical Assembly
Vertical Assembly The Model G0561 can easily be set up for vertical cutting operations. Components and Hardware Needed: Vertical Work Table ...1 Table Bracket ...1 Flat Head Screw ⁄ "-20 x ⁄ " ... 1 Hex Nut ⁄ "-20 ... 1... -
Page 23: Test Run
ON/OFF switch at all times dur- ing the test run (Figure 21). The bandsaw should run smoothly with little or no vibra- tion. G0561 7" x 12" Metal-Cutting Bandsaw — If you suspect any problems, immediately stop the bandsaw and correct before con- tinuing. -
Page 24: Section 4: Operations
OMMEND that you read books, trade maga- zines, or get formal training before begin- ning any projects. Regardless of the con- tent in this section, Grizzly Industrial will not be held liable for accidents caused by lack of training. -22-... -
Page 25: Blade Speed
Loosen the lock nut in Figure 24 on the opposite jaw so the jaw can float, and match the angle of the workpiece. Tighten the vise against the workpiece. Lock Nut Figure 24. Vise jaw lock nut. G0561 7" x 12" Metal-Cutting Bandsaw ⁄ " -23-... -
Page 26: Blade Selection
We suggest you do some research for your spe- cific situation so you get the best blade to match your needs. Grizzly is proud to offer a variety of selections that can be found in the current catalog and in SECTION 5: ACCESSORIES on Page 28. -
Page 27: Cutting Fluid
Make sure that the pressure is not so high that coolant spills on the floor and creates a slipping hazard. Figure 29. Coolant control valve. Turn the pump toggle switch ON before mak- ing your cut. G0561 7" x 12" Metal-Cutting Bandsaw when -25-... -
Page 28: Feed Rate
— Thin powder-like chips are from insufficient feed pressure. This will dull your blade rap- idly. — The best cut and feed rate will give you evenly shaped spiraled curls with very little color change, if any at all. G0561 7" x 12" Metal-Cutting Bandsaw... -
Page 29: Operation Tips
Figure 32. Proper starting position. NOTICE Loosen blade tension at the end of each day to prolong blade life. G0561 7" x 12" Metal-Cutting Bandsaw • Wait until the blade has completely stopped before removing the workpiece from the vise, and avoid touching the cut end—it could be... -
Page 30: Section 5: Accessories
Can be used in light or heavy machin- ing. Mix with water, 1:21 for general use or 1:11- 1:16 for heavy use. Figure 36. G7897 Machining Fluid. G0561 7" x 12" Metal-Cutting Bandsaw ™... - Page 31 H1300 G7984 H2347 Figure 38. Our most popular safety glasses. G0561 7" x 12" Metal-Cutting Bandsaw H1302—Standard Earmuffs H4979—Deluxe Twin Cup Hearing Protector H4977—Work-Tunes Radio Headset Earmuffs Protect yourself comfortably with a pair of cush- ioned earmuffs. Especially important if you or employees operate for hours at a time.
-
Page 32: Section 6: Maintenance
• Lubricate vise screw. • Check gear box lubrication. Cleaning Cleaning the Model G0561 is relatively easy. After using your bandsaw, sweep off excess chips and remove any excess coolant with a dry towel. -30- Lubrication Before applying lubricant to any area, wipe the area clean to avoid contamination. -
Page 33: Section 7: Service
2. Blade is at fault. 3. Gearbox is at fault. 4. Wrong blade & too slow of speed. G0561 7" x 12" Metal-Cutting Bandsaw Troubleshooting Possible Solution 1. Test for good contacts; correct the wiring. 2. Test/replace if faulty. -
Page 34: Bandsaw Operations
1. Refer to Blade Selection on Page 24 and decrease the feed pressure. Refer to Feed Rate on Page 26, and adjust as required. 2. Re-clamp the workpiece in the vise, and use a jig if required. 3. Use a coarser-tooth blade. G0561 7" x 12" Metal-Cutting Bandsaw... -
Page 35: Blade Change
Install the new blade through both blade guide bearings, as shown in Figure 44, and around the bottom wheel. G0561 7" x 12" Metal-Cutting Bandsaw Figure 44. Installing blade. Hold the blade around the bottom wheel with one hand and slip it around the top wheel with the other hand, keeping the blade between the blade guide bearings. -
Page 36: Blade Tension & Tracking
Tracking Proper blade tension is essential to long blade life, straight cuts, and efficient cutting. The Model G0561 features a blade tension indicator to assist you with blade tensioning. Two major signs that you do not have proper blade tension are: 1) the blade stalls in the cut and slips on the wheels, and 2) the blade frequently breaks from being too tight. -
Page 37: Squaring The Blade
Squaring the Blade It is always a good idea during the life of your saw to check and adjust this setting. This adjustment will improve your cutting results and extend the life of your blade. To square the blade to the bed of the table:... -
Page 38: Blade Guide Bearings
The backing bear- ing is not adjustable and will make light con- tact with the blade. Adjust the carbide blade guides so they make the same contact with the blade as the bear- ings. G0561 7" x 12" Metal-Cutting Bandsaw... -
Page 39: Electrical Components
Electrical Components Figure 49. Circuit breaker and capacitor. Figure 51. Coolant pump ON/OFF Switch. Figure 52. Pump motor 110V connection. Figure 50. Power switch. -37- G0561 7" x 12" Metal-Cutting Bandsaw... -
Page 40: G0561 110V & 220V Wiring Diagram
G0561 110V & 220V Wiring Diagram �������������������� ������ �� �� �� �� �� �� �� �� �� ������ �� ������� ���� ���� �� ��� ��� ��� �������������������� ������ �� �� �� �� �� �� �� �� �� ������ �� �... -
Page 41: G0561 Cabinet/Base
�� �� �� �� �� �� � � � �� ��� �� �� �� �� �� �� G0561 7" x 12" Metal-Cutting Bandsaw �� �� �� �� �� �� �� �� �� �� �� �� � �� � � ��... -
Page 42: G0561 Bow/Motor
��� ��� ��� ��� ��� ��� ��� ��� ��� ��� ��� ��� ��� ��� ��� ��� ��� G0561 7" x 12" Metal-Cutting Bandsaw ����� ����� ����� ����� ����� ��� ��� ����� ��� ��� ��� ��� ��� ����� ��� ��� ���... -
Page 43: G0561 Gear Box
G0561 Gear Box ������ ������ ����� ����� ����� ����� ����� ����� ����� ����� ������ ����� ����� ����� ����� ��� ����� ����� ��� ����� ������ ������ -41- G0561 7" x 12" Metal-Cutting Bandsaw... -
Page 44: Parts List
P0561097 PW07 PB03 PSB29 PW02 PS06 PW07 PB07 G0561 7" x 12" Metal-Cutting Bandsaw DESCRIPTION HEX NUT 3/8-16 HEX BOLT 5/16-18 X 3/4 FLAT WASHER 5/16 HEX BOLT 3/8-16 X 1-3/4 HEX NUT 3/8-16 HEX BOLT 5/16-18 X 3/4 FLAT WASHER 3/4... -
Page 45: Parts List
HEX BOLT 5/16-18 X 1-1/2 PW07 FLAT WASHER 5/16 PLW01 LOCK WASHER 5/16 PB07 HEX BOLT 5/16-18 X 3/4 P0561244 COMPRESSION SPRING 115 x 4 G0561 7" x 12" Metal-Cutting Bandsaw Parts List PART # P0561245 P0561249 P0561250 P0561251 P0561254 PW06... -
Page 46: Parts List
P0561393 P0561407 PN08 PW02 PB24 P0561411 PN08 PW02 G0561 7" x 12" Metal-Cutting Bandsaw DESCRIPTION CYLINDER LOWER SUPPORT CYLINDER UPPER SUPPORT FLAT WASHER 5/16 HEX BOLT 5/16-18 X 1/2 SPECIAL WASHER 8 x 16 x 2 HEX NUT 3/8-16 FLAT WASHER 5/16... -
Page 47: Machine Labels & Parts List
The machine owner MUST maintain the original label location and readability. If a label is removed or becomes unreadable, REPLACE the label before using the machine. For new labels, contact Grizzly Industrial Inc. at (570) 546-9663 or G0561 7" x 12" Metal-Cutting Bandsaw... -
Page 48: Warranty And Returns
WARRANTY AND RETURNS Grizzly Industrial, Inc. warrants every product it sells for a period of 1 year to the original purchaser from the date of purchase. This warranty does not apply to defects due directly or indirectly to misuse, abuse, negligence, accidents, repairs or alterations or lack of maintenance. -
Page 49: Warranty Card
Do you think your machine represents a good value? Would you recommend Grizzly Industrial to a friend? Would you allow us to use your name as a reference for Grizzly customers in your area? Note: We never use names more than 3 times. - Page 50 FOLD ALONG DOTTED LINE FOLD ALONG DOTTED LINE Send a Grizzly Catalog to a friend: GRIZZLY INDUSTRIAL, INC. P.O. BOX 2069 BELLINGHAM, WA 98227-2069 Name_______________________________ Street_______________________________ City______________State______Zip______ TAPE ALONG EDGES--PLEASE DO NOT STAPLE Place Stamp Here...
- Page 52 Buy Direct and Save with Grizzly Visit Our Website Today And Discover Why • • • – Trusted, Proven and a Great Value! ® Grizzly Is The Industry Leader! ® SECURE ORDERING ORDERS SHIPPED WITHIN 24 HOURS E-MAIL RESPONSE WITHIN ONE HOUR...