Grizzly G0561 Owner's Manual
7" x 12" metal-cutting bandsaw
Hide thumbs
Also See for G0561:
- Owner's manual (52 pages) ,
- Owner's manual (60 pages) ,
- Owner's manual (60 pages)
Table of Contents
Advertisement
Quick Links
Advertisement
Table of Contents

Related Manuals for Grizzly G0561


Summary of Contents for Grizzly G0561
- Page 1 7"x 12" METAL-CUTTING BANDSAW OWNER'S MANUAL COPYRIGHT © MAY, 2006 BY GRIZZLY INDUSTRIAL, INC. REVISED FEBRUARY, 2008 (TR) WARNING: NO PORTION OF THIS MANUAL MAY BE REPRODUCED IN ANY SHAPE OR FORM WITHOUT THE WRITTEN APPROVAL OF GRIZZLY INDUSTRIAL, INC.
- Page 2 ���� ������ �������� �������� ������ ������������ �� ��� ������ ������ ���������� ����������� ��� ������� �� ���� ������������������ ������� �� ����� ���������� ��� ������ ��� ������������ ����� �� ���� ������ ��� ������ �� ������� �������� ������� ��������� ����������� ������������� �� ������ ���...
-
Page 3: Table Of Contents
Blade Guide Bearings ........38 Setup Safety ..........10 Electrical Components ......... 39 Items Needed for Setup ....... 10 G0561 110V & 220V Wiring Diagram ..40 Unpacking ............ 10 SECTION 8: PARTS ........41 Inventory ............11 Hardware Recognition Chart ....... 12 Cabinet/Base .......... -
Page 4: Introduction
INTRODUCTION Foreword Contact Info We are proud to offer the Model G0561 7" x 12" If you have any comments regarding this manual, Metal-Cutting Bandsaw. This machine is part please write to us at the address below: of a growing Grizzly family of fine metalworking machinery. -
Page 5: Identification
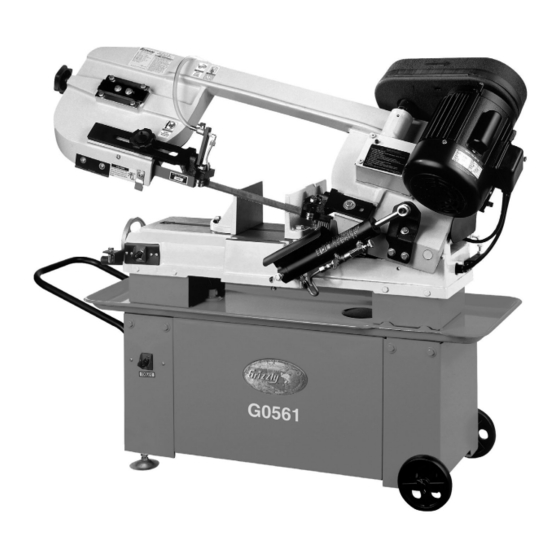
Identification Figure 1. Main view of machine features. A. Blade Tension Handle B. Blade Guide Adjustment Knob C. Coolant Control Valve D. Motor ON/OFF Switch E. 1 HP Motor Feed ON/OFF Valve Lever G0561 7" x 12" Metal-Cutting Bandsaw... -
Page 6: Machine Data
MACHINE DATA SHEET Customer Service #: (570) 546-9663 · To Order Call: (800) 523-4777 · Fax #: (800) 438-5901 MODEL G0561 7" X 12" METAL CUTTING BANDSAW Product Dimensions: Weight................................330 lbs. Length/Width/Height..........................48 x 16 x 40 in. Foot Print (Length/Width)..........................38 x 13 in. - Page 7 The information contained herein is deemed accurate as of 2/14/2008 and represents our most recent product specifications. Model G0561 PAGE 2 OF 2 Due to our ongoing improvement efforts, this information may not accurately describe items previously purchased. G0561 7" x 12" Metal-Cutting Bandsaw...
-
Page 8: Section 1: Safety
����� ������� ���������� ������������ ���� ������������������������������������� ������������������� �� ����� ������� ��������� ���� �� ������ ���� � ����� �������� ����� �� ����� ��� ��������� �� ���������� ���� ��������� ����� �� �������� ������������������ ��������� ���� �������� ������ ������������������������������������ ������������������������������������������� ����������������������������������� G0561 7" x 12" Metal-Cutting Bandsaw... - Page 9 ��� ���� ������������ �������� ��� ������� ���� ����������������������������������������� ������������������������������������������� �������������������������������������������� ���� ����� ��� ����� ���� ���� �������� ��� ���� ������������������������������������� �������������������������������������������� ��� ���� ���� ������ ��� �� ����� ������������������ ��� ���� ��������� ������ ����� ���������� G0561 7" x 12" Metal-Cutting Bandsaw...
-
Page 10: Safety Instructions For Metal Bandsaws
No list of safety guidelines can be complete. Every shop environment is different. Like all machines there is danger associated with the Model G0561. Accidents are frequently caused by lack of familiarity or failure to pay attention. Use this machine with respect and caution to lessen the possibility of operator injury. -
Page 11: Section 2: Circuit Requirements
SECTION 2: CIRCUIT REQUIREMENTS 110/220V Operation Power Connection Device The Model G0561 comes prewired with a NEMA 5-15 plug for connection to power. If you rewire the motor to 220V, we recommend using the plug and receptacle shown in Figure 2 for 220V. -
Page 12: Section 3: Setup
Wear safety glasses dur- Unpacking ing the entire setup pro- cess! The Model G0561 was carefully packed when it left our warehouse. If you discover the machine is damaged after you have signed for delivery, The Model G0561 is a please immediately call Customer Service at heavy machine. -
Page 13: Inventory
Phillips Head Screws ⁄ "-20 x ⁄ " (Pulley Cover) ..........2 • Flat Washers ⁄ " (Pulley Cover) ....4 • Knob ⁄ "-20 x ⁄ " (Pulley Cover) ....1 • Hex Nuts ⁄ "-16 ...........2 -11- G0561 7" x 12" Metal-Cutting Bandsaw... -
Page 14: Hardware Recognition Chart
Hardware Recognition Chart -12- G0561 7" x 12" Metal-Cutting Bandsaw... -
Page 15: Clean Up
Minimize your risk by only using these products in a well ventilated area. Figure 5. Minimum G0561 working clearances. G2544—Solvent Cleaner & Degreaser A great product for removing the waxy shipping grease from your machine during clean up. Unsupervised children and... -
Page 16: Shipping Bracket
Figure 7. Installed work stop. Slide the work stop over the rod. Figure 6. Removing shipping bracket. Measuring from the outside of the blade, tighten the thumbscrew to set the work stop at your desired length. -14- G0561 7" x 12" Metal-Cutting Bandsaw... -
Page 17: Wheels & Leveling Feet
Figure 9. Adjust the feet to level the bandsaw as need- Figure 10. Chip screen installed. -15- G0561 7" x 12" Metal-Cutting Bandsaw... -
Page 18: Pulley Cover
Close the pulley cover lid and secure with the knob (see Figure 13). Figure 11. Collar installed. Knob Entanglement Hazard! You MUST install the pul- ley cover before operat- ing or severe injury may Figure 13 Secured pulley cover lid. occur. -16- G0561 7" x 12" Metal-Cutting Bandsaw... -
Page 19: V-Belt
V-Belt Handle Components and Hardware Needed: The V-Belt on the Model G0561 may have come Handle ..............1 installed and only need to be tensioned or reposi- Hex Bolts ⁄ "-18 x 1 ⁄ " ........4 tioned for your desired RPM. The following steps Flat Washers ⁄... -
Page 20: Vertical Assembly
Set a square to the side of the blade, as shown in Figure 18, and adjust the table bracket to square the table to the blade. The Model G0561 can easily be set up for vertical cutting operations. Components and Hardware Needed: Vertical Work Table ..........1... -
Page 21: Test Run
Blade Guide Bearings (Page 38). Start the bandsaw while keeping your finger near the ON/OFF switch at all times dur- ing the test run (Figure 22). The bandsaw should run smoothly with little or no vibra- tion. -19- G0561 7" x 12" Metal-Cutting Bandsaw... -
Page 22: Section 4: Operations
OMMEND that you read books, trade maga- zines, or get formal training before begin- ning any projects. Regardless of the con- tent in this section, Grizzly Industrial will not be held liable for accidents caused by lack of training. -20-... -
Page 23: Blade Terminology
Loosen the lock nut in Figure 25 on the opposite jaw so the jaw can float, and match the angle of the workpiece. Tighten the vise against the workpiece. Lock Nut Figure 25. Vise jaw lock nut. -21- G0561 7" x 12" Metal-Cutting Bandsaw... -
Page 24: Blade Selection
⁄ " bandsaw blades. characteristics result in very smooth cuts, but do Grizzly is proud to offer a variety of selections not cut fast and generate more heat than other that can be found in the current catalog and in types while cutting. -
Page 25: Choosing Blades And Speeds
����� ���������� ���������� ���� ���������� ���������� ���� ��������� ������� ������ ������� ������� ������������� ���������� ��� �������� ��������� ����� ���������� ���������� ���������� ���������� ���� Figure 29. Blade selection and speed chart for metal cutting. -23- G0561 7" x 12" Metal-Cutting Bandsaw... -
Page 26: Changing Speeds
FPM (see Figure 30). Blade Guides Knob Motor Pulley Wheel Pulley Figure 30. V-belt positions in FPM. Tension the V-belt as described in the V-Belt section on Page 17. Figure 31. Blade guides. -24- G0561 7" x 12" Metal-Cutting Bandsaw... -
Page 27: Cutting Fluid System
Place the filter screen and drain tube in the reservoir as shown in Figure 32. Fill the reservoir to the "High" mark with your chosen cutting fluid solution. Figure 32. Filter screen and hose. -25- G0561 7" x 12" Metal-Cutting Bandsaw... -
Page 28: Cutting Fluid
Clamp the workpiece in the table vise. requirements to properly dispose of cutting fluid. Close the feed ON/OFF valve shown in Figure 35, to lock the bow and blade a few inches above the workpiece. -26- G0561 7" x 12" Metal-Cutting Bandsaw... -
Page 29: Blade Breakage
The general rule of thumb is to have at least evenly shaped spiraled curls with very little three teeth in contact with the workpiece at all color change, if any at all. times during cutting. -27- G0561 7" x 12" Metal-Cutting Bandsaw... -
Page 30: Blade Care & Break-In
Use the Chip Inspection Chart on Page 30 to check the blade efficiency for metal cut- ting. -28- G0561 7" x 12" Metal-Cutting Bandsaw... -
Page 31: Operation Tips
Adjust the blade guides as close as possible to the workpiece to minimize side-to-side blade movement. Figure 36. Proper starting position. NOTICE Loosen blade tension at the end of each day to prolong blade life. -29- G0561 7" x 12" Metal-Cutting Bandsaw... -
Page 32: Chip Inspection Chart
Increase ������� ��������������� ������� ��������������� Curled Tight & Check Blade Good Silver Decrease ��������������������� Thin Pitch ��������������� ������� ��������������������� ������� Figure 37. Chip inspection chart. ��������������������� ������� ��������������������� ������� ��������������������� ��������������������� ��������������������� ��������������������� -30- G0561 7" x 12" Metal-Cutting Bandsaw... -
Page 33: Section 5: Accessories
Buy extras for visitors or employees. You can't be too careful with shop safety! T20448 T20452 T20501 Figure 39. H5408 Blade Tensioning Gauge. T20456 H0736 Figure 41. Our most popular eye protection. -31- G0561 7" x 12" Metal-Cutting Bandsaw... -
Page 34: Section 6: Maintenance
Lubricate vise screw. • Check gear box lubrication. Cleaning Cleaning the Model G0561 is relatively easy. After using your bandsaw, sweep off excess chips and remove any excess coolant with a dry towel. Gear Box Figure 43. Gear box lubrication. -
Page 35: Section 7: Service
2. Blade is at fault. 2. Replace/resharpen blade. 3. Gearbox is at fault. 3. Rebuild gearbox for bad gear(s)/bearing(s). 4. Wrong blade & too slow of speed. 4. Change blade and or speed. -33- G0561 7" x 12" Metal-Cutting Bandsaw... -
Page 36: Bandsaw Operations
4. Refer to Changing the Blade on Page 35 and 4. The blade is dull. replace the blade. 5. Refer to Changing Blade Speed on Page 24, and 5. The blade speed is wrong. adjust as required. -34- G0561 7" x 12" Metal-Cutting Bandsaw... -
Page 37: Blade Change
Figure 45, and against the shoulder of the wheels. around the bottom wheel. Complete the blade change by following the steps in Blade Tension & Tracking. -35- G0561 7" x 12" Metal-Cutting Bandsaw... -
Page 38: Blade Tension & Tracking
Proper blade tension is essential to long blade Lower Hex Bolt life, straight cuts, and efficient cutting. The Model G0561 features a blade tension indicator to assist you with blade tensioning. Tracking Set Screw Two major signs that you do not have proper blade... -
Page 39: Squaring The Blade
Loosen the cap screw shown in Figure 48, and rotate the blade guide until the blade is vertical to the bed, then tighten the cap screw. Note: Both blade guides can be adjusted to achieve the results you want. -37- G0561 7" x 12" Metal-Cutting Bandsaw... -
Page 40: Blade Guide Bearings
After the guide bearings are set, you should be able to rotate the guide bearings (although they will be stiff) with your fingers. The backing bearing is not adjustable and should make light contact with the blade. -38- G0561 7" x 12" Metal-Cutting Bandsaw... -
Page 41: Electrical Components
Electrical Components Figure 50. Circuit breaker and capacitor. Figure 52. Coolant pump ON/OFF Switch. Figure 53. Pump motor 110V connection. Figure 51. Power switch. -39- G0561 7" x 12" Metal-Cutting Bandsaw... -
Page 42: G0561 110V & 220V Wiring Diagram
G0561 110V & 220V Wiring Diagram �������������������� ����������� ������ ������������ ����������� ���������� �� �� �� �� �� �� �� �� �� �� �� �� �� �� �� �� �� �� �� �� �� �� ������ �� ����� ��� ����� ��... -
Page 43: Section 8: Parts
�� ��� �� �� �� ��� �� �� �� ��� �� �� �� �� �� �� �� �� �� ��� �� ��� �� ��� �� ��� �� �� ��� ��� ��� �� ��� -41- G0561 7" x 12" Metal-Cutting Bandsaw... -
Page 44: Bow/Motor
��� ��� ��� ��� ��� ��� ��� ��� ��� ��� ��� ��� ��� ��� ��� ��� ��� ��� ��� ��� ��� ��� ��� ��� ��� ��� ��� ��� ��� ��� ��� ��� ��� -42- G0561 7" x 12" Metal-Cutting Bandsaw... -
Page 45: Gear Box
Gear Box ������ ������ ����� ����� ����� ����� ����� ����� ����� ����� ������ ����� ����� ����� ����� ��� ����� ����� ��� ����� ������ ������ -43- G0561 7" x 12" Metal-Cutting Bandsaw... -
Page 46: Parts List
201-11 P0561201-11 VENT PLUG PN08 HEX NUT 3/8-16 201-12 P0561201-12 BEARING COVER PB07 HEX BOLT 5/16-18 X 3/4 201-13 PS06 PHLP HD SCR 10-24 X 3/8 PW13 FLAT WASHER 3/4 201-14 P0561201-14 WORM GEAR -44- G0561 7" x 12" Metal-Cutting Bandsaw... - Page 47 PHLP HD SCR 1/4-20 X 1/2 PW02 FLAT WASHER 3/8 P0561290 PLUM HANDLE PB24 HEX BOLT 3/8-16 X 1-1/4 P0561291 MOTOR PULLEY COVER P0561411 LEVELING FOOT P0561292 COVER PN08 HEX NUT 3/8-16 PW02 FLAT WASHER 3/8 -45- G0561 7" x 12" Metal-Cutting Bandsaw...
-
Page 48: Machine Labels
The machine owner MUST maintain the original label location and readability. If a label is removed or becomes unreadable, REPLACE the label before using the machine. For new labels, contact Grizzly Industrial Inc. at (570) 546-9663 or techsupport@grizzly.com. - Page 49 �������� ���� ���������������������������������������������������������������������������������� � ������������������������������������������������������������������������������������ ����� ����������������������� ������ � ������������������������ ���� ��������������������� ���������������������������� ������ ������������������������ ���������� � ���������������� ���������������������������� ������������������������������� ��������������������������� ��� ��������� ����������� �� ����� �� � ��������� ������ �� ���� �� ���� ��� ��������� �������� �� ���� �� ������� ������...
- Page 50 ���������������������� ����� ����� ���� ������� ����������� ���� ���� ��� ���� ����������� �� ���������� ���������������������� ����������������������������������� ����������������������������������� ������������������������������������� �������������������������������������� ��������������������������������������...
-
Page 51: Warranty And Returns
WARRANTY AND RETURNS �������� ��� ������� �������������������������������������������������������������������������� ������������������������������������ ����������������������������������������������������������������������������������������������������������� �������������������������������������������������������������������������������������������������������������� ������������������������������������������������������������������������������������������������������������� ������������������������������������������������������������������������������������������������������������� ���������������������������������������������������������������������������������������������������������� ������������������������������������������������������������������������������������������������������������� ������������������������������������������������������������������������������������������������������� ������������������������������������������������������������������������������������������������������������������ �������������������������������������������������������������� ���������������������������������������������������������������������������������������������������������� ������ ���� �� �������� ���������� ������ ����� ��� �������� ������� ��� ���� �������� ��� ����� ��� ���� ������� ��� ���� �������� ��� ����� ���� ������� ���� ����� ����� �������� ����� �������� ������ ��� ��������� ����� ���������� ���� �������������... - Page 52 ��� ������ ��� ���� ���� ������� � �������� ������ ��� � ����� ������ � ����� ��� ������� ����� ��� �������� ��� ������� �� ��� �������� ������� � � ������ �������� � ������ ������� ������ �� ����� � ������ �������� ������ ��� ���� ����...