Alesis MICRON Reference Manual
8-voice analog modeling synthesizer
Hide thumbs
Also See for MICRON:
- Reference manual (133 pages) ,
- Service manual (41 pages) ,
- Quick start owner's manual (33 pages)
Table of Contents
Advertisement
Quick Links
Advertisement
Table of Contents

Related Manuals for Alesis MICRON


Summary of Contents for Alesis MICRON
- Page 1 Reference Manual...
-
Page 3: Table Of Contents
Connecting AC Power ..............................7 Making Audio Connections............................7 Connecting the Foot Pedals ............................7 Chapter 2: First Session ............... 9 A Tour of the Micron ......................9 The Micron’s top panel ......................9 Volume................................... 9 Real-time controllers..............................9 Performance buttons ..............................10 Display ................................... - Page 4 Store your changes! ..............................54 Exiting setup editing ..............................54 Chapter 6: Programs ................55 What is a “Program”? ......................55 Chapter 5: Program Parameters ............55 How the Micron Makes Sound ..................55 The Oscillators ................................55 The Pre Filter Mix................................ 56...
- Page 5 Loading Programs, Rhythms, Patterns, and Setups via MIDI ................96 What's a bundle?................................96 Compatibility with Alesis Ion programs........................97 Sharing programs between the Alesis Micron and the Alesis Ion ............... 97 Updating Software Via MIDI ............................ 97 All Notes Off................................98...
- Page 6 How do I split/layer the keyboard? .......................... 101 What is a MIDI Sequence? ............................101 Where can I get more Programs? ..........................101 Are Micron programs compatible with Ion programs? ..................101 Appendix B: Troubleshooting ............. 103 Recovering from a Crash ............................104 Checking the Software Version ..........................
-
Page 7: Introduction
MIDI, try to check the site once in a while for updates and extra goodies. We hope and trust that you’ll find the Micron to be an inspiring instrument that you can turn to again and again for new ideas, new sounds, and new inspiration. -
Page 8: Unpacking And Inspection
● This instruction manual ● A warranty card Please log on to the Alesis website at www.alesis.com to register your new Micron synthesizer. This will help us give you the best support we possibly can. How to Use This Manual We’re sure you’d like to jump in and start using your Micron... -
Page 9: Connection Diagram
Connections Connection Diagram Connecting AC Power Before making any power connections, make sure the Micron’s power switch is turned off. Then plug the adapter into the Micron and into a wall outlet. WARNING: When connecting audio cables or turning Making Audio Connections... - Page 10 Connections This page intentionally left blank.
-
Page 11: Chapter 2: First Session
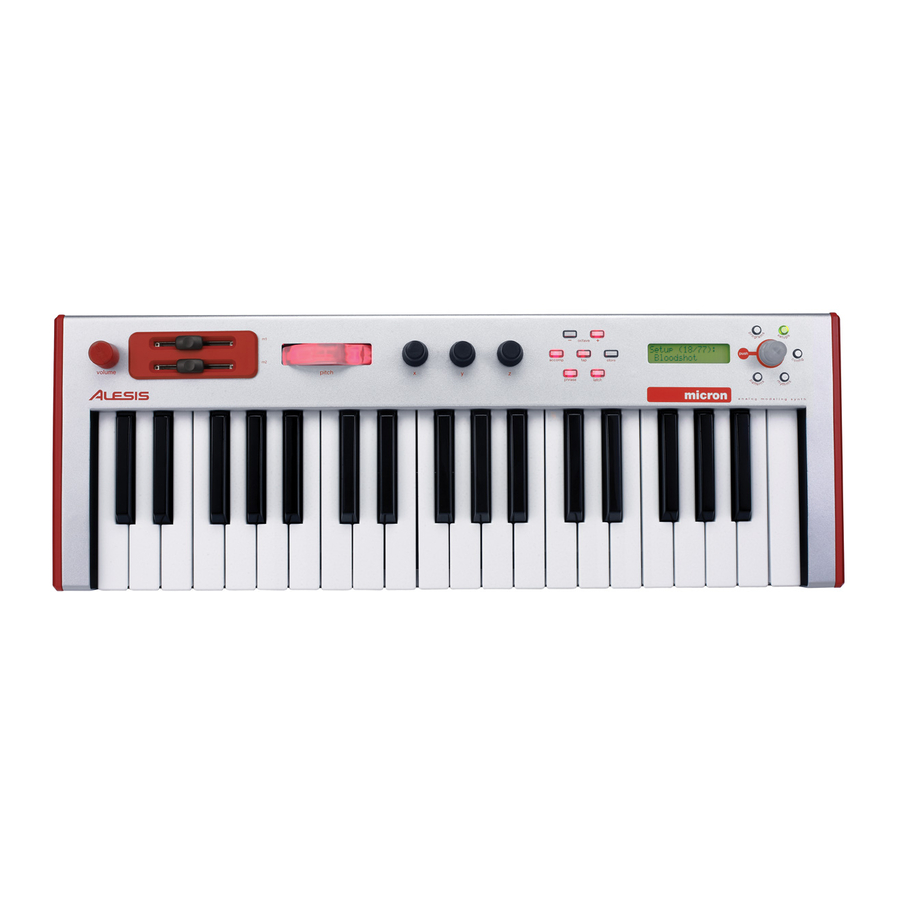
The Micron’s top panel Volume The (volume) knob on the far left-hand side of the Micron raises and lowers the volume. If you don’t hear anything as you play the Micron, suspect the (volume) knob’s setting. Real-time controllers... -
Page 12: Performance Buttons
Pressing one of these buttons – [programs], [setups], [config], [patterns], or [rhythms] – puts you into one of the Micron’s primary modes of operation. Turning the control knob then cycles through options. Pressing the control knob allows for editing. -
Page 13: Navigating With The Transparent Control Knob And Its Buttons
Use the transparent control knob to the right of the display and its surrounding circle of buttons to navigate through the Micron’s options. Most Micron functions involve pressing the buttons and then turning or pushing this knob. -
Page 14: Play The Programs
First Session Play the Programs The Micron’s basic sounds are called “Programs.” Play some of these programs now. Find the [programs] button on the right side of the top panel. Press it; then spin the control knob. Notice how the programs are organized by category –... -
Page 15: Switch Octaves
Switch Octaves While the Micron is a compact unit, all of its sounds span the full 128-note MIDI range. Use the [octave] buttons to the left of the display to transpose the keyboard up and down to cover that range. -
Page 16: Explore The Built-In Patterns
First Session Explore the Built-in Patterns The Micron features a powerful pattern sequencer with lots of editing capabilities. We’ll discuss the editing features later. For now, let’s get our feet wet playing some patterns. Press the [patterns] button to the left of the display. -
Page 17: Explore The Rhythms
First Session Explore the Rhythms Rhythms combine drum/percussion programs with specifically designed rhythm patterns. Press [rhythms]. Turn the control knob to cycle through different rhythms. ● To play a rhythm Press and hold any key from the bottom of the keyboard up to the middle G#. -
Page 18: Explore The Setups
● Level and left/right panning. ● Effects settings. ● Controller assignments. Once you’ve mastered setups, you’ve mastered the Micron! In this first session though, simply press the [setups] button, twirl the control knob a few times, and listen to the various presets. Be sure to play throughout the keyboard range to experience the various splits, layers, and rhythm triggers. -
Page 19: Record Some Phrases
Record Some Phrases You don't have to be in Patterns mode to create a pattern. At any time, the Micron can capture your playing and use it as a pattern. Press [programs] to enter Programs mode. Hold down the [phrase] button and start playing a riff. As soon as you hit the first note, the [phrase] button will start flashing, indicating that it is recording what you play. -
Page 20: Connect External Instruments
Micron. Future chapters will cover editing, MIDI, and other more advanced features. But if you want to throw this manual on the fire now and simply enjoy playing your Micron, no one will blame you. You’ve got the basics well at hand. -
Page 21: Chapter 3: Patterns
Patterns Pattern options: Playing Patterns Patterns are repeated melodic figures that you trigger from the keyboard. Press [patterns] near the control knob. To cycle through different patterns, turn the control knob. The pattern will change, with the current pattern name shown in the display. The pattern continues playing as long as you hold down the key. -
Page 22: Pattern Types: Arpeggios And Sequences
A sequence, on the other hand, already has a melody line built in. inspiration strikes as you're So, all you have to do is hold down a single key, and the Micron playing. will play back that melody relative to that key. Pressing another A phrase is nothing more key will transpose the sequence. -
Page 23: Editing Patterns
Otherwise, your changes will version. Press the control knob to revert. be lost when you turn off your Micron. Go back to your edited state by press the control knob a second time to unrevert. Use revert and unrevert often in order to compare your changes to the original pattern. -
Page 24: Send To Setup
4. split high. The setup’s existing part is split in two at a particular key. As with the split low option, the Micron prompts for a note on the keyboard at which to execute the split. The pattern is then sent to the upper part of the split. -
Page 25: Start New Setup
So, if you record a four-bar category names. pattern and change its length later to ¼ bar, the Micron Another way of setting the pattern’s program is to bring it over will only play a fraction of from Programs mode. Press [programs] to enter Programs your pattern, but it will remember the whole thing. -
Page 26: Grid
Patterns 6. Grid Four Beats per Bar All Micron patterns have four Choose 8, 12, 14, 16, 20, 24, or 32 steps per bar, or choose beats per bar. unquantized. Shortening the scale decreases the quantizing resolution. You’re more likely to hear double notes and simpler You can still create odd- syncopations at low values. -
Page 27: Real-Time Recording
120 the [tap] button to adjust it.) ticks in a beat. Once you're ready to play, just start playing. The Micron will begin Three-step beats land on 0, 40, and 80. recording from the first note of the pattern. Alternately, if you... -
Page 28: Step Editing
Micron will play the pattern over whatever notes you hold down. But if you later set the type to “sequence”, your recorded pitches will reappear. -
Page 29: Clear Controllers
Patterns d. Editing velocity Gauging note velocity and Place the cursor under the note that you want to edit and duration on the display press the control knob. Turn the control knob to increase or As you place the cursor under decrease the velocity. -
Page 30: Pattern Name
Sysex is and how to use it. 16. Send syx bundle? Choose this option to send both the pattern and its program to a computer or other MIDI storage device using the Micron’s (MIDI OUT) port. 17. Delete pattern? Delete the pattern using this function, if desired. -
Page 31: Store A Copy
Patterns 18. Store a copy? Unlike many synths, the Micron does not have fixed “banks” of programs, patterns, and so on, each with a predetermined number of storage locations. Instead, you may freely create and delete patterns at any time, just as you would on a computer. - Page 32 Patterns This page intentionally left blank.
-
Page 33: Chapter 4: Rhythms
Rhythms Rhythm options: Playing Rhythms Press the [rhythms] button next to the control knob. Press and hold any key on the left side of the keyboard to play a rhythm. Play the keys on the right side of the keyboard to play individual drum sounds. -
Page 34: Editing Rhythms
Press it to edit a parameter; press again to exit Otherwise, your changes will be lost when you turn off your parameter editing. Micron. 1. Revert-to-stored? / Unrevert-to-edited? If you have edited a rhythm, you may revert back to the original version. Press the control knob to revert. -
Page 35: Send To Setup
4. split high. The setup’s existing beat is split in two at a particular key. As with the split low option, the Micron prompts for a note on the keyboard at which to execute the split. The rhythm is then sent to the upper beat of the split. -
Page 36: Start New Setup
The rhythm will always play from the first note of the first bar. So, later to ¼ bar, the Micron will only play a fraction of if you select a value shorter than the current one, the latter parts of your rhythm, but it will the rhythm will be truncated. -
Page 37: Record Rhythm (Real-Time)
However, you frequently will want to wipe out the notes for just a single drum, leaving the other drums intact. Holding down a black key will make the Micron wipe the notes of the last drum played (the drum shown on the display). If you want to replay a particular... -
Page 38: Drum A Through Drum H
Rhythms 7. Drum A through Drum H Turn the control knob clockwise to access the Drum A settings. Each drum holds lots of options: ● Change the drum program. ● Edit the level. ● Edit the pan position. ● Edit the drum’s pattern, including the placement and velocity of each note. - Page 39 In the top line, the screen indicates that Drum A is being Time display edited in Step mode. The Micron displays time as “bar:beat:tick”. There are The cursor is positioned in bar 1, beat 1, shown as 1:1. four beats in a bar, and 120 ticks in a beat.
-
Page 40: Add
Rhythms b. Removing notes To remove a note, press any black key on the right side of the keyboard. The step will be erased, and the cursor will advance one step. The note is only removed from the drum that is displayed on the screen; all other drums are not affected. -
Page 41: Clear Rhythm
See page 95 for details on what Sysex is and how to use it. 12. Send syx bundle? Choose this option to send both the rhythm and its program to a computer or other MIDI storage device using the Micron’s (MIDI OUT) port. -
Page 42: Delete Rhythm
14. Store a copy? Unlike many synths, the Micron does not have fixed “banks” of programs, patterns, and so on, each with a predetermined number of storage locations. Instead, you may freely create and delete rhythms at any time, just as you would on a computer. -
Page 43: Chapter 5: Setups
“splits.” Setup Components Setups are constructed of two basic elements: Polyphony considerations The Micron allows you to ● Parts. Parts hold programs and patterns along with level, pan, stack together more sound and other settings. sources than its engine can play. - Page 44 Setups Setup options (1 of 2): Take a moment to cycle through these options. Press [setups] and turn the control knob to select a setup to edit. Then press the control knob to enter edit mode. Turn the control knob clockwise to cycle through the various parts.
- Page 45 Setups Setup options (2 of 2): Turn the control knob further to cycle through all of the beats. Beats are labeled “Beat A,” “Beat B,” “Beat C,” etc. – just like parts. After the last beat, you can add a new beat. Keep turning the control knob clockwise to cycle through screens dedicated to the effects.
-
Page 46: Parts
You can make the program dependent on this part’s pattern, and press a white key on the shown on the Micron as (pattern’s pgm). If you do so, the right side of the keyboard. setup will change programs automatically as the setup is Parts start at the A above changed. - Page 47 Remember that you can set these keys across the entire MIDI in a hole in playing range. note number range, not just the Micron’s 37 notes. Remember that you can always use the [octave] buttons to adjust the note range of the Micron's keyboard.
- Page 48 While this setting Micron's three-octave key range. If your bassline and pad violates every rule held parts are latched, you can simply let them play on their own...
- Page 49 If you choose to split a part, the Micron will prompt you to the A above middle C. select the key on the keyboard where the split should occur.
-
Page 50: Use As
Setups 2. Use as Suppose you come across a rhythm that would fit perfectly in your setup, but the snare drum doesn’t sound right. You could edit the rhythm, but that would affect all other setups using that rhythm. Instead, what you’d like to do is just swap out that particular drum within this particular setup. -
Page 51: Beats
Setups 4. Beats Once you are past the part screens, you reach the beat screens. Using multiple beats per a. Rhythm setup Choose the rhythm to use for this beat. All of the information A setup can have multiple for the rhythm – the sounds, panning, relative levels of the beats, just as it can have multiple parts. - Page 52 Remember that you can set these keys across the entire MIDI note number range, not just the Micron’s 37 notes. Remember that you can always use the [octave] buttons to adjust the note range of the Micron's keyboard.
-
Page 53: Add
The two parts will otherwise be identical. If you choose to split a part, the Micron will prompt you to select the key on the keyboard where the split should occur. -
Page 54: Fx Type
Setups 6. FX Type Choose an effect to apply to the setup, or turn the control knob all the way to the left (or double-click the control knob) to bypass the effects. If you do choose an effect, the editable parameters associated with that effect will be shown in subsequent screens. -
Page 55: Send Midi Sysex
You can even play other setups without losing your edits. Just hit the [setups] button and turn the control knob. You can always come back to your edited setup, just as you left it. The Micron doesn't discard your edits until you start editing a different setup. -
Page 56: Store Your Changes
Setups Store your changes! Be sure to press the [store] button after you’re satisfied with your changes. Otherwise, your changes will be lost when the Micron is powered down. Exiting setup editing You can exit setup editing at any time. Simply press any of the other buttons encircling the control knob, including the [setups] button a second time. -
Page 57: Chapter 6: Programs
In this way, the Micron can generate a virtually limitless variety of sounds. Let’s take a quick look at the Micron’s signal path, from start to finish. The Oscillators The oscillators are where sound is born. -
Page 58: The Pre Filter Mix
Each of the Micron’s voices contains two filters, and each filter can be one of eighteen different types, each with its own character and sonic flavor. -
Page 59: Output
The sound is getting near the end of its journey, but still has one more processing stage to go through. In the output stage, the Micron allows you to apply a drive effect, to give the sound a final push and add some compression, distortion, or other amplification effect. -
Page 60: Modulation
Fortunately, the Micron is willing to lend you a helping hand—twelve of them, in fact. -
Page 61: The Envelopes
This is the amp envelope. However, envelopes are useful in all sorts of mod routes, which is why you can hook up any of the Micron’s envelopes to any modulatable program parameter. Each of the... -
Page 62: Playing Programs
– again in alphabetical order. You can also quickly switch to any category by holding down [programs] and then pressing the white key on the Micron’s keyboard labeled with that category. Note that the “recent” category is generated automatically. The “faves”... -
Page 63: Send To Setup
4. split high. The setup’s existing part is split in two at a particular key. As with the split low option, the Micron prompts for a note on the keyboard at which to execute the split. The program is then sent to the upper part of the split. -
Page 64: Start New Setup
(e.g. “+Repeater2” or “+TranceTube2”). After doing this, you’ll notice that the program mode button is no long lit; the Micron has switched into setups mode. If you have not chosen to start a new setup, then you are still in programs mode. -
Page 65: Voice Parameters
Up to eight notes at a time. wiggle the knob that you want to map to. Unison one voice/note the Micron’s voices are distributed evenly amongst up to eight simultaneously held keys. Quick access to editing To jump to the voice two voices/note... - Page 66 Programs Portamento Set the amount of “glide” between notes: No portamento. legato only Portamento will occur only if you play a second key before lifting up the first key. always Portamento will occur even if there is no overlap between the lifting of one key and the playing of another.
- Page 67 AnlgDrft Set the amount of simulated analog drift, up to 100%. Analog synthesizers have circuits that drift out of tune over time. Adding a touch of drift can increase the realism of the Micron’s analog emulation. Osc Sync Set how the oscillators synchronize to one another.
- Page 68 Programs FM Amount FM, or “frequency modulation,” allows you to use one oscillator to control the frequency of another. Set the percentage by which the target oscillator’s frequency is affected by the master oscillator’s waveform. FM Type A. Linear FM types lin 2 >...
-
Page 69: Oscillator Parameters
Programs 6. Oscillator parameters These parameters are repeated for each of the Micron’s three Quick access to editing oscillators. To jump to the oscillator category, hold down the Waveform [programs] button and press sine the key labeled “osc.” Smooth and pure sound. -
Page 70: Pre-Filter Mix Parameters
Programs PWhlRange Sets the range of the pitch wheel, from 0 semitones (off) to +/- 12 semitones (one full octave). 7. Pre-filter mix parameters Before the sound sources are sent to the filters, they are mixed together. Use the pre-filter mix parameters to set the levels for Quick access to editing To jump to the pre-filter mix each of the oscillators, the ring modulation, noise, and external... -
Page 71: Filter Parameters
Programs 8. Filter parameters Each of the two filters has the following editable parameters: Quick access to editing To jump to the filter category, Type hold down the [programs] button and press the key Choose from a collection of classic and modern filter types. labeled “filter.”... -
Page 72: Post-Filter Mix Parameters
Preflt Src (Pre-Filter Source) You may not want to send all of the pre-filtered sound sources through the pre-filter source output. The Micron lets you choose any of the individual sound sources instead, as well as of course allowing you to choose the mix originally sent to filter 1 or filter 2. -
Page 73: Output
Programs 10. Output Quick access to editing Drive Type To jump to the output Select bypass for a clean sound or one of compressor, rms limiter, category, hold down the tube overdrive, distortion, tube amp, or fuzz pedal. [programs] button and press the key labeled “output.”... -
Page 74: Envelopes
The Micron allows you to model this behavior by specifying a sustain time. This is the amount of time it takes for the envelope level to drop from the sustain level to zero. - Page 75 Programs Velocity (Keyboard Velocity Tracking) This parameter determines the extent to which the note velocity, or how hard you hit the key, affects the envelope. When set to 0%, the envelope always comes out full-strength, regardless of how lightly you hit the key. When set to 100%, the amplitude of the envelope directly matches the velocity, and very light keystrokes will result in very weak envelopes.
- Page 76 Freerun setting. Sus Pedal (Sustain Pedal) The Micron treats the sustain pedal as if you are holding notes down on the keyboard, keeping notes within the sustain section of the envelope as long as the sustain pedal is held down.
-
Page 77: Low Frequency Oscillator (Lfo) Settings
Programs 12. Low Frequency Oscillator (LFO) settings Quick access to editing TempoSync (Tempo Synchronization) To jump to theLow Frequency Oscillator fixed rate category, hold down the The LFO rate is independent of the tempo set with the [tap] [programs] button and press button. - Page 78 Programs Reset mono Remember that it is possible to have the The LFO is shared between the voices of a program. It may be at LFOs set any point in its cycle when the first key is pressed. New voices will independently, so “ride”...
-
Page 79: Sample-And-Hold (S&H) Settings
Programs 13. Sample-and-Hold (S&H) settings The first three settings – TempoSync, Rate, and Reset – operate identically to the LFO settings listed above. Here are the additional S&H settings: What does Sample & Hold mean? Input The Input to the Sample & Hold determines the source of the Sample &... -
Page 80: Track (Tracking Generator)
Programs 14. Track (Tracking Generator) The tracking generator lets you create your own curves for the Quick access to editing modulation sources. This allows for non-linear effects. For To jump to the tracking instance, as a source increases in amplitude, the destination can be generator category, hold affected first negatively, then positively, and then negatively again. -
Page 81: Mod (Modulation Routing)
After the last modulation route, you can add a new route, up to the maximum twelve routes. To remove a mod route, select the "Dest" parameter and turn the control knob all the way to the left. The Micron will ask, "Remove mod?" Push the control knob to confirm. - Page 82 Programs Mod sources Here are the inputs to the modulation matrix: Source Description None No effect Note-On Velocity Velocity (how hard) the key is struck Release Velocity Velocity that the key is released. Key Track MIDI Key # used as modulator. MIDI note #60 is equivalent to 0. M1 Wheel Position Value of M1 Wheel, or incoming MIDI CC#00 message.
- Page 83 Programs Mod destinations Here are the possible destinations for the modulation matrix: Destination Description None No effect. Voice Pitch Modulates pitch of all three oscillators Osc 1 Pitch Full Modulates oscillator pitch through entire 10 octave range Osc 2 Pitch Full Osc 3 Pitch Full Osc 1 Pitch Narrow Modulates oscillator pitch, constrained to 1 octave...
- Page 84 Programs LFO 2 Rate See equivalent Program Parameter LFO 2 Amplitude Scales the amplitude of LFO 2's output - thus affecting the amount that the LFO can modulate anything else. S&H Rate See equivalent Program Parameter S&H Smoothing S&H Amplitude Scales the amplitude of the S&H output - thus affecting the amount that the S&H can modulate anything else.
-
Page 85: Category
Effects Parameter B Effects Parameter C Effects Parameter D 16. Category Place the program in one of the Micron’s pre-defined categories. 17. Program name Since programs are listed alphabetically, creative naming can help you move smoothly from one program to another. -
Page 86: Delete
Sysex is and how to use it. 20. Store a copy? Unlike many synths, the Micron does not have fixed “banks” of programs, patterns, and so on, each with a predetermined number of storage locations. Instead, you may freely create and delete programs at any time, just as you would on a computer. -
Page 87: Exiting Program Editing
Programs Exiting program editing You can exit program editing at any time. Simply press any of the buttons encircling the control knob, including the [programs] button a second time. - Page 88 Programs This page intentionally left blank.
-
Page 89: Chapter 7: Configuration
Configuration options can be reset by pressing the control knob twice quickly (double- If you happen to turn on your Micron and the screen is blank, it’s clicking). possible that your contrast setting was somehow turned down. Since contrast is the first of the config options, you should be able to get to it even when navigating blindly. -
Page 90: Velocity Curve
Config 4. Velocity Curve Edit the keyboard’s response to your playing velocity. This option affects the velocity values that are generated when you play the keyboard; it has no effect on incoming MIDI notes. Options are linear low, medium and high; exponential low, medium and high;... -
Page 91: Local Control
Turn the control knob clockwise once to edit the keyboard’s local control setting. Options are “on” or “off.” By default, local control is set to “on.” Set to “on,” the Micron functions normally – the keyboard, pitch wheel, sliders, footswitches, and pedal all play the Micron. -
Page 92: Midi Mode
Your options will differ depending upon the setting chosen earlier in MIDI mode: ● If the Micron is set to “single-channel” mode, you will be able to select the MIDI channel. ● If the Micron is set to “multi-channel” mode, you will be able to select the MIDI channel for the first part. -
Page 93: Midi Sync
Micron’s tempo normally, using the [tap] button and the control clock” to rectify the situation. knob. When MIDI sync is set to “ext MIDI sync,” the Micron accepts incoming tempo information from external MIDI devices such as sequencers. When it receives such information, the tempo from the external device controls the tempo setting in the Micron. - Page 94 Config This page intentionally left blank.
-
Page 95: Chapter 8: Midi
What is MIDI? MIDI is the communication standard for electronic musical instruments. You can use MIDI to: ● Record what you play on your Micron synthesizer into a sequencer or computer. ● Play back sequences from a sequencer or computer on your Micron. - Page 96 MIDI Controller. With this setup, you can use your Micron to “play” another MIDI instrument (synthesizer, sound module, drum machine etc.). Connect a MIDI cable from the Micron’s (MIDI IN) jack to the MIDI IN of the device you want to control.
-
Page 97: Saving Programs, Setups, Rhythms, And Patterns Via Midi System Exclusive
MIDI Sequencing. This setup allows you to use your Micron with a MIDI sequencer or a computer with a MIDI interface. Attach one MIDI cable from the MIDI OUT of the sequencer or computer to the (MIDI IN) jack of the Micron. Attach another cable from the Micron’s (MIDI OUT) jack to the MIDI IN of the sequencer or computer. -
Page 98: Loading Programs, Rhythms, Patterns, And Setups Via Midi
For example, a setup can depend on patterns and rhythms that are stored on your Micron. If you send a setup to a friend and his Micron doesn’t have the patterns and rhythms that your setup uses, the setup might not sound the same. -
Page 99: Compatibility With Alesis Ion Programs
Sharing programs between the Alesis Micron and the Alesis Ion Sending programs from the Micron to the Ion Connect the Micron’s (MIDI OUT) port to the Ion’s MIDI IN port. Send programs using the Send SysEx screen from within the Micron’s [programs] mode. -
Page 100: All Notes Off
This is usually caused when a Note On message is received without a Note Off. The Micron responds to the All Notes Off message, and can also send it. Press the [programs] button twice in quick succession... -
Page 101: Midi Implementation Chart
MIDI MIDI Implementation Chart Function Transmitted Recognized Remarks Basic Default 1 — 16 1 — 16 Channel Changed 1 — 16 each 1 — 16 each Memorized Default Mode 3 Mode 3 Mode Messages * * * * * * * * Altered Note 0 —... - Page 102 MIDI This page intentionally left blank.
-
Page 103: Appendix A: Frequently Asked Questions
(or string) “section”. In the Micron, splits and layers are functions of the setup mode. In setups, navigate to each part’s low keys and high keys screens to assign splits and layers. See chapter 5 – Setups – for additional detail. - Page 104 Frequently Asked Questions This page intentionally left blank.
-
Page 105: Appendix B: Troubleshooting
Troubleshooting If you experience problems while operating your Micron, please use the following table to check for possible causes and solutions before contacting Alesis customer service for assistance. Symptoms Cause Solution The display does not light up No power. Check... -
Page 106: Recovering From A Crash
Troubleshooting Recovering from a Crash If your Micron behaves erratically or “freezes” on you, turn it off, wait for a moment, and then turn it on again. Make sure you turn off any amplification first! If your instrument still isn’t working after that, then disconnect the [MIDI IN] cable and repeat the power on/off trick. - Page 107 ..............69 resonance............. 69 type ............... 69 Filters, defined ............56 FM ................66 Freerun ..............73 Frequency Modulation ..........66 Global transposition ..........87 Global tuning............87 How the Micron makes sound ......55 Ion ..............5, 97, 101...
- Page 108 Index Compatibility with ..........97 Key track, filter............69 keyboard splits............47 Keyboard Velocity Curve ........88 Knobs (setups) ............47 Latch ................14 layer ............47, 48, 51, 101 defined ..............58 Local Control............89 Low Frequency Oscillators........75 m1 slider ..............12 m2 slider ..............
- Page 109 Index Length..............23 Name..............28, 52 Program ............... 23 Real-time recording ........... 25 Revert-to-Stored / Unrevert-to-Edited..21 Send MIDI SysEx ......... 28, 39, 53 Send SysEx Bundle....... 28, 39, 53 Send to Setup............22 split high .............. 22 split low ............... 22 Start New Setup ..........
- Page 110 Index Remove notes ............. 38 Revert-to-Stored / Unrevert-to-Edited..32 Send to Setup............33 split high .............. 33 split low ............... 33 Start New Setup ..........34 Sample-and-Hold (S&H) ........77 Smoothing ............77 sequence ..............101 Sequences ..............20 Setups..............16, 41 Signal Flow Diagram ..........
-
Page 111: Specifications
Specifications Sound Engine Sound Generation: Alesis proprietary DSP Analog Modeling Polyphonic Voices: 8, each with 3 oscillators, 2 multi-mode filters, 3 envelope generators, 2 LFOs, programmable effects send and modulation matrix. Program Memory: 512 Preset Programs, 32 Multi-timbral Setups, all user-rewritable... - Page 112 Specifications Audio Outputs: Main L/R , Aux L/R, Headphone (1/4” TRS) Dimensions (WxHxD): 22.75” x 2.75” x 7.75” / 577.85 x 69.85 x 196.85 mm Weight: 8.25 lbs / 3.5 kg...
-
Page 113: Warranty/Contact Alesis
To obtain warranty service, the purchaser must first call or write ALESIS at the address and telephone number printed below to obtain a Return Authorization Number and instructions concerning where to return the unit for service. All inquiries must be accompanied by a description of the problem. -
Page 114: Alesis Contact Information
Warranty/Contact Alesis made only by a duly authorized Alesis service representative in the country of sale. For warranty information in all other countries please refer to your local distributor. Alesis Contact Information Alesis Distribution, LLC Los Angeles, USA E-mail: support@alesis.com Website: http://www.alesis.com...