Table of Contents
Advertisement
Quick Links
EGO SYStems Inc. warrants the return policy to its original purchaser as follows; All EGO SYS products,
under normal use, will be free from faulty as long as the purchaser owns this product.
The terms of warranty is 15 months to EGO SYS distributors considering a 3-month temporary stock period
ahead of being sold to the end user. Therefore, the actual term of warranty is 12 months to the end user.
EGO SYS will, at its sole option, repair or replace a product, which is found to be defective. This warranty
shall be null and void if, in the sole opinion of EGO SYS, a product failure is the result of misuse, abuse,
modification, or misapplication.
Except as expressly provided above, EGO SYS products are provided 'as is' without any kind of warranty. No
claim is made for merchantability or fitness for any purpose.
In no event will EGO SYS be liable for any direct, indirect, consequential, or incidental damages arising out of
use of the product.
The purchaser must contact EGO SYS or its regional representative to receive prior approval before returning
a faulty unit. All such returns must be shipped to EGO SYS' headquarters in Seoul, Korea as being packaged
in the original or equivalent protective packaging material (Rack, PCI card, Power Cables, connection cables),
with freight prepaid and adequate insurance.
If the returned product is deemed to be defective, the repaired or replacement product will be back to you at
no extra charge via the carrier chosen by EGO SYS.
TRADE MARKS
AUDIOTRAK, AUDIOTRAK Prodigy 192 and Prodigy are trademarks of EGO SYStems Inc. IBM is a registered
trademark of International Business Machines Corporation. Windows is a trademark of Microsoft Corporation. Other
product and brand names are trademarks or registered trademarks of their respective companies.
Second Edition Jan. 2003
All features and specifications subject to change without notice.
WARRANTY
Your AUDIOTRAK Dealer
For technical support, contact Audiotrak:
www.audiotrak.net
support@audiotrak.net
Advertisement
Table of Contents

Related Manuals for Audiotrak AUDIOTRAK Prodigy 192

Summary of Contents for Audiotrak AUDIOTRAK Prodigy 192
- Page 1 WARRANTY EGO SYStems Inc. warrants the return policy to its original purchaser as follows; All EGO SYS products, under normal use, will be free from faulty as long as the purchaser owns this product. The terms of warranty is 15 months to EGO SYS distributors considering a 3-month temporary stock period ahead of being sold to the end user.
-
Page 2: Table Of Contents
CONTENTS 1. Introduction to Prodigy 192 ..................4 2. Hardware Installation ....................6 1. System Requirement ....................6 2. Preparation for hardware installation ..............7 3. Installing Prodigy 192 PCI card ................8 3. Prodigy 192 Driver Software Installation ..............10 4. - Page 3 4. Native Sound Processor – SpinAudio (Included) ..........33 1) Quick Start ......................35 2) Application window ................... 40 3) Audio Routing ....................43 4) Application Settings................... 44 5. nTrack Studio Pro –FARSOFT (Included) ............47 6. Cubase ........................49 7.
-
Page 4: Introduction To Prodigy 192
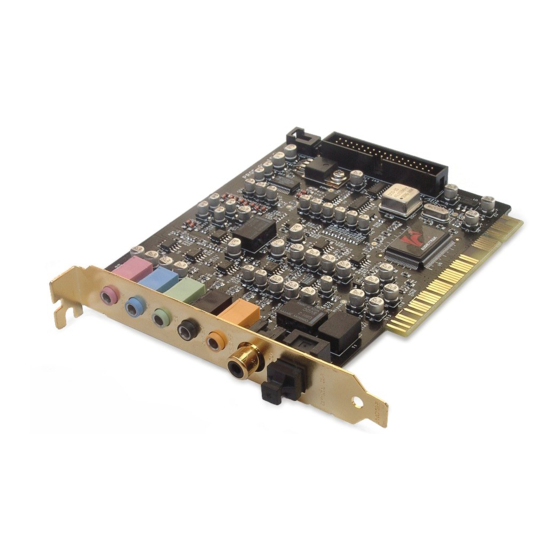
1. Introduction to Prodigy 192 PRODIGY 192 is the premier audio upgrade for PC users with demanding audio needs. PRODIGY 192 features a 24-bit 192 kHz coaxial output and a 24-bit 96 kHz optical output, with pro quality 24-bit 96 kHz A/D converters and 24-bit 192 kHz D/A converters for analog input and output at 104 dB dynamic range. - Page 5 Features - Experience High-Fidelity Surround Sound up to 7.1(with Digital Output) - Transfer Pure Audio to Digital Devices with Coaxial(192kHz) and Optical(96kHz) Digital Outputs - Simultaneous 2 In / 8 Out Sound Processing - 24-bit, 6 Channel 192 kHz Playback and 96 kHz Recording - Experience Stereo Audio Sources with Expanded 7.1 Channel Surround Sound - *Emulate Multi-Channel Surround Sound with SRS TruSurround XT with Enhanced Bass and Dialog...
-
Page 6: Hardware Installation
2. Hardware Installation The Prodigy 192 requires 3-steps of installation: ‘PCI card installation’, ‘Driver installation’, and finally ‘Connection with external device’. The ‘PCI card installation’ step includes install the Prodigy 192 card into the PCI slot. ‘Driver installation’ is having the operating system in your computer recognize the Prodigy 192 and building the communication channel. -
Page 7: Preparation For Hardware Installation
2. Preparation for hardware installation The Prodigy 192 PCI card and other components in the computer can be easily damaged by electrical shock. You need to use an anti-static device that can discharge the static electricity of your body to avoid potential static damage to the cards. 1. -
Page 8: Installing Prodigy 192 Pci Card
3. Installing Prodigy 192 PCI card Please look for an empty PCI slot. If you do not know which one is an actual PCI slot, please, read the following; There are 3 kinds of slots in most of recent computers. The PCI slot is most common and is used for different types of devices from the soundcard to the modem. - Page 9 Close the computer case. Caution; Before the closing the computer case, connect CD-Rom drive and Prodigy 192. Connect the Prodigy 192’s 2 pin CD-Rom connector to Digital out of your CD-Rom drive as below picture.
-
Page 10: Prodigy 192 Driver Software Installation
3. Prodigy 192 Driver Software Installation After completing the installation of hardware for the Prodigy 192, you need to install its driver software to use it. The software installation is not too hard, even for computer beginners. Just follow the steps below and you will complete it without any hassel. The installation steps under Windows 98SE, Windows ME, Windows 2000 and XP are a little bit different from each other. - Page 11 2. Choose ‘Search for the best driver in these locations’ and specify the location of the driver. Insert the provided Driver CD into the CD-Rom drive and find ‘Prodigy driver folder’. Copy this folder on your computer and select ‘Include this location in the search’...
- Page 13 3. First Prodigy driver will be installed. 4. Windows will automatically install second driver. It’s same as above procedure. And also Windows will continuously install from Prodigy 192 Wave2 to Wave5. And finally Windows will recognize and install ‘Prodigy192 EWDM Midi’. Even though, several devices will be recognized and installed, just follow above step 1 ~3.
- Page 15 5. After restart the windows, please confirm ‘Prodigy’ icon on the system tray.
- Page 16 6. Restart your computer. After rebooting, go to ‘My computer -> Control Panel -> System -> Device Manager’. Check the devices under ‘Sound, video and game controllers’. If they are installed correctly.
-
Page 17: Connection With External Device
4. Connection with external device Basically, Prodigy 192 is a digital audio interface with analog 2 channel (stereo) input, 1 Mic channel(mono) input, analog 6 channel output and Digital SPDIF Optical output and Digital SPDIF Coaxial Output. Also with optional MI/ODI/O add-on card, you can add SPDIF Optical Input, SPDIF Coaxial In/Out and 1 In/1 Out MIDI interface. - Page 18 1. MIC IN (pink) Connect to an external microphone for voice input. You cannot use this MIC input and below Line input at the same time. 2. LINE IN (blue) This is analog stereo Line input. Connects to an external device (such as a Cassette, DAT, or Mini Disc player). You cannot use MIC input and this Line input at the same time.
- Page 19 Caution: When you use Prodigy 192 with Optional add-on card MI/ODI/O, you can get not only Optical out, also Optical input and Coaxial In/Output. In this case, you need to select Digital out on Prodigy 192’s control panel. Caution: Although Prodigy 192’s Tos-Link Optical I/O port can’t support 192kHz in specification, we got the reports shows possibility while we were testing.
-
Page 20: Prodigy 192 Control Panel
5. Prodigy 192 Control Panel If you complete the Prodigy 192 hardware and driver installation, you need to learn about the Prodigy 192 Control Panel. This control panel is what you control your setup for the Prodigy 192. The Prodigy 192 Control Panel is built for easy to use. However, it could give a complicated look since there are many inputs and outputs. -
Page 21: Pull Down Menu
1. Pull Down Menu The Prodigy 192 control panel includes a pull down menu bar that contains the configuration menus for the Control Panel. 1. File - Exit File – Exit will close the Prodigy 192 Control Panel window but it will not shut down Prodigy the Control Panel. -
Page 22: Clock
2. Clock Select this menu for choosing digital clock source of the Prodigy 192 - Internal: Selecting ‘Internal’ makes the Prodigy 192’s internal clock and it becomes master clock. When you use only one the Prodigy 192 or other device was set as slave, you have to choose this mode. -
Page 23: Digital In - Digital Input Selector
1. LINE When you select this button, Prodigy 192 accepts stereo LINE Input. 2. MIC When you select this button, Prodigy 192 accepts MIC Input. 3. Monitor H.P When you select this button, Analog Input signals goes to Output 1,2 and Output 5,6 is changed to Headphone out. -
Page 24: Digital Type -Digital Format Selector
1. Coaxial When you connect Prodigy 192 with MI/ODI/O, you can select MI/ODI/O’s Coaxial Input as digital input. 2. Optical When you connect Prodigy 192 with MI/ODI/O, you can select MI/ODI/O’s Optical Input as digital input. 3. MONITOR & H.P When you select this button, Digital Input signals goes to Output 1,2. -
Page 25: Out/Mme -Output Level Adjust Fader
9. OUT/MME –Output Level Adjust fader 1. OUT 1,2 3,4 5,6 – When you don’t use input monitoring. Output goes to Output port 1,2 3,4 5,6 as you set on your application. Click and drag to change Level. The numbers of bottom show the relative amount of level in dB. -
Page 26: Directwire
11. DirectWIRE By clicking this menu on Prodigy 192 console, DirectWIRE window will be appeared. DirectWIRE is a unique feature of E-WDM driver that make possible to transfer digital audio data within different applications using same/different drivers. As you can see, MME, WDM, ASIO and GSIF indicate driver names of Prodigy192. Along the vertical channel indicate number, output and input ports of each driver are showed. -
Page 27: Setting In Applications
6. Setting in Applications The Prodigy 192 is premium multimedia audio device designed to be used for Multimedia and audio work in a Windows environment. It has a wide range of usage from game sound to DVD surround sound. It is very easy to set up the Prodigy 192 in the multimedia setup of the windows control panel. -
Page 28: Windows Multimedia Setup
1. Windows Multimedia setup The Windows Multimedia setup is required to use the Prodigy 192 as the sound system for Windows multimedia applications. Go to ‘My computer-> Control Panel -> Sounds and Audio Device Properties -> Audio tab. Select the Prodigy 192 driver as your playback device. -
Page 29: Win Dvd (Included)
2. Win DVD (included) The Prodigy 192 can be used with 5.1 or 7.1 channel DVD software player to provide 5.1 or 7.1(with Digital out) channel surround sound. The Prodigy 192 will deliver optimal sound for your DVD player. You can configure the Prodigy 192 easily to use it for surround sound. - Page 30 Click ‘Advanced’ Then, Go to Volume and on speaker settings and go to ‘Advanced Audio Properties’ and choose ‘7.1 Surround Speakers’. On the WinDVD main applet, click the right mouse button, and choose ‘Setting.’ Select ‘8 Speaker Output’. Now you can enjoy DVD with 5.1 or 7.1(with Digital out) channel surround sound.
- Page 31 * Speaker configuration of Dolby Laboratories Inc.
-
Page 32: Analog Cd-Rom Output
3. Analog CD-Rom Output Go to ‘My computer-> Control Panel -> Sounds and Audio Device Properties -> Hardware and click CD-Rom and Set ass below picture. -
Page 33: Native Sound Processor - Spinaudio (Included)
4. Native Sound Processor – SpinAudio (Included) SpinAudio’s Native Sound Processor is VST 2.0 and ASIO 2.0 host combined in a stand alone application that can turn your computer with Audiotrak audio card into a real-time multi-channel multi-effects processor. Besides external physical inputs and outputs, Native Sound Processor can stream audio from/to other audio applications running in your computer using Audiotrak’s ®... - Page 34 Audiotrak ASIO drivers provide audio streams in 32-bit fixed point format, that combined with Native Sound Processor’s internal 32-bit floating point processing guarantees that dynamic range of incoming audio signal is preserved. ® DirectWIRE is a technology incorporated into Prodigy 192 driver that allows to route audio streams internally within multiple applications using WDM - ASIO drivers when they are running at the same time.
-
Page 35: Quick Start
1) Quick Start Launch Native Sound Processor (hereinafter the application). You will see the application window like the below. When the application is launched for the first time it will try to detect your default VST folder. If no folder is detected you'll be prompted to go to application settings and specify the folder. - Page 36 When the folder is scanned, all VST plug ins and subfolders are stored, so next time you launch the application it wont perform the scanning once again. After you've set the VST folder, you should tune the streaming settings. Press 'Options' button and select 'Application Settings' item.
- Page 37 in drop-down Config combo-boxes for slots 1 and 2 respectively. Then select the input and output channels for these two slots according to your audio card specification. Press 'Ok' button to close the dialog. Let's clarify why there are two sets of settings in Native Sound Processor: Application settings that are accessible through Options\Settings and Setup Settings accessible through Setup\Settings.
- Page 38 application window will wrap around the plug in interface like shown on the screenshot from the section 3.1. below. Note that a dot icon in the slots list has changed to a small loudspeaker. This icon stands for bypass off. Pressing on the icon again will turn it to dot, that stands for slot bypass on.
- Page 39 Load on start-up - There are three options: Nothing, Autosave, Default: Nothing - Loads nothing Autosave - Loads a setup file automatically saved on the application exit. (See the option below) Default - Loads default setup file. Select this option if you would like the application to be started every time with a specific settings saved as a default setup through 'Setup\Save as default'.
-
Page 40: Application Window
2) Application window The application interface is pretty straightforward. When you run the application you will see a window with a set of controls at the right side. Here below is the screenshot of the application window when no plug in is loaded. Native Sound Processor is designed so that a loaded plug in would not show up in a separate window as it makes it hard to manage multiple windows, instead the application window is resized so that it wraps the plug in window. - Page 41 Start/Stop - Starts/Stops audio streaming. When the streaming is on, the button title is changed to "Stop". To stop the streaming just press this button again. CPU - CPU usage indicator. Show the amount of CPU used for processing and buffer conversion. If you would like to see how much it takes for buffer conversion simply check the bypass button.
- Page 42 [Unload All] - Unloads all the plugins in the list. Note: If you would like to see the full name of the loaded plugin, just move the mouse over the slot and wait for a second. The full name will be displayed as a tip. Presets >...
-
Page 43: Audio Routing
[About SpinAudio plugins] - displays a brief information about SpinAudio plugins Exit - Exists the application. If the streaming is on, it's automatically stopped. 3) Audio Routing Here you can specify the signal routing for each plugin slot. Config - Specifies the number of channels in input/output pair. There are three options: Mono-to-mono, Mono-to-stereo, and Stereo-to-stereo. -
Page 44: Application Settings
The sample rate drop down box lists all the sample rates supported by ESI/Audiotrak audio cards. IMPORTANT NOTE: Native Sound Processor works only with a set of specific... - Page 45 VST Plugin Folder - Here you can specify your VST plug ins folder. You can use browse button to select the folder. Whenever you change the VST folder, it's automatically re-scanned for VST plug ins when you press 'Apply' or 'OK' buttons. Set Default - Pressing this button sets the system default VST folder.
- Page 46 Default - Loads default setup file. Select this option if you would like the application to be started every time with a specific settings saved as a default setup through 'Setup\Save as default'. Save setup on exit - If this option is on, the application automatically saves the current setup to a file that can be loaded back on start-up.
-
Page 47: Ntrack Studio Pro -Farsoft (Included)
5. nTrack Studio Pro –FARSOFT (included) After launching nTrack, go to Files -> Settings -> Preference -> Audio Devices. When Wave devices menu appear, select ‘ ASIO 2.0 –Prodigy192’. You can also use WDM, MME and Direct Sound driver with nTrack. After click ‘Advanced tab’... -
Page 49: Cubase
6. Cubase After launching Cubase, go to ‘System’ under ‘Audio’ menu. Select ‘ASIO 2.0 –Prodigy 192’ for the ASIO device and ‘Prodigy 192 Clock’ for the Audio clock source. -
Page 50: Nuendo
7. Nuendo After launching Nuendo, go to Device -> Device setup ->VST Multitrack. Select ‘ASIO 2.0 –Prodigy 192’ for the ASIO device and ‘Prodigy 192 Clock’ for the Audio clock source. -
Page 51: Logic
8. Logic After launching Logic, go to Preference -> Audio Drivers2. Check the ‘ASIO’ and select ‘ASIO 2.0 –Prodigy192’. And go to ‘Synchronisation’ -> ‘MIDI’ and uncheck ‘Transmit MIDI Clock’ for better performance. -
Page 52: Maven 3D Pro - Emersys (Included)
9. Maven 3D pro – Emersys (included) After launching Maven 3D pro, Go to ‘Option’ -> Audio Device Setup and set like the below picture. You can also use this software with ASIO driver mode. -
Page 53: Sonar/Cakewalk
10. Sonar/Cakewalk Before you using Sonar, you have to do several setting first. You have to set proper latency on the control panel of the Prodigy 192. After launching sonar, Go to ‘Option’ -> Audio and select ‘Wave Profiler’ of ‘General’ tab. - Page 54 In the case of Sonar; Like a next picture, select ‘Prodigy192 5.1 ch 1~8’ for using WDM driver. Do not select 2 ch driver. In the case of Cakewalk: Cakewalk has to use MME driver, therefore select ‘Prodigy 192 2 ch’ driver...
-
Page 55: Sound Forge
11. Sound Forge In Sound Forge, select ‘Option’ from menu bar. Select ‘Preference…’ then Wave tab. Choose ‘Prodigy 192 2ch’ as Playback and Record device. -
Page 56: Wave Lab
12. Wave Lab In Wave Lab, Go to Option -> Preferences -> Audio Card. Choose ‘Prodigy 192 2ch’ as Playback and Record device. -
Page 57: Specification
Specification 1. Analog Input Specification 1) Type Line in: 3.5mm Mini Phone Jack MIC in: 3.5mm Mini Phone Jack 2) Level Line in: -10dBV Unbalanced, -10dBV Nominal, 8dBV Max (Gain +0dB) 3) Impedance : 10K Ohm 2. Analog Output Specification 1) Type : 6 Channel analog line output(3.5mm Mini Phone Jack) 2) Level... - Page 58 5) Resolution : 24 Bits 6) Inter channel Gain Mismatch : 0.5dB 7. D/A Converter Specification 1) Type : High performance SIGMA-DELTA DAC 2) Dynamic Range (S/N): 104dB A-Weighted (Typical) 3) Frequency Response : 20 ~ 22.5KHz (@ fs=48kHz) 4) Sample Rate Supports : Up to 192KHz 5) Resolution : 24 Bits 6) Inter channel Gain Mismatch : 0.5dB...